
Service Manual
Page 4
... Option(s 2-71 Hard Disk Option 2-71 Output bin sensor standard tray service check 2-72 Output expander service check 2-72 Paper feed service check 2-76 Parallel port service check 2-77 Printhead service check 2-78 Print quality service check 2-78 Smart contact assembly service check 2-85 StapleSmart finisher service check 2-86 Toner sensor service check 2-93 Transfer roll service check 2-94 iv Service Manual
... Option(s 2-71 Hard Disk Option 2-71 Output bin sensor standard tray service check 2-72 Output expander service check 2-72 Paper feed service check 2-76 Parallel port service check 2-77 Printhead service check 2-78 Print quality service check 2-78 Smart contact assembly service check 2-85 StapleSmart finisher service check 2-86 Toner sensor service check 2-93 Transfer roll service check 2-94 iv Service Manual
Service Manual
Page 6
... Developer drive assembly removal 4-20 Frames removals 4-20 EP frame assembly 4-20 Left side frame 4-20 Right side frame 4-22 Fuser assembly removal 4-23 vi Service Manual Check Stapler 3-26 Error Message 283 -
... Developer drive assembly removal 4-20 Frames removals 4-20 EP frame assembly 4-20 Left side frame 4-20 Right side frame 4-22 Fuser assembly removal 4-23 vi Service Manual Check Stapler 3-26 Error Message 283 -

Service Manual
Page 8
... finisher 2 7-80 Assembly 37: StapleSmart finisher 3 7-82 Assembly 38: StapleSmart finisher 4 7-84 Assembly 39: Options 7-86 Assembly 40: Miscellaneous 7-88 Index I-1 Part number index I-7 viii Service Manual
... finisher 2 7-80 Assembly 37: StapleSmart finisher 3 7-82 Assembly 38: StapleSmart finisher 4 7-84 Assembly 39: Options 7-86 Assembly 40: Miscellaneous 7-88 Index I-1 Part number index I-7 viii Service Manual

Service Manual
Page 18
4060-xxx Preface This manual contains maintenance procedures for individual FRUs. Special tools and test equipment are working. Parts catalog contains illustrations and part numbers for service personnel. CAUTION: When you see this chapter, as well as general environmental and safety ...: A caution identifies something that might damage the product hardware or software. Connector locations uses illustrations to perform the task. xviii Service Manual It is a danger from hazardous voltage in the area of the printer and the maintenance approach used to repair it. General...
4060-xxx Preface This manual contains maintenance procedures for individual FRUs. Special tools and test equipment are working. Parts catalog contains illustrations and part numbers for service personnel. CAUTION: When you see this chapter, as well as general environmental and safety ...: A caution identifies something that might damage the product hardware or software. Connector locations uses illustrations to perform the task. xviii Service Manual It is a danger from hazardous voltage in the area of the printer and the maintenance approach used to repair it. General...

Service Manual
Page 20
...Horizontal Kiosk Presenter • Application solutions - MarkNet™ Print Servers - Duplex option-250-sheet (For Lexmark T630 and Lexmark T630n) - StapleSmart™ Finisher - 5-bin Mailbox - Lexmark Document Solutions - Japanese 1-2 Service Manual Token-ring - and 500-sheet paper trays of A4, letter, A5, B5, Executive, folio, statement,...- ImageQuick™ card assembly - Parallel interface card - Envelope feeder - Duplex option-500-sheet (For Lexmark T632, Lexmark T632n, Lexmark T634, and Lexmark T634n) - Output expander - High-capacity output stacker -
...Horizontal Kiosk Presenter • Application solutions - MarkNet™ Print Servers - Duplex option-250-sheet (For Lexmark T630 and Lexmark T630n) - StapleSmart™ Finisher - 5-bin Mailbox - Lexmark Document Solutions - Japanese 1-2 Service Manual Token-ring - and 500-sheet paper trays of A4, letter, A5, B5, Executive, folio, statement,...- ImageQuick™ card assembly - Parallel interface card - Envelope feeder - Duplex option-500-sheet (For Lexmark T632, Lexmark T632n, Lexmark T634, and Lexmark T634n) - Output expander - High-capacity output stacker -
Service Manual
Page 22
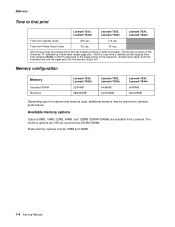
4060-xxx Time to first print Lexmark T630, Lexmark T630n Lexmark T632, Lexmark T632n Lexmark T634, Lexmark T634n Time from standby mode Time from Power Saver mode
4060-xxx Time to first print Lexmark T630, Lexmark T630n Lexmark T632, Lexmark T632n Lexmark T634, Lexmark T634n Time from standby mode Time from Power Saver mode

Service Manual
Page 24
... off 12 W 81 W Printing-maximum current 110V 230V 8.8 A 4 A Lexmark T630n 432 W 460 W 15 W 84 W 8.8 A 4 A Lexmark T632 523 W 540 W 14 W 81 W 9.8 A 5 A Lexmark T632n 527 W 544 W 14 W 84 W 9.8 A 5 A Lexmark T634 584 W 608 W 15 W 86 W 10.2 A 5 A Lexmark T634n 590 W 614 W 16 W 87 W 10.2 A 5 A Note: Using a 220 to 259 V ac, extreme 1-6 Service Manual Power and electrical specifications Average nominal power requirements for...
... off 12 W 81 W Printing-maximum current 110V 230V 8.8 A 4 A Lexmark T630n 432 W 460 W 15 W 84 W 8.8 A 4 A Lexmark T632 523 W 540 W 14 W 81 W 9.8 A 5 A Lexmark T632n 527 W 544 W 14 W 84 W 9.8 A 5 A Lexmark T634 584 W 608 W 15 W 86 W 10.2 A 5 A Lexmark T634n 590 W 614 W 16 W 87 W 10.2 A 5 A Note: Using a 220 to 259 V ac, extreme 1-6 Service Manual Power and electrical specifications Average nominal power requirements for...

Service Manual
Page 26
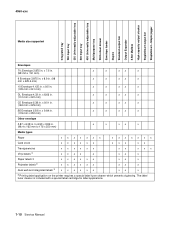
500-Sheet input Multipurpose tray 2,000-Sheet drawer Duplex Standard output 5-Bin Mailbox Output Expander Finisher to staple, hole punch, offset stack or with output bin 4060-xxx Media specifications Media type Media type Paper Card stock Transparencies Envelopes Vinyl labels Paper labels Polyester labels Dual web labels Integrated labels xxxxxxxx xx xx x xx x x x x x x x x x x xx x xx 1-8 Service Manual
500-Sheet input Multipurpose tray 2,000-Sheet drawer Duplex Standard output 5-Bin Mailbox Output Expander Finisher to staple, hole punch, offset stack or with output bin 4060-xxx Media specifications Media type Media type Paper Card stock Transparencies Envelopes Vinyl labels Paper labels Polyester labels Dual web labels Integrated labels xxxxxxxx xx xx x xx x x x x x x x x x x xx x xx 1-8 Service Manual
Service Manual
Page 28
... . x 9.01 in. (162 mm x 229 mm) x x xx x B5 Envelope 6.93 in . The label fuser cleaner is included with a special label cartridge for label applications. 1-10 Service Manual x 8.66 in. (110 mm x 220 mm) x x xx x C5 Envelope 6.38 in . (98.4 x 162 mm to 176 x 250 mm) x x xx x Media types Paper xxxxxxx xxxxxxx Card...
... . x 9.01 in. (162 mm x 229 mm) x x xx x B5 Envelope 6.93 in . The label fuser cleaner is included with a special label cartridge for label applications. 1-10 Service Manual x 8.66 in. (110 mm x 220 mm) x x xx x C5 Envelope 6.38 in . (98.4 x 162 mm to 176 x 250 mm) x x xx x Media types Paper xxxxxxx xxxxxxx Card...

Service Manual
Page 30
...applications on your vinyl label converter has passed Lexmark's criteria is limited to the printer's user information for "converter list." Search for additional media specifications. Any information placed outside this printer. 1-12 Service Manual Other types of the media. We recommend that...F) fusing temperature. • Preprinted forms and letterheads should provide satisfactory print quality and feed reliability. You can also check Lexmark's Automated Fax system (LEXFAXSM). Paper Use the following media guidelines for use with this specified printable area does not print....
...applications on your vinyl label converter has passed Lexmark's criteria is limited to the printer's user information for "converter list." Search for additional media specifications. Any information placed outside this printer. 1-12 Service Manual Other types of the media. We recommend that...F) fusing temperature. • Preprinted forms and letterheads should provide satisfactory print quality and feed reliability. You can also check Lexmark's Automated Fax system (LEXFAXSM). Paper Use the following media guidelines for use with this specified printable area does not print....
Service Manual
Page 32
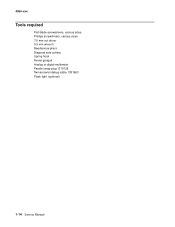
4060-xxx Tools required Flat-blade screwdrivers, various sizes Phillips screwdrivers, various sizes 7.0 mm nut driver 5.5 mm wrench Needlenose pliers Diagonal side cutters Spring hook Feeler gauges Analog or digital multimeter Parallel wrap plug 1319128 Twinax/serial debug cable 1381963 Flash light (optional) 1-14 Service Manual
4060-xxx Tools required Flat-blade screwdrivers, various sizes Phillips screwdrivers, various sizes 7.0 mm nut driver 5.5 mm wrench Needlenose pliers Diagonal side cutters Spring hook Feeler gauges Analog or digital multimeter Parallel wrap plug 1319128 Twinax/serial debug cable 1381963 Flash light (optional) 1-14 Service Manual

Service Manual
Page 34
4060-xxx 1-16 Service Manual
4060-xxx 1-16 Service Manual
Service Manual
Page 36
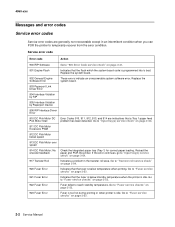
...and POR the printer. Go to "Fuser service checks" on page 2-52. 2-2 Service Manual Go to "900 Error Code service check" on page 2-64. 917 Transfer Roll Indicates a problem in an intermittent condition when you can POR the printer to "Input tray(s) service check" on page 2-41. 901 Engine...system software error. If the error continues, go to temporarily recover from the error condition. 4060-xxx Messages and error codes Service error codes Service error codes are indications that a Tray 1 paper feed Pick Motor Stall problem has been detected. Replace the system board. ...
...and POR the printer. Go to "Fuser service checks" on page 2-52. 2-2 Service Manual Go to "900 Error Code service check" on page 2-64. 917 Transfer Roll Indicates a problem in an intermittent condition when you can POR the printer to "Input tray(s) service check" on page 2-41. 901 Engine...system software error. If the error continues, go to temporarily recover from the error condition. 4060-xxx Messages and error codes Service error codes Service error codes are indications that a Tray 1 paper feed Pick Motor Stall problem has been detected. Replace the system board. ...

Service Manual
Page 38
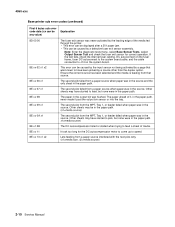
...printer is a network model, replace the system board. 980 Comm The engine is not available, replace the memory option. Note: Service errors 980 thru 984 can reflash NAND. If another DIMM is experiencing unreliable communications to slot 2. Flash parts failed while programming ... 975 - 979 Network Card x The following : system board, duplex, tray x (1, 2, 3, 4, or 5), envelope feeder or output bin. 2-4 Service Manual Where = CRC Failure or ECC Failure on reset (POR). Replace the interconnect board. 955 Code CRC Replace the system board. Replace the system board. ...
...printer is a network model, replace the system board. 980 Comm The engine is not available, replace the memory option. Note: Service errors 980 thru 984 can reflash NAND. If another DIMM is experiencing unreliable communications to slot 2. Flash parts failed while programming ... 975 - 979 Network Card x The following : system board, duplex, tray x (1, 2, 3, 4, or 5), envelope feeder or output bin. 2-4 Service Manual Where = CRC Failure or ECC Failure on reset (POR). Replace the interconnect board. 955 Code CRC Replace the system board. Replace the system board. ...

Service Manual
Page 40
Envelope D C5 Envelope E B5 Envelope F Legal envelope 2-6 Service Manual 4060-xxx Base printer sub error codes Each status byte has a different level of troubleshooting value for media size 1 Letter 2 Legal 3 B5 4 A4 5 Executive 6 A5 7 ... of x Printer area Values for tray sources 10 Multipurpose Tray (MPT) 11 Tray 1 12 Tray 2 13 Tray 3 14 Tray 4 15 Tray 5 31 Envelope feeder 40 Manual feeder Values for stacker destinations 91 Stacker 1 92 Stacker 2 93 Stacker 3 Values for each area of data.
Envelope D C5 Envelope E B5 Envelope F Legal envelope 2-6 Service Manual 4060-xxx Base printer sub error codes Each status byte has a different level of troubleshooting value for media size 1 Letter 2 Legal 3 B5 4 A4 5 Executive 6 A5 7 ... of x Printer area Values for tray sources 10 Multipurpose Tray (MPT) 11 Tray 1 12 Tray 2 13 Tray 3 14 Tray 4 15 Tray 5 31 Envelope feeder 40 Manual feeder Values for stacker destinations 91 Stacker 1 92 Stacker 2 93 Stacker 3 Values for each area of data.

Service Manual
Page 42
.... Check for media over the sensor. If the sensor and flag are operating correctly, go to "Input tray(s) service check" on page 2-64. 2-8 Service Manual Check for media over the sensor. Go to "Envelope feeder service check" on page 2-49. If no media is present, check the pass thru sensor, flag, and cables. •... for Tray 6 and see if Tray 5 is not the expected page. (x1=media size, x2=media source) Check the pass thru sensor to "Envelope feeder service check" on page 2-49. 84 xx 1E x1 x2 84 xx 20 x1 x2 84 xx 21 x1 x2 The envelope feeder pass thru sensor...
.... Check for media over the sensor. If the sensor and flag are operating correctly, go to "Input tray(s) service check" on page 2-64. 2-8 Service Manual Check for media over the sensor. Go to "Envelope feeder service check" on page 2-49. If no media is present, check the pass thru sensor, flag, and cables. •... for Tray 6 and see if Tray 5 is not the expected page. (x1=media size, x2=media source) Check the pass thru sensor to "Envelope feeder service check" on page 2-49. 84 xx 1E x1 x2 84 xx 20 x1 x2 84 xx 21 x1 x2 The envelope feeder pass thru sensor...
Service Manual
Page 44
... 11 8E xx 13 x1 x2 The second pick from a paper source interfered with the next pick retry. (x1=media size, x2=media source) 2-10 Service Manual The second pick failed from a paper source when paper was in the source and the only sheet in the source. The paper in the source...
... 11 8E xx 13 x1 x2 The second pick from a paper source interfered with the next pick retry. (x1=media size, x2=media source) 2-10 Service Manual The second pick failed from a paper source when paper was in the source and the only sheet in the source. The paper in the source...

Service Manual
Page 46
... duplex option due to the long length of paper never arrived at the exit sensor. Paper was sensed during the homing operation during POST. 2-12 Service Manual Paper was sensed during IR clear during POST. yy= Actual temperature zz= The temperature that the fuser was trying to do lamp detection and NVRAM...: The following table. 4060-xxx Base printer (fuser) sub error codes (continued) First 6 bytes sub error code data (xx can be any value) Explanation 925 Service -
... duplex option due to the long length of paper never arrived at the exit sensor. Paper was sensed during the homing operation during POST. 2-12 Service Manual Paper was sensed during IR clear during POST. yy= Actual temperature zz= The temperature that the fuser was trying to do lamp detection and NVRAM...: The following table. 4060-xxx Base printer (fuser) sub error codes (continued) First 6 bytes sub error code data (xx can be any value) Explanation 925 Service -

Service Manual
Page 48
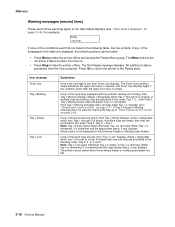
...-xxx User status displays Each user status screen may be available: • Cancel Job • Reset Printer • Reset Active Bin • Cancel FAX 2-14 Service Manual Press Go to return the printer to access the Busy/ Waiting Menu. When a job is known as HEX Trace Ready. Res Reduced Displayed whenever the...
...-xxx User status displays Each user status screen may be available: • Cancel Job • Reset Printer • Reset Active Bin • Cancel FAX 2-14 Service Manual Press Go to return the printer to access the Busy/ Waiting Menu. When a job is known as HEX Trace Ready. Res Reduced Displayed whenever the...
Service Manual
Page 50
...empty, then Tray x Empty displays, where x designates which tray (1 through 5 Missing message does not clear by inserting the tray, go to "Parallel port service check" on . • Press Stop to take the printer offline and access the Ready Menu group. The Not Ready message displays. Note: Tray x Empty...(see "User status displays" on page 2-64. If the Tray 1 Missing message does not clear when tray 1 is inserted, go to "Input tray(s) service check" on page 2-14). The Menu buttons are listed in this order: Tray 1, 2..., then Tray 5. For example, Ready If none of the input trays...
...empty, then Tray x Empty displays, where x designates which tray (1 through 5 Missing message does not clear by inserting the tray, go to "Parallel port service check" on . • Press Stop to take the printer offline and access the Ready Menu group. The Not Ready message displays. Note: Tray x Empty...(see "User status displays" on page 2-64. If the Tray 1 Missing message does not clear when tray 1 is inserted, go to "Input tray(s) service check" on page 2-14). The Menu buttons are listed in this order: Tray 1, 2..., then Tray 5. For example, Ready If none of the input trays...


