Quick Reference
Page 2
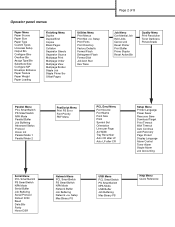
Operator panel menus Paper Menu Paper Source Paper Size Paper Type Custom Types Universal Setup Output Bin Configure Bins Overflow Bin Assign Type/Bin Substitute Size Configure MP Envelope Enhance Paper Texture Paper Weight Paper Loading Finishing Menu Duplex Duplex Bind Copies Blank Pages Collation Separator Sheets Separator Source Multipage Print Multipage ...
Operator panel menus Paper Menu Paper Source Paper Size Paper Type Custom Types Universal Setup Output Bin Configure Bins Overflow Bin Assign Type/Bin Substitute Size Configure MP Envelope Enhance Paper Texture Paper Weight Paper Loading Finishing Menu Duplex Duplex Bind Copies Blank Pages Collation Separator Sheets Separator Source Multipage Print Multipage ...
Quick Reference
Page 8
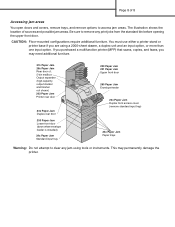
Be sure to remove any jam using a 2000-sheet drawer, a duplex unit and an input option, or more than one input option. CAUTION: Floor-mounted configurations require additional furniture. Page 8 of 8 Accessing jam areas You open doors and covers, remove trays, and remove options to clear any print jobs from the ...
Be sure to remove any jam using a 2000-sheet drawer, a duplex unit and an input option, or more than one input option. CAUTION: Floor-mounted configurations require additional furniture. Page 8 of 8 Accessing jam areas You open doors and covers, remove trays, and remove options to clear any print jobs from the ...
Setup Guide
Page 4
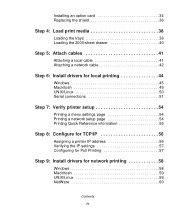
... setup 54 Printing a menu settings page 54 Printing a network setup page 54 Printing Quick Reference information 55 Step 8: Configure for TCP/IP 56 Assigning a printer IP address 56 Verifying the IP settings 57 Configuring for Pull Printing 57 Step 9: Install drivers for network printing 58 Windows 58 Macintosh 59 UNIX/Linux 59...
... setup 54 Printing a menu settings page 54 Printing a network setup page 54 Printing Quick Reference information 55 Step 8: Configure for TCP/IP 56 Assigning a printer IP address 56 Verifying the IP settings 57 Configuring for Pull Printing 57 Step 9: Install drivers for network printing 58 Windows 58 Macintosh 59 UNIX/Linux 59...
Setup Guide
Page 11
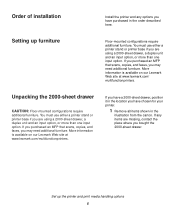
More information is available on our Lexmark Web site at www.lexmark.com/multifunctionprinters. Unpacking the 2000-sheet drawer CAUTION: Floor-mounted configurations require additional furniture. Set up furniture Floor-mounted configurations require additional furniture. If you purchased an MFP that scans, copies, and faxes, you bought the 2000-sheet drawer. If any options you...
More information is available on our Lexmark Web site at www.lexmark.com/multifunctionprinters. Unpacking the 2000-sheet drawer CAUTION: Floor-mounted configurations require additional furniture. Set up furniture Floor-mounted configurations require additional furniture. If you purchased an MFP that scans, copies, and faxes, you bought the 2000-sheet drawer. If any options you...
Setup Guide
Page 13
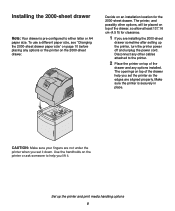
... printer on top of the drawer, so allow at least 137.16 cm (4.5 ft) for the 2000-sheet drawer. Make sure the printer is pre-configured to help you set the printer so the edges are installing the 2000-sheet drawer sometime after setting up the printer and print media handling...
... printer on top of the drawer, so allow at least 137.16 cm (4.5 ft) for the 2000-sheet drawer. Make sure the printer is pre-configured to help you set the printer so the edges are installing the 2000-sheet drawer sometime after setting up the printer and print media handling...
Setup Guide
Page 16
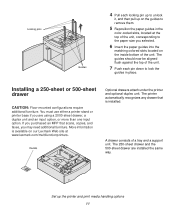
...any drawer that scans, copies, and faxes, you are installed the same way. If you purchased an MFP that is available on our Lexmark Web site at the top of the unit, corresponding to the paper size you selected. 6 Insert the paper guides into the matching ... Guides 4 Pull each pin down to lock the guides in the color-coded slots, located at www.lexmark.com/multifunctionprinters. Installing a 250-sheet or 500-sheet drawer CAUTION: Floor-mounted configurations require additional furniture. You must use either a printer stand or printer base if you may need additional ...
...any drawer that scans, copies, and faxes, you are installed the same way. If you purchased an MFP that is available on our Lexmark Web site at the top of the unit, corresponding to the paper size you selected. 6 Insert the paper guides into the matching ... Guides 4 Pull each pin down to lock the guides in the color-coded slots, located at www.lexmark.com/multifunctionprinters. Installing a 250-sheet or 500-sheet drawer CAUTION: Floor-mounted configurations require additional furniture. You must use either a printer stand or printer base if you may need additional ...
Setup Guide
Page 18
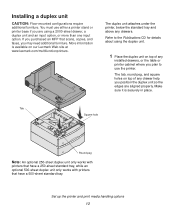
...duplex unit and an input option, or more than one input option. The tab, round peg, and square holes on our Lexmark Web site at www.lexmark.com/multifunctionprinters. Tab Square hole Round peg Note: An optional 250-sheet duplex unit only works with printers that have a 500-...sheet standard tray. If you are aligned properly. Make sure it is available on top of any drawers. Installing a duplex unit CAUTION: Floor-mounted configurations...
...duplex unit and an input option, or more than one input option. The tab, round peg, and square holes on our Lexmark Web site at www.lexmark.com/multifunctionprinters. Tab Square hole Round peg Note: An optional 250-sheet duplex unit only works with printers that have a 500-...sheet standard tray. If you are aligned properly. Make sure it is available on top of any drawers. Installing a duplex unit CAUTION: Floor-mounted configurations...
Setup Guide
Page 48
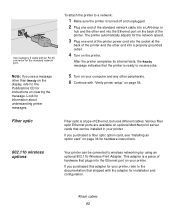
... other end into the Ethernet port on page 54. Fiber optic Fiber optic is a piece of Ethernet, but uses different cables. Look for installation and configuration. If you purchased this adapter for your printer. Attach cables 43 After the printer completes its internal tests, the Ready message indicates that can be...
... other end into the Ethernet port on page 54. Fiber optic Fiber optic is a piece of Ethernet, but uses different cables. Look for installation and configuration. If you purchased this adapter for your printer. Attach cables 43 After the printer completes its internal tests, the Ready message indicates that can be...

Setup Guide
Page 59
... Printing a network setup page If the printer is also a good time to print the page. This page also provides important information that the options you configure for the sizes and types of print media you installed is on. 2 Press Menu until you are installed correctly. 1 Make sure the printer is not.... The message Printing Menus appears on the display. 4 Verify that helps you installed are correctly listed under "Printer Information." 6 Verify that the trays are configured for network printing. See Step 3: "Install memory and option cards" on page 55.
... Printing a network setup page If the printer is also a good time to print the page. This page also provides important information that the options you configure for the sizes and types of print media you installed is on. 2 Press Menu until you are installed correctly. 1 Make sure the printer is not.... The message Printing Menus appears on the display. 4 Verify that helps you installed are correctly listed under "Printer Information." 6 Verify that the trays are configured for network printing. See Step 3: "Install memory and option cards" on page 55.
Setup Guide
Page 61
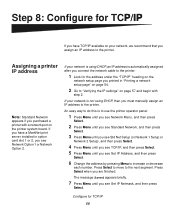
Step 8: Configure for TCP/IP If you have a MarkNet print server installed in "Printing a network setup page" on page 54. 2 Go to "Verifying the IP settings" on .... Press Select when you have TCP/IP available on the printer system board. Press Select to move to the printer. 1 Look for TCP/IP 56 Configure for the address under the "TCP/IP" heading on the network setup page you printed in option card slot 1 or 2, you see Network Option 1 or...
Step 8: Configure for TCP/IP If you have a MarkNet print server installed in "Printing a network setup page" on page 54. 2 Go to "Verifying the IP settings" on .... Press Select when you have TCP/IP available on the printer system board. Press Select to move to the printer. 1 Look for TCP/IP 56 Configure for the address under the "TCP/IP" heading on the network setup page you printed in option card slot 1 or 2, you see Network Option 1 or...
Setup Guide
Page 62
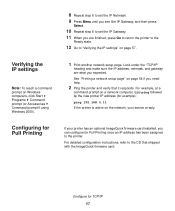
For example, at a command prompt on a network computer, type ping followed by the new printer IP address (for TCP/IP 57 For detailed configuration instructions, refer to the CD that it responds. Verifying the IP settings Note: To reach a command prompt on page 54 if you need help. 2 Ping ... until you see Set IP Gateway, and then press Select. 10 Repeat step 6 to set the IP Gateway. 11 When you are what you expected. Configure for example): ping 192.168.0.11 If the printer is active on page 57. Look under the "TCP/IP" heading and make sure the IP...
For example, at a command prompt on a network computer, type ping followed by the new printer IP address (for TCP/IP 57 For detailed configuration instructions, refer to the CD that it responds. Verifying the IP settings Note: To reach a command prompt on page 54 if you need help. 2 Ping ... until you see Set IP Gateway, and then press Select. 10 Repeat step 6 to set the IP Gateway. 11 When you are what you expected. Configure for example): ping 192.168.0.11 If the printer is active on page 57. Look under the "TCP/IP" heading and make sure the IP...
Setup Guide
Page 63
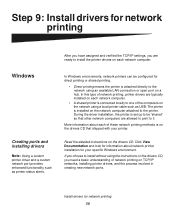
.../IP networks, installing printer drivers, and the process involved in creating new network ports. During the driver installation, the printer is set up to be configured for direct printing or shared printing. • Direct printing means the printer is on the drivers CD. Read the detailed instructions on the drivers CD...
.../IP networks, installing printer drivers, and the process involved in creating new network ports. During the driver installation, the printer is set up to be configured for direct printing or shared printing. • Direct printing means the printer is on the drivers CD. Read the detailed instructions on the drivers CD...

User's Reference
Page 2
... 14 Noise emission levels ...16 Energy Star ...16 Laser notice ...16 Statement of limited warranty 17 Chapter 1: Overview 20 Identifying printers ...20 Basic models ...20 Configured models 21 Chapter 2: Printing 22 Tips for successful printing 22 Tips on storing print media 22 Avoiding jams ...22 Sending a job to print ...22 Canceling...
... 14 Noise emission levels ...16 Energy Star ...16 Laser notice ...16 Statement of limited warranty 17 Chapter 1: Overview 20 Identifying printers ...20 Basic models ...20 Configured models 21 Chapter 2: Printing 22 Tips for successful printing 22 Tips on storing print media 22 Avoiding jams ...22 Sending a job to print ...22 Canceling...

User's Reference
Page 21
..., and faxes, you are options. Refer to www.lexmark.com/multifunctionprinters for the T632. 5-bin Mailbox* Finisher* Envelope feeder* Duplex unit* Tray 2* (250 or 500 sheets) Tray 3* (250 or 500 sheets) Tray 4* (250 or 500 sheets) Tray 5* (2000-sheet drawer) CAUTION: Floor-mounted configurations require additional furniture.You must use either a printer stand...
..., and faxes, you are options. Refer to www.lexmark.com/multifunctionprinters for the T632. 5-bin Mailbox* Finisher* Envelope feeder* Duplex unit* Tray 2* (250 or 500 sheets) Tray 3* (250 or 500 sheets) Tray 4* (250 or 500 sheets) Tray 5* (2000-sheet drawer) CAUTION: Floor-mounted configurations require additional furniture.You must use either a printer stand...
User's Reference
Page 38
... provide information on card stock and labels, refer to www.lexmark.com/ multifunctionprinters for your printer model, including the print media sizes you are using a 2000-sheet drawer, a duplex unit and an input option, or more information. 38 CAUTION: Floor-mounted configurations require additional furniture.You must use a print media size not...
... provide information on card stock and labels, refer to www.lexmark.com/ multifunctionprinters for your printer model, including the print media sizes you are using a 2000-sheet drawer, a duplex unit and an input option, or more information. 38 CAUTION: Floor-mounted configurations require additional furniture.You must use a print media size not...

User's Reference
Page 63
Click the topic that describes your printer configuration. • Neither a duplex unit nor a finisher attached • A duplex unit, but no finisher attached • A finisher, but no duplex unit attached • Both a duplex unit and a finisher attached Neither a duplex unit nor a finisher attached a Load letterhead paper for single-sided printing with step 7 on the printer. b Continue with the logo face up as shown. Using and loading the multipurpose feeder Loading letterhead Load letterhead according to the options installed on page 65. 63
Click the topic that describes your printer configuration. • Neither a duplex unit nor a finisher attached • A duplex unit, but no finisher attached • A finisher, but no duplex unit attached • Both a duplex unit and a finisher attached Neither a duplex unit nor a finisher attached a Load letterhead paper for single-sided printing with step 7 on the printer. b Continue with the logo face up as shown. Using and loading the multipurpose feeder Loading letterhead Load letterhead according to the options installed on page 65. 63

User's Reference
Page 74
... now. Using and loading the optional 2000-sheet drawer Changing the print media size for the 2000-sheet drawer Your 2000-sheet drawer comes pre-configured for either letter or A4 size. The printer elevator tray should be approximately halfway up position. 8 To make a selection, turn the knob completely in a counterclockwise...
... now. Using and loading the optional 2000-sheet drawer Changing the print media size for the 2000-sheet drawer Your 2000-sheet drawer comes pre-configured for either letter or A4 size. The printer elevator tray should be approximately halfway up position. 8 To make a selection, turn the knob completely in a counterclockwise...
User's Reference
Page 119
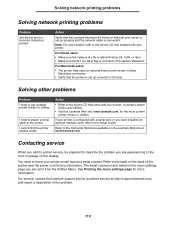
... server to allow Macintosh connection. • Verify that the Lexmark internal print server or external print server is set up properly and the network cable is configured with your printer. For service, contact the Lexmark support site for this information. It contains printer drivers and ...utilities. • Visit the Lexmark Web site, www.lexmark.com, for more details, refer to know your printer...
... server to allow Macintosh connection. • Verify that the Lexmark internal print server or external print server is set up properly and the network cable is configured with your printer. For service, contact the Lexmark support site for this information. It contains printer drivers and ...utilities. • Visit the Lexmark Web site, www.lexmark.com, for more details, refer to know your printer...
User's Reference
Page 122
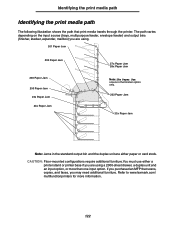
CAUTION: Floor-mounted configurations require additional furniture.You must use either paper or card stock. Refer to www.lexmark.com/ multifunctionprinters for more than one input option. Identifying the print media path Identifying the print media path The following illustration shows the path that ...
CAUTION: Floor-mounted configurations require additional furniture.You must use either paper or card stock. Refer to www.lexmark.com/ multifunctionprinters for more than one input option. Identifying the print media path Identifying the print media path The following illustration shows the path that ...

User's Reference
Page 186
... the following settings: Paper Settings Paper Source Paper Size (per supported sources) Paper Type (per supported sources) Custom Types (per custom type number) Substitute Size Configure MP Paper Texture (per supported media) Paper Weight (per supported media) Paper Loading (per supported media) PostScript Settings Print PS Error Font Priority Finishing Settings...
... the following settings: Paper Settings Paper Source Paper Size (per supported sources) Paper Type (per supported sources) Custom Types (per custom type number) Substitute Size Configure MP Paper Texture (per supported media) Paper Weight (per supported media) Paper Loading (per supported media) PostScript Settings Print PS Error Font Priority Finishing Settings...


