
Setup Guide
Page 20
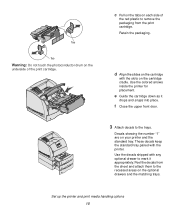
... as it appropriately. These decals keep the standard tray paired with any optional drawer to the trays. Tab Tab Warning: Do not touch the photoconductor drum on the underside of the red plastic to the recessed areas on the optional drawers and the matching trays. Retain the packaging. d Align the slides...
... as it appropriately. These decals keep the standard tray paired with any optional drawer to the trays. Tab Tab Warning: Do not touch the photoconductor drum on the underside of the red plastic to the recessed areas on the optional drawers and the matching trays. Retain the packaging. d Align the slides...
User's Reference
Page 88
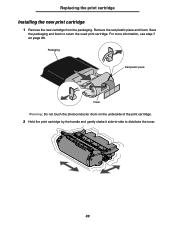
Packaging Red plastic piece Foam Warning: Do not touch the photoconductor drum on page 89. Save the packaging and foam to distribute the toner. 88 Replacing the print cartridge Installing the new print cartridge 1 Remove the new cartridge from the packaging. Remove the red plastic piece and foam. For more information, see step 7 on the underside of the print cartridge. 2 Hold the print cartridge by the handle and gently shake it side-to-side to return the used print cartridge.
Packaging Red plastic piece Foam Warning: Do not touch the photoconductor drum on page 89. Save the packaging and foam to distribute the toner. 88 Replacing the print cartridge Installing the new print cartridge 1 Remove the new cartridge from the packaging. Remove the red plastic piece and foam. For more information, see step 7 on the underside of the print cartridge. 2 Hold the print cartridge by the handle and gently shake it side-to-side to return the used print cartridge.
User's Reference
Page 125
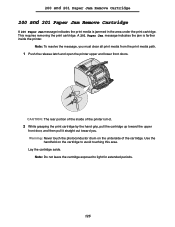
CAUTION: The rear portion of the inside the printer. Note: To resolve the message, you . Warning: Never touch the photoconductor drum on the cartridge to light for extended periods. 125 Use the handhold on the underside of the printer is jammed in the area under the ...
CAUTION: The rear portion of the inside the printer. Note: To resolve the message, you . Warning: Never touch the photoconductor drum on the cartridge to light for extended periods. 125 Use the handhold on the underside of the printer is jammed in the area under the ...

User's Reference
Page 142
... straight out toward the back of the cartridge. Note: Do not leave the cartridge exposed to avoid touching this area. Warning: Never touch the photoconductor drum on the cartridge to light for extended periods. 3 Gently push the feed roller release lever toward you .
... straight out toward the back of the cartridge. Note: Do not leave the cartridge exposed to avoid touching this area. Warning: Never touch the photoconductor drum on the cartridge to light for extended periods. 3 Gently push the feed roller release lever toward you .
User's Reference
Page 148
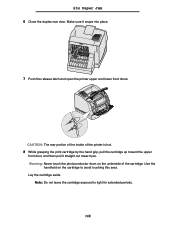
... of the printer is hot. 8 While grasping the print cartridge by the hand grip, pull the cartridge up toward you. Warning: Never touch the photoconductor drum on the cartridge to light for extended periods. 148 23x Paper Jam 6 Close the duplex rear door. Lay the cartridge aside. Note: Do not leave...
... of the printer is hot. 8 While grasping the print cartridge by the hand grip, pull the cartridge up toward you. Warning: Never touch the photoconductor drum on the cartridge to light for extended periods. 148 23x Paper Jam 6 Close the duplex rear door. Lay the cartridge aside. Note: Do not leave...

User's Reference
Page 155
... you see the edge of the print media in the standard tray: a Push the tray back into the printer. Warning: Do not touch the photoconductor drum on the cartridge to avoid touching this area. Make sure it snaps into the duplex unit. b Slide the tray all the way into the printer...
... you see the edge of the print media in the standard tray: a Push the tray back into the printer. Warning: Do not touch the photoconductor drum on the cartridge to avoid touching this area. Make sure it snaps into the duplex unit. b Slide the tray all the way into the printer...

Service Manual
Page 113
...a mechanical shutter as previous laser printers. Check the front cable harness at J22 on the system board and at J22 on the entire photoconductor drum. Diagnostic information 2-79 Make sure the charge roll bushing is connected properly. If the contact is no continuity, replace the front cable harness....attach the contacts to printer ground. Screws are incorrect, replace the system board. Note: Inspect the HVPS PC drum contact on the board for damage, especially the PC drum contact on the HVPS to ensure they fit securely and are measured with one from the HV contact kit. ...
...a mechanical shutter as previous laser printers. Check the front cable harness at J22 on the system board and at J22 on the entire photoconductor drum. Diagnostic information 2-79 Make sure the charge roll bushing is connected properly. If the contact is no continuity, replace the front cable harness....attach the contacts to printer ground. Screws are incorrect, replace the system board. Note: Inspect the HVPS PC drum contact on the board for damage, especially the PC drum contact on the HVPS to ensure they fit securely and are measured with one from the HV contact kit. ...

Service Manual
Page 243
... mounting 1 Smart cartridge contact assembly w/cable 1 Cartridge fan 1 Toner sensor assembly 1 Parts packet, contact kit • Contact, doctor blade/TAR/developer roll (3) • Contact, PC drum (1) • Contact, charge roll (1) • Block, contact mounting (4) • Screw, contact mounting (5) 1 Spring, tray bias 2 Spring, cartridge hold down 1 Tray bias arm assembly 2 Roller, developer...
... mounting 1 Smart cartridge contact assembly w/cable 1 Cartridge fan 1 Toner sensor assembly 1 Parts packet, contact kit • Contact, doctor blade/TAR/developer roll (3) • Contact, PC drum (1) • Contact, charge roll (1) • Block, contact mounting (4) • Screw, contact mounting (5) 1 Spring, tray bias 2 Spring, cartridge hold down 1 Tray bias arm assembly 2 Roller, developer...


