Setup Guide (1.4 MB)
Page 3
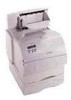
... you bought the printer. Options Compatibility Options compatible with Optra™ T printers are labeled with a colored triangle. Troubleshooting If you have a sturdy, low table or the optional printer stand on the Optra T Publications CD, for service or storage. Note: Leave the printer in .) CDs Paper bail and bracket ... Power switch cover Power cord 304.8 mm (12 in.) 304.8 mm (12 in the box until you lift the printer using the handholds. Tray number decals - The location of the label is shown before installing any options. Getting Started 137.16 cm (4 ½...
... you bought the printer. Options Compatibility Options compatible with Optra™ T printers are labeled with a colored triangle. Troubleshooting If you have a sturdy, low table or the optional printer stand on the Optra T Publications CD, for service or storage. Note: Leave the printer in .) CDs Paper bail and bracket ... Power switch cover Power cord 304.8 mm (12 in.) 304.8 mm (12 in the box until you lift the printer using the handholds. Tray number decals - The location of the label is shown before installing any options. Getting Started 137.16 cm (4 ½...
Setup Guide (1.4 MB)
Page 7
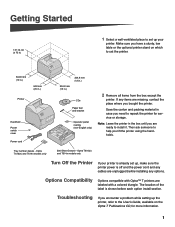
...Optra T label (colored triangle) 1 Remove the tray from both the support unit and the tray. The tab, round hole and square holes on top of any drawer will help you plan to use the printer. The printer automatically recognizes any previously installed paper drawers, or the table or printer...on page 7. To attach a duplex unit, see "Placing the Printer" on page 6. Tray labels Installing a 250-Sheet or 500-Sheet Drawer Paper drawers attach under the printer and optional duplex unit. A drawer consists of a paper tray and a support unit. Remove all packing material and tape from ...
...Optra T label (colored triangle) 1 Remove the tray from both the support unit and the tray. The tab, round hole and square holes on top of any drawer will help you plan to use the printer. The printer automatically recognizes any previously installed paper drawers, or the table or printer...on page 7. To attach a duplex unit, see "Placing the Printer" on page 6. Tray labels Installing a 250-Sheet or 500-Sheet Drawer Paper drawers attach under the printer and optional duplex unit. A drawer consists of a paper tray and a support unit. Remove all packing material and tape from ...
Setup Guide (1.4 MB)
Page 8
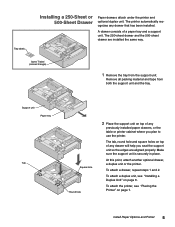
... square holes on top of any installed paper drawers, or the table or printer cabinet where you plan to the printer User's Guide, available on the Optra T Publications CD, for Optra T616(n), T614(n) and T612(n) (back cover curves inward) The duplex unit attaches under the printer, below the standard input tray and above any drawer will help you...
... square holes on top of any installed paper drawers, or the table or printer cabinet where you plan to the printer User's Guide, available on the Optra T Publications CD, for Optra T616(n), T614(n) and T612(n) (back cover curves inward) The duplex unit attaches under the printer, below the standard input tray and above any drawer will help you...
Setup Guide (1.4 MB)
Page 10
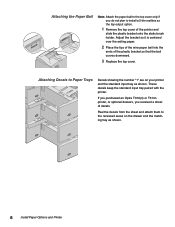
... and the matching tray as shown. 8 Install Paper Options and Printer Attaching Decals to the recessed areas on your printer and the standard input tray as the top output option. 1 Remove the top cover of decals. These decals keep the standard input tray paired with the printer. If you purchased an Optra T616(n) or T614n printer, or optional drawers...
... and the matching tray as shown. 8 Install Paper Options and Printer Attaching Decals to the recessed areas on your printer and the standard input tray as the top output option. 1 Remove the top cover of decals. These decals keep the standard input tray paired with the printer. If you purchased an Optra T616(n) or T614n printer, or optional drawers...
Setup Guide (1.4 MB)
Page 12
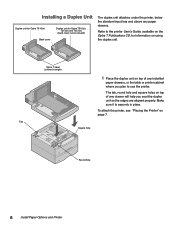
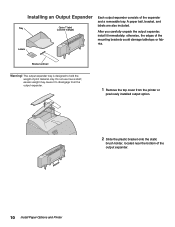
...After you carefully unpack the output expander, install it as a shelf; The output expander tray is designed to disengage from the output expander. 1 Remove the top cover from the printer or previously installed output option. 2 Slide the plastic bracket onto the static brush holder, ... otherwise, the edges of the expander and a removable tray. Bracket and bail Warning! excess weight may cause it to hold the weight of the output expander. 10 Install Paper Options and Printer Installing an Output Expander Tray Optra T label (colored triangle) Labels Each output expander consists...
...After you carefully unpack the output expander, install it as a shelf; The output expander tray is designed to disengage from the output expander. 1 Remove the top cover from the printer or previously installed output option. 2 Slide the plastic bracket onto the static brush holder, ... otherwise, the edges of the expander and a removable tray. Bracket and bail Warning! excess weight may cause it to hold the weight of the output expander. 10 Install Paper Options and Printer Installing an Output Expander Tray Optra T label (colored triangle) Labels Each output expander consists...
Setup Guide (1.4 MB)
Page 13
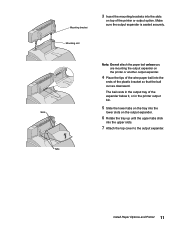
...below it, or in the printer output bin. 5 Slide the lower tabs on the tray into the lower slots on the output expander. 6 Rotate the tray up until the upper tabs click into the slots on the printer or another output expander. 4 Place the tips of the wire paper bail into the ends of ...the printer or output option. Mounting bracket Mounting slot 3 Insert the mounting brackets into the ...
...below it, or in the printer output bin. 5 Slide the lower tabs on the tray into the lower slots on the output expander. 6 Rotate the tray up until the upper tabs click into the slots on the printer or another output expander. 4 Place the tips of the wire paper bail into the ends of ...the printer or output option. Mounting bracket Mounting slot 3 Insert the mounting brackets into the ...
Setup Guide (1.4 MB)
Page 15
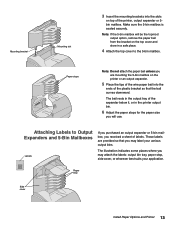
...store in the printer output bin. 6 Adjust the paper stops for the paper size you will use. Paper stop , side cover, or wherever best suits your various output bins. The illustration indicates some places where you may label your application. The bail rests in the output tray of the ...mounting brackets into the slots on the printer or an output expander. 5 Place the tips of the wire paper bail into the ends of the plastic bracket so that you may attach the labels: output bin tray, paper stop Side cover Install Paper Options and Printer 13 These labels are mounting the ...
...store in the printer output bin. 6 Adjust the paper stops for the paper size you will use. Paper stop , side cover, or wherever best suits your various output bins. The illustration indicates some places where you may label your application. The bail rests in the output tray of the ...mounting brackets into the slots on the printer or an output expander. 5 Place the tips of the wire paper bail into the ends of the plastic bracket so that you may attach the labels: output bin tray, paper stop Side cover Install Paper Options and Printer 13 These labels are mounting the ...
Setup Guide (1.4 MB)
Page 21
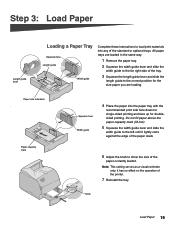
... on the operation of the standard or optional trays. Paper capacity mark Squeeze here Width guide 4 Place the paper into any of the printer. 7 Reinstall the tray. Knob Load Paper 19 All paper trays are loading. it lightly rests against the edge of the paper stack 6 Adjust the knob to show the... size of the tray. 3 Squeeze the length guide lever and ...
... on the operation of the standard or optional trays. Paper capacity mark Squeeze here Width guide 4 Place the paper into any of the printer. 7 Reinstall the tray. Knob Load Paper 19 All paper trays are loading. it lightly rests against the edge of the paper stack 6 Adjust the knob to show the... size of the tray. 3 Squeeze the length guide lever and ...


