Quick Reference
Page 3
...telephone line 30 Step 2: Check the dial tone 37 Step 3: Set your fax name and fax number 37 Step 4: Set the printer to receive faxes automatically or manually 37 Step 5: Set the number of rings 38 Step 6: Create a contact list 38 Faxing 39 Sending faxes...39 Receiving faxes...39... Wireless networking 41 Information you will need to set up the printer on a wireless network 41 Installing the printer on a wireless network 41 ...
...telephone line 30 Step 2: Check the dial tone 37 Step 3: Set your fax name and fax number 37 Step 4: Set the printer to receive faxes automatically or manually 37 Step 5: Set the number of rings 38 Step 6: Create a contact list 38 Faxing 39 Sending faxes...39 Receiving faxes...39... Wireless networking 41 Information you will need to set up the printer on a wireless network 41 Installing the printer on a wireless network 41 ...
Quick Reference
Page 5
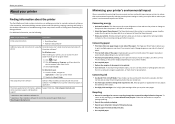
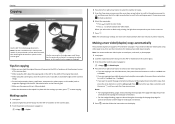
... of paper. • Print on both sides of the paper manually or automatically (depending on your printer's environmental impact We are committed to protecting the environment and are continually improving our printers to print multiple pages on one side of the paper. You can... User's Guide. Conserving ink • Use Quick Print or Draft Mode. About your printer About your printer Finding information about the printer The Quick Reference Guide contains instructions on adding your printer to www.lexmark.com/recycle. To return an ink cartridge, go to a wireless network, setting up ...
... of paper. • Print on both sides of the paper manually or automatically (depending on your printer's environmental impact We are committed to protecting the environment and are continually improving our printers to print multiple pages on one side of the paper. You can... User's Guide. Conserving ink • Use Quick Print or Draft Mode. About your printer About your printer Finding information about the printer The Quick Reference Guide contains instructions on adding your printer to www.lexmark.com/recycle. To return an ink cartridge, go to a wireless network, setting up ...

Quick Reference
Page 15
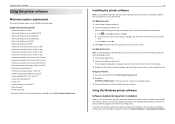
...off in a fax number to wait for three seconds to turn off . • Switch to view the last five numbers dialed. Dial the telephone number manually using the keypad before sending the fax. 11 Address Book Access fax numbers from one menu level to a higher one. 11 10 9 8 Use 8... Redial 9 Pause 10 Dial Tone 17 15 16 To Display the last number dialed. Enter a pause only when you want to make. About your printer Using the printer control panel 2 3 1 4 5 Use 7 Select OK To • Select menu options. • Save settings. 12 13 15 14 7 6 Use To 1 Power ...
...off in a fax number to wait for three seconds to turn off . • Switch to view the last five numbers dialed. Dial the telephone number manually using the keypad before sending the fax. 11 Address Book Access fax numbers from one menu level to a higher one. 11 10 9 8 Use 8... Redial 9 Pause 10 Dial Tone 17 15 16 To Display the last number dialed. Enter a pause only when you want to make. About your printer Using the printer control panel 2 3 1 4 5 Use 7 Select OK To • Select menu options. • Save settings. 12 13 15 14 7 6 Use To 1 Power ...
Quick Reference
Page 20
...software programs. 2 Insert the installation software CD. Using the Internet 1 Go to the Lexmark Web site at http://support.lexmark.com. 20 Installing the printer software Note: If you installed the printer software on this operating system is the letter of your operating system 3 Download the ... does not appear after a minute, then launch the CD manually: a Click , or click Start and then click Run. For Windows users 1 Close all the necessary software was installed. Using the Windows printer software Software installed during initial installation, then reinsert the installation ...
...software programs. 2 Insert the installation software CD. Using the Internet 1 Go to the Lexmark Web site at http://support.lexmark.com. 20 Installing the printer software Note: If you installed the printer software on this operating system is the letter of your operating system 3 Download the ... does not appear after a minute, then launch the CD manually: a Click , or click Start and then click Run. For Windows users 1 Close all the necessary software was installed. Using the Windows printer software Software installed during initial installation, then reinsert the installation ...
Quick Reference
Page 25
...ADF Scanner glass Use the ADF for making a two‑sided copy manually. Note: The selected copy settings are copying a two-sided document and ... that corresponds to black‑and‑white mode. Place these items on the scanner glass. 3 From the printer control panel, navigate to: > Copy > OK > Copies 25 4 Press the left or right arrow button ...page (top edge for landscape orientation). 5 Press , and then follow the instructions on the scanner glass. 3 From the printer control panel, navigate to: > Copy > OK > 2‑Sided Copies 4 Press the left or right arrow button to ...
...ADF Scanner glass Use the ADF for making a two‑sided copy manually. Note: The selected copy settings are copying a two-sided document and ... that corresponds to black‑and‑white mode. Place these items on the scanner glass. 3 From the printer control panel, navigate to: > Copy > OK > Copies 25 4 Press the left or right arrow button ...page (top edge for landscape orientation). 5 Press , and then follow the instructions on the scanner glass. 3 From the printer control panel, navigate to: > Copy > OK > 2‑Sided Copies 4 Press the left or right arrow button to ...

Quick Reference
Page 30
...any electrical or cabling connections, such as the power supply cord or telephone, during a lightning storm. Do not set the printer to receive faxes automatically (Auto Answer On) or manually (Auto Answer Off). • If you want to receive faxes automatically (Auto Answer On), then set the... printer to the public switched telephone network. Tips for this product or make any number of the printer, and then connect the answering machine...
...any electrical or cabling connections, such as the power supply cord or telephone, during a lightning storm. Do not set the printer to receive faxes automatically (Auto Answer On) or manually (Auto Answer Off). • If you want to receive faxes automatically (Auto Answer On), then set the... printer to the public switched telephone network. Tips for this product or make any number of the printer, and then connect the answering machine...

Quick Reference
Page 31
... on your line, then you need to set the correct ring pattern for the printer. Otherwise, the printer will not receive faxes even if you have distinctive ring service, then make sure that you set the printer to receive faxes manually (Auto Answer Off). This way, the answering machine picks up after the answering...
... on your line, then you need to set the correct ring pattern for the printer. Otherwise, the printer will not receive faxes even if you have distinctive ring service, then make sure that you set the printer to receive faxes manually (Auto Answer Off). This way, the answering machine picks up after the answering...

Quick Reference
Page 32
...jack. 2 Connect a telephone cable from the and then connect the telephone to the port. Setting up the printer to fax When you answer the telephone and you hear fax tones, press *9* or the manual answer code on the telephone to receive the fax. • You can use the same line for analog... voice calls (including faxes) and digital Internet access. This setting works best if you are expecting a fax. port of the printer. To minimize interference between the two...
...jack. 2 Connect a telephone cable from the and then connect the telephone to the port. Setting up the printer to fax When you answer the telephone and you hear fax tones, press *9* or the manual answer code on the telephone to receive the fax. • You can use the same line for analog... voice calls (including faxes) and digital Internet access. This setting works best if you are expecting a fax. port of the printer. To minimize interference between the two...

Quick Reference
Page 37
... the wall jack. 2 Listen for a dial tone. If you cannot send a fax without sender information, so make sure that you can set the printer to receive faxes manually. 1 From the printer control panel, navigate to: > Setup > OK > Fax Setup > OK > Ringing and Answering > OK > Auto Answer > OK 2 Press the ... fax telephone line), and the time and date on your telephone number, and then press OK . Step 4: Set the printer to receive faxes automatically or manually If the printer is connected to any of the faxes that you hear a dial tone, then the telephone line and the wall jack are...
... the wall jack. 2 Listen for a dial tone. If you cannot send a fax without sender information, so make sure that you can set the printer to receive faxes manually. 1 From the printer control panel, navigate to: > Setup > OK > Fax Setup > OK > Ringing and Answering > OK > Auto Answer > OK 2 Press the ... fax telephone line), and the time and date on your telephone number, and then press OK . Step 4: Set the printer to receive faxes automatically or manually If the printer is connected to any of the faxes that you hear a dial tone, then the telephone line and the wall jack are...
Quick Reference
Page 39
..., press to enter another number, and then press OK . ports while actively sending a Tip: • You can enter fax numbers manually or by using the printer control panel 1 From the printer control panel, navigate to: > Fax 2 Enter a fax number, or press Address Book to select a number from the Speed Dial or... When receiving faxes: • Make sure that the ringer volume is not set to Off. • If you set the printer to receive faxes manually (Auto Answer Off), then make sure that the printer is working telephone, DSL, or VoIP line. The line is on the list, then choose Add...
..., press to enter another number, and then press OK . ports while actively sending a Tip: • You can enter fax numbers manually or by using the printer control panel 1 From the printer control panel, navigate to: > Fax 2 Enter a fax number, or press Address Book to select a number from the Speed Dial or... When receiving faxes: • Make sure that the ringer volume is not set to Off. • If you set the printer to receive faxes manually (Auto Answer Off), then make sure that the printer is working telephone, DSL, or VoIP line. The line is on the list, then choose Add...

Quick Reference
Page 40
... jack through the port. Warning-Potential Damage: Do not touch the cables or the and a fax. If the call . Receiving faxes manually 1 Turn off Auto Answer: From the printer control panel, navigate to: > Setup > OK > Fax Setup > OK > Ringing and Answering > OK > Auto Answer > OK...received. ports while actively receiving Tips: • The default code for answering faxes manually is detected, the printer automatically receives the incoming fax. ports while actively receiving Tips: • If the printer is sharing the line with other analog devices (telephone, answering machine), then set...
... jack through the port. Warning-Potential Damage: Do not touch the cables or the and a fax. If the call . Receiving faxes manually 1 Turn off Auto Answer: From the printer control panel, navigate to: > Setup > OK > Fax Setup > OK > Ringing and Answering > OK > Auto Answer > OK...received. ports while actively receiving Tips: • The default code for answering faxes manually is detected, the printer automatically receives the incoming fax. ports while actively receiving Tips: • If the printer is sharing the line with other analog devices (telephone, answering machine), then set...
Quick Reference
Page 41
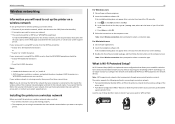
...users 1 Close all open applications. 2 Insert the installation software CD. If the installation dialog does not appear after a minute, then launch the CD manually: a Click , or click Start and then click Run. Look for network devices. b In the Start Search or Run box, type D:\setup.exe...• Hexadecimal characters are A-F, a-f, and 0-9. • ASCII characters are pushed within a given period of Wi‑Fi technology. The printer supports the following methods in a WPA/WPA2 passphrase are using is Wi‑Fi Protected Setup? If you cannot find the WPA/WPA2 passphrase ...
...users 1 Close all open applications. 2 Insert the installation software CD. If the installation dialog does not appear after a minute, then launch the CD manually: a Click , or click Start and then click Run. Look for network devices. b In the Start Search or Run box, type D:\setup.exe...• Hexadecimal characters are A-F, a-f, and 0-9. • ASCII characters are pushed within a given period of Wi‑Fi technology. The printer supports the following methods in a WPA/WPA2 passphrase are using is Wi‑Fi Protected Setup? If you cannot find the WPA/WPA2 passphrase ...
Quick Reference
Page 42
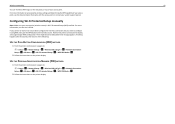
... person. If nothing happens after 30 seconds, then do one of the following: USE THE PUSH BUTTON CONFIGURATION (PBC) METHOD 1 From the printer control panel, navigate to begin WPS configuration. For more information on the wireless router. Wait for wireless connection and you want to : > ... OK > WPS PIN Mode > OK 2 Follow the instructions on the printer display. Configuring Wi‑Fi Protected Setup manually Note: Make sure your access point. USE THE PERSONAL IDENTIFICATION NUMBER (PIN) METHOD 1 From the printer control panel, navigate to configure it using WPS, then push the WPS...
... person. If nothing happens after 30 seconds, then do one of the following: USE THE PUSH BUTTON CONFIGURATION (PBC) METHOD 1 From the printer control panel, navigate to begin WPS configuration. For more information on the wireless router. Wait for wireless connection and you want to : > ... OK > WPS PIN Mode > OK 2 Follow the instructions on the printer display. Configuring Wi‑Fi Protected Setup manually Note: Make sure your access point. USE THE PERSONAL IDENTIFICATION NUMBER (PIN) METHOD 1 From the printer control panel, navigate to configure it using WPS, then push the WPS...

Quick Reference
Page 43
... checklist does not solve the problem, then try one or more of your printer does not appear in the list in the printers folder or as a printer option when sending a print job, then try the following: LAUNCH THE PRINTER CD MANUALLY For Windows users 1 Click , or click Start and then click Run. 2...button to scroll to Yes, and then press OK . If Troubleshooting does not solve your problem Visit our Web site at http://support.lexmark.com to find the following : MAKE SURE THAT YOUR COMPUTER MEETS THE MINIMUM SYSTEM REQUIREMENTS TEMPORARILY DISABLE SECURITY PROGRAMS IN WINDOWS BEFORE INSTALLING ...
... checklist does not solve the problem, then try one or more of your printer does not appear in the list in the printers folder or as a printer option when sending a print job, then try the following: LAUNCH THE PRINTER CD MANUALLY For Windows users 1 Click , or click Start and then click Run. 2...button to scroll to Yes, and then press OK . If Troubleshooting does not solve your problem Visit our Web site at http://support.lexmark.com to find the following : MAKE SURE THAT YOUR COMPUTER MEETS THE MINIMUM SYSTEM REQUIREMENTS TEMPORARILY DISABLE SECURITY PROGRAMS IN WINDOWS BEFORE INSTALLING ...
Quick Reference
Page 47
...service before you know. Note: To increase the security, you can change your manual pickup code to a number that the printer is available for your code. Cannot run the fax software The printer must be able to receive more incoming faxes. Wireless network troubleshooting If you can... receive it. 1 From the printer control panel, navigate to: > Setup > OK > Fax Setup > OK > Ringing and Answering > OK > Manual Pickup Code > OK 2 Copy the manual answer code that converts digital signals into analog signals. Try accessing other devices...
...service before you know. Note: To increase the security, you can change your manual pickup code to a number that the printer is available for your code. Cannot run the fax software The printer must be able to receive more incoming faxes. Wireless network troubleshooting If you can... receive it. 1 From the printer control panel, navigate to: > Setup > OK > Fax Setup > OK > Ringing and Answering > OK > Manual Pickup Code > OK 2 Copy the manual answer code that converts digital signals into analog signals. Try accessing other devices...
Quick Reference
Page 50
...of your wireless router, is working . • Remove any objects that could be blocking the signal. • Temporarily turn off the device that the printer is a problem with your wireless network. Make sure that the computer is connected to is typically the access point. For Macintosh users 1 From the .../IP section, look for the SSID. 4 Write down exactly, including any two numbers between 0 and 255), then do this, then refer to the manual that came with your computer screen when you see this message, then wait a few seconds to power up again and reattach to the wireless network...
...of your wireless router, is working . • Remove any objects that could be blocking the signal. • Temporarily turn off the device that the printer is a problem with your wireless network. Make sure that the computer is connected to is typically the access point. For Macintosh users 1 From the .../IP section, look for the SSID. 4 Write down exactly, including any two numbers between 0 and 255), then do this, then refer to the manual that came with your computer screen when you see this message, then wait a few seconds to power up again and reattach to the wireless network...
Quick Reference
Page 53
... USB 45 cannot receive faxes 47 cannot run fax software 47 cannot send faxes 46 cartridges, ink ordering 17 checking an unresponsive printer 43 checking the dial tone 37 checklist before you troubleshoot 43 fax troubleshooting 46 cleaning printhead nozzles 19 Communication not available message 50... 47 cannot run fax software 47 cannot send faxes 46 fax troubleshooting checklist 46 faxing Auto Answer setting 37 receiving automatically 40 receiving manually 40 sending a broadcast fax immediately 39 sending using the control panel 39 setting sender information 37 tips, receiving 39 tips, sending ...
... USB 45 cannot receive faxes 47 cannot run fax software 47 cannot send faxes 46 cartridges, ink ordering 17 checking an unresponsive printer 43 checking the dial tone 37 checklist before you troubleshoot 43 fax troubleshooting 46 cleaning printhead nozzles 19 Communication not available message 50... 47 cannot run fax software 47 cannot send faxes 46 fax troubleshooting checklist 46 faxing Auto Answer setting 37 receiving automatically 40 receiving manually 40 sending a broadcast fax immediately 39 sending using the control panel 39 setting sender information 37 tips, receiving 39 tips, sending ...
Quick Reference
Page 54
... 15 using 15 Wi‑Fi indicator 16 printer does not respond 45 printer features 6 printer models 6 printer printing blank pages 44 printer problems, basic solutions 43 printer software installing 20 printers supported 24 printhead aligning 18 printhead access area ...14 printhead nozzles cleaning 19 printing documents 23 network setup page 48 on both sides of the paper 23 two‑sided 23 publications finding 5 Push Button Configuration method using 42 R receiving faxes Auto Answer setting 37, 40 automatically 40 manually...
... 15 using 15 Wi‑Fi indicator 16 printer does not respond 45 printer features 6 printer models 6 printer printing blank pages 44 printer problems, basic solutions 43 printer software installing 20 printers supported 24 printhead aligning 18 printhead access area ...14 printhead nozzles cleaning 19 printing documents 23 network setup page 48 on both sides of the paper 23 two‑sided 23 publications finding 5 Push Button Configuration method using 42 R receiving faxes Auto Answer setting 37, 40 automatically 40 manually...

User's Guide
Page 7
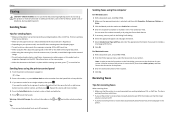
...reduce their environmental impact. Use the preview features found in a minimum‑power standby mode after the printer is left idle for choosing this printer! To start using your printer's environmental impact We are committed to protecting the environment and are the reason we do what we want... of a sheet of paper. • Print on both sides of the paper manually or automatically (depending on your needs. Minimizing your new printer right away, use the setup materials that came with our printers, and we do, and your suggestions help you print on both sides of documents...
...reduce their environmental impact. Use the preview features found in a minimum‑power standby mode after the printer is left idle for choosing this printer! To start using your printer's environmental impact We are committed to protecting the environment and are the reason we do what we want... of a sheet of paper. • Print on both sides of the paper manually or automatically (depending on your needs. Minimizing your new printer right away, use the setup materials that came with our printers, and we do, and your suggestions help you print on both sides of documents...

User's Guide
Page 19
... dialed. Press the left or right arrow button to wait for an outside line or get through an automated answering system. Dial the telephone number manually using the keypad before sending the fax. Insert a three-second pause in a fax number to view the last five numbers dialed. Using the... printer control panel buttons and menus 19 Use 5 Keypad 6 Back 7 Select OK To In Copy mode or Photo mode: Enter the number of copies or prints ...
... dialed. Press the left or right arrow button to wait for an outside line or get through an automated answering system. Dial the telephone number manually using the keypad before sending the fax. Insert a three-second pause in a fax number to view the last five numbers dialed. Using the... printer control panel buttons and menus 19 Use 5 Keypad 6 Back 7 Select OK To In Copy mode or Photo mode: Enter the number of copies or prints ...


