Quick Reference
Page 3
... the printer...6 Understanding the parts of the printer 13 Using the printer control panel 15 Using flash drives...16 Ordering and replacing ink cartridges 17 Ordering ink cartridges...17 Replacing ink cartridges...17 Maintaining ink cartridges 18 Using the printer software 20 Minimum system requirements 20 Installing the printer software 20 Using the Windows printer software 20 Using...
... the printer...6 Understanding the parts of the printer 13 Using the printer control panel 15 Using flash drives...16 Ordering and replacing ink cartridges 17 Ordering ink cartridges...17 Replacing ink cartridges...17 Maintaining ink cartridges 18 Using the printer software 20 Minimum system requirements 20 Installing the printer software 20 Using the Windows printer software 20 Using...
Quick Reference
Page 5
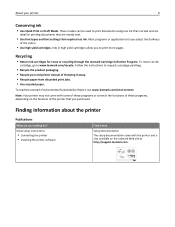
... you may be used to print multiple pages on one side of the paper. Recycling • Return ink cartridges for ? The latest supplemental information, updates, Support Web site-http://support.lexmark.com online customer support, and telephone support 1 Available on the installation software CD. 2 Available on the installation software CD and on the...
... you may be used to print multiple pages on one side of the paper. Recycling • Return ink cartridges for ? The latest supplemental information, updates, Support Web site-http://support.lexmark.com online customer support, and telephone support 1 Available on the installation software CD. 2 Available on the installation software CD and on the...

Quick Reference
Page 12
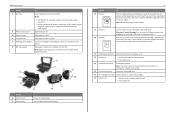
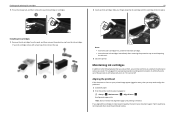
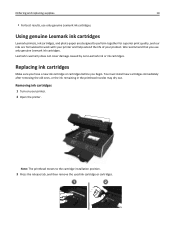
Slide your printer 26 Open the printer. Note: The printhead moves to air. 29 Close the printer. 1 2 3 About your finger along the ink cartridge until the cartridge clicks into place. 3 1 2 Notes: • Insert the color cartridges first, and then the black cartridge. • Insert the new ink cartridges immediately after removing the protective cap to avoid exposing the ink to the cartridge installation position. 27 Unpack the ink cartridges, and then remove the protective caps from the cartridges. 12 28 Insert each ink cartridge.
Slide your printer 26 Open the printer. Note: The printhead moves to air. 29 Close the printer. 1 2 3 About your finger along the ink cartridge until the cartridge clicks into place. 3 1 2 Notes: • Insert the color cartridges first, and then the black cartridge. • Insert the new ink cartridges immediately after removing the protective cap to avoid exposing the ink to the cartridge installation position. 27 Unpack the ink cartridges, and then remove the protective caps from the cartridges. 12 28 Insert each ink cartridge.
Quick Reference
Page 14
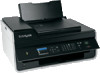
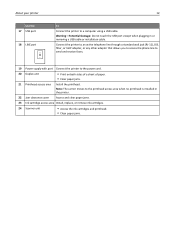
... Access the scanner glass. Keep paper in the printer. 22 Jam clearance cover Access and clear paper jams. 23 Ink cartridge access area Install, replace, or remove ink cartridges. 24 Scanner unit • Access the ink cartridges and printhead. • Clear paper jams. Connect the printer to an active telephone line through a standard wall jack (RJ...
... Access the scanner glass. Keep paper in the printer. 22 Jam clearance cover Access and clear paper jams. 23 Ink cartridge access area Install, replace, or remove ink cartridges. 24 Scanner unit • Access the ink cartridges and printhead. • Clear paper jams. Connect the printer to an active telephone line through a standard wall jack (RJ...
Quick Reference
Page 17
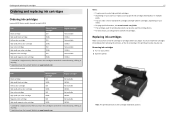
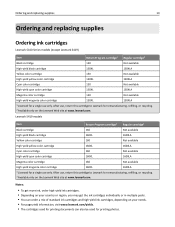
... region, you begin. Ordering and replacing ink cartridges Ordering and replacing ink cartridges Ordering ink cartridges Lexmark S410 Series models (except Lexmark S419) Item Return Program Regular cartridge2 cartridge1 Black cartridge 150 Not available High‑yield black cartridge Yellow color cartridge 150XL 150 150XLA Not available High‑yield yellow color cartridge Cyan color cartridge 150XL 150 150XLA Not available High‑...
... region, you begin. Ordering and replacing ink cartridges Ordering and replacing ink cartridges Ordering ink cartridges Lexmark S410 Series models (except Lexmark S419) Item Return Program Regular cartridge2 cartridge1 Black cartridge 150 Not available High‑yield black cartridge Yellow color cartridge 150XL 150 150XLA Not available High‑yield yellow color cartridge Cyan color cartridge 150XL 150 150XLA Not available High‑...
Quick Reference
Page 18
... print quality has not improved, then clean the printhead nozzles. Ordering and replacing ink cartridges 3 Press the release tab, and then remove the used ink cartridge or cartridges. 1 2 Installing ink cartridges 1 Remove the ink cartridge from the pack, and then remove the protective cap from the ink cartridge. Maintaining ink cartridges In addition to air. 3 Close the printer. Aligning the printhead If the...
... print quality has not improved, then clean the printhead nozzles. Ordering and replacing ink cartridges 3 Press the release tab, and then remove the used ink cartridge or cartridges. 1 2 Installing ink cartridges 1 Remove the ink cartridge from the pack, and then remove the protective cap from the ink cartridge. Maintaining ink cartridges In addition to air. 3 Close the printer. Aligning the printhead If the...
Quick Reference
Page 19
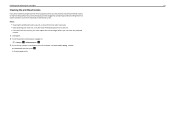
... • Cleaning the printhead nozzles uses ink, so clean them only when necessary. • Deep cleaning uses more ink, so try the Clean Printhead option first to save ink. • If the ink levels are too low, you must replace the ink cartridges before you may need to clean the ...the quality of your printer plugged to a properly grounded, working electrical outlet to allow it to perform automatic maintenance cycles. Ordering and replacing ink cartridges 19 Cleaning the printhead nozzles If you have not been using the printer for a long period, then you can clean the printhead nozzles...
... • Cleaning the printhead nozzles uses ink, so clean them only when necessary. • Deep cleaning uses more ink, so try the Clean Printhead option first to save ink. • If the ink levels are too low, you must replace the ink cartridges before you may need to clean the ...the quality of your printer plugged to a properly grounded, working electrical outlet to allow it to perform automatic maintenance cycles. Ordering and replacing ink cartridges 19 Cleaning the printhead nozzles If you have not been using the printer for a long period, then you can clean the printhead nozzles...
Quick Reference
Page 21
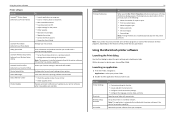
...Use the Printer Settings Shortcuts Wireless Setup Assistant Uninstaller To • Customize settings for the printer. • Order supplies. • Maintain ink cartridges. • Register the printer. • Contact technical support. • Access the User's Guide. Remove the printer software from your favorite... Use the LexmarkTM Printer Home (referred to as Printer Home) Lexmark Phone Book (referred to as Phone Book) Abbyy Sprint OCR Lexmark Wireless Setup Utility (referred to as Wireless Setup Utility) Lexmark Tools for Office (referred to as the following: • Select...
...Use the Printer Settings Shortcuts Wireless Setup Assistant Uninstaller To • Customize settings for the printer. • Order supplies. • Maintain ink cartridges. • Register the printer. • Contact technical support. • Access the User's Guide. Remove the printer software from your favorite... Use the LexmarkTM Printer Home (referred to as Printer Home) Lexmark Phone Book (referred to as Phone Book) Abbyy Sprint OCR Lexmark Wireless Setup Utility (referred to as Wireless Setup Utility) Lexmark Tools for Office (referred to as the following: • Select...

Quick Reference
Page 43
... package, and then follow the instructions on the computer screen. If Troubleshooting does not solve your problem Visit our Web site at http://support.lexmark.com to Yes, and then press OK . Before you want, and then press OK . 3 To confirm the setting, press the left...in Sleep mode. Incorrect language appears on . Press and hold for paper jam messages, and clear any jams. • Check the ink cartridges, and install new cartridges if necessary. • Turn the printer off the printer. Software did not appear during installation If the "Before you encountered problems while ...
... package, and then follow the instructions on the computer screen. If Troubleshooting does not solve your problem Visit our Web site at http://support.lexmark.com to Yes, and then press OK . Before you want, and then press OK . 3 To confirm the setting, press the left...in Sleep mode. Incorrect language appears on . Press and hold for paper jam messages, and clear any jams. • Check the ink cartridges, and install new cartridges if necessary. • Turn the printer off the printer. Software did not appear during installation If the "Before you encountered problems while ...
Quick Reference
Page 44
... : • For a USB-connected printer, remove and then reconnect the USB cable. • For a printer that is wirelessly connected, see "Replacing ink cartridges" on the computer. From the list of printers in the Default tab, select your printer, and then click Add. 44 If your printer does not... troubleshoot" checklist does not solve the problem, then try another USB port on page 17 for more of the following : MAKE SURE THE INK CARTRIDGES ARE INSERTED CORRECTLY 1 Turn the printer on the printer. Note: Make sure the printer is printing blank pages Blank pages may have connected ...
... : • For a USB-connected printer, remove and then reconnect the USB cable. • For a printer that is wirelessly connected, see "Replacing ink cartridges" on the computer. From the list of printers in the Default tab, select your printer, and then click Add. 44 If your printer does not... troubleshoot" checklist does not solve the problem, then try another USB port on page 17 for more of the following : MAKE SURE THE INK CARTRIDGES ARE INSERTED CORRECTLY 1 Turn the printer on the printer. Note: Make sure the printer is printing blank pages Blank pages may have connected ...
Quick Reference
Page 53
...wireless network 48 cannot print through USB 45 cannot receive faxes 47 cannot run fax software 47 cannot send faxes 46 cartridges, ink ordering 17 checking an unresponsive printer 43 checking the dial tone 37 checklist before you troubleshoot 43 fax troubleshooting 46 ...53 I incorrect language appears on display 43 information finding 5 information needed for setting up printer on wireless network 41 ink conserving 5 ink cartridge access area 14 ink cartridges installing 17 ordering 17 removing 17 replacing 17 inserting a flash drive 16 installation screen did not appear automatically 43 ...
...wireless network 48 cannot print through USB 45 cannot receive faxes 47 cannot run fax software 47 cannot send faxes 46 cartridges, ink ordering 17 checking an unresponsive printer 43 checking the dial tone 37 checklist before you troubleshoot 43 fax troubleshooting 46 ...53 I incorrect language appears on display 43 information finding 5 information needed for setting up printer on wireless network 41 ink conserving 5 ink cartridge access area 14 ink cartridges installing 17 ordering 17 removing 17 replacing 17 inserting a flash drive 16 installation screen did not appear automatically 43 ...
Quick Reference
Page 54
...;sided 23 publications finding 5 Push Button Configuration method using 42 R receiving faxes Auto Answer setting 37, 40 automatically 40 manually 40 tips 40 recycling 5 replacing ink cartridges 17 RJ‑11 adapter 34 S safety information 2, 30 scan job canceling 28 scanner cover 14 scanner glass 14 scanner unit 14 scanning creating a PDF...
...;sided 23 publications finding 5 Push Button Configuration method using 42 R receiving faxes Auto Answer setting 37, 40 automatically 40 manually 40 tips 40 recycling 5 replacing ink cartridges 17 RJ‑11 adapter 34 S safety information 2, 30 scan job canceling 28 scanner cover 14 scanner glass 14 scanner unit 14 scanning creating a PDF...
User's Guide
Page 2
... 7 Finding information about the printer...8 Understanding the parts of the printer 10 Ordering and replacing supplies 13 Ordering ink cartridges...13 Using genuine Lexmark ink cartridges...14 Replacing ink cartridges...14 Ordering paper and other supplies...15 Recycling Lexmark products...16 Using the printer control panel buttons and menus 17 Replacing the language sheet...17 Using the printer...
... 7 Finding information about the printer...8 Understanding the parts of the printer 10 Ordering and replacing supplies 13 Ordering ink cartridges...13 Using genuine Lexmark ink cartridges...14 Replacing ink cartridges...14 Ordering paper and other supplies...15 Recycling Lexmark products...16 Using the printer control panel buttons and menus 17 Replacing the language sheet...17 Using the printer...

User's Guide
Page 4
......79 Faxing FAQ...81 Networking 87 Installing the printer on a wireless network 87 Advanced wireless setup...94 Networking FAQ...104 Maintaining the printer 117 Maintaining ink cartridges...117 Cleaning the exterior of the printer...118 Cleaning the scanner glass...119 Moving the printer to another location 119 Troubleshooting 121 Before you troubleshoot...
......79 Faxing FAQ...81 Networking 87 Installing the printer on a wireless network 87 Advanced wireless setup...94 Networking FAQ...104 Maintaining the printer 117 Maintaining ink cartridges...117 Cleaning the exterior of the printer...118 Cleaning the scanner glass...119 Moving the printer to another location 119 Troubleshooting 121 Before you troubleshoot...
User's Guide
Page 8
...programs or some of the functions of these programs, depending on the Lexmark Web site at http://support.lexmark.com. Most programs or applications let you looking for reuse or recycling through the Lexmark Cartridge Collection Program. These modes can be used to request a postage‑...paid bag. • Recycle the product packaging. • Recycle your printer 8 Conserving ink • Use Quick Print or Draft Mode. Finding ...
...programs or some of the functions of these programs, depending on the Lexmark Web site at http://support.lexmark.com. Most programs or applications let you looking for reuse or recycling through the Lexmark Cartridge Collection Program. These modes can be used to request a postage‑...paid bag. • Recycle the product packaging. • Recycle your printer 8 Conserving ink • Use Quick Print or Draft Mode. Finding ...
User's Guide
Page 12
... the USB port except when plugging in the printer. 22 Jam clearance cover Access and clear paper jams. 23 Ink cartridge access area Install, replace, or remove ink cartridges. 24 Scanner unit • Access the ink cartridges and printhead. • Clear paper jams. Note: The carrier moves to the printhead access area when no printhead is...
... the USB port except when plugging in the printer. 22 Jam clearance cover Access and clear paper jams. 23 Ink cartridge access area Install, replace, or remove ink cartridges. 24 Scanner unit • Access the ink cartridges and printhead. • Clear paper jams. Note: The carrier moves to the printhead access area when no printhead is...
User's Guide
Page 13
... replacing supplies 13 Ordering and replacing supplies Ordering ink cartridges Lexmark S410 Series models (except Lexmark S419) Item Black cartridge Return Program cartridge1 150 Regular cartridge2 Not available High‑yield black cartridge 150XL 150XLA Yellow color cartridge 150 Not available High‑yield yellow color cartridge 150XL 150XLA Cyan color cartridge 150 Not available High‑yield cyan...
... replacing supplies 13 Ordering and replacing supplies Ordering ink cartridges Lexmark S410 Series models (except Lexmark S419) Item Black cartridge Return Program cartridge1 150 Regular cartridge2 Not available High‑yield black cartridge 150XL 150XLA Yellow color cartridge 150 Not available High‑yield yellow color cartridge 150XL 150XLA Cyan color cartridge 150 Not available High‑yield cyan...
User's Guide
Page 14
... tab, and then remove the used ink cartridge or cartridges. 1 2 Ordering and replacing supplies 14 • For best results, use only genuine Lexmark ink cartridges. Replacing ink cartridges Make sure you have a new ink cartridge or cartridges before you use only genuine Lexmark ink cartridges. Lexmark's warranty does not cover damage caused by non-Lexmark ink or ink cartridges. You must install new cartridges immediately after removing the old ones...
... tab, and then remove the used ink cartridge or cartridges. 1 2 Ordering and replacing supplies 14 • For best results, use only genuine Lexmark ink cartridges. Replacing ink cartridges Make sure you have a new ink cartridge or cartridges before you use only genuine Lexmark ink cartridges. Lexmark's warranty does not cover damage caused by non-Lexmark ink or ink cartridges. You must install new cartridges immediately after removing the old ones...
User's Guide
Page 15
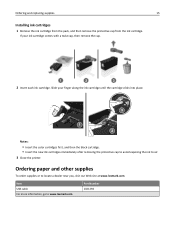
..., go to locate a dealer near you, visit our Web site at www.lexmark.com. Part Number 1021294 If your finger along the ink cartridge until the cartridge clicks into place. 3 1 2 Notes: • Insert the color cartridges first, and then the black cartridge. • Insert the new ink cartridges immediately after removing the protective cap to avoid exposing the...
..., go to locate a dealer near you, visit our Web site at www.lexmark.com. Part Number 1021294 If your finger along the ink cartridge until the cartridge clicks into place. 3 1 2 Notes: • Insert the color cartridges first, and then the black cartridge. • Insert the new ink cartridges immediately after removing the protective cap to avoid exposing the...
User's Guide
Page 23
... LexmarkTM Printer Home (referred to as Printer Home) Lexmark Phone Book (referred to as Phone Book) Abbyy Sprint OCR Lexmark Wireless Setup Utility (referred to as Wireless Setup Utility) Lexmark Tools for Office (referred to as Tools for the printer. • Order supplies. • Maintain ink cartridges. • Register the printer. • Contact technical support...
... LexmarkTM Printer Home (referred to as Printer Home) Lexmark Phone Book (referred to as Phone Book) Abbyy Sprint OCR Lexmark Wireless Setup Utility (referred to as Wireless Setup Utility) Lexmark Tools for Office (referred to as Tools for the printer. • Order supplies. • Maintain ink cartridges. • Register the printer. • Contact technical support...


