User Guide
Page 2
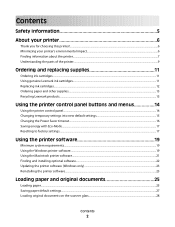
...printer's environmental impact...6 Finding information about the printer...7 Understanding the parts of the printer...9 Ordering and replacing supplies 11 Ordering ink cartridges...11 Using genuine Lexmark ink cartridges...11 Replacing ink cartridges...12 Ordering paper and other supplies...13 Recycling Lexmark products...13 Using... the printer control panel buttons and menus 14 Using the printer control panel...14 Changing temporary settings into new default settings 15 Changing the Power Saver timeout...16 Saving ...
...printer's environmental impact...6 Finding information about the printer...7 Understanding the parts of the printer...9 Ordering and replacing supplies 11 Ordering ink cartridges...11 Using genuine Lexmark ink cartridges...11 Replacing ink cartridges...12 Ordering paper and other supplies...13 Recycling Lexmark products...13 Using... the printer control panel buttons and menus 14 Using the printer control panel...14 Changing temporary settings into new default settings 15 Changing the Power Saver timeout...16 Saving ...

User Guide
Page 5
...is not responsible for signs of such problems. Remove the power cord from the printer before inspecting it. Use only the power supply and power cord provided with the use of the paper path. Do not pinch the power cord between objects such as part of other than those described... has protruding ribs as furniture and walls. Refer service or repairs, other replacement parts. SAVE THESE INSTRUCTIONS. Safety information Connect the power cord to an electrical outlet that is near water or wet locations. CAUTION-SHOCK HAZARD: Do not use caution when accessing this ...
...is not responsible for signs of such problems. Remove the power cord from the printer before inspecting it. Use only the power supply and power cord provided with the use of the paper path. Do not pinch the power cord between objects such as part of other than those described... has protruding ribs as furniture and walls. Refer service or repairs, other replacement parts. SAVE THESE INSTRUCTIONS. Safety information Connect the power cord to an electrical outlet that is near water or wet locations. CAUTION-SHOCK HAZARD: Do not use caution when accessing this ...
User Guide
Page 10
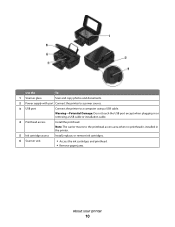
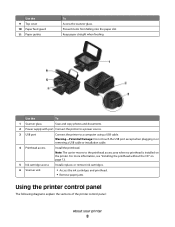
Use the To 1 Scanner glass Scan and copy photos and documents. 2 Power supply with port Connect the printer to a power source. 3 USB port Connect the printer to the printhead access area when no printhead is installed in or removing a USB cable or installation cable. 4 Printhead ...
Use the To 1 Scanner glass Scan and copy photos and documents. 2 Power supply with port Connect the printer to a power source. 3 USB port Connect the printer to the printhead access area when no printhead is installed in or removing a USB cable or installation cable. 4 Printhead ...

User Guide
Page 87
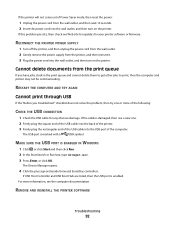
... click the For additional assistance, use the Service Center link. If Troubleshooting does not solve your problem Visit our Web site at support.lexmark.com to find the following: • Knowledgebase articles with the latest information and troubleshooting for your printer • Live online technical support...plugged into the printer and into a working electrical outlet. • Make sure the printer is not plugged into any surge protectors, uninterrupted power supplies, or extension cords. • Make sure the printer is turned on. • Make sure the printer is securely connected to the ...
... click the For additional assistance, use the Service Center link. If Troubleshooting does not solve your problem Visit our Web site at support.lexmark.com to find the following: • Knowledgebase articles with the latest information and troubleshooting for your printer • Live online technical support...plugged into the printer and into a working electrical outlet. • Make sure the printer is not plugged into any surge protectors, uninterrupted power supplies, or extension cords. • Make sure the printer is turned on. • Make sure the printer is securely connected to the ...

User Guide
Page 90
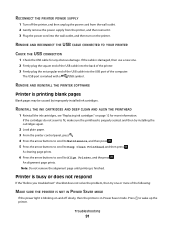
... rectangular end of the USB cable into the matching color slot of the computer. RECONNECT THE PRINTER POWER SUPPLY 1 Turn off the printer, and then unplug the power cord from the wall outlet. 2 Gently remove the power supply from the printer, and then reinsert it. 3 Plug the power cord into the wall outlet, and then turn on...
... rectangular end of the USB cable into the matching color slot of the computer. RECONNECT THE PRINTER POWER SUPPLY 1 Turn off the printer, and then unplug the power cord from the wall outlet. 2 Gently remove the power supply from the printer, and then reinsert it. 3 Plug the power cord into the wall outlet, and then turn on...
User Guide
Page 91
... into the wall outlet, and then turn on and off the printer, and then unplug the power cord from the wall outlet. 2 Gently remove the power supply from the printer, and then reinsert it. 3 Plug the power cord into the USB port of the computer. A cleaning page prints. 6 Press the arrow... buttons to scroll to wake up the printer. The USB port is marked with a USB symbol. RECONNECT THE PRINTER POWER SUPPLY 1 Turn off slowly, then the printer is in Power Saver mode. Press to Align Printer, and the press . REMOVE AND RECONNECT THE USB CABLE CONNECTED TO YOUR PRINTER ...
... into the wall outlet, and then turn on and off the printer, and then unplug the power cord from the wall outlet. 2 Gently remove the power supply from the printer, and then reinsert it. 3 Plug the power cord into the USB port of the computer. A cleaning page prints. 6 Press the arrow... buttons to scroll to wake up the printer. The USB port is marked with a USB symbol. RECONNECT THE PRINTER POWER SUPPLY 1 Turn off slowly, then the printer is in Power Saver mode. Press to Align Printer, and the press . REMOVE AND RECONNECT THE USB CABLE CONNECTED TO YOUR PRINTER ...
User Guide
Page 92
... type devmgmt.msc. 3 Press Enter, or click OK. RECONNECT THE PRINTER POWER SUPPLY 1 Turn off the printer, and then unplug the power cord from the wall outlet. 2 Gently remove the power supply from the printer, and then reinsert it. 3 Plug the power cord into the wall outlet, and then turn on the printer. If USB... Host Controller and USB Root Hub are listed, then the USB port is marked with a USB symbol. If the printer will not come out of Power ...
... type devmgmt.msc. 3 Press Enter, or click OK. RECONNECT THE PRINTER POWER SUPPLY 1 Turn off the printer, and then unplug the power cord from the wall outlet. 2 Gently remove the power supply from the printer, and then reinsert it. 3 Plug the power cord into the wall outlet, and then turn on the printer. If USB... Host Controller and USB Root Hub are listed, then the USB port is marked with a USB symbol. If the printer will not come out of Power ...

User Guide
Page 104
...MODEL Compare the printer model on the printer. If you have just turned on the computer. RECONNECT THE POWER SUPPLY 1 Turn off the printer. 2 Unplug the power cord from the power outlet. 3 Remove the power supply from the back of the installation screen. Troubleshooting 104 MAKE SURE THAT THE USB CABLE IS WORKING Try ... Mac OS X 10.5 or later. If the USB port on the computer is unavailable Try the following solutions in . 4 Plug the power cord back into the power outlet. 5 Turn on the printer, and then resume the installation on our Web site. If you can be within the same series. The...
...MODEL Compare the printer model on the printer. If you have just turned on the computer. RECONNECT THE POWER SUPPLY 1 Turn off the printer. 2 Unplug the power cord from the power outlet. 3 Remove the power supply from the back of the installation screen. Troubleshooting 104 MAKE SURE THAT THE USB CABLE IS WORKING Try ... Mac OS X 10.5 or later. If the USB port on the computer is unavailable Try the following solutions in . 4 Plug the power cord back into the power outlet. 5 Turn on the printer, and then resume the installation on our Web site. If you can be within the same series. The...

User Guide
Page 122
... is plugged into a wall outlet, but the power switch is turned 0.33 off mode which still consumes a small amount of power, then to completely stop product power consumption, disconnect the power supply cord from hard-copy original documents. 10.31... Scanning The product is scanning hard-copy documents. 9.37 Ready The product is equivalent to calculate the total product energy usage. Instantaneous power draws may be multiplied by lowering power consumption during extended periods of time, called Power Saver. See www.lexmark...
... is plugged into a wall outlet, but the power switch is turned 0.33 off mode which still consumes a small amount of power, then to completely stop product power consumption, disconnect the power supply cord from hard-copy original documents. 10.31... Scanning The product is scanning hard-copy documents. 9.37 Ready The product is equivalent to calculate the total product energy usage. Instantaneous power draws may be multiplied by lowering power consumption during extended periods of time, called Power Saver. See www.lexmark...

User Guide
Page 137
... 120 nothing happens when memory card is inserted 98 notices 119, 120, 121, 122, 123, 124, 125, 126, 127, 128 O ordering paper and other supplies 13 P page does not print 90 Pages per Sheet copies 52 paper conserving 6 paper and media banner paper 26 envelopes 26 heavyweight matte paper 26...9 PictBridge-enabled camera connecting 40 plain paper 25 poor quality at the edges of page 94 poor scanned image quality 96 postcards 27 Power Saver timeout changing 16 power supply port 10 print job canceling 47 pausing 46 resuming 47 print media greeting cards 27 labels 26 print speed is slow 95 print...
... 120 nothing happens when memory card is inserted 98 notices 119, 120, 121, 122, 123, 124, 125, 126, 127, 128 O ordering paper and other supplies 13 P page does not print 90 Pages per Sheet copies 52 paper conserving 6 paper and media banner paper 26 envelopes 26 heavyweight matte paper 26...9 PictBridge-enabled camera connecting 40 plain paper 25 poor quality at the edges of page 94 poor scanned image quality 96 postcards 27 Power Saver timeout changing 16 power supply port 10 print job canceling 47 pausing 46 resuming 47 print media greeting cards 27 labels 26 print speed is slow 95 print...
Quick Reference Guide
Page 2
... the power supply and power cord provided with zero waste to Lexmark for signs of fire or electrical shock results. Mail the bag to abrasion or stress. Inspect the power cord regularly for recycling. If you agree to return them only to landfills. The patented Lexmark inkjet cartridges and their contents terminates, and you 're sending single-color...
... the power supply and power cord provided with zero waste to Lexmark for signs of fire or electrical shock results. Mail the bag to abrasion or stress. Inspect the power cord regularly for recycling. If you agree to return them only to landfills. The patented Lexmark inkjet cartridges and their contents terminates, and you 're sending single-color...
Quick Reference Guide
Page 8
... the scanner glass. Prevent items from falling into the paper slot. Use the To 1 Scanner glass Scan and copy photos and documents. 2 Power supply with port Connect the printer to a power source. 3 USB port Connect the printer to the printhead access area when no printhead is installed on page 12. 5 Ink cartridge access...
... the scanner glass. Prevent items from falling into the paper slot. Use the To 1 Scanner glass Scan and copy photos and documents. 2 Power supply with port Connect the printer to a power source. 3 USB port Connect the printer to the printhead access area when no printhead is installed on page 12. 5 Ink cartridge access...

Quick Reference Guide
Page 30
... is plugged into the printer and into a working electrical outlet. • Make sure the printer is not plugged into any surge protectors, uninterrupted power supplies, or extension cords. • Make sure the printer is turned on. • Make sure the printer is securely connected to the host computer, print server, ... page 31 • "Software did not install" on page 33 Troubleshooting 30 If Troubleshooting does not solve your problem Visit our Web site at support.lexmark.com to printer maintenance tasks and customer support.
... is plugged into the printer and into a working electrical outlet. • Make sure the printer is not plugged into any surge protectors, uninterrupted power supplies, or extension cords. • Make sure the printer is turned on. • Make sure the printer is securely connected to the host computer, print server, ... page 31 • "Software did not install" on page 33 Troubleshooting 30 If Troubleshooting does not solve your problem Visit our Web site at support.lexmark.com to printer maintenance tasks and customer support.

Quick Reference Guide
Page 33
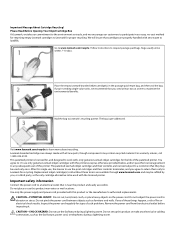
... CARTRIDGES ARE INSERTED CORRECTLY 1 Turn the printer on the printer. RECONNECT THE PRINTER POWER SUPPLY 1 Turn off the printer, and then unplug the power cord from the wall outlet. 2 Gently remove the power supply from the printer, and then reinsert it. 3 Plug the power cord into the wall outlet, and then turn on , and then open... the square end of the USB cable into the back of the printer. 3 Firmly plug the rectangular end of the USB cable into the matching color slot of the printhead. 3 Close the printer.
... CARTRIDGES ARE INSERTED CORRECTLY 1 Turn the printer on the printer. RECONNECT THE PRINTER POWER SUPPLY 1 Turn off the printer, and then unplug the power cord from the wall outlet. 2 Gently remove the power supply from the printer, and then reinsert it. 3 Plug the power cord into the wall outlet, and then turn on , and then open... the square end of the USB cable into the back of the printer. 3 Firmly plug the rectangular end of the USB cable into the matching color slot of the printhead. 3 Close the printer.

Quick Reference Guide
Page 34
RECONNECT THE PRINTER POWER SUPPLY 1 Turn off slowly, then the printer is in Power Saver mode. REINSTALL THE INK CARTRIDGES AND DEEP CLEAN AND ALIGN THE PRINTHEAD 1 Reinstall the ink cartridges, see "Replacing ink cartridges" on the printer. Printer ... the following: MAKE SURE THE PRINTER IS NOT IN POWER SAVER MODE If the power light is blinking on and off the printer, and then unplug the power cord from the wall outlet. 2 Gently remove the power supply from the printer, and then reinsert it. 3 Plug the power cord into the wall outlet, and then turn...
RECONNECT THE PRINTER POWER SUPPLY 1 Turn off slowly, then the printer is in Power Saver mode. REINSTALL THE INK CARTRIDGES AND DEEP CLEAN AND ALIGN THE PRINTHEAD 1 Reinstall the ink cartridges, see "Replacing ink cartridges" on the printer. Printer ... the following: MAKE SURE THE PRINTER IS NOT IN POWER SAVER MODE If the power light is blinking on and off the printer, and then unplug the power cord from the wall outlet. 2 Gently remove the power supply from the printer, and then reinsert it. 3 Plug the power cord into the wall outlet, and then turn...

Quick Reference Guide
Page 35
...REMOVE AND REINSTALL THE PRINTER SOFTWARE Troubleshooting 35 RECONNECT THE PRINTER POWER SUPPLY 1 Turn off the printer, and then unplug the power cord from the wall outlet. 2 Gently remove the power supply from the printer, and then reinsert it. 3 Plug the power cord into the wall outlet, and then turn on the... printer. If the printer will not come out of Power Saver mode, then reset the power: 1 Unplug the power cord from the wall outlet, ...
...REMOVE AND REINSTALL THE PRINTER SOFTWARE Troubleshooting 35 RECONNECT THE PRINTER POWER SUPPLY 1 Turn off the printer, and then unplug the power cord from the wall outlet. 2 Gently remove the power supply from the printer, and then reinsert it. 3 Plug the power cord into the wall outlet, and then turn on the... printer. If the printer will not come out of Power Saver mode, then reset the power: 1 Unplug the power cord from the wall outlet, ...


