User Guide
Page 2
... parts of the printer...9 Ordering and replacing supplies 11 Ordering ink cartridges...11 Using genuine Lexmark ink cartridges...11 Replacing ink cartridges...12 Ordering paper and other supplies...13 Recycling Lexmark products...13 Using the printer control panel buttons and menus 14 Using the printer control panel...new default settings 17 Resetting to factory settings...18 Using the printer software 19 Minimum system requirements...19 Using the Windows printer software...19 Using the Macintosh printer software...21 Finding and installing optional software...22 Updating the printer software...
... parts of the printer...9 Ordering and replacing supplies 11 Ordering ink cartridges...11 Using genuine Lexmark ink cartridges...11 Replacing ink cartridges...12 Ordering paper and other supplies...13 Recycling Lexmark products...13 Using the printer control panel buttons and menus 14 Using the printer control panel...new default settings 17 Resetting to factory settings...18 Using the printer software 19 Minimum system requirements...19 Using the Windows printer software...19 Using the Macintosh printer software...21 Finding and installing optional software...22 Updating the printer software...
User Guide
Page 6
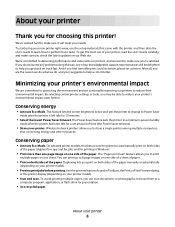
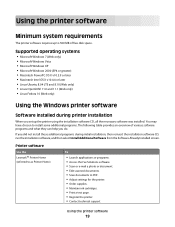
... choosing this feature sets the printer to automatically print on both sides of the paper (duplex) for copy and fax jobs and for printing in Windows. • Print more than one page image on track fast. If you do it will be able to reduce your printer 6 On selected printer models...
... choosing this feature sets the printer to automatically print on both sides of the paper (duplex) for copy and fax jobs and for printing in Windows. • Print more than one page image on track fast. If you do it will be able to reduce your printer 6 On selected printer models...
User Guide
Page 8
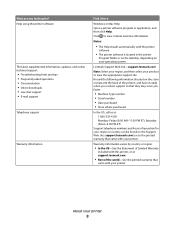
... site-support.lexmark.com Note: Select your region, and then select your product to view context-sensitive information. Record the following information (located on the store receipt and the back of the printer), and have it here Windows or Mac Help Open a printer software program or application, and then ... you contact support so that they may serve you looking for your region or country can be found on the Support Web site (support.lexmark.com) or on the printed warranty that came with your printer. Click to view the appropriate support site. Warranty information varies by country...
... site-support.lexmark.com Note: Select your region, and then select your product to view context-sensitive information. Record the following information (located on the store receipt and the back of the printer), and have it here Windows or Mac Help Open a printer software program or application, and then ... you contact support so that they may serve you looking for your region or country can be found on the Support Web site (support.lexmark.com) or on the printed warranty that came with your printer. Click to view the appropriate support site. Warranty information varies by country...
User Guide
Page 16
...) for copy and fax jobs, and for ten minutes. • Set screen brightness to low. 7 Cancel • Cancel a print, copy, scan, or fax job in Windows (selected models only).
...) for copy and fax jobs, and for ten minutes. • Set screen brightness to low. 7 Cancel • Cancel a print, copy, scan, or fax job in Windows (selected models only).
User Guide
Page 19
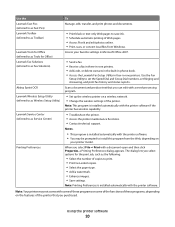
... not install these additional programs during printer installation When you do. Supported operating systems • Microsoft Windows 7 (Web only) • Microsoft Windows Vista • Microsoft Windows XP • Microsoft Windows 2000 (SP4 or greater) • Macintosh PowerPC OS X v10.3.9 or later • Macintosh...) • Linux OpenSUSE 11.0 and 11.1 (Web only) • Linux Fedora 10 (Web only) Using the Windows printer software Software installed during initial installation, then reinsert the installation software CD, run the installation software, and then select Install...
... not install these additional programs during printer installation When you do. Supported operating systems • Microsoft Windows 7 (Web only) • Microsoft Windows Vista • Microsoft Windows XP • Microsoft Windows 2000 (SP4 or greater) • Macintosh PowerPC OS X v10.3.9 or later • Macintosh...) • Linux OpenSUSE 11.0 and 11.1 (Web only) • Linux Fedora 10 (Web only) Using the Windows printer software Software installed during initial installation, then reinsert the installation software CD, run the installation software, and then select Install...
User Guide
Page 20
... install this program from Windows. Access your printer model. Scan a document and produce text that you select options for Office) Lexmark Fax Solutions (referred to as Fax Solutions) Abbyy Sprint OCR Lexmark Wireless Setup Utility (referred to as Wireless Setup Utility) Lexmark Service Center (referred to...; Contact technical support. The dialog lets you purchased. Using the printer software 20 Use the Lexmark Fast Pics (referred to as Fast Pics) Lexmark Toolbar (referred to as Toolbar) Lexmark Tools for Office (referred to as Tools for the print job, such as Service Center)...
... install this program from Windows. Access your printer model. Scan a document and produce text that you select options for Office) Lexmark Fax Solutions (referred to as Fax Solutions) Abbyy Sprint OCR Lexmark Wireless Setup Utility (referred to as Wireless Setup Utility) Lexmark Service Center (referred to...; Contact technical support. The dialog lets you purchased. Using the printer software 20 Use the Lexmark Fast Pics (referred to as Fast Pics) Lexmark Toolbar (referred to as Toolbar) Lexmark Tools for Office (referred to as Tools for the print job, such as Service Center)...

User Guide
Page 22
Updating the printer software (Windows only) Checking for software updates 1 Click or Start. 2 Click All Programs or Programs, and then select the printer program folder from the list. 3 Select Printer ..., click Customer Support. 4 From the Web site, select your printer and download the driver. 5 Install additional or optional software. Finding and installing optional software For Windows users 1 Click or Start. 2 Click All Programs or Programs, and then select the printer program folder from the list. 3 Select Printer Home. 4 Choose your printer...
Updating the printer software (Windows only) Checking for software updates 1 Click or Start. 2 Click All Programs or Programs, and then select the printer program folder from the list. 3 Select Printer ..., click Customer Support. 4 From the Web site, select your printer and download the driver. 5 Install additional or optional software. Finding and installing optional software For Windows users 1 Click or Start. 2 Click All Programs or Programs, and then select the printer program folder from the list. 3 Select Printer Home. 4 Choose your printer...

User Guide
Page 23
... When you installed the printer software on this computer before but need to reinstall the software, then uninstall the current software first. For Windows users 1 Close all open software applications. 2 Insert the installation software CD. For Macintosh users 1 Close all the necessary software was installed...not appear after a minute, then launch the CD manually: a Click , or click Start and then click Run. Uninstalling the printer software For Windows users 1 Click or Start. 2 Click All Programs or Programs, and then select the printer program folder from the list. 3 Select the uninstall ...
... When you installed the printer software on this computer before but need to reinstall the software, then uninstall the current software first. For Windows users 1 Close all open software applications. 2 Insert the installation software CD. For Macintosh users 1 Close all the necessary software was installed...not appear after a minute, then launch the CD manually: a Click , or click Start and then click Run. Uninstalling the printer software For Windows users 1 Click or Start. 2 Click All Programs or Programs, and then select the printer program folder from the list. 3 Select the uninstall ...

User Guide
Page 35
... a document 1 Load the paper in the ink cartridges. • Remove each sheet as it is enough ink in the printer. 2 Send the print job: For Windows users a With a document open , choose File > Print. e Click Print.
... a document 1 Load the paper in the ink cartridges. • Remove each sheet as it is enough ink in the printer. 2 Send the print job: For Windows users a With a document open , choose File > Print. e Click Print.

User Guide
Page 36
.... 4 In the Copies field, enter the number of copies that you want to read with the first page on top, then do the following: For Windows users 1 With a document open , click File Print. 2 Click Properties, Preferences, Options, or Setup. 3 From the Copies section of the Print ... multiple copies of a document, then you can choose to print each photo as it exits the printer, and then let it dry before stacking. For Windows users 1 With a document open , click File Print. 2 Click Properties, Preferences, Options, or Setup. Printing 36 Collated Not collated Notes: • ...
.... 4 In the Copies field, enter the number of copies that you want to read with the first page on top, then do the following: For Windows users 1 With a document open , click File Print. 2 Click Properties, Preferences, Options, or Setup. 3 From the Copies section of the Print ... multiple copies of a document, then you can choose to print each photo as it exits the printer, and then let it dry before stacking. For Windows users 1 With a document open , click File Print. 2 Click Properties, Preferences, Options, or Setup. Printing 36 Collated Not collated Notes: • ...

User Guide
Page 37
3 From the Copies section of page images to print on one sheet For Windows users 1 With a document open, click File Print. 2 Click Properties, Preferences, Options, or Setup. 3 From the Layout list of the Advanced tab, select Pages per ...
3 From the Copies section of page images to print on one sheet For Windows users 1 With a document open, click File Print. 2 Click Properties, Preferences, Options, or Setup. 3 From the Layout list of the Advanced tab, select Pages per ...
User Guide
Page 38
... menu, choose a layout direction. • If you want to print a border around each page image, then choose an option from a memory card or flash drive (Windows only) To enable the File Print function: • The printer must be connected to a computer through a USB cable or through a network. • The printer and...
... menu, choose a layout direction. • If you want to print a border around each page image, then choose an option from a memory card or flash drive (Windows only) To enable the File Print function: • The printer must be connected to a computer through a USB cable or through a network. • The printer and...
User Guide
Page 39
...If no size matches the size of the envelope. Printing labels 1 Load the label sheets in the printer. 2 Send the print job: For Windows users a With a document open , choose File > Print. Note: To print on a custom-size envelope, select Custom Size, and then specify.... Notes: • Most envelopes use landscape orientation. • Make sure the same orientation is also selected in the printer. 2 Send the print job: For Windows users a With a document open, click File Print. d From the Paper Size list, select the envelope size. b Click Properties, Preferences, Options, or...
...If no size matches the size of the envelope. Printing labels 1 Load the label sheets in the printer. 2 Send the print job: For Windows users a With a document open , choose File > Print. Note: To print on a custom-size envelope, select Custom Size, and then specify.... Notes: • Most envelopes use landscape orientation. • Make sure the same orientation is also selected in the printer. 2 Send the print job: For Windows users a With a document open, click File Print. d From the Paper Size list, select the envelope size. b Click Properties, Preferences, Options, or...
User Guide
Page 40
... the printer first. • Make sure the adhesive on custom-size paper Before beginning these instructions, load the custom-size paper in a paper jam. For Windows users 1 With a document open , choose File > Print. e Click OK or Print. For Macintosh users a With a document open , click File Print. 2 Click Properties, Preferences, Options...
... the printer first. • Make sure the adhesive on custom-size paper Before beginning these instructions, load the custom-size paper in a paper jam. For Windows users 1 With a document open , choose File > Print. e Click OK or Print. For Macintosh users a With a document open , click File Print. 2 Click Properties, Preferences, Options...
User Guide
Page 44
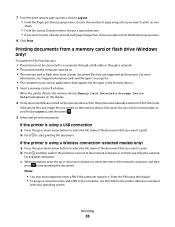
... using a USB connection • For Windows users Fast Pics launches automatically when you insert the memory device. Follow the instructions on the computer screen to transfer the photos to the computer or to print. • For Macintosh users If you have set a color or black-and-white print. d Press... on . 12 Press . Printing 44 Note: For best results, allow the prints to print. If the printer is established. When you select color or black-only printing, the light near your selections. c Press to Share Media on the computer. 10 If you want to the computer, then...
... using a USB connection • For Windows users Fast Pics launches automatically when you insert the memory device. Follow the instructions on the computer screen to transfer the photos to the computer or to print. • For Macintosh users If you have set a color or black-and-white print. d Press... on . 12 Press . Printing 44 Note: For best results, allow the prints to print. If the printer is established. When you select color or black-only printing, the light near your selections. c Press to Share Media on the computer. 10 If you want to the computer, then...
User Guide
Page 47
...color or black-only printing, the light near your Bluetooth-enabled device manufacturers (cellular phone or PDA) to determine their hardware compatibility and interoperability. Note: For best results, allow the prints to dry at least 24 hours before stacking, displaying, or storing. Printing photos from your computer using DPOF If your Windows... card into the printer or connect the camera to the printer. Check with Bluetooth Specification 2.0. 12 Press the Color/Black button to set up a connection between your printer and a Bluetooth-enabled device Note: The printer does not...
...color or black-only printing, the light near your Bluetooth-enabled device manufacturers (cellular phone or PDA) to determine their hardware compatibility and interoperability. Note: For best results, allow the prints to dry at least 24 hours before stacking, displaying, or storing. Printing photos from your computer using DPOF If your Windows... card into the printer or connect the camera to the printer. Check with Bluetooth Specification 2.0. 12 Press the Color/Black button to set up a connection between your printer and a Bluetooth-enabled device Note: The printer does not...

User Guide
Page 51
.... 7 Click OK to the Advanced tab. Note: To return to single-sided printing, return to close any printer software dialogs. 8 Click OK or Print. For Windows users 1 With a document open , choose File > Print. 2 From the Printer pop-up menu, choose the printer. 3 From the print options pop-up menu, choose Layout...
.... 7 Click OK to the Advanced tab. Note: To return to single-sided printing, return to close any printer software dialogs. 8 Click OK or Print. For Windows users 1 With a document open , choose File > Print. 2 From the Printer pop-up menu, choose the printer. 3 From the print options pop-up menu, choose Layout...

User Guide
Page 52
... instruction sheet to complete the print job. • For Short-edged binding, pages are bound along the short edge of the paper (duplexing) manually For Windows users 1 With a document open, click File Print. 2 Click Properties, Preferences, Options, or Setup. 3 Click the Advanced tab. 4 From the 2-Sided Printing section, select Manual...
... instruction sheet to complete the print job. • For Short-edged binding, pages are bound along the short edge of the paper (duplexing) manually For Windows users 1 With a document open, click File Print. 2 Click Properties, Preferences, Options, or Setup. 3 Click the Advanced tab. 4 From the 2-Sided Printing section, select Manual...

User Guide
Page 53
... the Print or "Pages to print" pop-up menu, select to print the odd numbered pages. 4 After printing the first set the default printer: For Windows users 1 Click , or click Start and then click Run. 2 In the Start Search or Run box, type control printers. 3 Press Enter, or click OK. If...
... the Print or "Pages to print" pop-up menu, select to print the odd numbered pages. 4 After printing the first set the default printer: For Windows users 1 Click , or click Start and then click Run. 2 In the Start Search or Run box, type control printers. 3 Press Enter, or click OK. If...

User Guide
Page 54
... a name for your operating system. 4 From the Print Quality pop-up menu for each print job. Changing the printing mode for a single print job For Windows users 1 With a document open , choose File > Print. 2 From the printer pop-up menu, choose the printer. 3 From the print options pop-up menu, choose ... default printing mode for all print jobs to print photos or other high-quality documents, then you need to change the default print mode: For Windows users 1 Click , or click Start and then click Run. 2 In the Start Search or Run box, type control printers. 3 Press Enter, or click OK. ...
... a name for your operating system. 4 From the Print Quality pop-up menu for each print job. Changing the printing mode for a single print job For Windows users 1 With a document open , choose File > Print. 2 From the printer pop-up menu, choose the printer. 3 From the print options pop-up menu, choose ... default printing mode for all print jobs to print photos or other high-quality documents, then you need to change the default print mode: For Windows users 1 Click , or click Start and then click Run. 2 In the Start Search or Run box, type control printers. 3 Press Enter, or click OK. ...


