
User Guide
Page 5
... user documentation, to meet strict global safety standards with this area for signs of other than those described in ports. Inspect the power cord regularly for clearing a paper jam. To avoid injury, use caution when accessing this product or the manufacturer's authorized replacements. Use ... near the product and easily accessible. CAUTION-POTENTIAL INJURY: The area behind the duplex cover has protruding ribs as the fax feature, power cord, or telephone, during a lightning storm. The manufacturer is near water or wet locations. CAUTION-SHOCK HAZARD: Make sure that is...
... user documentation, to meet strict global safety standards with this area for signs of other than those described in ports. Inspect the power cord regularly for clearing a paper jam. To avoid injury, use caution when accessing this product or the manufacturer's authorized replacements. Use ... near the product and easily accessible. CAUTION-POTENTIAL INJURY: The area behind the duplex cover has protruding ribs as the fax feature, power cord, or telephone, during a lightning storm. The manufacturer is near water or wet locations. CAUTION-SHOCK HAZARD: Make sure that is...
User Guide
Page 10
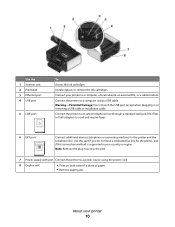
... DSL, or a cable modem. Warning-Potential Damage: Do not touch the USB port except when plugging in your printer to a computer using the power cord. 8 Duplex unit • Print on both sides of a sheet of paper. • Remove paper jams. About your printer 10 Use this port...) to send and receive faxes. 6 EXT port Connect additional devices (telephone or answering machine) to a power source using a USB cable. Note: Remove the plug to access the port. 7 Power supply with port Connect the printer to the printer and the telephone line. Install, replace, or remove the...
... DSL, or a cable modem. Warning-Potential Damage: Do not touch the USB port except when plugging in your printer to a computer using the power cord. 8 Duplex unit • Print on both sides of a sheet of paper. • Remove paper jams. About your printer 10 Use this port...) to send and receive faxes. 6 EXT port Connect additional devices (telephone or answering machine) to a power source using a USB cable. Note: Remove the plug to access the port. 7 Power supply with port Connect the printer to the printer and the telephone line. Install, replace, or remove the...

User Guide
Page 69
... the cable from the wall jack to receive faxes automatically (Auto Answer On), then set up on any electrical or cabling connections, such as the power supply cord or telephone, during a lightning storm. Faxing 69 Faxing CAUTION-SHOCK HAZARD: Do not use the fax feature during a lightning storm.
... the cable from the wall jack to receive faxes automatically (Auto Answer On), then set up on any electrical or cabling connections, such as the power supply cord or telephone, during a lightning storm. Faxing 69 Faxing CAUTION-SHOCK HAZARD: Do not use the fax feature during a lightning storm.

User Guide
Page 123
... of the printer, making sure to clean the interior may damage the finish of the printer. 4 Wipe only the outside of the printer, unplug the power cord from the wall outlet and disconnect all ink or corrective fluid on a document is turned off and unplugged from the paper support and paper exit...
... of the printer, making sure to clean the interior may damage the finish of the printer. 4 Wipe only the outside of the printer, unplug the power cord from the wall outlet and disconnect all ink or corrective fluid on a document is turned off and unplugged from the paper support and paper exit...
User Guide
Page 124
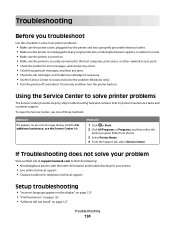
If Troubleshooting does not solve your problem Visit our Web site at support.lexmark.com to printer maintenance tasks and customer support. Using the Service Center to solve printer problems The Service Center provides step-by-step troubleshooting ...the For additional assistance, use the Service Center link. Troubleshooting Before you troubleshoot Use this checklist to solve most printer problems: • Make sure the power cord is plugged into the printer and into a properly grounded electrical outlet. • Make sure the printer is not plugged into any surge protectors, uninterrupted...
If Troubleshooting does not solve your problem Visit our Web site at support.lexmark.com to printer maintenance tasks and customer support. Using the Service Center to solve printer problems The Service Center provides step-by-step troubleshooting ...the For additional assistance, use the Service Center link. Troubleshooting Before you troubleshoot Use this checklist to solve most printer problems: • Make sure the power cord is plugged into the printer and into a properly grounded electrical outlet. • Make sure the printer is not plugged into any surge protectors, uninterrupted...

User Guide
Page 127
... IS SET AS THE DEFAULT PRINTER Troubleshooting 127 RECONNECT THE PRINTER POWER SUPPLY 1 Turn off the printer, and then unplug the power cord from the wall outlet. 2 Gently remove the power supply from the printer, and then reinsert it. 3 Plug the power cord into the matching color slot of the following : MAKE SURE THAT YOUR COMPUTER MEETS...
... IS SET AS THE DEFAULT PRINTER Troubleshooting 127 RECONNECT THE PRINTER POWER SUPPLY 1 Turn off the printer, and then unplug the power cord from the wall outlet. 2 Gently remove the power supply from the printer, and then reinsert it. 3 Plug the power cord into the matching color slot of the following : MAKE SURE THAT YOUR COMPUTER MEETS...
User Guide
Page 128
... the ink cartridges, see "Replacing ink cartridges" on and off the printer, and then unplug the power cord from the wall outlet. 2 Gently remove the power supply from the printer, and then reinsert it. 3 Plug the power cord into the USB port of the following: MAKE SURE THE PRINTER IS NOT IN... POWER SAVER MODE If the power light is blinking on page 12 for any obvious damage. Printer is marked with a USB symbol. RECONNECT THE PRINTER POWER SUPPLY 1 Turn off slowly, then...
... the ink cartridges, see "Replacing ink cartridges" on and off the printer, and then unplug the power cord from the wall outlet. 2 Gently remove the power supply from the printer, and then reinsert it. 3 Plug the power cord into the USB port of the following: MAKE SURE THE PRINTER IS NOT IN... POWER SAVER MODE If the power light is blinking on page 12 for any obvious damage. Printer is marked with a USB symbol. RECONNECT THE PRINTER POWER SUPPLY 1 Turn off slowly, then...
User Guide
Page 129
... 1 Turn off the printer, and then unplug the power cord from the wall outlet. 2 Gently remove the power supply from the printer, and then reinsert it. 3 Plug the power cord into the wall outlet, and then turn on the printer. The Device Manager opens. 4 Click the plus sign (+) beside Universal Serial ...port is marked with a USB symbol. If the printer will not come out of Power Saver mode, then reset the power: 1 Unplug the power cord from the wall outlet, and then wait 10 seconds. 2 Insert the power cord into the wall outlet, and then turn on the printer. Cannot delete documents from ...
... 1 Turn off the printer, and then unplug the power cord from the wall outlet. 2 Gently remove the power supply from the printer, and then reinsert it. 3 Plug the power cord into the wall outlet, and then turn on the printer. The Device Manager opens. 4 Click the plus sign (+) beside Universal Serial ...port is marked with a USB symbol. If the printer will not come out of Power Saver mode, then reset the power: 1 Unplug the power cord from the wall outlet, and then wait 10 seconds. 2 Insert the power cord into the wall outlet, and then turn on the printer. Cannot delete documents from ...

User Guide
Page 134
... images in the document. • Remove as many unused fonts as possible from the access point. 2 Wait ten seconds, and then insert the power cord. Print speed is slow If the "Before you troubleshoot" checklist does not solve the problem, then try one of the following : MAXIMIZE COMPUTER PROCESSING... IF YOU ARE USING A USB CONNECTION, THEN TRY A DIFFERENT USB CABLE IF YOU ARE ON A NETWORK, THEN RESET THE POWER OF THE ACCESS POINT (ROUTER) 1 Unplug the power cord from your system. ALIGN THE PRINTHEAD CLEAN OR DEEP CLEAN THE PRINTHEAD NOZZLES Note: If these solutions do not remove the streaks...
... images in the document. • Remove as many unused fonts as possible from the access point. 2 Wait ten seconds, and then insert the power cord. Print speed is slow If the "Before you troubleshoot" checklist does not solve the problem, then try one of the following : MAXIMIZE COMPUTER PROCESSING... IF YOU ARE USING A USB CONNECTION, THEN TRY A DIFFERENT USB CABLE IF YOU ARE ON A NETWORK, THEN RESET THE POWER OF THE ACCESS POINT (ROUTER) 1 Unplug the power cord from your system. ALIGN THE PRINTHEAD CLEAN OR DEEP CLEAN THE PRINTHEAD NOZZLES Note: If these solutions do not remove the streaks...

User Guide
Page 146
... different USB cable. If the USB port on our Web site. For more information, see "Installing the printer software" in . 4 Plug the power cord back into the power outlet. 5 Turn on the printer, and then resume the installation on your printer, select Additional Computer when you have any doubts, look for an...run the installer again. MAKE SURE THAT THE USB CABLE IS WORKING Try using the other USB ports on the printer. RECONNECT THE POWER SUPPLY 1 Turn off the printer. 2 Unplug the power cord from the power outlet. 3 Remove the power supply from the back of the installation screen.
... different USB cable. If the USB port on our Web site. For more information, see "Installing the printer software" in . 4 Plug the power cord back into the power outlet. 5 Turn on the printer, and then resume the installation on your printer, select Additional Computer when you have any doubts, look for an...run the installer again. MAKE SURE THAT THE USB CABLE IS WORKING Try using the other USB ports on the printer. RECONNECT THE POWER SUPPLY 1 Turn off the printer. 2 Unplug the power cord from the power outlet. 3 Remove the power supply from the back of the installation screen.

User Guide
Page 167
...PROMPTLY RETURN THE PRODUCT UNUSED AND REQUEST A REFUND OF THE AMOUNT YOU PAID. A variable amount of time, called Power Saver. LEXMARK LICENSE AGREEMENTS PLEASE READ CAREFULLY: BY USING THIS PRODUCT, YOU AGREE TO BE BOUND BY ALL THE TERMS AND ...power consumption, disconnect the power supply cord from the wall outlet. Power Saver This product is /are licensed for current values. If I accept such terms as images and recordings), and associated media, printed materials and electronic documentation, whether incorporated into, distributed with this product is /are designed to Lexmark...
...PROMPTLY RETURN THE PRODUCT UNUSED AND REQUEST A REFUND OF THE AMOUNT YOU PAID. A variable amount of time, called Power Saver. LEXMARK LICENSE AGREEMENTS PLEASE READ CAREFULLY: BY USING THIS PRODUCT, YOU AGREE TO BE BOUND BY ALL THE TERMS AND ...power consumption, disconnect the power supply cord from the wall outlet. Power Saver This product is /are licensed for current values. If I accept such terms as images and recordings), and associated media, printed materials and electronic documentation, whether incorporated into, distributed with this product is /are designed to Lexmark...

