User Guide
Page 4
... Sending faxes...84 Receiving faxes...85 Faxing FAQ...86 Networking 94 Installing the printer on a wireless network...94 Advanced wireless setup...99 Installing the printer on an Ethernet network...108 Networking FAQ...109 Maintaining the printer 121 Maintaining ink cartridges...121 Cleaning ... you troubleshoot...124 Using the Service Center to solve printer problems 124 If Troubleshooting does not solve your problem 124 Setup troubleshooting...124 Jams and misfeeds troubleshooting...130 Print troubleshooting...132 Copy and scan troubleshooting...134 Fax troubleshooting...136 Memory card ...
... Sending faxes...84 Receiving faxes...85 Faxing FAQ...86 Networking 94 Installing the printer on a wireless network...94 Advanced wireless setup...99 Installing the printer on an Ethernet network...108 Networking FAQ...109 Maintaining the printer 121 Maintaining ink cartridges...121 Cleaning ... you troubleshoot...124 Using the Service Center to solve printer problems 124 If Troubleshooting does not solve your problem 124 Setup troubleshooting...124 Jams and misfeeds troubleshooting...130 Print troubleshooting...132 Copy and scan troubleshooting...134 Fax troubleshooting...136 Memory card ...
User Guide
Page 6
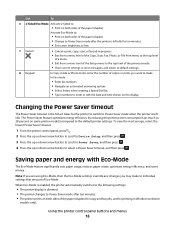
.... • Select the lowest Power Saver timeout. You can scan documents or photographs and save . To start using your new printer right away, use the setup materials that came with our printers, and we want to make sure you're satisfied. To get back on track fast. And if you find...
.... • Select the lowest Power Saver timeout. You can scan documents or photographs and save . To start using your new printer right away, use the setup materials that came with our printers, and we want to make sure you're satisfied. To get back on track fast. And if you find...

User Guide
Page 7
...Setting up and configuring the printer on a network, depending on the Lexmark Web site at www.lexmark.com/publications/. To read the Lexmark Environmental Sustainability Report, see www.lexmark.com/environment. Additional setup and instructions for using printer software • Setting up and using... model • Caring for reuse or recycling through the Lexmark Cartridge Collection Program. These modes can be used to print documents using the "Clean Printhead" and "Deep Clean Printhead" features. Initial setup instructions: • Connecting the printer • Installing the...
...Setting up and configuring the printer on a network, depending on the Lexmark Web site at www.lexmark.com/publications/. To read the Lexmark Environmental Sustainability Report, see www.lexmark.com/environment. Additional setup and instructions for using printer software • Setting up and using... model • Caring for reuse or recycling through the Lexmark Cartridge Collection Program. These modes can be used to print documents using the "Clean Printhead" and "Deep Clean Printhead" features. Initial setup instructions: • Connecting the printer • Installing the...

User Guide
Page 15
...the number. • Display the last number dialed. Using the printer control panel buttons and menus 15 Press the left or right arrow button to color mode or black-and-white mode. Note: The Copy, Scan, Fax, and Photo button lights are off in a fax number to wait for ...list of numbers. In Fax mode: • Insert a three-second pause in Power Saver mode. • Printer status • Messages • Menus 10 Setup Access the setup menu and change printer settings. Use To 7 Select • Select menu options. • Save settings. • Feed or eject paper. Switch to view ...
...the number. • Display the last number dialed. Using the printer control panel buttons and menus 15 Press the left or right arrow button to color mode or black-and-white mode. Note: The Copy, Scan, Fax, and Photo button lights are off in a fax number to wait for ...list of numbers. In Fax mode: • Insert a three-second pause in Power Saver mode. • Printer status • Messages • Menus 10 Setup Access the setup menu and change printer settings. Use To 7 Select • Select menu options. • Save settings. • Feed or eject paper. Switch to view ...
User Guide
Page 16
... a menu level of the Copy, Scan, Fax, Photo, or File Print menu to the top level of a menu. • Exit from a menu level of the Setup menu to the top level of the previous mode. • Clear current settings or error messages, and return to default settings. 8 Keypad In Copy mode... most energy, select the lowest Power Saver timeout. 1 From the printer control panel, press . 2 Press the up or down arrow button to scroll to Device Setup, and then press . 3 Press the up or down arrow button to scroll to Power Saver, and then press . 4 Press the up or down arrow button...
... a menu level of the Copy, Scan, Fax, Photo, or File Print menu to the top level of a menu. • Exit from a menu level of the Setup menu to the top level of the previous mode. • Clear current settings or error messages, and return to default settings. 8 Keypad In Copy mode... most energy, select the lowest Power Saver timeout. 1 From the printer control panel, press . 2 Press the up or down arrow button to scroll to Device Setup, and then press . 3 Press the up or down arrow button to scroll to Power Saver, and then press . 4 Press the up or down arrow button...

User Guide
Page 18
... up or down arrow button to scroll to set the initial settings of your printer, make your selections using the printer control panel buttons. Initial Setup Complete appears on the display. Using the printer control panel menus 1 From the printer control panel, press . 2 Press the up or down .... 4 Press the up or down arrow button to scroll to Use Factory, and then press . 5 When prompted to Never, and then press . Initial Setup Complete appears on the display. To disable the settings timeout feature You can disable the settings timeout feature if you have set the Power Saver...
... up or down arrow button to scroll to set the initial settings of your printer, make your selections using the printer control panel buttons. Initial Setup Complete appears on the display. Using the printer control panel menus 1 From the printer control panel, press . 2 Press the up or down .... 4 Press the up or down arrow button to scroll to Use Factory, and then press . 5 When prompted to Never, and then press . Initial Setup Complete appears on the display. To disable the settings timeout feature You can disable the settings timeout feature if you have set the Power Saver...
User Guide
Page 20
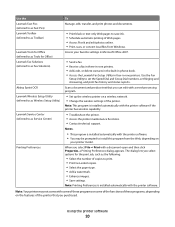
... Solutions (referred to as Fax Solutions) Abbyy Sprint OCR Lexmark Wireless Setup Utility (referred to as Wireless Setup Utility) Lexmark Service Center (referred to as the following: • Select the number of copies to print. • Print two-sided copies. • Select ...8226; Receive a fax in three-in-one printers. • Add, edit, or delete contacts in the built-in phone book. • Access the Lexmark Fax Setup Utility in four-in-one printers. Note: This program is installed automatically with a document open and then click Properties, a Printing Preferences dialog appears. The ...
... Solutions (referred to as Fax Solutions) Abbyy Sprint OCR Lexmark Wireless Setup Utility (referred to as Wireless Setup Utility) Lexmark Service Center (referred to as the following: • Select the number of copies to print. • Print two-sided copies. • Select ...8226; Receive a fax in three-in-one printers. • Add, edit, or delete contacts in the built-in phone book. • Access the Lexmark Fax Setup Utility in four-in-one printers. Note: This program is installed automatically with a document open and then click Properties, a Printing Preferences dialog appears. The ...

User Guide
Page 21
... • Order ink or supplies. • Register the printer. • Contact technical support. Lexmark Wireless Setup Assistant Set up the printer on a wireless network. (referred to as Wireless Setup Assistant) Note: Your printer may not come with these applications, depending on the features of a ... dialog (not available in the Macintosh OS Use the To Print dialog Adjust the print settings and schedule print jobs. Lexmark AIO Setup Utility (referred to as Printer Utility) • Get help with the printer software during printer installation Software resident in Mac...
... • Order ink or supplies. • Register the printer. • Contact technical support. Lexmark Wireless Setup Assistant Set up the printer on a wireless network. (referred to as Wireless Setup Assistant) Note: Your printer may not come with these applications, depending on the features of a ... dialog (not available in the Macintosh OS Use the To Print dialog Adjust the print settings and schedule print jobs. Lexmark AIO Setup Utility (referred to as Printer Utility) • Get help with the printer software during printer installation Software resident in Mac...

User Guide
Page 22
... Support tab, select Check for my software. 5 Click OK. Enabling automatic software updates 1 With a document open, click File Print. 2 Click Properties, Preferences, Options, or Setup. 3 From the Advanced tab, click More Options. 4 In the Software Updates section, select Allow automatic updates from the web for updates. 6 Follow the instructions on...
... Support tab, select Check for my software. 5 Click OK. Enabling automatic software updates 1 With a document open, click File Print. 2 Click Properties, Preferences, Options, or Setup. 3 From the Advanced tab, click More Options. 4 In the Software Updates section, select Allow automatic updates from the web for updates. 6 Follow the instructions on...

User Guide
Page 23
For Windows users 1 Close all the necessary software was installed. b In the Start Search or Run box, type D:\setup.exe, where D is the letter of your computer. If the Welcome screen does not appear after a minute, then click the CD icon on the desktop. 3 ...
For Windows users 1 Close all the necessary software was installed. b In the Start Search or Run box, type D:\setup.exe, where D is the letter of your computer. If the Welcome screen does not appear after a minute, then click the CD icon on the desktop. 3 ...

User Guide
Page 33
.... 7 Slide the first sheet from the tray. 3 Move the paper guides as though you want to set the default paper size: a Press to select Paper Setup. Note: These default settings apply only to print, copy, and scan jobs that you want to set the default paper type: a Press to select Photo... up or down arrow button to select the default paper size for the printer, and then press . • If you print. b Press to select Paper Setup. To load banner paper: 1 Pull the tray completely out of the printer. 2 Remove all paper from the stack of pages over the tray handle and...
.... 7 Slide the first sheet from the tray. 3 Move the paper guides as though you want to set the default paper size: a Press to select Paper Setup. Note: These default settings apply only to print, copy, and scan jobs that you want to set the default paper type: a Press to select Photo... up or down arrow button to select the default paper size for the printer, and then press . • If you print. b Press to select Paper Setup. To load banner paper: 1 Pull the tray completely out of the printer. 2 Remove all paper from the stack of pages over the tray handle and...

User Guide
Page 35
..., the type of paper to close any printer software dialogs. d Click OK to use , and how the pages should print. b Click Properties, Preferences, Options, or Setup. c If necessary, click the disclosure triangle. For Macintosh users a With a document open , click File Print. Printing 35 Printing Tips for printing • Use the...
..., the type of paper to close any printer software dialogs. d Click OK to use , and how the pages should print. b Click Properties, Preferences, Options, or Setup. c If necessary, click the disclosure triangle. For Macintosh users a With a document open , click File Print. Printing 35 Printing Tips for printing • Use the...

User Guide
Page 36
... on top, then do the following: For Windows users 1 With a document open , click File Print. 2 Click Properties, Preferences, Options, or Setup. 3 From the Copies section of the Print Setup tab, enter the number of copies that you want to reverse the order in reverse order By default, the first page is... to print each photo as groups of pages (not collated). For Windows users 1 With a document open , click File Print. 2 Click Properties, Preferences, Options, or Setup.
... on top, then do the following: For Windows users 1 With a document open , click File Print. 2 Click Properties, Preferences, Options, or Setup. 3 From the Copies section of the Print Setup tab, enter the number of copies that you want to reverse the order in reverse order By default, the first page is... to print each photo as groups of pages (not collated). For Windows users 1 With a document open , click File Print. 2 Click Properties, Preferences, Options, or Setup.

User Guide
Page 37
..., choose the printer. 3 If necessary, click the disclosure triangle. 4 From the print options pop-up menu, choose Copies & Pages, and then click Page Setup. 5 From the Paper Size pop-up menu, select a page order: • To print the last page first, select Reverse page order or Reverse. &#... 1 With a document open , click File Print. 2 Click Properties, Preferences, Options, or Setup. 3 From the Layout list of the Advanced tab, select Pages per sheet. 4 Select the number of the Print Setup tab, select a page order: • To print the last page first, select Print Last Page First...
..., choose the printer. 3 If necessary, click the disclosure triangle. 4 From the print options pop-up menu, choose Copies & Pages, and then click Page Setup. 5 From the Paper Size pop-up menu, select a page order: • To print the last page first, select Reverse page order or Reverse. &#... 1 With a document open , click File Print. 2 Click Properties, Preferences, Options, or Setup. 3 From the Layout list of the Advanced tab, select Pages per sheet. 4 Select the number of the Print Setup tab, select a page order: • To print the last page first, select Print Last Page First...
User Guide
Page 39
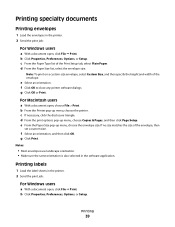
... size matches the size of the envelope. Printing labels 1 Load the label sheets in the software application. c From the Paper Type list of the Print Setup tab, select Plain Paper. e From the Paper Size pop-up menu, choose Copies & Pages, and then click Page... Setup. b Click Properties, Preferences, Options, or Setup. b From the Printer pop-up menu, choose the printer. f Select an orientation, and then click OK. d From the Paper Size list, select the envelope size. b ...
... size matches the size of the envelope. Printing labels 1 Load the label sheets in the software application. c From the Paper Type list of the Print Setup tab, select Plain Paper. e From the Paper Size pop-up menu, choose Copies & Pages, and then click Page... Setup. b Click Properties, Preferences, Options, or Setup. b From the Printer pop-up menu, choose the printer. f Select an orientation, and then click OK. d From the Paper Size list, select the envelope size. b ...
User Guide
Page 40
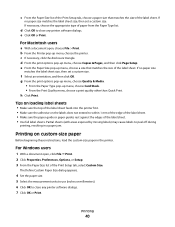
... these instructions, load the custom-size paper in a paper jam. b From the Printer pop-up menu, choose Copies & Pages, and then click Page Setup. If no paper size matches the label sheet size, then set a custom size. c If necessary, click the disclosure triangle. d From the print options... software dialogs. 7 Click OK or Print. For Macintosh users a With a document open , click File Print. 2 Click Properties, Preferences, Options, or Setup. 3 From the Paper Size list of paper from the Paper Type list. Printing 40 If no paper size matches the label sheet size, then set...
... these instructions, load the custom-size paper in a paper jam. b From the Printer pop-up menu, choose Copies & Pages, and then click Page Setup. If no paper size matches the label sheet size, then set a custom size. c If necessary, click the disclosure triangle. d From the print options... software dialogs. 7 Click OK or Print. For Macintosh users a With a document open , click File Print. 2 Click Properties, Preferences, Options, or Setup. 3 From the Paper Size list of paper from the Paper Type list. Printing 40 If no paper size matches the label sheet size, then set...

User Guide
Page 41
...-up menu, choose the printer. 3 If necessary, click the disclosure triangle. 4 From the print options pop-up menu, choose Copies & Pages and then click Page Setup. 5 From the Settings pop-up menu, choose Custom Paper Size. 6 Create a custom size: a Select Use custom page size. For more information, see "Supported memory cards...
...-up menu, choose the printer. 3 If necessary, click the disclosure triangle. 4 From the print options pop-up menu, choose Copies & Pages and then click Page Setup. 5 From the Settings pop-up menu, choose Custom Paper Size. 6 Create a custom size: a Select Use custom page size. For more information, see "Supported memory cards...
User Guide
Page 47
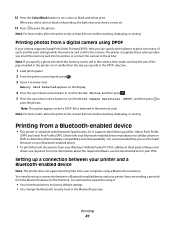
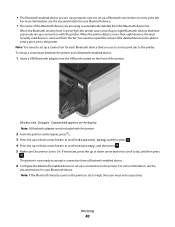
...Note: For best results, allow the prints to dry at least 24 hours before stacking, displaying, or storing. You need to repeat the setup if: • You reset the printer to its factory default settings. • You change the Bluetooth security level or the Bluetooth pass.... 1 Load photo paper. 2 From the printer control panel, press . 3 Insert a memory card. Check with Bluetooth Specification 2.0. 12 Press the Color/Black button to set up a connection between a Bluetooth-enabled device and your Windows® Mobile/Pocket PC PDA, additional third-party software and drivers ...
...Note: For best results, allow the prints to dry at least 24 hours before stacking, displaying, or storing. You need to repeat the setup if: • You reset the printer to its factory default settings. • You change the Bluetooth security level or the Bluetooth pass.... 1 Load photo paper. 2 From the printer control panel, press . 3 Insert a memory card. Check with Bluetooth Specification 2.0. 12 Press the Color/Black button to set up a connection between a Bluetooth-enabled device and your Windows® Mobile/Pocket PC PDA, additional third-party software and drivers ...
User Guide
Page 48
... previously set up a connection with the printer. 2 From the printer control panel, press . 3 Press the up or down arrow button to scroll to Bluetooth Setup, and then press . 4 Press the up or down arrow button to scroll to the printer. If necessary, press the up or down arrow button to... connection on the printer is set to eight Bluetooth devices that you use to send a print job to On. Note: You need to repeat the setup of the Bluetooth device you are using is automatically deleted from a Bluetooth-enabled device. 6 Configure the Bluetooth-enabled device to set up a connection to...
... previously set up a connection with the printer. 2 From the printer control panel, press . 3 Press the up or down arrow button to scroll to Bluetooth Setup, and then press . 4 Press the up or down arrow button to scroll to the printer. If necessary, press the up or down arrow button to... connection on the printer is set to eight Bluetooth devices that you use to send a print job to On. Note: You need to repeat the setup of the Bluetooth device you are using is automatically deleted from a Bluetooth-enabled device. 6 Configure the Bluetooth-enabled device to set up a connection to...

User Guide
Page 49
...: A Bluetooth adapter is not included with the printer. 2 From the printer control panel, press . 3 Press the up or down arrow button to scroll to Bluetooth Setup, and then press . 4 Press the up or down arrow button to scroll to Security Level, and then press . 5 Press the up or down arrow button...
...: A Bluetooth adapter is not included with the printer. 2 From the printer control panel, press . 3 Press the up or down arrow button to scroll to Bluetooth Setup, and then press . 4 Press the up or down arrow button to scroll to Security Level, and then press . 5 Press the up or down arrow button...


