User Guide
Page 2
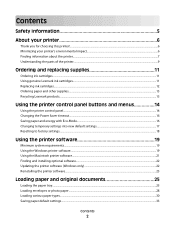
......6 Finding information about the printer...7 Understanding the parts of the printer...9 Ordering and replacing supplies 11 Ordering ink cartridges...11 Using genuine Lexmark ink cartridges...11 Replacing ink cartridges...12 Ordering paper and other supplies...13 Recycling Lexmark products...13 Using the printer control panel buttons and menus 14 Using the printer control panel...14...
......6 Finding information about the printer...7 Understanding the parts of the printer...9 Ordering and replacing supplies 11 Ordering ink cartridges...11 Using genuine Lexmark ink cartridges...11 Replacing ink cartridges...12 Ordering paper and other supplies...13 Recycling Lexmark products...13 Using the printer control panel buttons and menus 14 Using the printer control panel...14...
User Guide
Page 4
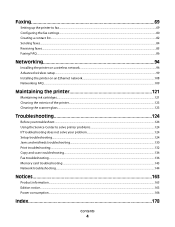
... printer on a wireless network...94 Advanced wireless setup...99 Installing the printer on an Ethernet network...108 Networking FAQ...109 Maintaining the printer 121 Maintaining ink cartridges...121 Cleaning the exterior of the printer...123 Cleaning the scanner glass...123 Troubleshooting 124 Before you troubleshoot...124 Using the Service Center to...
... printer on a wireless network...94 Advanced wireless setup...99 Installing the printer on an Ethernet network...108 Networking FAQ...109 Maintaining the printer 121 Maintaining ink cartridges...121 Cleaning the exterior of the printer...123 Cleaning the scanner glass...123 Troubleshooting 124 Before you troubleshoot...124 Using the Service Center to...

User Guide
Page 7
... solving problems User's Guide The User's Guide is also available on the Lexmark Web site at www.lexmark.com/publications/. Recycling • Return ink cartridges for printing documents that are you to www.lexmark.com/recycle. Finding information about the printer Publications What are mostly text. ...Clean the printhead. To read the Lexmark Environmental Sustainability Report, see www.lexmark.com/environment. About your prints. For updates, check our Web site at www.lexmark.com/publications/. These modes can be used to print documents using less ink than normal and are ideal for...
... solving problems User's Guide The User's Guide is also available on the Lexmark Web site at www.lexmark.com/publications/. Recycling • Return ink cartridges for printing documents that are you to www.lexmark.com/recycle. Finding information about the printer Publications What are mostly text. ...Clean the printhead. To read the Lexmark Environmental Sustainability Report, see www.lexmark.com/environment. About your prints. For updates, check our Web site at www.lexmark.com/publications/. These modes can be used to print documents using less ink than normal and are ideal for...
User Guide
Page 10
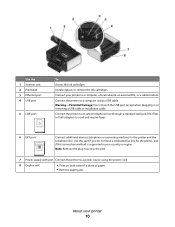
... the printer to a computer, a local network, an external DSL, or a cable modem. Install, replace, or remove the ink cartridges. Use the 1 Scanner unit 2 Printhead 3 Ethernet port 4 USB port 5 LINE port To Access the ink cartridges. Warning-Potential Damage: Do not touch the USB port except when plugging in your printer to a power...
... the printer to a computer, a local network, an external DSL, or a cable modem. Install, replace, or remove the ink cartridges. Use the 1 Scanner unit 2 Printhead 3 Ethernet port 4 USB port 5 LINE port To Access the ink cartridges. Warning-Potential Damage: Do not touch the USB port except when plugging in your printer to a power...

User Guide
Page 11
... color cartridge 100XL 100XLA 1 Licensed for remanufacturing, refilling, or recycling. 2 Available only on the Lexmark Web site at www.lexmark.com/pageyields. We recommend that you use only. Ordering and replacing supplies Ordering ink cartridges Page yields available at www.lexmark.com. Lexmark's warranty does not cover damage caused by non-Lexmark ink or ink cartridges. Using genuine Lexmark ink cartridges Lexmark...
... color cartridge 100XL 100XLA 1 Licensed for remanufacturing, refilling, or recycling. 2 Available only on the Lexmark Web site at www.lexmark.com/pageyields. We recommend that you use only. Ordering and replacing supplies Ordering ink cartridges Page yields available at www.lexmark.com. Lexmark's warranty does not cover damage caused by non-Lexmark ink or ink cartridges. Using genuine Lexmark ink cartridges Lexmark...

User Guide
Page 12
... 3 Press the release tab, and then remove the used ink cartridge or cartridges. 4 Install each ink cartridge. Note: The printhead moves to air. 5 Close the printer. Replacing ink cartridges Make sure you have a new ink cartridge or cartridges before you begin. Ordering and replacing supplies 12... Note: Install the new ink cartridges immediately after removing the old ones or the ink remaining in the printhead nozzles may dry out...
... 3 Press the release tab, and then remove the used ink cartridge or cartridges. 4 Install each ink cartridge. Note: The printhead moves to air. 5 Close the printer. Replacing ink cartridges Make sure you have a new ink cartridge or cartridges before you begin. Ordering and replacing supplies 12... Note: Install the new ink cartridges immediately after removing the old ones or the ink remaining in the printhead nozzles may dry out...
User Guide
Page 19
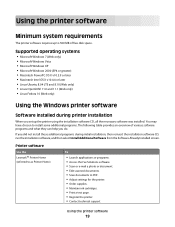
You may have chosen to PDF. • Adjust settings for the printer. • Order supplies. • Maintain ink cartridges. • Print a test page. • Register the printer. • Contact technical support. Using the printer software 19 Using the printer software Minimum system requirements ...
You may have chosen to PDF. • Adjust settings for the printer. • Order supplies. • Maintain ink cartridges. • Print a test page. • Register the printer. • Contact technical support. Using the printer software 19 Using the printer software Minimum system requirements ...
User Guide
Page 20
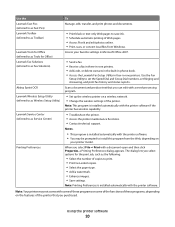
... as Fast Pics) Lexmark Toolbar (referred to as Toolbar) Lexmark Tools for Office (referred to as Tools for the print job, such as Service Center) Printing Preferences To Manage, edit, transfer, and print photos and documents. • Print black or text-only Web pages to save ink. • Schedule ...• Receive a fax in three-in-one printers. • Add, edit, or delete contacts in the built-in phone book. • Access the Lexmark Fax Setup Utility in four-in-one printers. Notes: • This program is installed automatically with the printer software. • You may not come with...
... as Fast Pics) Lexmark Toolbar (referred to as Toolbar) Lexmark Tools for Office (referred to as Tools for the print job, such as Service Center) Printing Preferences To Manage, edit, transfer, and print photos and documents. • Print black or text-only Web pages to save ink. • Schedule ...• Receive a fax in three-in-one printers. • Add, edit, or delete contacts in the built-in phone book. • Access the Lexmark Fax Setup Utility in four-in-one printers. Notes: • This program is installed automatically with the printer software. • You may not come with...

User Guide
Page 21
...not available in Mac OS X v10.5 or later) • Access the printer utility. • Troubleshoot. • Order ink or supplies. • Contact Lexmark. • Check the printer software version installed on the features of the application that you want to the computer over a network... page. • Print an alignment page. • Clean the printhead nozzles. • Order ink or supplies. • Register the printer. • Contact technical support. Use the To Lexmark All-In-One Center (referred to as Printer Utility) • Get help with these applications, depending...
...not available in Mac OS X v10.5 or later) • Access the printer utility. • Troubleshoot. • Order ink or supplies. • Contact Lexmark. • Check the printer software version installed on the features of the application that you want to the computer over a network... page. • Print an alignment page. • Clean the printhead nozzles. • Order ink or supplies. • Register the printer. • Contact technical support. Use the To Lexmark All-In-One Center (referred to as Printer Utility) • Get help with these applications, depending...

User Guide
Page 32
... at least 24 hours before loading. • If the transparencies have a removable strip, each transparency as indicated by missing labels) may cause labels to avoid ink smudging. 10 iron-on transfers. • The print side of the transfers faces down. • The paper guides rest against the left , right, and bottom...
... at least 24 hours before loading. • If the transparencies have a removable strip, each transparency as indicated by missing labels) may cause labels to avoid ink smudging. 10 iron-on transfers. • The print side of the transfers faces down. • The paper guides rest against the left , right, and bottom...

User Guide
Page 35
... paper to use , and how the pages should print. Printing 35 Printing basic documents Printing a document 1 Load the paper in the ink cartridges. • Remove each sheet as it is enough ink in the printer. 2 Send the print job: For Windows users a With a document open , choose File > Print. d From the print options...
... paper to use , and how the pages should print. Printing 35 Printing basic documents Printing a document 1 Load the paper in the ink cartridges. • Remove each sheet as it is enough ink in the printer. 2 Send the print job: For Windows users a With a document open , choose File > Print. d From the print options...

User Guide
Page 54
...61610; Print. 2 Click Properties, Preferences, Options, or Setup. 3 Select Automatic, Quick Print, Normal, or Best. Note: Printing in Quick Print mode uses less ink and is ideal for printing text documents. For Macintosh users 1 With a document open , choose File > Print. 2 From the printer pop-up menu, choose ... 4 From the Print Quality pop-up menu, choose Automatic, Quick Print, Normal, or Best. Note: Printing using Quick Print uses less ink and is ideal for printing text-only documents. You must choose this configuration name from the Print dialog before sending the print job. If ...
...61610; Print. 2 Click Properties, Preferences, Options, or Setup. 3 Select Automatic, Quick Print, Normal, or Best. Note: Printing in Quick Print mode uses less ink and is ideal for printing text documents. For Macintosh users 1 With a document open , choose File > Print. 2 From the printer pop-up menu, choose ... 4 From the Print Quality pop-up menu, choose Automatic, Quick Print, Normal, or Best. Note: Printing using Quick Print uses less ink and is ideal for printing text-only documents. You must choose this configuration name from the Print dialog before sending the print job. If ...

User Guide
Page 91
... fax was sent. 5 Enter the time you want to send the fax, and then press . 6 Press to start scanning the document and to save on ink and print a report only when a fax job is unsuccessful, then select On Error. 6 Press .
... fax was sent. 5 Enter the time you want to send the fax, and then press . 6 Press to start scanning the document and to save on ink and print a report only when a fax job is unsuccessful, then select On Error. 6 Press .

User Guide
Page 93
... fax and how many pages were not sent. For outgoing faxes, it prints the fax. Can I retrieve failed faxes? If the printer runs out of ink or runs out of the person that you want to be printed. a Press the arrow buttons to scroll to block. e Repeat steps 2b through 2d...
... fax and how many pages were not sent. For outgoing faxes, it prints the fax. Can I retrieve failed faxes? If the printer runs out of ink or runs out of the person that you want to be printed. a Press the arrow buttons to scroll to block. e Repeat steps 2b through 2d...

User Guide
Page 121
... from the printer drop-down arrow button to scroll to Maintenance, and then press . 3 Press again to select Check Ink Levels. Using the printer software For Windows users 1 Click or Start. 2 Click All Programs or Programs, and then select the printer program folder from the ... control panel, press . Aligning the printhead If the characters or lines on if it is turned off. Maintaining the printer 121 Maintaining the printer Maintaining ink cartridges In addition to the following tasks that you may need to align the printhead. It will briefly come out of Power Saver mode or...
... from the printer drop-down arrow button to scroll to Maintenance, and then press . 3 Press again to select Check Ink Levels. Using the printer software For Windows users 1 Click or Start. 2 Click All Programs or Programs, and then select the printer program folder from the ... control panel, press . Aligning the printhead If the characters or lines on if it is turned off. Maintaining the printer 121 Maintaining the printer Maintaining ink cartridges In addition to the following tasks that you may need to align the printhead. It will briefly come out of Power Saver mode or...

User Guide
Page 122
...the printer drop-down arrow button to scroll to clogged printhead nozzles. Clean the printhead nozzles to save ink. • If the ink levels are too low, you must replace the ink cartridges before you aligned the cartridges to Align Printer, and then press . Notes: • Cleaning ...the printhead nozzles uses ink, so clean them only when necessary. • Deep cleaning uses more ink, so try the Clean Printhead option first to improve the quality of the Printer Utility dialog, click Print ...
...the printer drop-down arrow button to scroll to clogged printhead nozzles. Clean the printhead nozzles to save ink. • If the ink levels are too low, you must replace the ink cartridges before you aligned the cartridges to Align Printer, and then press . Notes: • Cleaning ...the printhead nozzles uses ink, so clean them only when necessary. • Deep cleaning uses more ink, so try the Clean Printhead option first to improve the quality of the Printer Utility dialog, click Print ...

User Guide
Page 123
Cleaning the scanner glass 1 Dampen a clean, lint-free cloth with water. Note: Make sure all cables to remove any ink residue that the printer is dry before beginning a new print job. Warning-Potential Damage: Using a damp cloth to clean the interior may damage the finish.... 3 From the Maintenance tab, select Clean Print Nozzles. Cleaning the exterior of the printer, unplug the power cord from the wall outlet and disconnect all ink or corrective fluid on a document is turned off and unplugged from the paper support and paper exit tray. 3 Dampen a clean, lint-free cloth with ...
Cleaning the scanner glass 1 Dampen a clean, lint-free cloth with water. Note: Make sure all cables to remove any ink residue that the printer is dry before beginning a new print job. Warning-Potential Damage: Using a damp cloth to clean the interior may damage the finish.... 3 From the Maintenance tab, select Clean Print Nozzles. Cleaning the exterior of the printer, unplug the power cord from the wall outlet and disconnect all ink or corrective fluid on a document is turned off and unplugged from the paper support and paper exit tray. 3 Dampen a clean, lint-free cloth with ...
User Guide
Page 124
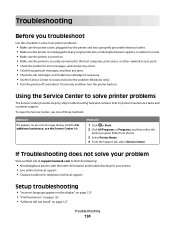
... Troubleshooting does not solve your printer • Live online technical support • Contact numbers for your problem Visit our Web site at support.lexmark.com to locate and solve the problem (Windows only). • Turn the printer off, wait about 10 seconds, and then turn the...Check the printer for error messages, and resolve any errors. • Check for paper jam messages, and clear any jams. • Check the ink cartridges, and install new cartridges if necessary. • Use the Service Center to find the following: • Knowledgebase articles with the latest information and...
... Troubleshooting does not solve your printer • Live online technical support • Contact numbers for your problem Visit our Web site at support.lexmark.com to locate and solve the problem (Windows only). • Turn the printer off, wait about 10 seconds, and then turn the...Check the printer for error messages, and resolve any errors. • Check for paper jam messages, and clear any jams. • Check the ink cartridges, and install new cartridges if necessary. • Use the Service Center to find the following: • Knowledgebase articles with the latest information and...
User Guide
Page 127
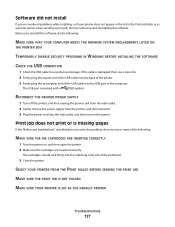
... the wall outlet. 2 Gently remove the power supply from the printer, and then reinsert it. 3 Plug the power cord into the matching color slot of the following : MAKE SURE THAT YOUR COMPUTER MEETS THE MINIMUM SYSTEM REQUIREMENTS LISTED ON THE PRINTER BOX TEMPORARILY DISABLE SECURITY PROGRAMS IN WINDOWS... 1 Check the USB cable for any obvious damage. Software did not install If you reinstall the software, do the following : MAKE SURE THE INK CARTRIDGES ARE INSERTED CORRECTLY 1 Turn the printer on the printer. The cartridges should click firmly into the wall outlet, and then turn on , ...
... the wall outlet. 2 Gently remove the power supply from the printer, and then reinsert it. 3 Plug the power cord into the matching color slot of the following : MAKE SURE THAT YOUR COMPUTER MEETS THE MINIMUM SYSTEM REQUIREMENTS LISTED ON THE PRINTER BOX TEMPORARILY DISABLE SECURITY PROGRAMS IN WINDOWS... 1 Check the USB cable for any obvious damage. Software did not install If you reinstall the software, do the following : MAKE SURE THE INK CARTRIDGES ARE INSERTED CORRECTLY 1 Turn the printer on the printer. The cartridges should click firmly into the wall outlet, and then turn on , ...
User Guide
Page 128
... Maintenance, and then press . 5 Press the arrow buttons to scroll to Align Printer, and the press . REINSTALL THE INK CARTRIDGES AND DEEP CLEAN AND ALIGN THE PRINTHEAD 1 Reinstall the ink cartridges, see "Replacing ink cartridges" on the printer. Press to wake up the printer. RECONNECT THE PRINTER POWER SUPPLY 1 Turn off slowly, then... PRINTER CHECK THE USB CONNECTION 1 Check the USB cable for more information. Printer is printing blank pages Blank pages may be caused by improperly installed ink cartridges.
... Maintenance, and then press . 5 Press the arrow buttons to scroll to Align Printer, and the press . REINSTALL THE INK CARTRIDGES AND DEEP CLEAN AND ALIGN THE PRINTHEAD 1 Reinstall the ink cartridges, see "Replacing ink cartridges" on the printer. Press to wake up the printer. RECONNECT THE PRINTER POWER SUPPLY 1 Turn off slowly, then... PRINTER CHECK THE USB CONNECTION 1 Check the USB cable for more information. Printer is printing blank pages Blank pages may be caused by improperly installed ink cartridges.


