User Guide
Page 4
...78 Sending faxes...79 Receiving faxes...81 Faxing FAQ...82 Networking 89 Installing the printer on a wireless network...89 Advanced wireless setup...94 Networking FAQ...101 Maintaining the printer 112 Maintaining ink cartridges...112 Cleaning the exterior of the printer...114 Cleaning the ...Before you troubleshoot...115 Using the Service Center to solve printer problems 115 If Troubleshooting does not solve your problem 115 Setup troubleshooting...115 Jams and misfeeds troubleshooting...121 Print troubleshooting...124 Copy and scan troubleshooting...126 Fax troubleshooting...128 Memory card ...
...78 Sending faxes...79 Receiving faxes...81 Faxing FAQ...82 Networking 89 Installing the printer on a wireless network...89 Advanced wireless setup...94 Networking FAQ...101 Maintaining the printer 112 Maintaining ink cartridges...112 Cleaning the exterior of the printer...114 Cleaning the ...Before you troubleshoot...115 Using the Service Center to solve printer problems 115 If Troubleshooting does not solve your problem 115 Setup troubleshooting...115 Jams and misfeeds troubleshooting...121 Print troubleshooting...124 Copy and scan troubleshooting...126 Fax troubleshooting...128 Memory card ...
User Guide
Page 6
...; Print on one sheet. About your needs. We've worked hard to perform basic tasks. To start using your new printer right away, use the setup materials that came with our printers, and we could do encounter any problems along the way, one side of a sheet of the paper.
...; Print on one sheet. About your needs. We've worked hard to perform basic tasks. To start using your new printer right away, use the setup materials that came with our printers, and we could do encounter any problems along the way, one side of a sheet of the paper.
User Guide
Page 7
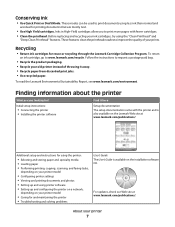
..." and "Deep Clean Printhead" features. To read the Lexmark Environmental Sustainability Report, see www.lexmark.com/environment. For updates, check our Web site at www.lexmark.com/publications/. These features clean the printhead nozzles to improve the quality of throwing it here Setup documentation The setup documentation came with fewer cartridges. • Clean the printhead...
..." and "Deep Clean Printhead" features. To read the Lexmark Environmental Sustainability Report, see www.lexmark.com/environment. For updates, check our Web site at www.lexmark.com/publications/. These features clean the printhead nozzles to improve the quality of throwing it here Setup documentation The setup documentation came with fewer cartridges. • Clean the printhead...
User Guide
Page 16
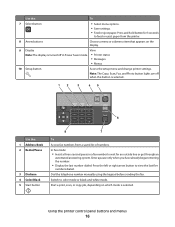
... scan, or copy job, depending on which mode is selected.. 12 3 45 Eco-Mode Cancel 6 Use the: 1 Address Book 2 Redial/Pause 3 Dialtone 4 Color/Black 5 Start button 8 7 To Access fax numbers from the printer. 8 Arrow buttons Choose a menu or submenu item that appears on the display. 9 Display ..., Fax, and Photo button lights are off in Power Saver mode. • Printer status • Messages • Menus 10 Setup button Access the setup menu and change printer settings. Switch to view the last five numbers dialed. Using the printer control panel buttons and menus 16 In...
... scan, or copy job, depending on which mode is selected.. 12 3 45 Eco-Mode Cancel 6 Use the: 1 Address Book 2 Redial/Pause 3 Dialtone 4 Color/Black 5 Start button 8 7 To Access fax numbers from the printer. 8 Arrow buttons Choose a menu or submenu item that appears on the display. 9 Display ..., Fax, and Photo button lights are off in Power Saver mode. • Printer status • Messages • Menus 10 Setup button Access the setup menu and change printer settings. Switch to view the last five numbers dialed. Using the printer control panel buttons and menus 16 In...
User Guide
Page 17
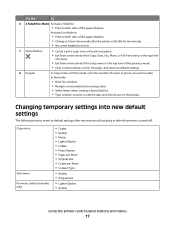
... a menu level of the Copy, Scan, Fax, Photo, or File Print menu to the top level of a menu. • Exit from a menu level of the Setup menu to the top level of the previous mode. • Clear current settings or error messages, and return to default settings. 8 Keypad In Copy mode...
... a menu level of the Copy, Scan, Fax, Photo, or File Print menu to the top level of a menu. • Exit from a menu level of the Setup menu to the top level of the previous mode. • Clear current settings or error messages, and return to default settings. 8 Keypad In Copy mode...
User Guide
Page 18
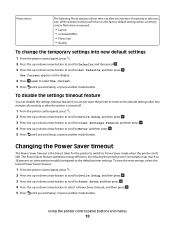
... the printer power consumption (as much as 28 percent on the display. 4 Press again to select Use Current. 5 Press until you exit Setup, or press another mode button. Use Current appears on some printer models) compared to the default printer settings. To save the most energy, ...Photo menu The following Photo options will return to the factory default settings when a memory card or flash drive is removed. • Layout • Colorized Effect • Photo Size • Quality To change the temporary settings into new default settings 1 From the printer control panel, press . 2 Press ...
... the printer power consumption (as much as 28 percent on the display. 4 Press again to select Use Current. 5 Press until you exit Setup, or press another mode button. Use Current appears on some printer models) compared to the default printer settings. To save the most energy, ...Photo menu The following Photo options will return to the factory default settings when a memory card or flash drive is removed. • Layout • Colorized Effect • Photo Size • Quality To change the temporary settings into new default settings 1 From the printer control panel, press . 2 Press ...
User Guide
Page 19
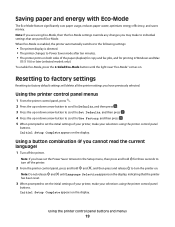
... on the display, indicating that are using Eco-Mode, then the Eco-Mode settings override any changes you have previously selected. Initial Setup Complete appears on the display. Using the printer control panel buttons and menus 19 Using the printer control panel menus 1 From the ...initial settings of Eco-Mode. Note: If you are part of your printer, make your selections using the printer control panel buttons. Initial Setup Complete appears on the display. When Eco-Mode is enabled, the printer automatically switches to the following settings: • The printer display ...
... on the display, indicating that are using Eco-Mode, then the Eco-Mode settings override any changes you have previously selected. Initial Setup Complete appears on the display. Using the printer control panel buttons and menus 19 Using the printer control panel menus 1 From the ...initial settings of Eco-Mode. Note: If you are part of your printer, make your selections using the printer control panel buttons. Initial Setup Complete appears on the display. When Eco-Mode is enabled, the printer automatically switches to the following settings: • The printer display ...
User Guide
Page 21
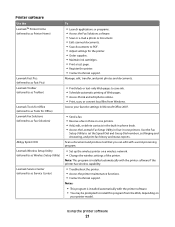
.... • Contact technical support. Access your printer model. Use the Fax Setup Utility to PDF. • Adjust settings for Office) Lexmark Fax Solutions (referred to as Fax Solutions) Abbyy Sprint OCR Lexmark Wireless Setup Utility (referred to as Wireless Setup Utility) Lexmark Service Center (referred to as Service Center) To • Launch applications or...a fax. • Receive a fax in three-in-one printers. • Add, edit, or delete contacts in the built-in phone book. • Access the Lexmark Fax Setup Utility in four-in-one printers. Using the printer software 21
.... • Contact technical support. Access your printer model. Use the Fax Setup Utility to PDF. • Adjust settings for Office) Lexmark Fax Solutions (referred to as Fax Solutions) Abbyy Sprint OCR Lexmark Wireless Setup Utility (referred to as Wireless Setup Utility) Lexmark Service Center (referred to as Service Center) To • Launch applications or...a fax. • Receive a fax in three-in-one printers. • Add, edit, or delete contacts in the built-in phone book. • Access the Lexmark Fax Setup Utility in four-in-one printers. Using the printer software 21
User Guide
Page 22
...; Access the printer utility. • Troubleshoot. • Order ink or supplies. • Contact Lexmark. • Check the printer software version installed on the features of copies to as Fax Setup Utility) To • Scan photos and documents. • Customize settings for scan jobs. •... Customize settings for the print job, such as All-In-One Center) Lexmark Fax Setup Utility (referred to print. • Print two-sided copies. • Select the paper type. • Add a watermark. • Enhance ...
...; Access the printer utility. • Troubleshoot. • Order ink or supplies. • Contact Lexmark. • Check the printer software version installed on the features of copies to as Fax Setup Utility) To • Scan photos and documents. • Customize settings for scan jobs. •... Customize settings for the print job, such as All-In-One Center) Lexmark Fax Setup Utility (referred to print. • Print two-sided copies. • Select the paper type. • Add a watermark. • Enhance ...

User Guide
Page 23
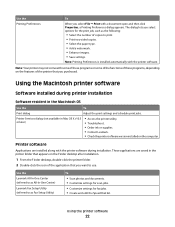
..., select your printer and download the driver. 7 Install additional or optional software. Using the printer software 23 Use the To Lexmark Network Card Reader (referred to as Network Card Reader) • View the contents of the printer that you purchased... 6 From the Web site, select your printer and download the driver. 5 Install additional or optional software. Lexmark Wireless Setup Assistant Set up the printer on a wireless network. (referred to as Wireless Setup Assistant) Note: Your printer may not come with cartridge installation. • Print a test page. •...
..., select your printer and download the driver. 7 Install additional or optional software. Using the printer software 23 Use the To Lexmark Network Card Reader (referred to as Network Card Reader) • View the contents of the printer that you purchased... 6 From the Web site, select your printer and download the driver. 5 Install additional or optional software. Lexmark Wireless Setup Assistant Set up the printer on a wireless network. (referred to as Wireless Setup Assistant) Note: Your printer may not come with cartridge installation. • Print a test page. •...

User Guide
Page 24
... job, then try removing and reinstalling the printer software. Enabling automatic software updates 1 With a document open, click File Print. 2 Click Properties, Preferences, Options, or Setup. 3 From the Advanced tab, click More Options. 4 In the Software Updates section, select Allow automatic updates from the list. 3 Select the uninstall option. 4 Follow the...
... job, then try removing and reinstalling the printer software. Enabling automatic software updates 1 With a document open, click File Print. 2 Click Properties, Preferences, Options, or Setup. 3 From the Advanced tab, click More Options. 4 In the Software Updates section, select Allow automatic updates from the list. 3 Select the uninstall option. 4 Follow the...
User Guide
Page 25
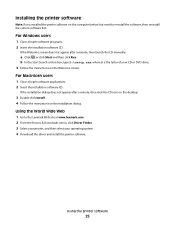
... on the Welcome screen. b In the Start Search or Run box, type D:\setup.exe, where D is the letter of your CD or DVD drive. 3 Follow the instructions on this computer before but need to the Lexmark Web site at www.lexmark.com. 2 From the Drivers & Downloads menu, click Driver Finder. 3 Select your printer...
... on the Welcome screen. b In the Start Search or Run box, type D:\setup.exe, where D is the letter of your CD or DVD drive. 3 Follow the instructions on this computer before but need to the Lexmark Web site at www.lexmark.com. 2 From the Drivers & Downloads menu, click Driver Finder. 3 Select your printer...
User Guide
Page 29
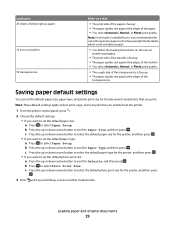
... Paper Type, and then press . c Press the up or down arrow button to select Paper Setup. c Press the up or down arrow button to select the default paper size for the printer, and then... press . • If you exit Setup, or press another mode button. Loading paper and original documents 29 c Press the up or ...Size. Note: These default settings apply only to Defaults, and then press . b Press to select Paper Setup. Saving paper default settings You can set the default paper size, paper type, and photo print size for...
... Paper Type, and then press . c Press the up or down arrow button to select Paper Setup. c Press the up or down arrow button to select the default paper size for the printer, and then... press . • If you exit Setup, or press another mode button. Loading paper and original documents 29 c Press the up or ...Size. Note: These default settings apply only to Defaults, and then press . b Press to select Paper Setup. Saving paper default settings You can set the default paper size, paper type, and photo print size for...
User Guide
Page 31
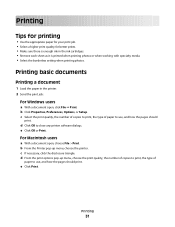
... there is enough ink in the printer. 2 Send the print job: For Windows users a With a document open , choose File > Print. b Click Properties, Preferences, Options, or Setup. e Click OK or Print. Printing 31 e Click Print. c If necessary, click the disclosure triangle. For Macintosh users a With a document open , click File Print.
... there is enough ink in the printer. 2 Send the print job: For Windows users a With a document open , choose File > Print. b Click Properties, Preferences, Options, or Setup. e Click OK or Print. Printing 31 e Click Print. c If necessary, click the disclosure triangle. For Macintosh users a With a document open , click File Print.
User Guide
Page 32
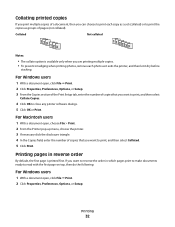
...following: For Windows users 1 With a document open , click File Print. 2 Click Properties, Preferences, Options, or Setup. 3 From the Copies section of the Print Setup tab, enter the number of copies that you want to reverse the order in reverse order By default, the first page is.... 5 Click OK or Print. For Windows users 1 With a document open , click File Print. 2 Click Properties, Preferences, Options, or Setup. Collating printed copies If you print multiple copies of a document, then you can choose to print each photo as groups of pages (not collated).
...following: For Windows users 1 With a document open , click File Print. 2 Click Properties, Preferences, Options, or Setup. 3 From the Copies section of the Print Setup tab, enter the number of copies that you want to reverse the order in reverse order By default, the first page is.... 5 Click OK or Print. For Windows users 1 With a document open , click File Print. 2 Click Properties, Preferences, Options, or Setup. Collating printed copies If you print multiple copies of a document, then you can choose to print each photo as groups of pages (not collated).
User Guide
Page 33
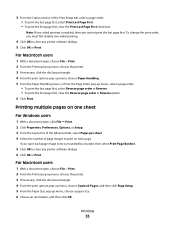
...users 1 With a document open, click File Print. 2 Click Properties, Preferences, Options, or Setup. 3 From the Layout list of the Advanced tab, select Pages per sheet. 4 Select the number of the Print Setup tab, select a page order: • To print the last page first, select Print Last Page ..., choose the printer. 3 If necessary, click the disclosure triangle. 4 From the print options pop-up menu, choose Copies & Pages, and then click Page Setup. 5 From the Paper Size pop-up menu, select a page order: • To print the last page first, select Reverse page order or Reverse. •...
...users 1 With a document open, click File Print. 2 Click Properties, Preferences, Options, or Setup. 3 From the Layout list of the Advanced tab, select Pages per sheet. 4 Select the number of the Print Setup tab, select a page order: • To print the last page first, select Print Last Page ..., choose the printer. 3 If necessary, click the disclosure triangle. 4 From the print options pop-up menu, choose Copies & Pages, and then click Page Setup. 5 From the Paper Size pop-up menu, select a page order: • To print the last page first, select Reverse page order or Reverse. •...

User Guide
Page 35
b From the Printer pop-up menu, choose Copies & Pages, and then click Page Setup. g Click Print. Printing labels 1 Load the label sheets in the printer. 2 Send the print job: For Windows users a With a document open , click File ...If no size matches the size of the envelope. Printing 35 For Macintosh users a With a document open, choose File > Print. b Click Properties, Preferences, Options, or Setup. b Click Properties, Preferences, Options, or Setup. c From the Paper Type list of the Print Setup tab, select Plain Paper. f Click OK to close any printer software dialogs.
b From the Printer pop-up menu, choose Copies & Pages, and then click Page Setup. g Click Print. Printing labels 1 Load the label sheets in the printer. 2 Send the print job: For Windows users a With a document open , click File ...If no size matches the size of the envelope. Printing 35 For Macintosh users a With a document open, choose File > Print. b Click Properties, Preferences, Options, or Setup. b Click Properties, Preferences, Options, or Setup. c From the Paper Type list of the Print Setup tab, select Plain Paper. f Click OK to close any printer software dialogs.

User Guide
Page 36
... the measurement units to use (inches or millimeters). 6 Click OK to close any printer software dialogs. c From the Paper Size list of the Print Setup tab, choose a paper size that matches the size of the label sheet. h Click Print. Partial sheets (with areas exposed by missing labels) may ... Type list. e Click OK or Print. For Macintosh users a With a document open , click File Print. 2 Click Properties, Preferences, Options, or Setup. 3 From the Paper Size list of the label sheet. g From the print options pop-up menu, choose Quality & Media. • From the Paper Type ...
... the measurement units to use (inches or millimeters). 6 Click OK to close any printer software dialogs. c From the Paper Size list of the Print Setup tab, choose a paper size that matches the size of the label sheet. h Click Print. Partial sheets (with areas exposed by missing labels) may ... Type list. e Click OK or Print. For Macintosh users a With a document open , click File Print. 2 Click Properties, Preferences, Options, or Setup. 3 From the Paper Size list of the label sheet. g From the print options pop-up menu, choose Quality & Media. • From the Paper Type ...

User Guide
Page 37
...-up menu, choose the printer. 3 If necessary, click the disclosure triangle. 4 From the print options pop-up menu, choose Copies & Pages and then click Page Setup. 5 From the Settings pop-up menu, choose Custom Paper Size. 6 Create a custom size: a Select Use custom page size. You can remove the memory card from...
...-up menu, choose the printer. 3 If necessary, click the disclosure triangle. 4 From the print options pop-up menu, choose Copies & Pages and then click Page Setup. 5 From the Settings pop-up menu, choose Custom Paper Size. 6 Create a custom size: a Select Use custom page size. You can remove the memory card from...
User Guide
Page 43
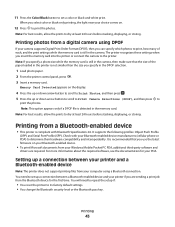
...allow the prints to its factory default settings. • You change the Bluetooth security level or the Bluetooth pass key. You need to repeat the setup if: • You reset the printer to dry at least 24 hours before stacking, displaying, or storing. The printer recognizes these settings when you... printing files from the Bluetooth device for your computer using DPOF If your printer if you specify in the memory card. 11 Press the Color/Black button to set up or down arrow button to scroll to Print Camera Selections (DPOF), and then press to print the photos. Note...
...allow the prints to its factory default settings. • You change the Bluetooth security level or the Bluetooth pass key. You need to repeat the setup if: • You reset the printer to dry at least 24 hours before stacking, displaying, or storing. The printer recognizes these settings when you... printing files from the Bluetooth device for your computer using DPOF If your printer if you specify in the memory card. 11 Press the Color/Black button to set up or down arrow button to scroll to Print Camera Selections (DPOF), and then press to print the photos. Note...


