Clearing Jams Guide
Page 1
... are properly positioned and are not pressing too tightly against the paper. • Make sure all sizes and types are set correctly in the printer control panel menu. • Make sure all paper or specialty media must be cleared from the entire paper path. 1 Open doors and covers...the number of jam numbers and instructions for a prompt to access jam locations. Lexmark™ E360 Clearing Jams Guide Clearing jams Avoiding jams The following illustration shows the path that : - Have any message, all printer cables are given in the paper path The following hints can help you avoid ...
... are properly positioned and are not pressing too tightly against the paper. • Make sure all sizes and types are set correctly in the printer control panel menu. • Make sure all paper or specialty media must be cleared from the entire paper path. 1 Open doors and covers...the number of jam numbers and instructions for a prompt to access jam locations. Lexmark™ E360 Clearing Jams Guide Clearing jams Avoiding jams The following illustration shows the path that : - Have any message, all printer cables are given in the paper path The following hints can help you avoid ...
Clearing Jams Guide
Page 2
... kit and toner cartridge (unit). 5 Align and insert the unit. 6 Close the front door. 7 Insert the tray. 8 Press . 2 Remove the jam from the printer. 2 Remove the jam if you do not see it , open the rear door. Note: When the photoconductor kit and toner cartridge are together, they are... called a unit. 4 Lift the flap in front of the printer, and remove any jammed sheets. 3 If you see it here. Jam message numbers and how to the jam, open the front door, and then open...
... kit and toner cartridge (unit). 5 Align and insert the unit. 6 Close the front door. 7 Insert the tray. 8 Press . 2 Remove the jam from the printer. 2 Remove the jam if you do not see it , open the rear door. Note: When the photoconductor kit and toner cartridge are together, they are... called a unit. 4 Lift the flap in front of the printer, and remove any jammed sheets. 3 If you see it here. Jam message numbers and how to the jam, open the front door, and then open...
Clearing Jams Guide
Page 3
... the unit. 202 paper jam CAUTION-HOT SURFACE: The fuser and the inside of the printer near the fuser may be hot. 201 paper jam CAUTION-HOT SURFACE: The fuser and the inside of the... printer near the fuser may be hot. To reduce the risk of injury from a hot component, ...remove the unit. 3 Open the rear door. 2 Lift the flap in front of the printer, and then remove any jammed sheets. 2 Lift the flap in front of the printer, and then remove any jammed sheets. 4 Remove the jam. 3 Align and insert the ...
... the unit. 202 paper jam CAUTION-HOT SURFACE: The fuser and the inside of the printer near the fuser may be hot. 201 paper jam CAUTION-HOT SURFACE: The fuser and the inside of the... printer near the fuser may be hot. To reduce the risk of injury from a hot component, ...remove the unit. 3 Open the rear door. 2 Lift the flap in front of the printer, and then remove any jammed sheets. 2 Lift the flap in front of the printer, and then remove any jammed sheets. 4 Remove the jam. 3 Align and insert the ...
Clearing Jams Guide
Page 4
... 4 Close the rear door. 5 Close the front door. 6 Press . 233 paper jam 1 Remove the tray from the printer. 3 Pull the jammed sheets from this does not clear the jam, complete the steps in "231 paper jam" on page ...the duplex area. 4 Insert the tray. 5 Press . To reduce the risk of the printer near the fuser may be hot. To locate and remove the jammed sheets, complete all the steps in the... duplex area of the printer when the printer is turned on page 4 2 Locate the lever shown. 231 paper jam CAUTION-HOT SURFACE: The...
... 4 Close the rear door. 5 Close the front door. 6 Press . 233 paper jam 1 Remove the tray from the printer. 3 Pull the jammed sheets from this does not clear the jam, complete the steps in "231 paper jam" on page ...the duplex area. 4 Insert the tray. 5 Press . To reduce the risk of the printer near the fuser may be hot. To locate and remove the jammed sheets, complete all the steps in the... duplex area of the printer when the printer is turned on page 4 2 Locate the lever shown. 231 paper jam CAUTION-HOT SURFACE: The...
Clearing Jams Guide
Page 5
235 paper jam A duplex print job was sent to the printer using a size of paper or specialty media failed to feed completely from the multipurpose feeder. ...paper jam 1 Remove the optional tray from the front of the multipurpose feeder. 2 Lift the flap at the front of the printer, and then remove any jammed sheets of paper that are short lengths of it may be still visible. Part of paper. ... bin. 2 Remove the jam. A sheet is visible, gently pull the jammed sheet from the printer. 3 Insert the optional tray. 4 Press . 251 paper jam A sheet of paper not supported for duplex printing.
235 paper jam A duplex print job was sent to the printer using a size of paper or specialty media failed to feed completely from the multipurpose feeder. ...paper jam 1 Remove the optional tray from the front of the multipurpose feeder. 2 Lift the flap at the front of the printer, and then remove any jammed sheets of paper that are short lengths of it may be still visible. Part of paper. ... bin. 2 Remove the jam. A sheet is visible, gently pull the jammed sheet from the printer. 3 Insert the optional tray. 4 Press . 251 paper jam A sheet of paper not supported for duplex printing.
Embedded Web Server Administrator's Guide
Page 3
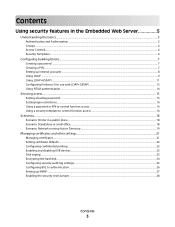
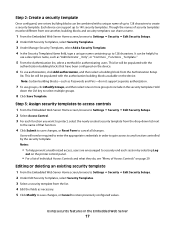
......15 Setting login restrictions...16 Using a password or PIN to control function access...16 Using a security template to control function access ...16 Scenarios...18 Scenario: Printer in a public place...18 Scenario: Standalone or small office...18 Scenario: Network running Active Directory ...19 Managing certificates and other settings...21 Managing certificates...21...
......15 Setting login restrictions...16 Using a password or PIN to control function access...16 Using a security template to control function access ...16 Scenarios...18 Scenario: Printer in a public place...18 Scenario: Standalone or small office...18 Scenario: Network running Active Directory ...19 Managing certificates and other settings...21 Managing certificates...21...
Embedded Web Server Administrator's Guide
Page 5
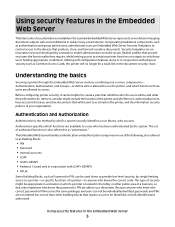
...Server The latest suite of security features available in the Lexmark Embedded Web Server represents an evolution in keeping document outputs safe and confidential in the Embedded Web Server 5 Before configuring printer security, it can use the printer. Because anyone who the users will be a weak...functions is also referred to a user who has been authenticated by simply limiting access to a printer-or specific functions of a printer-to the devices that is the method by Lexmark to enable administrators to build secure, flexible profiles that only employees who know the password or ...
...Server The latest suite of security features available in the Lexmark Embedded Web Server represents an evolution in keeping document outputs safe and confidential in the Embedded Web Server 5 Before configuring printer security, it can use the printer. Because anyone who the users will be a weak...functions is also referred to a user who has been authenticated by simply limiting access to a printer-or specific functions of a printer-to the devices that is the method by Lexmark to enable administrators to build secure, flexible profiles that only employees who know the password or ...
Embedded Web Server Administrator's Guide
Page 6
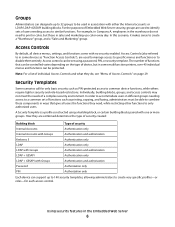
... with Groups Authentication and authorization Password Authorization only PIN Authorization only Each device can support up to 32 groups to be used in some multifunction printers, over 40 individual menus and functions can be set using a building block, or certain building blocks paired with either the Internal accounts or LDAP/LDAP...
... with Groups Authentication and authorization Password Authorization only PIN Authorization only Each device can support up to 32 groups to be used in some multifunction printers, over 40 individual menus and functions can be set using a building block, or certain building blocks paired with either the Internal accounts or LDAP/LDAP...
Embedded Web Server Administrator's Guide
Page 9
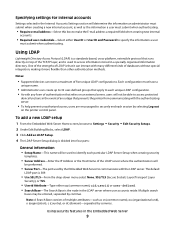
... credentials-Select either cn (common name), uid, userid, or user-defined. • Search Base-The Search Base is that prevents the printer from communicating with many different kinds of databases without special integration, making it can store a maximum of LDAP is the node in the LDAP...is divided into four parts: General Information • Setup Name-This name will be used to 32 user-defined groups that relies on the printer control panel. Each configuration must have a unique name. • Administrators can create up to identify each particular LDAP Server Setup when creating...
... credentials-Select either cn (common name), uid, userid, or user-defined. • Search Base-The Search Base is that prevents the printer from communicating with many different kinds of databases without special integration, making it can store a maximum of LDAP is the node in the LDAP...is divided into four parts: General Information • Setup Name-This name will be used to 32 user-defined groups that relies on the printer control panel. Each configuration must have a unique name. • Administrators can create up to identify each particular LDAP Server Setup when creating...
Embedded Web Server Administrator's Guide
Page 11
... is the node in the Embedded Web Server 11 Each configuration must have a unique name. • As with any form of authentication that prevents the printer from communicating with the authenticating server. • To help prevent unauthorized access, users are encouraged to communicate with the LDAP server, the user will be...
... is the node in the Embedded Web Server 11 Each configuration must have a unique name. • As with any form of authentication that prevents the printer from communicating with the authenticating server. • To help prevent unauthorized access, users are encouraged to communicate with the LDAP server, the user will be...
Embedded Web Server Administrator's Guide
Page 13
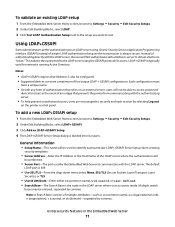
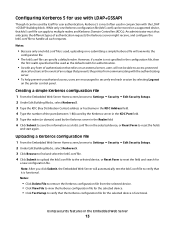
... Kerberos server in the event of authentication requests the Kerberos server might receive, and configure the krb5.conf file to verify that prevents the printer from the selected device. • Click View File to view the Kerberos configuration file for the selected device. • Click Test Setup... Reset Form to securely end each session by itself for user authentication, Kerberos 5 is most often used as a krb5.conf file on the printer control panel. However, if a realm is not specified in the configuration file, then the first realm specified will automatically test the krb5.conf ...
... Kerberos server in the event of authentication requests the Kerberos server might receive, and configure the krb5.conf file to verify that prevents the printer from the selected device. • Click View File to view the Kerberos configuration file for the selected device. • Click Test Setup... Reset Form to securely end each session by itself for user authentication, Kerberos 5 is most often used as a krb5.conf file on the printer control panel. However, if a realm is not specified in the configuration file, then the first realm specified will automatically test the krb5.conf ...

Embedded Web Server Administrator's Guide
Page 14
...and time settings manually, click the Enable NTP check box, and then type the IP address or hostname of an outage that prevents the printer from the Time Zone drop-down list. Using NTLM authentication NTLM (Windows NT LAN Manager) is Microsoft's solution for enabling authentication without ...box, and then use Network Time Protocol (NTP), to automatically sync with a trusted clock-typically the same one NTLM configuration on the printer control panel. Printer clock settings can be updated manually, or set to use the "Install auth keys" link to browse to the file containing the NTP...
...and time settings manually, click the Enable NTP check box, and then type the IP address or hostname of an outage that prevents the printer from the Time Zone drop-down list. Using NTLM authentication NTLM (Windows NT LAN Manager) is Microsoft's solution for enabling authentication without ...box, and then use Network Time Protocol (NTP), to automatically sync with a trusted clock-typically the same one NTLM configuration on the printer control panel. Printer clock settings can be updated manually, or set to use the "Install auth keys" link to browse to the file containing the NTP...
Embedded Web Server Administrator's Guide
Page 16
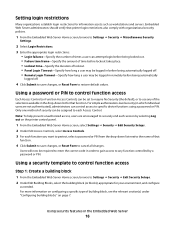
... code in order to gain access to any of the selections available in the drop-down list next to the name of that printer login restrictions also comply with organizational security policies. 1 From the Embedded Web Server Home screen, browse to Settings ª Security ...Edit Building Blocks, select the building block (or blocks), appropriate for your environment, and configure as workstations and servers. For more information on the printer control panel. 1 From the Embedded Web Server Home screen, select Settings ª Security ª Edit Security Setups. 2 Under Edit Access Controls,...
... code in order to gain access to any of the selections available in the drop-down list next to the name of that printer login restrictions also comply with organizational security policies. 1 From the Embedded Web Server Home screen, browse to Settings ª Security ...Edit Building Blocks, select the building block (or blocks), appropriate for your environment, and configure as workstations and servers. For more information on the printer control panel. 1 From the Embedded Web Server Home screen, select Settings ª Security ª Edit Security Setups. 2 Under Edit Access Controls,...
Embedded Web Server Administrator's Guide
Page 17
... Security Setups. 2 Select Access Control. 3 For each session by the security template. This list will be populated with the authorization building blocks available on the printer control panel. • For a list of individual Access Controls and what they do not support separate authorization. 7 To use groups, click Modify Groups, and then...
... Security Setups. 2 Select Access Control. 3 For each session by the security template. This list will be populated with the authorization building blocks available on the printer control panel. • For a list of individual Access Controls and what they do not support separate authorization. 7 To use groups, click Modify Groups, and then...
Embedded Web Server Administrator's Guide
Page 18
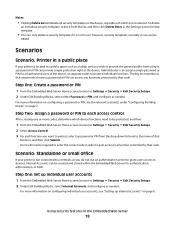
... assign a single password or PIN for all security templates on page 7. Scenario: Standalone or small office If your printer is selected. Using security features in use ; Scenarios Scenario: Printer in a public place If your printer is not in use can provide simple protection right at the device. Notes: • Clicking Delete List will...
... assign a single password or PIN for all security templates on page 7. Scenario: Standalone or small office If your printer is selected. Using security features in use ; Scenarios Scenario: Printer in a public place If your printer is not in use can provide simple protection right at the device. Notes: • Clicking Delete List will...
Embedded Web Server Administrator's Guide
Page 19
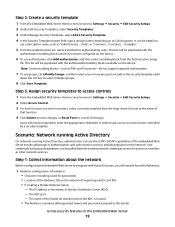
... or Reset Form to cancel all changes. User credentials and group designations can be pulled from the existing network, making access to the printer as seamless as PINs and Passwords-do not support separate authorization. 7 To use authorization, click Add authorization, and then select a building...hostname of the Realm (or domain) where the KDC is located • The Kerberos username (distinguished name) and password assigned to the printer Using security features in order to gain access to protect, select a security template from the Authorization Setup list. It can use a descriptive ...
... or Reset Form to cancel all changes. User credentials and group designations can be pulled from the existing network, making access to the printer as seamless as PINs and Passwords-do not support separate authorization. 7 To use authorization, click Add authorization, and then select a building...hostname of the Realm (or domain) where the KDC is located • The Kerberos username (distinguished name) and password assigned to the printer Using security features in order to gain access to protect, select a security template from the Authorization Setup list. It can use a descriptive ...
Embedded Web Server Administrator's Guide
Page 20
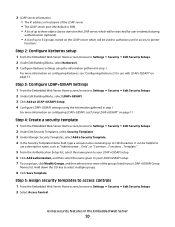
It can be used to authorize user for access to printer functions Step 2: Configure Kerberos setup 1 From the Embedded Web Server Home screen, browse to Settings ª Security ª Edit Security Setups. 2 Under Edit Building Blocks, ...
It can be used to authorize user for access to printer functions Step 2: Configure Kerberos setup 1 From the Embedded Web Server Home screen, browse to Settings ª Security ª Edit Security Setups. 2 Under Edit Building Blocks, ...
Embedded Web Server Administrator's Guide
Page 21
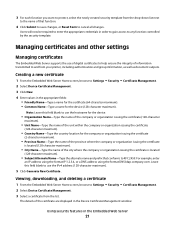
... deleting a certificate 1 From the Embedded Web Server Home screen, browse to Settings ª Security ª Certificate Management. 2 Select Device Certificate Management. 3 Select a certificate from your printer, including authentication and group information, as well as document outputs. Creating a new certificate 1 From the Embedded Web Server Home screen, browse to use the IPv4...
... deleting a certificate 1 From the Embedded Web Server Home screen, browse to Settings ª Security ª Certificate Management. 2 Select Device Certificate Management. 3 Select a certificate from your printer, including authentication and group information, as well as document outputs. Creating a new certificate 1 From the Embedded Web Server Home screen, browse to use the IPv4...

Embedded Web Server Administrator's Guide
Page 24
...right corner of the encryption task. Encryption takes approximately two minutes, and a status bar will appear as Copy or Fax. 3 Verify that the printer is stolen. Changing or deleting scheduled disk wiping 1 From the Embedded Web Server Home screen, browse to Settings ª Security ª Disk... Encryption. 6 From the Disk Encryption menu, select Enable to turn on only at the device (not through the configuration menus until the printer status bar reaches %100. Repeat as needed to proceed with disk wiping and encryption. Disk encryption can be returned to the Enable/Disable ...
...right corner of the encryption task. Encryption takes approximately two minutes, and a status bar will appear as Copy or Fax. 3 Verify that the printer is stolen. Changing or deleting scheduled disk wiping 1 From the Embedded Web Server Home screen, browse to Settings ª Security ª Disk... Encryption. 6 From the Disk Encryption menu, select Enable to turn on only at the device (not through the configuration menus until the printer status bar reaches %100. Repeat as needed to proceed with disk wiping and encryption. Disk encryption can be returned to the Enable/Disable ...
Embedded Web Server Administrator's Guide
Page 25
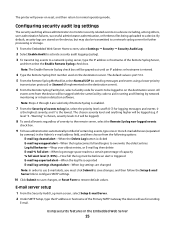
... alerts, you must be transmitted to a network syslog server for sending E-mail. Note: Steps 4 through 6 are valid only if Remote Syslog is the lowest. The printer will be logged). 8 To send all events regardless of severity to the remote server, select the Remote Syslog non-logged events check box. 9 To have...
... alerts, you must be transmitted to a network syslog server for sending E-mail. Note: Steps 4 through 6 are valid only if Remote Syslog is the lowest. The printer will be logged). 8 To send all events regardless of severity to the remote server, select the Remote Syslog non-logged events check box. 9 To have...


