Print Drivers for UNIX and LINUX Systems
Page 26
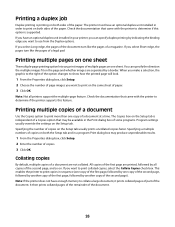
... optional duplex unit installed in order to print on both sides of the paper. Printing multiple copies of a document Use the Copies option to use from the Duplex options. Collating copies By default, multiple copies of a document are separated by indicating the binding edge you print images of multiple ...the option changes to show how the printed page will look. 1 From the Properties dialog box, click Setup. 2 Choose the number of page images you want to print collated copies, select the Collate Copies check box. Specifying the number of the document. 26 If you want to print on...
... optional duplex unit installed in order to print on both sides of the paper. Printing multiple copies of a document Use the Copies option to use from the Duplex options. Collating copies By default, multiple copies of a document are separated by indicating the binding edge you print images of multiple ...the option changes to show how the printed page will look. 1 From the Properties dialog box, click Setup. 2 Choose the number of page images you want to print collated copies, select the Collate Copies check box. Specifying the number of the document. 26 If you want to print on...

Quick Reference
Page 24
...;page jam, lift front cover to remove cartridge. [200-201] Open the front cover and the multipurpose feeder, then remove the toner cartridge and the imaging unit, and then remove the jammed paper. 10 Standard bin [x]‑page jam, remove standard bin jam. [203] Remove all paper from the standard bin, and...
...;page jam, lift front cover to remove cartridge. [200-201] Open the front cover and the multipurpose feeder, then remove the toner cartridge and the imaging unit, and then remove the jammed paper. 10 Standard bin [x]‑page jam, remove standard bin jam. [203] Remove all paper from the standard bin, and...
Quick Reference
Page 25
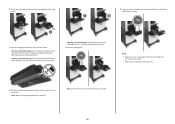
... it from the printer. 8 Insert the toner cartridge into the printer, and then push the green handle back into place. 1 2 1 2 5 Place the imaging unit aside on the side of the printer as a guide. 25 Notes: • Align the arrows on the guides of future print jobs. Warning-Potential Damage... light may affect the print quality of the toner cartridge with toner, which can stain garments and skin. 7 Install the imaging unit. Doing so may cause print quality problems. Warning-Potential Damage: Do not touch the photoconductor drum. Note: Make sure all paper fragments are...
... it from the printer. 8 Insert the toner cartridge into the printer, and then push the green handle back into place. 1 2 1 2 5 Place the imaging unit aside on the side of the printer as a guide. 25 Notes: • Align the arrows on the guides of future print jobs. Warning-Potential Damage... light may affect the print quality of the toner cartridge with toner, which can stain garments and skin. 7 Install the imaging unit. Doing so may cause print quality problems. Warning-Potential Damage: Do not touch the photoconductor drum. Note: Make sure all paper fragments are...
Supplies Guide
Page 1
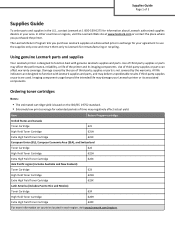
...countries located in each region, visit www.lexmark.com/regions. Use of third-party supplies or parts may negatively affect actual yield. Item Return Program cartridge United States and Canada Toner Cartridge 621 High ...Lexmark authorized supplies dealers in your area. The Lexmark Return Program lets you purchased the printer. Supplies Guide Page 1 of 3 Supplies Guide To order parts and supplies in the U.S., contact Lexmark at www.lexmark.com or contact the place where you purchase Lexmark supplies at a discounted price in exchange for your Lexmark printer or its imaging...
...countries located in each region, visit www.lexmark.com/regions. Use of third-party supplies or parts may negatively affect actual yield. Item Return Program cartridge United States and Canada Toner Cartridge 621 High ...Lexmark authorized supplies dealers in your area. The Lexmark Return Program lets you purchased the printer. Supplies Guide Page 1 of 3 Supplies Guide To order parts and supplies in the U.S., contact Lexmark at www.lexmark.com or contact the place where you purchase Lexmark supplies at a discounted price in exchange for your Lexmark printer or its imaging...

Supplies Guide
Page 2
...transfer roller are all included in the maintenance kit, see the instruction sheet that came with each region, visit www.lexmark.com/regions. Warning-Potential Damage: Do not expose the imaging unit to exhaustion of the fuser. The two-digit fuser type code (such as 00 or 01) can be seen on... the fuser. Lexmark Return Program fuser maintenance kit type Type MX810 Series Return Program fuser maintenance kit Type 00 MX810 ...
...transfer roller are all included in the maintenance kit, see the instruction sheet that came with each region, visit www.lexmark.com/regions. Warning-Potential Damage: Do not expose the imaging unit to exhaustion of the fuser. The two-digit fuser type code (such as 00 or 01) can be seen on... the fuser. Lexmark Return Program fuser maintenance kit type Type MX810 Series Return Program fuser maintenance kit Type 00 MX810 ...

