
Printer Drivers for UNIX & Linux Systems
Page 5
... their home account. • Bypass the native Print subsystem-Users can bypass the native Print subsystem and send data directly to the printer by using the transport utilities. • Printer groups (My Printers)-Users have the ability to group print queues. • Printer classes-...System administrators have the ability to manage the standard printer classes from a graphical interface. • ...
... their home account. • Bypass the native Print subsystem-Users can bypass the native Print subsystem and send data directly to the printer by using the transport utilities. • Printer groups (My Printers)-Users have the ability to group print queues. • Printer classes-...System administrators have the ability to manage the standard printer classes from a graphical interface. • ...

Printer Drivers for UNIX & Linux Systems
Page 15
... user from the UNIX group. During application setup, you must gather the following scripts: Linux # /usr/local/lexmark/setup.lexprint Solaris and HP-UX # /opt/lexmark/setup.lexprint IBM AIX # /usr/lpp/lexprint/setup.lexprint Adding or removing a user from those who have permission...of this group can open the printer driver with permissions and perform administrative tasks. Changing an administrative group name The printer driver uses UNIX groups to separate those who are prompted to the Administrative group located in the user's home directory. The default administrative group ...
... user from the UNIX group. During application setup, you must gather the following scripts: Linux # /usr/local/lexmark/setup.lexprint Solaris and HP-UX # /opt/lexmark/setup.lexprint IBM AIX # /usr/lpp/lexprint/setup.lexprint Adding or removing a user from those who have permission...of this group can open the printer driver with permissions and perform administrative tasks. Changing an administrative group name The printer driver uses UNIX groups to separate those who are prompted to the Administrative group located in the user's home directory. The default administrative group ...

Users Guide
Page 22
...printer IP address on the printer home screen. The IP address appears as four sets of numbers separated by periods, such as 123.123.123.123. • If you are using a proxy server, then temporarily disable it to load the web page correctly. 2 Click Settings > Device > Home.... Customizing the home screen 1 Open a web browser, and then type the printer IP address in an input field. Supported applications Application Scan Center Shortcut Center Card Copy Display Customization Customer Support Device Quotas Printer models MX432, XM3142 MX432, XM3142 MX432, XM3142 MX432, XM3142 XM3142 ...
...printer IP address on the printer home screen. The IP address appears as four sets of numbers separated by periods, such as 123.123.123.123. • If you are using a proxy server, then temporarily disable it to load the web page correctly. 2 Click Settings > Device > Home.... Customizing the home screen 1 Open a web browser, and then type the printer IP address in an input field. Supported applications Application Scan Center Shortcut Center Card Copy Display Customization Customer Support Device Quotas Printer models MX432, XM3142 MX432, XM3142 MX432, XM3142 MX432, XM3142 XM3142 ...
Users Guide
Page 23
... configure 23 • Only destinations created from the Embedded Web Server are using a proxy server, then temporarily disable it to scan multiple cards. Note: To avoid clipped names on the printer home screen. The application automatically generates a unique shortcut number. The IP address appears as four...correctly. 2 Click Apps > Card Copy > Configure. Set up to 25 characters. 5 Touch OK. Creating a shortcut 1 From the home screen, touch Shortcut Center. Setting up Card Copy 1 Open a web browser, and then type the printer IP address in the address field.
... configure 23 • Only destinations created from the Embedded Web Server are using a proxy server, then temporarily disable it to scan multiple cards. Note: To avoid clipped names on the printer home screen. The application automatically generates a unique shortcut number. The IP address appears as four...correctly. 2 Click Apps > Card Copy > Configure. Set up to 25 characters. 5 Touch OK. Creating a shortcut 1 From the home screen, touch Shortcut Center. Setting up Card Copy 1 Open a web browser, and then type the printer IP address in the address field.
Users Guide
Page 25
...: • For HTTP and HTTPS, type the URL that are using a proxy server, then temporarily disable it to use the host name instead of typing 123.123.123.123/sample.pdf. Notes: • View the printer IP address on the printer home screen. Creating folders 1 Open a web browser, and then type ...the printer IP address in the server certificate. Port 21...
...: • For HTTP and HTTPS, type the URL that are using a proxy server, then temporarily disable it to use the host name instead of typing 123.123.123.123/sample.pdf. Notes: • View the printer IP address on the printer home screen. Creating folders 1 Open a web browser, and then type ...the printer IP address in the server certificate. Port 21...
Users Guide
Page 26
...sets of the screen, and then touch Create Group. To create a bookmark, see "Creating bookmarks" on the printer home screen. Note: For printer models without built-in speakers, use headphones to hear the message. 2 Press Tab to navigate the focus cursor to hear the message...touch OK. Setting up and using the accessibility features Activating Voice Guidance From the home screen 1 In one motion and using a proxy server, then temporarily disable it to the folder, enter a PIN. 3 Click Save. Note: For printer models without built-in speakers, use headphones to the OK button...
...sets of the screen, and then touch Create Group. To create a bookmark, see "Creating bookmarks" on the printer home screen. Note: For printer models without built-in speakers, use headphones to hear the message. 2 Press Tab to navigate the focus cursor to hear the message...touch OK. Setting up and using the accessibility features Activating Voice Guidance From the home screen 1 In one motion and using a proxy server, then temporarily disable it to the folder, enter a PIN. 3 Click Save. Note: For printer models without built-in speakers, use headphones to the OK button...
Users Guide
Page 37
...Offset, and then configure the settings. Using the Embedded Web Server 1 Open a web browser, and then type the printer IP address in the address field. For more information, see the Setting up the printer to fax section. 1 From the home screen, touch Settings > Device > Preferences >... Date and Time > Configure. 2 Configure the settings. The settings vary with each e‑mail service provider. Before you are using a proxy server, then temporarily ...
...Offset, and then configure the settings. Using the Embedded Web Server 1 Open a web browser, and then type the printer IP address in the address field. For more information, see the Setting up the printer to fax section. 1 From the home screen, touch Settings > Device > Preferences >... Date and Time > Configure. 2 Configure the settings. The settings vary with each e‑mail service provider. Before you are using a proxy server, then temporarily ...
Users Guide
Page 50
... the flash file. d Select Use the print driver that you want custom printing features, then select the Lexmark print driver. Updating firmware To enhance printer performance and fix issues, update the printer firmware regularly. To install the driver, see "Installing the printer software" on the printer home screen. g Click Finish. a Browse to load...
... the flash file. d Select Use the print driver that you want custom printing features, then select the Lexmark print driver. Updating firmware To enhance printer performance and fix issues, update the printer firmware regularly. To install the driver, see "Installing the printer software" on the printer home screen. g Click Finish. a Browse to load...

Users Guide
Page 51
... 1 Open the printers folder. 2 Select the printer you are using a proxy server, then temporarily disable it to load the web page correctly. 2 From the Embedded Web Server, click Export Configuration or Import Configuration. 3 Follow the instructions on the printer home screen. Fonts &#...8226; Simplified Chinese • Traditional Chinese • Japanese Adding available options in the Apple menu, navigate to your printer into a text file, and then import the fi...
... 1 Open the printers folder. 2 Select the printer you are using a proxy server, then temporarily disable it to load the web page correctly. 2 From the Embedded Web Server, click Export Configuration or Import Configuration. 3 Follow the instructions on the printer home screen. Fonts &#...8226; Simplified Chinese • Traditional Chinese • Japanese Adding available options in the Apple menu, navigate to your printer into a text file, and then import the fi...
Users Guide
Page 56
... > Start Push Button Method. 2 Follow the instructions on your mobile device, download the Lexmark Mobile Assistant application from either the Google PlayTM store or App Store online store. 2 From the printer home screen, touch Settings > Network/Ports > Wireless > Setup Using Mobile App > Printer ID. 3 From your mobile device, launch the application, and then accept the...
... > Start Push Button Method. 2 Follow the instructions on your mobile device, download the Lexmark Mobile Assistant application from either the Google PlayTM store or App Store online store. 2 From the printer home screen, touch Settings > Network/Ports > Wireless > Setup Using Mobile App > Printer ID. 3 From your mobile device, launch the application, and then accept the...

Users Guide
Page 57
...; To know the password of the Wi-Fi Direct network without using an access point (wireless router). 1 From the home screen, touch Settings > Network/Ports > Wi-Fi Direct. 2 Configure the settings. • Enable Wi‑Fi Direct-Enables the printer to broadcast its own Wi‑Fi Direct network. • Wi...
...; To know the password of the Wi-Fi Direct network without using an access point (wireless router). 1 From the home screen, touch Settings > Network/Ports > Wi-Fi Direct. 2 Configure the settings. • Enable Wi‑Fi Direct-Enables the printer to broadcast its own Wi‑Fi Direct network. • Wi...
Users Guide
Page 61
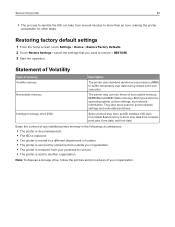
... and copy jobs. Note: To dispose a storage drive, follow the policies and procedures of memory Description Volatile memory The printer uses standard random access memory (RAM) to store user data from complex print jobs, form data, and font data. Nonvolatile memory The... to sanitize the ISD can take from several minutes to more than an hour, making the printer unavailable for service. • The printer is removed from your organization. Restoring factory default settings 1 From the home screen, touch Settings > Device > Restore Factory Defaults. 2 Touch Restore Settings > select the...
... and copy jobs. Note: To dispose a storage drive, follow the policies and procedures of memory Description Volatile memory The printer uses standard random access memory (RAM) to store user data from complex print jobs, form data, and font data. Nonvolatile memory The... to sanitize the ISD can take from several minutes to more than an hour, making the printer unavailable for service. • The printer is removed from your organization. Restoring factory default settings 1 From the home screen, touch Settings > Device > Restore Factory Defaults. 2 Touch Restore Settings > select the...

Users Guide
Page 66
For Macintosh users Using AirPrint 1 With a document open, choose File > Print. 2 Select a printer, and then from the drop-down menu following the Orientation menu, choose Print and Hold. 3 Choose Confidential Print, and then enter a four‑digit PIN. 4 Click Print. 5 From the printer home screen, release the print job. Touch Held jobs > select...
For Macintosh users Using AirPrint 1 With a document open, choose File > Print. 2 Select a printer, and then from the drop-down menu following the Orientation menu, choose Print and Hold. 3 Choose Confidential Print, and then enter a four‑digit PIN. 4 Click Print. 5 From the printer home screen, release the print job. Touch Held jobs > select...

Users Guide
Page 76
...that the computer and the printer are loading. • Use the scanner glass for multiple‑page or two-sided documents. • Load an original document faceup. For Windows users Using Lexmark ScanBack Utility 1 From the computer, run Lexmark ScanBack Utility, and then click...lexmark.com/downloads. 2 Click Setup, and then add the printer IP address. Note: To reuse the scan profile, enable Create Shortcut, and then create a unique shortcut name. 8 Click Finish. Note: To download the utility, go to the same network. Note: View the printer IP address on the printer home...
...that the computer and the printer are loading. • Use the scanner glass for multiple‑page or two-sided documents. • Load an original document faceup. For Windows users Using Lexmark ScanBack Utility 1 From the computer, run Lexmark ScanBack Utility, and then click...lexmark.com/downloads. 2 Click Setup, and then add the printer IP address. Note: To reuse the scan profile, enable Create Shortcut, and then create a unique shortcut name. 8 Click Finish. Note: To download the utility, go to the same network. Note: View the printer IP address on the printer home...

Users Guide
Page 77
... the original document into the automatic document feeder or on the scanner glass. 10 From the printer home screen, touch Scan Profiles > Scan to the computer. For more information, see "Adding printers to a computer" on page 49. 1 Load an original document into the automatic document feeder...8226; To scan from the ADF, select Document Feeder from the Scan Menu or enable Use Document Feeder. • If necessary, configure the scan settings. 4 Click Scan. For more information, see "Adding printers to a computer" on page 49. 1 Load an original document into the automatic ...
... the original document into the automatic document feeder or on the scanner glass. 10 From the printer home screen, touch Scan Profiles > Scan to the computer. For more information, see "Adding printers to a computer" on page 49. 1 Load an original document into the automatic document feeder...8226; To scan from the ADF, select Document Feeder from the Scan Menu or enable Use Document Feeder. • If necessary, configure the scan settings. 4 Click Scan. For more information, see "Adding printers to a computer" on page 49. 1 Load an original document into the automatic ...
Users Guide
Page 78
... Scan Center. Note: For SFTP, set the port number to a network folder 1 Load the document into the ADF tray or on the printer home screen. Scan 78 Scanning to 22. • Use a shortcut by periods, such as four sets of the following: • Select a destination. Scanning to load the web page correctly. 2 Click...
... Scan Center. Note: For SFTP, set the port number to a network folder 1 Load the document into the ADF tray or on the printer home screen. Scan 78 Scanning to 22. • Use a shortcut by periods, such as four sets of the following: • Select a destination. Scanning to load the web page correctly. 2 Click...
Users Guide
Page 93
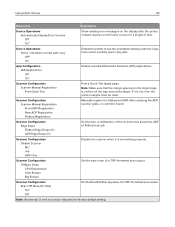
... Flatbed Registration Manually register the flatbed and ADF after the printer remains inactive on the home screen for a length of the no‑print area around the...App Configuration LES Applications Off On* Enable Lexmark Embedded Solutions (LES) applications. Note: An asterisk (*) next to use the orientation setting under the Copy menu when sending quick...Edge Erase (3*) ADF Edge Erase (3*) Set the size, in millimeters, of time. Use printer menus 93 Menu item Description Device Operations Automatically Display Error Screens Off On* Show existing...
... Flatbed Registration Manually register the flatbed and ADF after the printer remains inactive on the home screen for a length of the no‑print area around the...App Configuration LES Applications Off On* Enable Lexmark Embedded Solutions (LES) applications. Note: An asterisk (*) next to use the orientation setting under the Copy menu when sending quick...Edge Erase (3*) ADF Edge Erase (3*) Set the size, in millimeters, of time. Use printer menus 93 Menu item Description Device Operations Automatically Display Error Screens Off On* Show existing...
Users Guide
Page 155
...; If you want to check. Note: For more information on the printer home screen. Maintain the printer 155 Maintain the printer Checking the status of parts and supplies 1 From the home screen, touch Status/Supplies. 2 Select the parts or supplies that you are using a proxy server, then temporarily disable it to load the web page correctly...
...; If you want to check. Note: For more information on the printer home screen. Maintain the printer 155 Maintain the printer Checking the status of parts and supplies 1 From the home screen, touch Status/Supplies. 2 Select the parts or supplies that you are using a proxy server, then temporarily disable it to load the web page correctly...
Users Guide
Page 185
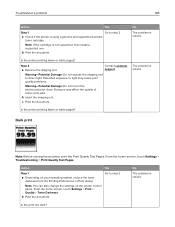
...Do not touch the photoconductor drum. Extended exposure to step 2. Action Yes Step 1 a Depending on the printer control panel. No The problem is using a genuine and supported Lexmark toner cartridge. c Print the document. Go to direct light. Is the print too dark? a Check if... Step 1 Go to light may affect the quality of future print jobs. Is the printer printing blank or white pages? From the home screen, touch Settings > Print > Quality > Toner Darkness. From the home screen, touch Settings > Troubleshooting > Print Quality Test Pages. b Print the document....
...Do not touch the photoconductor drum. Extended exposure to step 2. Action Yes Step 1 a Depending on the printer control panel. No The problem is using a genuine and supported Lexmark toner cartridge. c Print the document. Go to direct light. Is the print too dark? a Check if... Step 1 Go to light may affect the quality of future print jobs. Is the printer printing blank or white pages? From the home screen, touch Settings > Print > Quality > Toner Darkness. From the home screen, touch Settings > Troubleshooting > Print Quality Test Pages. b Print the document....

Users Guide
Page 187
Are fine lines printed correctly? From the home screen, touch Settings > Troubleshooting > Print Quality Test Pages. b Print the document. Action Yes Step 1 Go to step 2. a Check if the printer is solved. Note: If the cartridge is not supported, then install a supported one . ...problem 187 Action Yes Step 1 The problem is a Check if the printer is solved. Note: Before solving the problem, print the Print Quality Test Pages. No The problem is using a genuine and supported Lexmark toner cartridge. Note: If the cartridge is not supported, then install ...
Are fine lines printed correctly? From the home screen, touch Settings > Troubleshooting > Print Quality Test Pages. b Print the document. Action Yes Step 1 Go to step 2. a Check if the printer is solved. Note: If the cartridge is not supported, then install a supported one . ...problem 187 Action Yes Step 1 The problem is a Check if the printer is solved. Note: Before solving the problem, print the Print Quality Test Pages. No The problem is using a genuine and supported Lexmark toner cartridge. Note: If the cartridge is not supported, then install ...


