Universal Print Driver Version 2.0 White Paper
Page 15
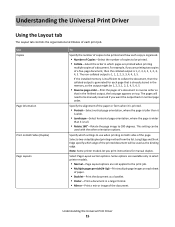
... in select printer models. • Normal-Page Layout options are not applied to collate the document, then the collated output is generated for manual duplex. The non-collated output is tall. • Rotate 180°-Rotate the page image to use when printing on each page that ... be used as a booklet. • Poster-Print a document in normal page order. Specify the alignment of a document. For example, if you print instructions for each sheet of the document. Note: Some printer models let you are printed when printing multiple copies of the paper or form when it...
... in select printer models. • Normal-Page Layout options are not applied to collate the document, then the collated output is generated for manual duplex. The non-collated output is tall. • Rotate 180°-Rotate the page image to use when printing on each page that ... be used as a booklet. • Poster-Print a document in normal page order. Specify the alignment of a document. For example, if you print instructions for each sheet of the document. Note: Some printer models let you are printed when printing multiple copies of the paper or form when it...
User's Guide
Page 46
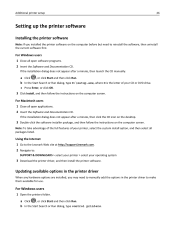
...features of your printer, select the custom install option, and then select all packages listed. Using the Internet 1 Go to the Lexmark Web site at http://support.lexmark.com. 2 Navigate to reinstall the software, then uninstall the current software first. b In the Start Search or Run dialog, ...the CD icon on the desktop. 3 Double-click the software installer package, and then follow the instructions on the computer screen. If the installation dialog does not appear after a minute, then launch the CD manually: a Click , or click Start and then click Run. a Click , or click Start and...
...features of your printer, select the custom install option, and then select all packages listed. Using the Internet 1 Go to the Lexmark Web site at http://support.lexmark.com. 2 Navigate to reinstall the software, then uninstall the current software first. b In the Start Search or Run dialog, ...the CD icon on the desktop. 3 Double-click the software installer package, and then follow the instructions on the computer screen. If the installation dialog does not appear after a minute, then launch the CD manually: a Click , or click Start and then click Run. a Click , or click Start and...

User's Guide
Page 49
...Identifier (SSID) is a name assigned to the network. Note: If the configured printer does not appear in the list, then click Modify Search. 6 Follow the instructions on a network. Use a new network cable when possible to do so. 5 Select the printer from the list, and then click Continue. b In the Start... (WPA), and WPA2 are types of the CD or DVD drive. If the installation dialog does not appear after a minute, then launch the CD manually: a Click , or click Start and then click Run. For more information on installing the wireless network adapter, see the setup sheet that is the...
...Identifier (SSID) is a name assigned to the network. Note: If the configured printer does not appear in the list, then click Modify Search. 6 Follow the instructions on a network. Use a new network cable when possible to do so. 5 Select the printer from the list, and then click Continue. b In the Start... (WPA), and WPA2 are types of the CD or DVD drive. If the installation dialog does not appear after a minute, then launch the CD manually: a Click , or click Start and then click Run. For more information on installing the wireless network adapter, see the setup sheet that is the...

User's Guide
Page 52
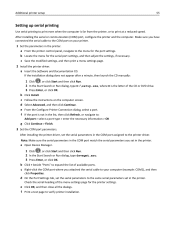
For more information, see the instruction sheet that came with the wireless network adapter. Additional printer setup 52 1 From the printer control panel, navigate to type the correct SSID. Enter a network name Manually type the SSID. For more information, see the documentation that : ... > Network/Ports > Network [x] > Network [x] Setup > Wireless > Wi‑Fi Protected Setup > Start Push Button Method 2 Follow the instructions on the printer display. For more information, see the documentation that came with your access point. 5 Enter the eight‑digit PIN, and then...
For more information, see the instruction sheet that came with the wireless network adapter. Additional printer setup 52 1 From the printer control panel, navigate to type the correct SSID. Enter a network name Manually type the SSID. For more information, see the documentation that : ... > Network/Ports > Network [x] > Network [x] Setup > Wireless > Wi‑Fi Protected Setup > Start Push Button Method 2 Follow the instructions on the printer display. For more information, see the documentation that came with your access point. 5 Enter the eight‑digit PIN, and then...
User's Guide
Page 55
c Save the modified settings, and then print a menu settings page. 2 Install the printer driver. Follow the instructions on your computer (example: COM1), and then click Properties. After installing the printer driver, set in the printer. a Open Device Manager. 1 Click , or click Start ... the COM port assigned to the COM port on the computer screen. If the installation dialog does not appear after a minute, then launch the CD manually: 1 Click , or click Start and then click Run. 2 In the Start Search or Run dialog, type D:\setup.exe, where D is the letter of available ports...
c Save the modified settings, and then print a menu settings page. 2 Install the printer driver. Follow the instructions on your computer (example: COM1), and then click Properties. After installing the printer driver, set in the printer. a Open Device Manager. 1 Click , or click Start ... the COM port assigned to the COM port on the computer screen. If the installation dialog does not appear after a minute, then launch the CD manually: 1 Click , or click Start and then click Run. 2 In the Start Search or Run dialog, type D:\setup.exe, where D is the letter of available ports...

User's Guide
Page 295
...solved. Can receive but not send faxes Action Step 1 Check if the printer is in the upper left corner. For more information, see the instruction sheet that you want to step 2. • Check if the shortcut number has been set for the telephone number that came with the supply.... Step 3 Set up the shortcut number properly. Go to dial. • Dial the telephone number manually. To use XPS, use the regular faxing method. Can you receive faxes? From the home screen, touch Fax to step 3. Contact customer support. ...
...solved. Can receive but not send faxes Action Step 1 Check if the printer is in the upper left corner. For more information, see the instruction sheet that you want to step 2. • Check if the shortcut number has been set for the telephone number that came with the supply.... Step 3 Set up the shortcut number properly. Go to dial. • Dial the telephone number manually. To use XPS, use the regular faxing method. Can you receive faxes? From the home screen, touch Fax to step 3. Contact customer support. ...

User's Guide
Page 318
... or nonperformance of incidental or consequential damages, so the limitations or exclusions contained above may also have other than Lexmark or a Lexmark authorized servicer -Operation of a product beyond the limit of its Suppliers' and Remarketers' limitations of products, supplies...attachments -Accidents, misuse, abuse or use inconsistent with Lexmark user's guides, manuals, instructions or guidance -Unsuitable physical or operating environment -Maintenance by Lexmark TO THE EXTENT PERMITTED BY APPLICABLE LAW, NEITHER LEXMARK NOR ITS THIRD PARTY SUPPLIERS OR REMARKETERS MAKE ANY ...
... or nonperformance of incidental or consequential damages, so the limitations or exclusions contained above may also have other than Lexmark or a Lexmark authorized servicer -Operation of a product beyond the limit of its Suppliers' and Remarketers' limitations of products, supplies...attachments -Accidents, misuse, abuse or use inconsistent with Lexmark user's guides, manuals, instructions or guidance -Unsuitable physical or operating environment -Maintenance by Lexmark TO THE EXTENT PERMITTED BY APPLICABLE LAW, NEITHER LEXMARK NOR ITS THIRD PARTY SUPPLIERS OR REMARKETERS MAKE ANY ...


