
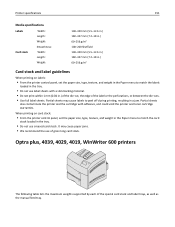
Card Stock & Label Guide
Page 11
... the media. Embossing leads to nesting and double‑sheet feeds, and the fusing process significantly reduces the height of non‑Lexmark supplies (such as toner cartridges and/or inkjet cartridges) • use micro‑perfs to bleed charge. Note: We do not recommend using metallics in forms, whether in .) on both sides...
... the media. Embossing leads to nesting and double‑sheet feeds, and the fusing process significantly reduces the height of non‑Lexmark supplies (such as toner cartridges and/or inkjet cartridges) • use micro‑perfs to bleed charge. Note: We do not recommend using metallics in forms, whether in .) on both sides...
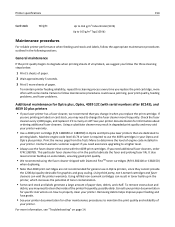
Card Stock & Label Guide
Page 14
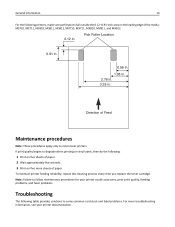
... Location 0.91 in. 0.56 in. 1.08 in. 2.76 in. 3.28 in . To maintain printer feeding reliability, repeat this cleaning process every time you replace the toner cartridge. Note: Failure to follow maintenance procedures for your printer documentation. Direction of Feed Maintenance procedures Note: These procedures apply only to some common card stock...
... Location 0.91 in. 0.56 in. 1.08 in. 2.76 in. 3.28 in . To maintain printer feeding reliability, repeat this cleaning process every time you replace the toner cartridge. Note: Failure to follow maintenance procedures for your printer documentation. Direction of Feed Maintenance procedures Note: These procedures apply only to some common card stock...
Card Stock & Label Guide
Page 65
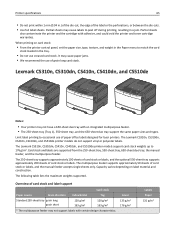
Partial sheets also contaminate the printer and the cartridge with certain design characteristics. Lexmark CS310n, CS310dn, CS410n, CS410dn, and CS510de Notes: • Your printer may cause labels to match the card stock loaded in the tray. • ...sizes and types. It may not support labels with adhesive, and could void the printer and toner cartridge warranties. The Lexmark CS310n, CS310dn, CS410n, CS410dn, and CS510de printer models do not support vinyl or polyester labels. The Lexmark CS310n, CS310dn, CS410n, CS410dn, and CS510de printer models support card stock weights up to ...
Partial sheets also contaminate the printer and the cartridge with certain design characteristics. Lexmark CS310n, CS310dn, CS410n, CS410dn, and CS510de Notes: • Your printer may cause labels to match the card stock loaded in the tray. • ...sizes and types. It may not support labels with adhesive, and could void the printer and toner cartridge warranties. The Lexmark CS310n, CS310dn, CS410n, CS410dn, and CS510de printer models do not support vinyl or polyester labels. The Lexmark CS310n, CS310dn, CS410n, CS410dn, and CS510de printer models support card stock weights up to ...
Card Stock & Label Guide
Page 125
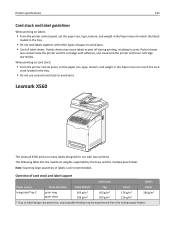
...a jam. Overview of labels is not recommended. When printing on many labels designed for use with adhesive, and could void the printer and toner cartridge warranties. The following table lists the maximum weights supported by the trays and the multipurpose feeder. Partial sheets may be experienced from the multipurpose ... in the Paper menu to match the card stock loaded in the tray. • Do not use creased card stock to avoid jams. Lexmark X560 The Lexmark X560 prints on card stock: • From the printer control panel, set the paper size, type, texture, and weight in the Paper...
...a jam. Overview of labels is not recommended. When printing on many labels designed for use with adhesive, and could void the printer and toner cartridge warranties. The following table lists the maximum weights supported by the trays and the multipurpose feeder. Partial sheets may be experienced from the multipurpose ... in the Paper menu to match the card stock loaded in the tray. • Do not use creased card stock to avoid jams. Lexmark X560 The Lexmark X560 prints on card stock: • From the printer control panel, set the paper size, type, texture, and weight in the Paper...
Card Stock & Label Guide
Page 151
It may cause labels to peel off during printing, resulting in a jam. Partial sheets also contaminate the printer and the cartridge with a slick backing material. • Do not print within 1 mm (0.04 in.) of the die‑cut, the edge of the label or the perforations, ... grain long card stock. Partial sheets may cause paper jams. • We recommend the use label sheets with adhesive, and could void the printer and toner cartridge warranties.
It may cause labels to peel off during printing, resulting in a jam. Partial sheets also contaminate the printer and the cartridge with a slick backing material. • Do not print within 1 mm (0.04 in.) of the die‑cut, the edge of the label or the perforations, ... grain long card stock. Partial sheets may cause paper jams. • We recommend the use label sheets with adhesive, and could void the printer and toner cartridge warranties.
Card Stock & Label Guide
Page 154
... card stock and labels, follow the appropriate maintenance procedures outlined in the following sections. It also lessens toner buildup on some media. Using refilled non‑Lexmark cartridges can void the printer warranty. Machine engine code level 43.74 or later is crusty or stiff. ... card stock and labels generate a large amount of paper dust, debris, and chaff. Using third party, non‑Lexmark cartridges and fuser cleaners can result in toner build‑up in your Optra and Optra plus laser printers that you change the fuser cleaner more information, see "...
... card stock and labels, follow the appropriate maintenance procedures outlined in the following sections. It also lessens toner buildup on some media. Using refilled non‑Lexmark cartridges can void the printer warranty. Machine engine code level 43.74 or later is crusty or stiff. ... card stock and labels generate a large amount of paper dust, debris, and chaff. Using third party, non‑Lexmark cartridges and fuser cleaners can result in toner build‑up in your Optra and Optra plus laser printers that you change the fuser cleaner more information, see "...
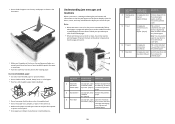
Quick Reference
Page 11
... is set to manufacturer recommendations. bin. [20y.xx] 3 Front door [x]‑page jam, open front door. [20y.xx] Open the front door, then remove the toner cartridge and imaging unit, and then the jammed paper. 11 Jam access area Printer control panel message What to do 1 Automatic [x]‑page jam, open Remove...
... is set to manufacturer recommendations. bin. [20y.xx] 3 Front door [x]‑page jam, open front door. [20y.xx] Open the front door, then remove the toner cartridge and imaging unit, and then the jammed paper. 11 Jam access area Printer control panel message What to do 1 Automatic [x]‑page jam, open Remove...

Quick Reference
Page 12
.... 3 Lift the green handle, and then pull the imaging unit out of the printer. 5 Lift the green flap in front of the printer. 2 Pull the toner cartridge out using the handle.
.... 3 Lift the green handle, and then pull the imaging unit out of the printer. 5 Lift the green flap in front of the printer. 2 Pull the toner cartridge out using the handle.
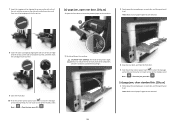
Quick Reference
Page 13
...3 Firmly grasp the jammed paper on each side, and then gently pull it out. 7 Insert the imaging unit by aligning the side rails of the cartridge with the arrows on the side rails inside the printer, and then insert the imaging unit into the printer. 9 Close the front door. 10 From... the message and continue printing. Note: Make sure all paper fragments are removed. 13 Note: Make sure all paper fragments are removed. 8 Insert the toner cartridge by aligning the arrows on the side rails of the unit with the arrows on the side rails inside of injury from a hot component, allow...
...3 Firmly grasp the jammed paper on each side, and then gently pull it out. 7 Insert the imaging unit by aligning the side rails of the cartridge with the arrows on the side rails inside the printer, and then insert the imaging unit into the printer. 9 Close the front door. 10 From... the message and continue printing. Note: Make sure all paper fragments are removed. 13 Note: Make sure all paper fragments are removed. 8 Insert the toner cartridge by aligning the arrows on the side rails of the unit with the arrows on the side rails inside of injury from a hot component, allow...

Supplies Guide
Page 1
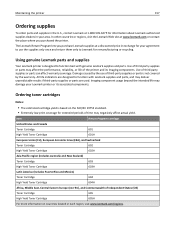
... function best with Lexmark supplies and parts, and may negatively affect actual yield. Item Return Program cartridge United States and Canada Toner Cartridge 601 High Yield Toner Cartridge 601H European Union (EU), European Economic Area (EEA), and Switzerland Toner Cartridge 602 High Yield Toner Cartridge 602H Asia Pacific region (includes Australia and New Zealand) Toner Cartridge 603 High Yield Toner Cartridge 603H Latin America...
... function best with Lexmark supplies and parts, and may negatively affect actual yield. Item Return Program cartridge United States and Canada Toner Cartridge 601 High Yield Toner Cartridge 601H European Union (EU), European Economic Area (EEA), and Switzerland Toner Cartridge 602 High Yield Toner Cartridge 602H Asia Pacific region (includes Australia and New Zealand) Toner Cartridge 603 High Yield Toner Cartridge 603H Latin America...

Supplies Guide
Page 2
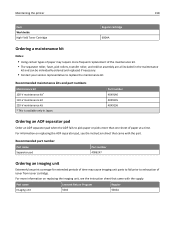
... replace the maintenance kit. Part name Lexmark Return Program Regular Imaging unit 500Z 500ZA Ordering a maintenance kit Notes: • Using certain types of paper may cause imaging unit parts to fail prior to exhaustion of toner from toner cartridge. Supplies Guide Page 2 of 2 Item Worldwide High Yield Toner Cartridge Regular cartridge 600HA Ordering an imaging unit Extremely...
... replace the maintenance kit. Part name Lexmark Return Program Regular Imaging unit 500Z 500ZA Ordering a maintenance kit Notes: • Using certain types of paper may cause imaging unit parts to fail prior to exhaustion of toner from toner cartridge. Supplies Guide Page 2 of 2 Item Worldwide High Yield Toner Cartridge Regular cartridge 600HA Ordering an imaging unit Extremely...

User's Guide
Page 49
Partial sheets may contaminate the printer. Tips on using card stock Card stock is 40 percent. Partial sheets also contaminate the printer and the cartridge with adhesive, and could void the warranty. • If zone coating of the adhesive is not possible, then remove a 2‑...; Make sure the Paper Type is recommended, especially when printing bar codes. Adhesive material contaminates the printer and could void the printer and toner cartridge warranties. • Do not use labels with relative humidity between die‑cuts of the label. • Make sure the adhesive backing...
Partial sheets may contaminate the printer. Tips on using card stock Card stock is 40 percent. Partial sheets also contaminate the printer and the cartridge with adhesive, and could void the warranty. • If zone coating of the adhesive is not possible, then remove a 2‑...; Make sure the Paper Type is recommended, especially when printing bar codes. Adhesive material contaminates the printer and could void the printer and toner cartridge warranties. • Do not use labels with relative humidity between die‑cuts of the label. • Make sure the adhesive backing...

User's Guide
Page 151
... the instructions on the computer screen. When you return a cartridge to Lexmark, you can also do the following: 1 Go to www.lexmark.com/recycle. 2 From the Toner Cartridges section, select your area. Facilities may not exist in your printer or cartridge and use the prepaid shipping label. Lexmark will recycle the box. Boxes used to ensure that...
... the instructions on the computer screen. When you return a cartridge to Lexmark, you can also do the following: 1 Go to www.lexmark.com/recycle. 2 From the Toner Cartridges section, select your area. Facilities may not exist in your printer or cartridge and use the prepaid shipping label. Lexmark will recycle the box. Boxes used to ensure that...
User's Guide
Page 157
... warranty coverage. Use of Independent States (CIS) Toner Cartridge 605 High Yield Toner Cartridge 605H For more information on the ISO/IEC 19752 standard. • Extremely low print coverage for information about Lexmark authorized supplies dealers in each region, visit www.lexmark.com/regions. Ordering toner cartridges Notes: • The estimated cartridge yield is based on countries located in...
... warranty coverage. Use of Independent States (CIS) Toner Cartridge 605 High Yield Toner Cartridge 605H For more information on the ISO/IEC 19752 standard. • Extremely low print coverage for information about Lexmark authorized supplies dealers in each region, visit www.lexmark.com/regions. Ordering toner cartridges Notes: • The estimated cartridge yield is based on countries located in...
User's Guide
Page 158
... ADF separator pad when the ADF fails to exhaustion of toner from toner cartridge. For more information on replacing the ADF separator pad, see the instruction sheet that came with the part. Part name Lexmark Return Program Regular Imaging unit 500Z 500ZA For information on ...fuser, pick rollers, transfer roller, and redrive assembly are all included in Japan. Maintaining the printer 158 Item Worldwide High Yield Toner Cartridge Regular cartridge 600HA Ordering a maintenance kit Notes: • Using certain types of paper may cause imaging unit parts to fail prior to pick...
... ADF separator pad when the ADF fails to exhaustion of toner from toner cartridge. For more information on replacing the ADF separator pad, see the instruction sheet that came with the part. Part name Lexmark Return Program Regular Imaging unit 500Z 500ZA For information on ...fuser, pick rollers, transfer roller, and redrive assembly are all included in Japan. Maintaining the printer 158 Item Worldwide High Yield Toner Cartridge Regular cartridge 600HA Ordering a maintenance kit Notes: • Using certain types of paper may cause imaging unit parts to fail prior to pick...

User's Guide
Page 159
Maintaining the printer 159 Storing supplies Choose a cool, clean storage area for the printer supplies. Do not expose supplies to use them. Store supplies right side up in their original packing until you are ready to : • Direct sunlight • Temperatures above 35°C (95°F) • High humidity above 80% • Salty air • Corrosive gases • Heavy dust Replacing supplies Replacing the toner cartridge 1 Press the button on the right side of the printer, and then open the front door.
Maintaining the printer 159 Storing supplies Choose a cool, clean storage area for the printer supplies. Do not expose supplies to use them. Store supplies right side up in their original packing until you are ready to : • Direct sunlight • Temperatures above 35°C (95°F) • High humidity above 80% • Salty air • Corrosive gases • Heavy dust Replacing supplies Replacing the toner cartridge 1 Press the button on the right side of the printer, and then open the front door.

User's Guide
Page 160
Warning-Potential Damage: Do not expose the imaging unit to redistribute the toner. 5 Insert the toner cartridge into the printer by aligning the side rails of the cartridge with the arrows on the side rails inside the printer. Maintaining the printer 160 2 Pull the toner cartridge out using the handle. 3 Unpack the toner cartridge, and then remove all packing materials. 4 Shake the new cartridge to direct light for more than 10 minutes. Extended exposure to light may cause print quality problems. 6 Close the front door.
Warning-Potential Damage: Do not expose the imaging unit to redistribute the toner. 5 Insert the toner cartridge into the printer by aligning the side rails of the cartridge with the arrows on the side rails inside the printer. Maintaining the printer 160 2 Pull the toner cartridge out using the handle. 3 Unpack the toner cartridge, and then remove all packing materials. 4 Shake the new cartridge to direct light for more than 10 minutes. Extended exposure to light may cause print quality problems. 6 Close the front door.
User's Guide
Page 161
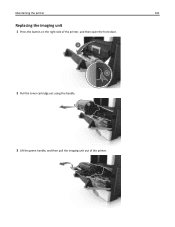
Maintaining the printer 161 Replacing the imaging unit 1 Press the button on the right side of the printer, and then open the front door. 2 Pull the toner cartridge out using the handle. 3 Lift the green handle, and then pull the imaging unit out of the printer.
Maintaining the printer 161 Replacing the imaging unit 1 Press the button on the right side of the printer, and then open the front door. 2 Pull the toner cartridge out using the handle. 3 Lift the green handle, and then pull the imaging unit out of the printer.
User's Guide
Page 163
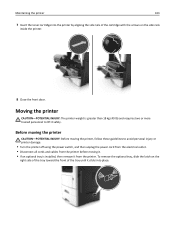
..., slide the latch on the right side of the tray toward the front of the tray until it safely. Maintaining the printer 163 7 Insert the toner cartridge into place. Before moving the printer CAUTION-POTENTIAL INJURY: Before moving the printer, follow these guidelines to avoid personal injury or printer damage: • Turn...
..., slide the latch on the right side of the tray toward the front of the tray until it safely. Maintaining the printer 163 7 Insert the toner cartridge into place. Before moving the printer CAUTION-POTENTIAL INJURY: Before moving the printer, follow these guidelines to avoid personal injury or printer damage: • Turn...
User's Guide
Page 166
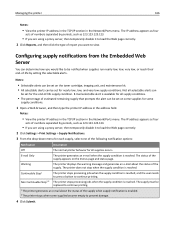
... reached, and the user needs to press a button to view. E‑mail selectable alert is reached. Notes: • Selectable alerts can be set on the toner cartridge, imaging unit, and maintenance kit. • All selectable alerts can be replaced to prevent damage. 4 Click Submit. The IP address appears as four sets of...
... reached, and the user needs to press a button to view. E‑mail selectable alert is reached. Notes: • Selectable alerts can be set on the toner cartridge, imaging unit, and maintenance kit. • All selectable alerts can be replaced to prevent damage. 4 Click Submit. The IP address appears as four sets of...


