
Tech Notes
Page 1
Tech Note Your LexmarkTM Printer Driver Using your printer driver: creating custom forms The ability to associate a friendly name with a group of a button. For example, if you print a daily report that may include: • paper size. • paper type. • watermark selections. &#...access this will be a welcome timesaver in a subsequent section) and associate those settings with the press of frequently used when the document prints. button from the Paper size drop-down list on the next page.) 5 Enter a name for printing. this feature, you want to begin: 1...
Tech Note Your LexmarkTM Printer Driver Using your printer driver: creating custom forms The ability to associate a friendly name with a group of a button. For example, if you print a daily report that may include: • paper size. • paper type. • watermark selections. &#...access this will be a welcome timesaver in a subsequent section) and associate those settings with the press of frequently used when the document prints. button from the Paper size drop-down list on the next page.) 5 Enter a name for printing. this feature, you want to begin: 1...
Tech Notes
Page 2
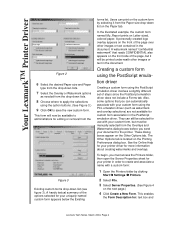
...named custom form appears below the Existing forms list. To begin, you can still be selected for use with your custom form using the option buttons. (See Figure 3.) 9 Click OK to administrators for editing or removal from the Paper size drop-down list on the Other Options tab. ...This enables the Form Description for: text box and Lexmark Tech Notes, March 2004, Page 2 In the illustrated example, the custom form named My_Report prints on the next page.) 4 Click Create a New Form....
...named custom form appears below the Existing forms list. To begin, you can still be selected for use with your custom form using the option buttons. (See Figure 3.) 9 Click OK to administrators for editing or removal from the Paper size drop-down list on the Other Options tab. ...This enables the Form Description for: text box and Lexmark Tech Notes, March 2004, Page 2 In the illustrated example, the custom form named My_Report prints on the next page.) 4 Click Create a New Form....
Universal Print Driver Version 2.0 White Paper
Page 20
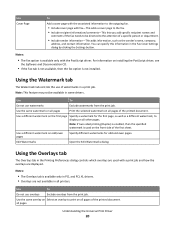
... all other pages. Using the Watermark tab The Watermark tab controls the use of watermarks in the Fax Cover Settings dialog by clicking the Settings button. Use a different watermark on the first page Specify a watermark for odd and even pages. Using the Overlays tab The Overlays tab in all pages of...
... all other pages. Using the Watermark tab The Watermark tab controls the use of watermarks in the Fax Cover Settings dialog by clicking the Settings button. Use a different watermark on the first page Specify a watermark for odd and even pages. Using the Overlays tab The Overlays tab in all pages of...

Copy Guide
Page 1
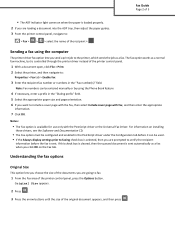
... paper guides. Place these items on the scanner glass. • The ADF indicator light comes on the scanner glass, press the left or right arrow button to scroll to Scan the Next Page, and then press . 3 Press the left corner. 2 From the printer control panel, use the keypad to be printed... number of copies, and then press . Copy Guide Page 1 of 3 Copy Guide Note: You can load paper sizes in the upper left or right arrow button to scroll to Finish the Job, and then press .
... paper guides. Place these items on the scanner glass. • The ADF indicator light comes on the scanner glass, press the left or right arrow button to scroll to Scan the Next Page, and then press . 3 Press the left corner. 2 From the printer control panel, use the keypad to be printed... number of copies, and then press . Copy Guide Page 1 of 3 Copy Guide Note: You can load paper sizes in the upper left or right arrow button to scroll to Finish the Job, and then press .

Copy Guide
Page 2
...to scale the scan image to fit the size of the original document, press the left or right arrow button on which you set "Copy to" to Auto Size Sense, and then press . You can select ...Sides (Duplex) This option lets you make a continuous decrease or increase in value, press and hold the button for "Copy from your copies will be printed. • To scroll to the paper size and type that...and type on the printer control panel. To make one percent, press the left or right arrow button to scroll to Auto Size Match. Content Type This option lets you are in relation to load ...
...to scale the scan image to fit the size of the original document, press the left or right arrow button on which you set "Copy to" to Auto Size Sense, and then press . You can select ...Sides (Duplex) This option lets you make a continuous decrease or increase in value, press and hold the button for "Copy from your copies will be printed. • To scroll to the paper size and type that...and type on the printer control panel. To make one percent, press the left or right arrow button to scroll to Auto Size Match. Content Type This option lets you are in relation to load ...

Fax Guide
Page 1
... recipients. 1 Load an original document faceup, short edge first into the ADF tray or facedown on the scanner glass, press the left or right arrow button to scroll to Scan the Next Page, and then press . 4 Press the left or right arrow...
... recipients. 1 Load an original document faceup, short edge first into the ADF tray or facedown on the scanner glass, press the left or right arrow button to scroll to Scan the Next Page, and then press . 4 Press the left or right arrow...
Fax Guide
Page 2
...option lets you choose the size of the documents you want to fax. 1 From the Fax area of the printer control panel, press the Options button. Note: Fax numbers can be entered manually or by using the computer The printer driver fax option lets you send a print job to : ...queued document is available for use only with fax, and then enter the appropriate information. 7 Click OK. Original Size appears. 2 Press . 3 Press the arrow buttons until the size of the original document appears, and then press . Fax Guide Page 2 of 3 • The ADF indicator light comes on the Fax tab...
...option lets you choose the size of the documents you want to fax. 1 From the Fax area of the printer control panel, press the Options button. Note: Fax numbers can be entered manually or by using the computer The printer driver fax option lets you send a print job to : ...queued document is available for use only with fax, and then enter the appropriate information. 7 Click OK. Original Size appears. 2 Press . 3 Press the arrow buttons until the size of the original document appears, and then press . Fax Guide Page 2 of 3 • The ADF indicator light comes on the Fax tab...

Quick Reference
Page 1
...The largest supported Universal paper size is 215.9 x 359.92 mm (8.5 x 14.17 inches), and is selected. 10 Fax button Send faxes. 11 Back button Return to the previous screen. 12 Home button Go to : > Settings > > Paper Menu > > Universal Setup > > Units of Measure > > select a unit... of the printer. Indicator light color and its corresponding printer status Sleep button light Off Solid amber Blinking amber Blinking amber for 0.1 second, then goes completely off or in Hibernate mode. The printer is in Ready state...
...The largest supported Universal paper size is 215.9 x 359.92 mm (8.5 x 14.17 inches), and is selected. 10 Fax button Send faxes. 11 Back button Return to the previous screen. 12 Home button Go to : > Settings > > Paper Menu > > Universal Setup > > Units of Measure > > select a unit... of the printer. Indicator light color and its corresponding printer status Sleep button light Off Solid amber Blinking amber Blinking amber for 0.1 second, then goes completely off or in Hibernate mode. The printer is in Ready state...

Quick Reference
Page 2
.... • Make sure the width and length guides are loading. 1 2 A5 A4 EXEC LTR B5 3 Unlock the length guide. 3 Press the left or right arrow button to the correct position for the size of the paper you can purchase a dust cover separately. Doing so may cause a jam. 2 Squeeze, and then slide...
.... • Make sure the width and length guides are loading. 1 2 A5 A4 EXEC LTR B5 3 Unlock the length guide. 3 Press the left or right arrow button to the correct position for the size of the paper you can purchase a dust cover separately. Doing so may cause a jam. 2 Squeeze, and then slide...

Quick Reference
Page 8
... clippings) into the ADF tray or facedown on the scanner glass, press the left or right arrow button to scroll to Scan the Next Page, and then press . 4 Press the left or right arrow button to scroll to Finish the Job, and then press . If you are using a proxy server, then temporarily... e-mail address. Copying photos 1 Place a photo facedown on the scanner glass, press the left or right arrow button to scroll to Scan the Next Page, and then press . 3 Press the left or right arrow button to scroll to Finish the Job, and then press . Note: If you are copying, and then press...
... clippings) into the ADF tray or facedown on the scanner glass, press the left or right arrow button to scroll to Scan the Next Page, and then press . 4 Press the left or right arrow button to scroll to Finish the Job, and then press . If you are using a proxy server, then temporarily... e-mail address. Copying photos 1 Place a photo facedown on the scanner glass, press the left or right arrow button to scroll to Scan the Next Page, and then press . 3 Press the left or right arrow button to scroll to Finish the Job, and then press . Note: If you are copying, and then press...

Quick Reference
Page 9
... to fax another document, then place it on the scanner glass, press the left or right arrow button to scroll to Scan the Next Page, and then press . 4 Press the left or right arrow button to scroll to the printer, which sends the job as a fax. Notes: • Do not load postcards...
... to fax another document, then place it on the scanner glass, press the left or right arrow button to scroll to Scan the Next Page, and then press . 4 Press the left or right arrow button to scroll to the printer, which sends the job as a fax. Notes: • Do not load postcards...

Quick Reference
Page 10
... the Job appears, then press . Canceling a fax job after scanning the original documents 1 From the printer control panel, press . 2 Press the left or right arrow button to scroll to cancel. 3 Press > Delete Selected Jobs. Notes: • Do not load postcards, photos, small items, transparencies, photo paper, or thin media (such as...
... the Job appears, then press . Canceling a fax job after scanning the original documents 1 From the printer control panel, press . 2 Press the left or right arrow button to scroll to cancel. 3 Press > Delete Selected Jobs. Notes: • Do not load postcards, photos, small items, transparencies, photo paper, or thin media (such as...

Quick Reference
Page 12
... problems. 12 Note: Make sure all paper fragments are removed. 4 Place the imaging unit aside on each side, and then gently pull it . 1 Press the button on the right side of the printer, and then open front door. [20y.xx] CAUTION-HOT SURFACE: The inside of the printer might be hot...
... problems. 12 Note: Make sure all paper fragments are removed. 4 Place the imaging unit aside on each side, and then gently pull it . 1 Press the button on the right side of the printer, and then open front door. [20y.xx] CAUTION-HOT SURFACE: The inside of the printer might be hot...

User's Guide
Page 2
... of the scanner 11 Using the ADF and scanner glass...12 Using the printer control panel...13 Understanding the colors of the indicator and Sleep button lights 13 Additional printer setup 15 Installing internal options...15 Installing hardware options...19 Attaching cables...22 Setting up the printer software...23 Networking...24...
... of the scanner 11 Using the ADF and scanner glass...12 Using the printer control panel...13 Understanding the colors of the indicator and Sleep button lights 13 Additional printer setup 15 Installing internal options...15 Installing hardware options...19 Attaching cables...22 Setting up the printer software...23 Networking...24...
User's Guide
Page 11
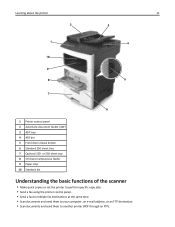
Learning about the printer 11 1 Printer control panel 2 Automatic document feeder (ADF) 3 ADF tray 4 ADF bin 5 Front door release button 6 Standard 250‑sheet tray 7 Optional 250‑ or 550‑sheet tray 8 50‑sheet multipurpose feeder 9 Paper stop 10 Standard bin Understanding the ...
Learning about the printer 11 1 Printer control panel 2 Automatic document feeder (ADF) 3 ADF tray 4 ADF bin 5 Front door release button 6 Standard 250‑sheet tray 7 Optional 250‑ or 550‑sheet tray 8 50‑sheet multipurpose feeder 9 Paper stop 10 Standard bin Understanding the ...
User's Guide
Page 13
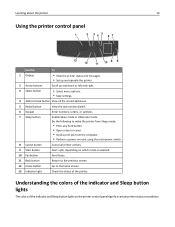
...to the home screen. Cancel all the stored addresses. 5 Redial button 6 Keypad 7 Sleep button 8 Cancel button 9 Start button 10 Fax button 11 Back button View the last number dialed. Check the status of the indicator and Sleep button lights on the printer control panel signify a certain printer status or...• Set up and down or left and right. 3 Select button • Select menu options. • Save settings. 4 Address book button View all printer activity. Return to the previous screen. 12 Home button 13 Indicator light Go to wake the printer from Sleep mode: •...
...to the home screen. Cancel all the stored addresses. 5 Redial button 6 Keypad 7 Sleep button 8 Cancel button 9 Start button 10 Fax button 11 Back button View the last number dialed. Check the status of the indicator and Sleep button lights on the printer control panel signify a certain printer status or...• Set up and down or left and right. 3 Select button • Select menu options. • Save settings. 4 Address book button View all printer activity. Return to the previous screen. 12 Home button 13 Indicator light Go to wake the printer from Sleep mode: •...
User's Guide
Page 14
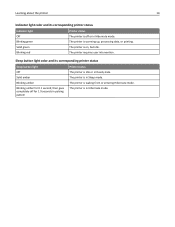
Blinking red The printer requires user intervention. Sleep button light color and its corresponding printer status Indicator light Off Blinking green Solid green Printer status The printer is waking from or entering Hibernate mode. ...The printer is idle or in Hibernate mode. Learning about the printer 14 Indicator light color and its corresponding printer status Sleep button light Off Solid amber Blinking amber Blinking amber for 0.1 second, then goes completely off or in Sleep mode. The printer is off for 1.9 seconds in...
Blinking red The printer requires user intervention. Sleep button light color and its corresponding printer status Indicator light Off Blinking green Solid green Printer status The printer is waking from or entering Hibernate mode. ...The printer is idle or in Hibernate mode. Learning about the printer 14 Indicator light color and its corresponding printer status Sleep button light Off Solid amber Blinking amber Blinking amber for 0.1 second, then goes completely off or in Sleep mode. The printer is off for 1.9 seconds in...

User's Guide
Page 28
...;digit PIN, and then save the setting. Notes: • View the printer IP address on the printer display. Additional printer setup 28 Using the Push Button Configuration (PBC) method 1 From the printer control panel, navigate to: > Settings > >Network/Ports > > Network [x] > > Network [x] Setup > > Wireless > > Wi‑Fi Protected Setup > > Start Push...
...;digit PIN, and then save the setting. Notes: • View the printer IP address on the printer display. Additional printer setup 28 Using the Push Button Configuration (PBC) method 1 From the printer control panel, navigate to: > Settings > >Network/Ports > > Network [x] > > Network [x] Setup > > Wireless > > Wi‑Fi Protected Setup > > Start Push...

User's Guide
Page 30
... Loading paper and specialty media The selection and handling of 2 Select Portrait Width or Portrait Height, and then press . 3 Press the left or right arrow button to change the settings. Notes: • The smallest supported Universal paper size is 76.2 x 76.2 mm (3 x 3 inches), and is supported only... select the tray or feeder, and then press . 3 Press the up or down arrow button to select the paper size, and then press . 4 Press the up or down arrow button to select the paper type, and then press to : > Settings > measure > > Paper Menu > > Universal Setup > > Units of Measure > > ...
... Loading paper and specialty media The selection and handling of 2 Select Portrait Width or Portrait Height, and then press . 3 Press the left or right arrow button to change the settings. Notes: • The smallest supported Universal paper size is 76.2 x 76.2 mm (3 x 3 inches), and is supported only... select the tray or feeder, and then press . 3 Press the up or down arrow button to select the paper size, and then press . 4 Press the up or down arrow button to select the paper type, and then press to : > Settings > measure > > Paper Menu > > Universal Setup > > Units of Measure > > ...
User's Guide
Page 54
... activated. Printing information pages Printing a font sample list 1 From the printer control panel, navigate to: > Settings > > Reports > > Print Fonts 2 Press the up or down arrow button to cancel, and then Canceling a print job from the printer control panel From the printer control panel, press press . . Canceling a print job Canceling a print job...
... activated. Printing information pages Printing a font sample list 1 From the printer control panel, navigate to: > Settings > > Reports > > Print Fonts 2 Press the up or down arrow button to cancel, and then Canceling a print job from the printer control panel From the printer control panel, press press . . Canceling a print job Canceling a print job...


