Universal Print Driver Version 2.0 White Paper
Page 9
... - MX718de Color laser printers - CS417dn - MX717de - CS827de Monochrome laser printers - MS617dn - CX317dn - CX827de Monochrome laser multifunction products - MX617de - MS417dn - MS817dn - MS817n - MS317dn - Croatian - XM7200 Series (XM7263, XM7270) Note: For more information, see "Supported printers" on page 22. ...• Added support for the following languages: - Serbian If you can upgrade to UPD version 2.11. MX317dn - MX417de - MS517dn - CS517de - CS727de - XM5200 Series (XM5263, XM5270) - Change history 9 Lexmark...
... - MX718de Color laser printers - CS417dn - MX717de - CS827de Monochrome laser printers - MS617dn - CX317dn - CX827de Monochrome laser multifunction products - MX617de - MS417dn - MS817dn - MS817n - MS317dn - Croatian - XM7200 Series (XM7263, XM7270) Note: For more information, see "Supported printers" on page 22. ...• Added support for the following languages: - Serbian If you can upgrade to UPD version 2.11. MX317dn - MX417de - MS517dn - CS517de - CS727de - XM5200 Series (XM5263, XM5270) - Change history 9 Lexmark...
Universal Print Driver Version 2.0 White Paper
Page 29
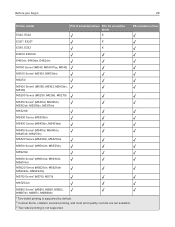
Before you begin 29 Printer model E320, E322 PCL 5 emulation driver PCL XL emulation driver X PS emulation driver E3213, E3233 X E330, E332 X E360d, E360dn E460dn, E460dw, E462dtn M1100 Series1...MS331dn) MS430 Series (MS431dn, MS431dw) MS410 Series1 (MS410d, MS410dn, MS415dn, MS417dn) MS420 Series (MS421dn, MS421dw) MS510 Series1 (MS510dn, MS517dn) MS521dn MS610 Series1 (MS610de, MS610dn, MS617dn) MS620 Series (MS621dn, MS621dtn MS622de, MS622dte) MS710 Series1 (MS710, MS711) MS725dvn MS810 Series1 (MS810, MS811, MS812, MS817dn, MS817n, MS818dn) 1 Two‑sided printing is ...
Before you begin 29 Printer model E320, E322 PCL 5 emulation driver PCL XL emulation driver X PS emulation driver E3213, E3233 X E330, E332 X E360d, E360dn E460dn, E460dw, E462dtn M1100 Series1...MS331dn) MS430 Series (MS431dn, MS431dw) MS410 Series1 (MS410d, MS410dn, MS415dn, MS417dn) MS420 Series (MS421dn, MS421dw) MS510 Series1 (MS510dn, MS517dn) MS521dn MS610 Series1 (MS610de, MS610dn, MS617dn) MS620 Series (MS621dn, MS621dtn MS622de, MS622dte) MS710 Series1 (MS710, MS711) MS725dvn MS810 Series1 (MS810, MS811, MS812, MS817dn, MS817n, MS818dn) 1 Two‑sided printing is ...

Forms and Bar Code Card 3.3 Users Guide
Page 4
... forms. - Supported devices • Lexmark CS410dn, CS410n, CS417dn • Lexmark CS510de, CS510e, CS517de • Lexmark CX310n, CX310dn, CX317dn • Lexmark CX410e, CX410de, CX417de • Lexmark CX510de, CX517de • Lexmark MS510dn, MS517dn • Lexmark MS610de, MS610dn, MS617dn It serves as bitmap and scalable fonts... options include the following features: • Storing and printing forms from a 256MB flash memory or optional/standard printer hard disk • Built‑in SAP R/3 software program. Bar code options include the following features: • ...
... forms. - Supported devices • Lexmark CS410dn, CS410n, CS417dn • Lexmark CS510de, CS510e, CS517de • Lexmark CX310n, CX310dn, CX317dn • Lexmark CX410e, CX410de, CX417de • Lexmark CX510de, CX517de • Lexmark MS510dn, MS517dn • Lexmark MS610de, MS610dn, MS617dn It serves as bitmap and scalable fonts... options include the following features: • Storing and printing forms from a 256MB flash memory or optional/standard printer hard disk • Built‑in SAP R/3 software program. Bar code options include the following features: • ...

Embedded Web Server Administrator s Guide
Page 4
...+, M1145, M3150dn, M5163dn, MS310d, MS310dn, MS312dn, MS315dn, MS317dn, MS410d, MS410dn, MS415dn, MS417dn, MS510dn, MS517dn, MS610dn, MS610dtn, MS617dn, MS711dn, MS711dn, MS810n, MS810dn, MS811n, MS811dn, MS812dn, MS817dn, MS817n, MS818dn, MX310dn, MX317dn Advanced‑security devices Series Printer models C Series CS510de, CS510dte, CS517de, CX410de, CX410e/dte, CX417de, CX510de, CX510dhe/dthe, CX517de M Series MS610de, MS610dte, MS810de...
...+, M1145, M3150dn, M5163dn, MS310d, MS310dn, MS312dn, MS315dn, MS317dn, MS410d, MS410dn, MS415dn, MS417dn, MS510dn, MS517dn, MS610dn, MS610dtn, MS617dn, MS711dn, MS711dn, MS810n, MS810dn, MS811n, MS811dn, MS812dn, MS817dn, MS817n, MS818dn, MX310dn, MX317dn Advanced‑security devices Series Printer models C Series CS510de, CS510dte, CS517de, CX410de, CX410e/dte, CX417de, CX510de, CX510dhe/dthe, CX517de M Series MS610de, MS610dte, MS810de...

PRESCRIBE Emulation P41g Technical Reference -- July 2017
Page 3
...; Lexmark MS510dn, MS517dn • Lexmark MS610de, MS610dn, MS617dn • Lexmark MS810, MS811, MS812, MS817n, MS817dn, MS818dn • Lexmark MX310 • Lexmark MX410, MX410de • Lexmark MX510, MX517de • Lexmark MX610, MX617de • Lexmark MX710, MX717de, MX718de • Lexmark MX810 Installing the PRESCRIBE emulation option Note: Installing the option may not require further setup. Introduction 3 Introduction PRESCRIBE emulation option for Lexmark laser printers...
...; Lexmark MS510dn, MS517dn • Lexmark MS610de, MS610dn, MS617dn • Lexmark MS810, MS811, MS812, MS817n, MS817dn, MS818dn • Lexmark MX310 • Lexmark MX410, MX410de • Lexmark MX510, MX517de • Lexmark MX610, MX617de • Lexmark MX710, MX717de, MX718de • Lexmark MX810 Installing the PRESCRIBE emulation option Note: Installing the option may not require further setup. Introduction 3 Introduction PRESCRIBE emulation option for Lexmark laser printers...

Users Guide PDF
Page 2
... 5 Conventions...5 Overview...8 Using this guide...8 Finding information about the printer...8 Selecting a location for the printer 10 Additional printer setup 12 Installing internal options...12 Installing hardware options...27 Setting up the printer software...28 Networking...29 Using MS510dn, MS517dn, MS610dn, and MS617dn 34 Learning about the printer...34 Loading paper and specialty media...39 Printing...50...
... 5 Conventions...5 Overview...8 Using this guide...8 Finding information about the printer...8 Selecting a location for the printer 10 Additional printer setup 12 Installing internal options...12 Installing hardware options...27 Setting up the printer software...28 Networking...29 Using MS510dn, MS517dn, MS610dn, and MS617dn 34 Learning about the printer...34 Loading paper and specialty media...39 Printing...50...

Users Guide PDF
Page 13
Additional printer setup 13 Warning-Potential Damage: Controller board electronic components are easily damaged by its sides, align the plastic pins (1) on the card with the holes (2) ... the card by static electricity. For the MS610de printer model, see "Accessing the controller board" on page 38. Touch a metal surface on page 71. 2 Unpack the optional card. For the MS510dn, MS517dn, MS610dn, and MS617dn printer models, see "Accessing the controller board" on the printer before touching any controller board electronic components or connectors...
Additional printer setup 13 Warning-Potential Damage: Controller board electronic components are easily damaged by its sides, align the plastic pins (1) on the card with the holes (2) ... the card by static electricity. For the MS610de printer model, see "Accessing the controller board" on page 38. Touch a metal surface on page 71. 2 Unpack the optional card. For the MS510dn, MS517dn, MS610dn, and MS617dn printer models, see "Accessing the controller board" on the printer before touching any controller board electronic components or connectors...

Users Guide PDF
Page 14
...ush against the controller board. 5 For the MS510dn, MS517dn, MS610dn, and MS617dn printer models, close the access door. Note: The entire length of the card may cause damage to the printer, then turn the printer off, and unplug the power cord from the electrical outlet before continuing. ... board or installing optional hardware or memory devices sometime after setting up the printer, then turn them available for print jobs. Additional printer setup 14 4 Push the card firmly into the printer. Installing a memory card CAUTION-SHOCK HAZARD: If you have any cables going...
...ush against the controller board. 5 For the MS510dn, MS517dn, MS610dn, and MS617dn printer models, close the access door. Note: The entire length of the card may cause damage to the printer, then turn the printer off, and unplug the power cord from the electrical outlet before continuing. ... board or installing optional hardware or memory devices sometime after setting up the printer, then turn them available for print jobs. Additional printer setup 14 4 Push the card firmly into the printer. Installing a memory card CAUTION-SHOCK HAZARD: If you have any cables going...

Users Guide PDF
Page 15
... be purchased separately and attached to the controller board. 1 Access the controller board. Touch something metal on the connector. 1 2 For the MS510dn, MS517dn, MS610dn, and MS617dn printer models, see "Accessing the controller board" on page 38. Warning-Potential Damage: Do not touch the connection points along the edge of the card. 3 Align...
... be purchased separately and attached to the controller board. 1 Access the controller board. Touch something metal on the connector. 1 2 For the MS510dn, MS517dn, MS610dn, and MS617dn printer models, see "Accessing the controller board" on page 38. Warning-Potential Damage: Do not touch the connection points along the edge of the card. 3 Align...

Users Guide PDF
Page 16
... electrical outlet before continuing. CAUTION-SHOCK HAZARD: If you have any cables going into place. 1 2 5 For the MS510dn, MS517dn, MS610dn, and MS617dn printer models, close the access door. Note: When the printer software and any hardware options are accessing the controller board or installing optional hardware or memory devices sometime after setting up...
... electrical outlet before continuing. CAUTION-SHOCK HAZARD: If you have any cables going into place. 1 2 5 For the MS510dn, MS517dn, MS610dn, and MS617dn printer models, close the access door. Note: When the printer software and any hardware options are accessing the controller board or installing optional hardware or memory devices sometime after setting up...

Users Guide PDF
Page 34
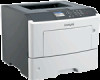
Keep all other trays closed until needed. MS510dn and MS517dn 23 4 1 5 6 8 7 1 Control panel 2 Paper stop 3 Standard bin 4 Front door release button 5 Controller board access door 6 100‑sheet multipurpose feeder 7 Standard 250‑sheet tray 8 Optional 250‑ or 550‑sheet trays Using MS510dn, MS517dn, MS610dn, and MS617dn 34 Using MS510dn, MS517dn, MS610dn, and MS617dn Learning about the printer Printer configurations CAUTION-POTENTIAL INJURY: To reduce the risk of equipment instability, load each tray separately.
Keep all other trays closed until needed. MS510dn and MS517dn 23 4 1 5 6 8 7 1 Control panel 2 Paper stop 3 Standard bin 4 Front door release button 5 Controller board access door 6 100‑sheet multipurpose feeder 7 Standard 250‑sheet tray 8 Optional 250‑ or 550‑sheet trays Using MS510dn, MS517dn, MS610dn, and MS617dn 34 Using MS510dn, MS517dn, MS610dn, and MS617dn Learning about the printer Printer configurations CAUTION-POTENTIAL INJURY: To reduce the risk of equipment instability, load each tray separately.

Users Guide PDF
Page 35
Select menu options. Save settings. Scroll up and operate the printer. Scroll to the left. Set up . 98 Using MS510dn, MS517dn, MS610dn, and MS617dn 35 MS610dn and MS617dn 1 23 4 5 6 8 7 1 Printer control panel 2 Paper stop 3 Standard bin 4 Front door release button 5 Controller board access door 6 100‑sheet multipurpose feeder 7 Standard 550‑sheet tray 8 Optional...
Select menu options. Save settings. Scroll up and operate the printer. Scroll to the left. Set up . 98 Using MS510dn, MS517dn, MS610dn, and MS617dn 35 MS610dn and MS617dn 1 23 4 5 6 8 7 1 Printer control panel 2 Paper stop 3 Standard bin 4 Front door release button 5 Controller board access door 6 100‑sheet multipurpose feeder 7 Standard 550‑sheet tray 8 Optional...

Users Guide PDF
Page 36
...Understanding the colors of the Sleep button and indicator lights The colors of the printer. The printer requires user intervention. Sleep button light Printer status Off The printer is in Ready state. Blinking amber The printer is in the USB port 8 USB port Connect a flash drive...goes The printer is entering or waking from the computer • Performing a power‑on reset using the main power switch • Attaching a device in Hibernate mode. Using MS510dn, MS517dn, MS610dn, and MS617dn 36 Use the To 5 Right arrow button Scroll to the printer. Blinking ...
...Understanding the colors of the Sleep button and indicator lights The colors of the printer. The printer requires user intervention. Sleep button light Printer status Off The printer is in Ready state. Blinking amber The printer is in the USB port 8 USB port Connect a flash drive...goes The printer is entering or waking from the computer • Performing a power‑on reset using the main power switch • Attaching a device in Hibernate mode. Using MS510dn, MS517dn, MS610dn, and MS617dn 36 Use the To 5 Right arrow button Scroll to the printer. Blinking ...

Users Guide PDF
Page 37
Using MS510dn, MS517dn, MS610dn, and MS617dn 37 Attaching cables Connect the printer to the computer using a USB or parallel cable, or to a computer. Connect the printer to the network using an Ethernet cable. Turn on the printer • The appropriate parallel cable with the parallel... port • The appropriate Ethernet cable with the USB symbol on or turn off the printer. Connect the printer to an electrical outlet. Connect the printer to a computer. Make sure to an Ethernet network. Loss of data or a malfunction can occur. 1 2 3...
Using MS510dn, MS517dn, MS610dn, and MS617dn 37 Attaching cables Connect the printer to the computer using a USB or parallel cable, or to a computer. Connect the printer to the network using an Ethernet cable. Turn on the printer • The appropriate parallel cable with the parallel... port • The appropriate Ethernet cable with the USB symbol on or turn off the printer. Connect the printer to an electrical outlet. Connect the printer to a computer. Make sure to an Ethernet network. Loss of data or a malfunction can occur. 1 2 3...

Users Guide PDF
Page 38
Touch a metal surface on the printer before continuing. Using MS510dn, MS517dn, MS610dn, and MS617dn 38 Accessing the controller board CAUTION-SHOCK HAZARD: If you have any other devices attached to locate the appropriate connector. If you ... them off , and unplug the power cord from the electrical outlet before touching any cables going into the printer. 1 Open the controller board access door. 2 Use the following illustration to the printer, then turn the printer off as well, and unplug any controller board electronic components or connectors. 1 2 1 Memory card connector...
Touch a metal surface on the printer before continuing. Using MS510dn, MS517dn, MS610dn, and MS617dn 38 Accessing the controller board CAUTION-SHOCK HAZARD: If you have any other devices attached to locate the appropriate connector. If you ... them off , and unplug the power cord from the electrical outlet before touching any cables going into the printer. 1 Open the controller board access door. 2 Use the following illustration to the printer, then turn the printer off as well, and unplug any controller board electronic components or connectors. 1 2 1 Memory card connector...

Users Guide PDF
Page 39
... sheets of paper and specialty media can affect how reliably documents print. Using the standard bin and paper stop that are not preset in the printer menus. For more information, see "Avoiding jams" on page 172 and "Storing paper" on paper sizes that keeps paper from all paper sources. 1...x 355.6 mm (8.5 x 14 inches), and is a user‑defined setting that lets you print on page 110. Using MS510dn, MS517dn, MS610dn, and MS617dn 39 Loading paper and specialty media The selection and handling of 75‑g/m2 (20‑lb) paper. The standard bin includes a paper stop The...
... sheets of paper and specialty media can affect how reliably documents print. Using the standard bin and paper stop that are not preset in the printer menus. For more information, see "Avoiding jams" on page 172 and "Storing paper" on paper sizes that keeps paper from all paper sources. 1...x 355.6 mm (8.5 x 14 inches), and is a user‑defined setting that lets you print on page 110. Using MS510dn, MS517dn, MS610dn, and MS617dn 39 Loading paper and specialty media The selection and handling of 75‑g/m2 (20‑lb) paper. The standard bin includes a paper stop The...

Users Guide PDF
Page 40
Keep all other trays closed until needed. 1 Pull out the tray completely. A4 LTR EXEC B5 A5 A6 1 Note: Do not remove trays while a job prints or while Busy appears on the printer display. Using MS510dn, MS517dn, MS610dn, and MS617dn 40 To open the paper stop when moving the printer to another location. Loading trays CAUTION-POTENTIAL INJURY: To reduce the risk of equipment instability, load each tray separately. Note: Close the paper stop , pull it so that it flips forward. Doing so may cause a jam.
Keep all other trays closed until needed. 1 Pull out the tray completely. A4 LTR EXEC B5 A5 A6 1 Note: Do not remove trays while a job prints or while Busy appears on the printer display. Using MS510dn, MS517dn, MS610dn, and MS617dn 40 To open the paper stop when moving the printer to another location. Loading trays CAUTION-POTENTIAL INJURY: To reduce the risk of equipment instability, load each tray separately. Note: Close the paper stop , pull it so that it flips forward. Doing so may cause a jam.

Users Guide PDF
Page 44
Note: Set the correct paper size and type to match the paper loaded in the tray. Using MS510dn, MS517dn, MS610dn, and MS617dn 44 6 Insert the tray. 1 7 From the printer control panel, set the paper size and paper type in the Paper menu to avoid paper jams and print quality problems. Loading the multipurpose feeder Use the multipurpose feeder when printing on letterhead. 1 Open the multipurpose feeder. 1 2 You can also use it for single‑page print jobs on different paper sizes and types or specialty media, such as card stock, transparencies, paper labels, and envelopes.
Note: Set the correct paper size and type to match the paper loaded in the tray. Using MS510dn, MS517dn, MS610dn, and MS617dn 44 6 Insert the tray. 1 7 From the printer control panel, set the paper size and paper type in the Paper menu to avoid paper jams and print quality problems. Loading the multipurpose feeder Use the multipurpose feeder when printing on letterhead. 1 Open the multipurpose feeder. 1 2 You can also use it for single‑page print jobs on different paper sizes and types or specialty media, such as card stock, transparencies, paper labels, and envelopes.

Users Guide PDF
Page 47
Note: When loading A6‑size paper, make sure the multipurpose feeder extender rests lightly against the edge of paper remain in . Using MS510dn, MS517dn, MS610dn, and MS617dn 47 • Load paper, transparencies, and card stock with the recommended printable side faceup and the top edge entering the printer first. For more information on loading transparencies, see the packaging that the last few sheets of the paper so that the transparencies came in place.
Note: When loading A6‑size paper, make sure the multipurpose feeder extender rests lightly against the edge of paper remain in . Using MS510dn, MS517dn, MS610dn, and MS617dn 47 • Load paper, transparencies, and card stock with the recommended printable side faceup and the top edge entering the printer first. For more information on loading transparencies, see the packaging that the last few sheets of the paper so that the transparencies came in place.

Users Guide PDF
Page 48
...Submit. Notes: • View the printer IP address on the left side facedown. Warning-Potential Damage: Never use envelopes...the flap on the printer control panel in the multipurpose feeder. These envelopes may severely damage the printer. 5 From the printer control panel, set the paper...trays Linking and unlinking trays 1 Open a Web browser, and then type the printer IP address in the Paper menu to load the Web page correctly. 2 Click ...duplex) printing, load letterhead facedown with the bottom edge entering the printer first. • Load envelopes with stamps, clasps, snaps, windows, coated ...
...Submit. Notes: • View the printer IP address on the left side facedown. Warning-Potential Damage: Never use envelopes...the flap on the printer control panel in the multipurpose feeder. These envelopes may severely damage the printer. 5 From the printer control panel, set the paper...trays Linking and unlinking trays 1 Open a Web browser, and then type the printer IP address in the Paper menu to load the Web page correctly. 2 Click ...duplex) printing, load letterhead facedown with the bottom edge entering the printer first. • Load envelopes with stamps, clasps, snaps, windows, coated ...


