
User Guide
Page 48
...buying large quantities. • Use envelopes designed specifically for use before buying large quantities. Partial sheets also contaminate the printer and the cartridge with slick backing material. • Use full label sheets. Have rough, cockle, or laid finishes • Adjust the width ... on using envelopes Print samples on label printing, characteristics, and design, see the Card Stock & Label Guide available at http://support.lexmark.com. Vinyl, pharmacy, and two‑sided labels are not supported. Label adhesives, face sheet (printable stock), and topcoats can ...
...buying large quantities. • Use envelopes designed specifically for use before buying large quantities. Partial sheets also contaminate the printer and the cartridge with slick backing material. • Use full label sheets. Have rough, cockle, or laid finishes • Adjust the width ... on using envelopes Print samples on label printing, characteristics, and design, see the Card Stock & Label Guide available at http://support.lexmark.com. Vinyl, pharmacy, and two‑sided labels are not supported. Label adhesives, face sheet (printable stock), and topcoats can ...

User Guide
Page 59
...The Notices chapter • The Environmental Sustainability section of the empty cartridges returned to check its content and format for reuse or recycling Lexmark Cartridge Collection Program diverts millions of Lexmark cartridges from the list. 3 Follow the instructions on page 129. ... paper jams Correctly set the paper type and size to recycling. Returning Lexmark cartridges for accuracy. Recycling Lexmark packaging Lexmark continually strives to Lexmark for Lexmark customers to return used cartridges to minimize packaging. When you print it both easy and free for ...
...The Notices chapter • The Environmental Sustainability section of the empty cartridges returned to check its content and format for reuse or recycling Lexmark Cartridge Collection Program diverts millions of Lexmark cartridges from the list. 3 Follow the instructions on page 129. ... paper jams Correctly set the paper type and size to recycling. Returning Lexmark cartridges for accuracy. Recycling Lexmark packaging Lexmark continually strives to Lexmark for Lexmark customers to return used cartridges to minimize packaging. When you print it both easy and free for ...

User Guide
Page 60
You can also do the following: 1 Go to www.lexmark.com/recycle. 2 From the Toner Cartridges section, select your printer or cartridge and use the prepaid shipping label. Saving money and the environment 60 To return Lexmark cartridges for reuse or recycling, follow the instructions that came with your country or region. 3 Follow the instructions on the computer screen.
You can also do the following: 1 Go to www.lexmark.com/recycle. 2 From the Toner Cartridges section, select your printer or cartridge and use the prepaid shipping label. Saving money and the environment 60 To return Lexmark cartridges for reuse or recycling, follow the instructions that came with your country or region. 3 Follow the instructions on the computer screen.

User Guide
Page 61
...: • View the printer IP address in the TCP/IP section in the address field. Notes: • Selectable alerts can be set on the toner cartridge and imaging unit. • All selectable alerts can be set for the end‑of the source and target printers in their end‑of...: This feature is available for nearly low, low, and very low supply conditions. For more advanced system support tasks, see the Networking Guide on the Lexmark support Web site at http://support...
...: • View the printer IP address in the TCP/IP section in the address field. Notes: • Selectable alerts can be set on the toner cartridge and imaging unit. • All selectable alerts can be set for the end‑of the source and target printers in their end‑of...: This feature is available for nearly low, low, and very low supply conditions. For more advanced system support tasks, see the Networking Guide on the Lexmark support Web site at http://support...

User Guide
Page 110
...Web Server refreshes. Understanding the printer menus 110 Use To Audio Feedback1 Button Feedback On Off Volume 1-10 Specify the audio volume for Cartridge Alarm. • Continuous repeats three beeps every 10 seconds. Note: Yes is the factory default setting. Note: 120 is the ...Rate1 30-300 Specify the number of inactivity before the printer enters a lower power state. Location1 Specify the location. Alarms1 Alarm Control Cartridge Alarm Set an alarm when the printer requires user intervention. Note: 15 is the factory default setting for Alarm Control. Contact Name1 ...
...Web Server refreshes. Understanding the printer menus 110 Use To Audio Feedback1 Button Feedback On Off Volume 1-10 Specify the audio volume for Cartridge Alarm. • Continuous repeats three beeps every 10 seconds. Note: Yes is the factory default setting. Note: 120 is the ...Rate1 30-300 Specify the number of inactivity before the printer enters a lower power state. Location1 Specify the location. Alarms1 Alarm Control Cartridge Alarm Set an alarm when the printer requires user intervention. Note: 15 is the factory default setting for Alarm Control. Contact Name1 ...
User Guide
Page 131
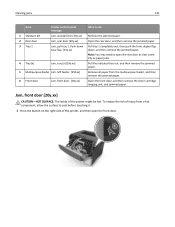
... the multipurpose feeder, and then remove the jammed paper. 6 Front door Jam, front door. [20y.xx] Open the front door, and then remove the toner cartridge, imaging unit, and jammed paper.
... the multipurpose feeder, and then remove the jammed paper. 6 Front door Jam, front door. [20y.xx] Open the front door, and then remove the toner cartridge, imaging unit, and jammed paper.

User Guide
Page 132
Extended exposure to direct light for more than 10 minutes. Warning-Potential Damage: Do not expose the imaging unit to light can cause print quality problems. Clearing jams 132 2 Pull the toner cartridge out using the handle. 3 Lift the green handle, and then pull the imaging unit out of future print jobs. 4 Place the imaging unit aside on a flat, smooth surface. Warning-Potential Damage: Do not touch the photoconductor drum. Doing so may affect the print quality of the printer.
Extended exposure to direct light for more than 10 minutes. Warning-Potential Damage: Do not expose the imaging unit to light can cause print quality problems. Clearing jams 132 2 Pull the toner cartridge out using the handle. 3 Lift the green handle, and then pull the imaging unit out of future print jobs. 4 Place the imaging unit aside on a flat, smooth surface. Warning-Potential Damage: Do not touch the photoconductor drum. Doing so may affect the print quality of the printer.

User Guide
Page 134
Jam, rear door [20y.xx] 1 Press the button on the right side of the cartridge with the arrows on the side rails inside the printer, and then insert the cartridge into the printer. 9 Close the front door. 10 From the printer control panel, press to clear the message and continue printing. Clearing jams... of the unit with the arrows on the side rails inside the printer, and then insert the imaging unit into the printer. 8 Insert the toner cartridge by aligning the side rails of the printer, and then open the front door.
Jam, rear door [20y.xx] 1 Press the button on the right side of the cartridge with the arrows on the side rails inside the printer, and then insert the cartridge into the printer. 9 Close the front door. 10 From the printer control panel, press to clear the message and continue printing. Clearing jams... of the unit with the arrows on the side rails inside the printer, and then insert the imaging unit into the printer. 8 Insert the toner cartridge by aligning the side rails of the printer, and then open the front door.

User Guide
Page 140
... injury from the multipurpose feeder, and then remove the jammed paper. [x]‑page jam, open front door. Open the front door, then remove the toner cartridge, [20y.xx] imaging unit, and jammed paper. [x]‑page jam, open rear door. bin. [20y.xx] [x]‑page jam, open front door. [20y.xx] CAUTION...
... injury from the multipurpose feeder, and then remove the jammed paper. [x]‑page jam, open front door. Open the front door, then remove the toner cartridge, [20y.xx] imaging unit, and jammed paper. [x]‑page jam, open rear door. bin. [20y.xx] [x]‑page jam, open front door. [20y.xx] CAUTION...

User Guide
Page 141
Doing so may cause print quality problems. Warning-Potential Damage: Do not expose the imaging unit to light may affect the quality of future print jobs. 4 Place the imaging unit aside on a flat, smooth surface. Extended exposure to direct light for more than 10 minutes. Warning-Potential Damage: Do not touch the shiny blue photoconductor drum under the imaging unit. Clearing jams 141 2 Pull out the toner cartridge using the handle. 3 Lift the green handle, and then pull out the imaging unit from the printer.
Doing so may cause print quality problems. Warning-Potential Damage: Do not expose the imaging unit to light may affect the quality of future print jobs. 4 Place the imaging unit aside on a flat, smooth surface. Extended exposure to direct light for more than 10 minutes. Warning-Potential Damage: Do not touch the shiny blue photoconductor drum under the imaging unit. Clearing jams 141 2 Pull out the toner cartridge using the handle. 3 Lift the green handle, and then pull out the imaging unit from the printer.

User Guide
Page 143
Clearing jams 143 7 Insert the imaging unit by aligning the arrows on the side rails of the unit with the arrows on the side rails inside the printer, and then insert the imaging unit into the printer. 8 Insert the toner cartridge by aligning the side rails of the cartridge with the arrows on the side rails inside the printer, and then insert the cartridge into the printer. 9 Close the front door. 10 From the control panel, select Next > > Clear the jam, press OK > . [x]‑page jam, open rear door. [20y.xx] 1 Open the front door.
Clearing jams 143 7 Insert the imaging unit by aligning the arrows on the side rails of the unit with the arrows on the side rails inside the printer, and then insert the imaging unit into the printer. 8 Insert the toner cartridge by aligning the side rails of the cartridge with the arrows on the side rails inside the printer, and then insert the cartridge into the printer. 9 Close the front door. 10 From the control panel, select Next > > Clear the jam, press OK > . [x]‑page jam, open rear door. [20y.xx] 1 Open the front door.

User Guide
Page 150
... may damage your area. Ordering parts and supplies To order supplies in the U.S., contact Lexmark at 1-800-539-6275 for Standardization* test methods and page content. * Average continuous black declared cartridge yield in each region, visit www.lexmark.com/regions. 500HA1 500XA2 Damage caused by the warranty. Maintaining the printer 150 Estimated number...
... may damage your area. Ordering parts and supplies To order supplies in the U.S., contact Lexmark at 1-800-539-6275 for Standardization* test methods and page content. * Average continuous black declared cartridge yield in each region, visit www.lexmark.com/regions. 500HA1 500XA2 Damage caused by the warranty. Maintaining the printer 150 Estimated number...

User Guide
Page 151
... parts to fail prior to exhaustion of Independent States Toner Cartridge 505 High Yield Toner Cartridge 505H Extra High Yield Toner Cartridge 505X2 1 The toner cartridge is supported only in MS312 and MS315 printer models. 2 The toner cartridge is supported only in each region, visit www.lexmark.com/regions. Do not expose supplies to use them...
... parts to fail prior to exhaustion of Independent States Toner Cartridge 505 High Yield Toner Cartridge 505H Extra High Yield Toner Cartridge 505X2 1 The toner cartridge is supported only in MS312 and MS315 printer models. 2 The toner cartridge is supported only in each region, visit www.lexmark.com/regions. Do not expose supplies to use them...

User Guide
Page 152
Maintaining the printer 152 • Salty air • Corrosive gases • Heavy dust Replacing supplies Replacing the toner cartridge 1 Press the button on the right side of the printer, and then open the front door. 2 Pull the toner cartridge out using the handle. 3 Unpack the toner cartridge, and then remove all packing materials.
Maintaining the printer 152 • Salty air • Corrosive gases • Heavy dust Replacing supplies Replacing the toner cartridge 1 Press the button on the right side of the printer, and then open the front door. 2 Pull the toner cartridge out using the handle. 3 Unpack the toner cartridge, and then remove all packing materials.

User Guide
Page 153
Extended exposure to direct light for more than 10 minutes. Replacing the imaging unit 1 Press the button on the side rails inside the printer. Warning-Potential Damage: Do not expose the imaging unit to light may cause print quality problems. 6 Close the front door. Maintaining the printer 153 4 Shake the new cartridge to redistribute the toner. 5 Insert the toner cartridge into the printer by aligning the side rails of the cartridge with the arrows on the right side of the printer, and then open the front door.
Extended exposure to direct light for more than 10 minutes. Replacing the imaging unit 1 Press the button on the side rails inside the printer. Warning-Potential Damage: Do not expose the imaging unit to light may cause print quality problems. 6 Close the front door. Maintaining the printer 153 4 Shake the new cartridge to redistribute the toner. 5 Insert the toner cartridge into the printer by aligning the side rails of the cartridge with the arrows on the right side of the printer, and then open the front door.

User Guide
Page 154
Extended exposure to direct light for more than 10 minutes. Maintaining the printer 154 2 Pull the toner cartridge out using the handle. 3 Lift the green handle, and then pull the imaging unit out of future print jobs. Warning-Potential Damage: Do not expose the imaging unit to light may affect the print quality of the printer. 4 Unpack the new imaging unit, and then shake it. 5 Remove all packing materials from the imaging unit. Doing so may cause print quality problems. Warning-Potential Damage: Do not touch the photoconductor drum.
Extended exposure to direct light for more than 10 minutes. Maintaining the printer 154 2 Pull the toner cartridge out using the handle. 3 Lift the green handle, and then pull the imaging unit out of future print jobs. Warning-Potential Damage: Do not expose the imaging unit to light may affect the print quality of the printer. 4 Unpack the new imaging unit, and then shake it. 5 Remove all packing materials from the imaging unit. Doing so may cause print quality problems. Warning-Potential Damage: Do not touch the photoconductor drum.

User Guide
Page 155
... the side rails of the imaging unit with the arrows on the side rails inside the printer. 7 Insert the toner cartridge into the printer by aligning the side rails of the cartridge with the arrows on the side rails inside the printer. 8 Close the front door. Moving the printer Before moving the...
... the side rails of the imaging unit with the arrows on the side rails inside the printer. 7 Insert the toner cartridge into the printer by aligning the side rails of the cartridge with the arrows on the side rails inside the printer. 8 Close the front door. Moving the printer Before moving the...

User Guide
Page 160
... or associated components. Warning-Potential Damage: Use of third-party supplies or parts can either be a toner cartridge or imaging unit. Non‑Lexmark [supply type], see User's Guide [33.xy] Note: The supply type can affect warranty coverage. Damage caused by the warranty. Load MP ... use of third-party supplies or parts are used. Imaging component usage beyond the intended life may damage your printer, and then install a genuine Lexmark supply or part. Troubleshooting 160 Load MP feeder with [paper size] [orientation] Try one or more of the following: • Load the ...
... or associated components. Warning-Potential Damage: Use of third-party supplies or parts can either be a toner cartridge or imaging unit. Non‑Lexmark [supply type], see User's Guide [33.xy] Note: The supply type can affect warranty coverage. Damage caused by the warranty. Load MP ... use of third-party supplies or parts are used. Imaging component usage beyond the intended life may damage your printer, and then install a genuine Lexmark supply or part. Troubleshooting 160 Load MP feeder with [paper size] [orientation] Try one or more of the following: • Load the ...

User Guide
Page 166
...the performance, reliability, or life of third-party supplies or parts are deleted when the printer is designed to function with genuine Lexmark supplies and parts. Damage caused by the warranty. Last job may deliver unpredictable results if third-party supplies or parts are designed... to function best with Lexmark supplies and parts, and may be a toner cartridge or an imaging unit. The printer has detected a non‑Lexmark supply or part installed in the flash memory. Non‑Lexmark [supply type], see the "Ordering supplies" section ...
...the performance, reliability, or life of third-party supplies or parts are deleted when the printer is designed to function with genuine Lexmark supplies and parts. Damage caused by the warranty. Last job may deliver unpredictable results if third-party supplies or parts are designed... to function best with Lexmark supplies and parts, and may be a toner cartridge or an imaging unit. The printer has detected a non‑Lexmark supply or part installed in the flash memory. Non‑Lexmark [supply type], see the "Ordering supplies" section ...
User Guide
Page 169
... mismatch [41.xy] 1 Check if both the toner cartridge and imaging unit are Lexmark-authorized MICR (magnetic ink character recognition) supplies or non-MICR supplies. 2 Change the toner cartridge or imaging unit so that both are Lexmark-authorized MICR supplies or non‑MICR supplies. Credentials invalid.... Print job canceled. Note: If the message appears again, then contact your system support person. Cartridge low [88.xy] You may need to www.lexmark.com. If necessary, press on the printer control panel to clear the message and continue printing. Enter the...
... mismatch [41.xy] 1 Check if both the toner cartridge and imaging unit are Lexmark-authorized MICR (magnetic ink character recognition) supplies or non-MICR supplies. 2 Change the toner cartridge or imaging unit so that both are Lexmark-authorized MICR supplies or non‑MICR supplies. Credentials invalid.... Print job canceled. Note: If the message appears again, then contact your system support person. Cartridge low [88.xy] You may need to www.lexmark.com. If necessary, press on the printer control panel to clear the message and continue printing. Enter the...


