

Service Manual
Page 4
4513-420, -430 Diagnostic aids 3-1 Accessing service menus 3-1 Printing menus 3-1 Configuration menu (CONFIG MENU 3-2 Entering Configuration Menu 3-2 Available menus 3-2 Reset photoconductor maintenance counter (Reset PC Cnt 3-3 Print quality pages (Prt... front cover removal 4-25 LVPS/HVPS removal 4-27 Main motor gear drive removal 4-30 Manual feed clutch removal 4-32 Manual feed solenoid removal 4-34 Media ACM ASM feeder removal 4-37 Media feed clutch with cable removal 4-40 Media manual input sensor 4-42 Multipurpose feeder (MPF) removal 4-45 iv Lexmark™ E360d, E360dn
4513-420, -430 Diagnostic aids 3-1 Accessing service menus 3-1 Printing menus 3-1 Configuration menu (CONFIG MENU 3-2 Entering Configuration Menu 3-2 Available menus 3-2 Reset photoconductor maintenance counter (Reset PC Cnt 3-3 Print quality pages (Prt... front cover removal 4-25 LVPS/HVPS removal 4-27 Main motor gear drive removal 4-30 Manual feed clutch removal 4-32 Manual feed solenoid removal 4-34 Media ACM ASM feeder removal 4-37 Media feed clutch with cable removal 4-40 Media manual input sensor 4-42 Multipurpose feeder (MPF) removal 4-45 iv Lexmark™ E360d, E360dn
Service Manual
Page 16
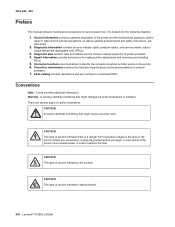
...in order to prevent problems. 7. Repair information provides instructions for service personnel. Unplug the product before you are working. Warning: A warning identifies something that might cause a servicer harm. General information contains a general description of the printer ... type of caution indicates a hot surface. There are discussed. 2. xvi Lexmark™ E360d, E360dn CAUTION This type of caution indicates a tipping hazard. 4513-420, -430 Preface This manual contains maintenance procedures for making printer adjustments and removing and installing FRUs. 5....
...in order to prevent problems. 7. Repair information provides instructions for service personnel. Unplug the product before you are working. Warning: A warning identifies something that might cause a servicer harm. General information contains a general description of the printer ... type of caution indicates a hot surface. There are discussed. 2. xvi Lexmark™ E360d, E360dn CAUTION This type of caution indicates a tipping hazard. 4513-420, -430 Preface This manual contains maintenance procedures for making printer adjustments and removing and installing FRUs. 5....

Service Manual
Page 17
... 1-1 General information The Lexmark™ E360d and E360dn are monochrome laser printers designed for more information. Maintenance approach The diagnostic information in this manual leads to determine the symptom and repair the failure. Use the error code charts, symptom index, and service checks to the correct field... to verify the repair. See "Diagnostics information" on E260d and E260dn, see the 4513-630, -63W, -6EW service manual. 4513-420, -430 1. See "Repair information" on E360d and E360dn. After completing the repair, perform tests as needed to help identify parts.
... 1-1 General information The Lexmark™ E360d and E360dn are monochrome laser printers designed for more information. Maintenance approach The diagnostic information in this manual leads to determine the symptom and repair the failure. Use the error code charts, symptom index, and service checks to the correct field... to verify the repair. See "Diagnostics information" on E260d and E260dn, see the 4513-630, -63W, -6EW service manual. 4513-420, -430 1. See "Repair information" on E360d and E360dn. After completing the repair, perform tests as needed to help identify parts.
Service Manual
Page 35
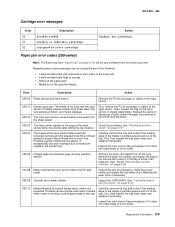
... Replace the cartridge. Paper jam error codes (200-series) Note: The Event log (See "Event log" on page 2-22. 200.12 Media detected at manual feeder sensor when not expected. Repeating jams or jam messages can be caused by any of the tray. The media is pointed upward and out... servo never started on the page at the input sensor before the EP was ready Inspect the tray for prestaging. Diagnostics information 2-9 See "Printhead service sensor within two inches after hitting the input sensor check" on the input sensor. Carefully remove the tray and notice if the leading edge of...
... Replace the cartridge. Paper jam error codes (200-series) Note: The Event log (See "Event log" on page 2-22. 200.12 Media detected at manual feeder sensor when not expected. Repeating jams or jam messages can be caused by any of the tray. The media is pointed upward and out... servo never started on the page at the input sensor before the EP was ready Inspect the tray for prestaging. Diagnostics information 2-9 See "Printhead service sensor within two inches after hitting the input sensor check" on the input sensor. Carefully remove the tray and notice if the leading edge of...
Service Manual
Page 36
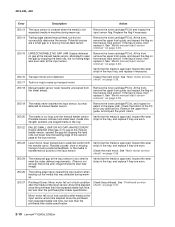
...sensor-more time elapsed since the printhead than the expected stable lock time, but less than the printhead jitter-stable specification. 2-10 Lexmark™ E360d, E360dn If the flag is loose, then replace it . Verify that was detected at the input sensor. Verify that the media... feed rolls, but did not successfully debounce the sensor. See "Media manual input sensor removal" on the manual input sensor. See "Media manual input sensor removal" on page 4-39. Check the printhead. See "Main motor service check" on page 2-26. 200.24 The measured gap at the ...
...sensor-more time elapsed since the printhead than the expected stable lock time, but less than the printhead jitter-stable specification. 2-10 Lexmark™ E360d, E360dn If the flag is loose, then replace it . Verify that was detected at the input sensor. Verify that the media... feed rolls, but did not successfully debounce the sensor. See "Media manual input sensor removal" on the manual input sensor. See "Media manual input sensor removal" on page 4-39. Check the printhead. See "Main motor service check" on page 2-26. 200.24 The measured gap at the ...
Service Manual
Page 37
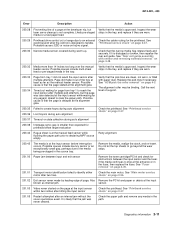
... at the input sensor while waiting for the printhead. See "Printhead service check" on data collection during auto alignment 200.38 Interpage servo gap is smaller than 14 inches too long over the manual feeder sensor. "Printhead service check" on page 4-3. The alignment roller may be binding. Retry ...alignment. 200.43 The media is likely that the page is at the manual feed sensor while flushing the paper path prior to ...
... at the input sensor while waiting for the printhead. See "Printhead service check" on data collection during auto alignment 200.38 Interpage servo gap is smaller than 14 inches too long over the manual feeder sensor. "Printhead service check" on page 4-3. The alignment roller may be binding. Retry ...alignment. 200.43 The media is likely that the page is at the manual feed sensor while flushing the paper path prior to ...

Service Manual
Page 48
... passes continuity otherwise, then check the LVPS/HVPS. 8. If the cable is correct, then check the continuity in the back of the manual which involve measuring voltages on the LVPS/HVPS (low voltage power supply/ high voltage power supply board) should complete POST in correctly, especially...the same time. Cables are not correct on . 4. See "Operator panel service check" on positions 6, 17, and 19 of the controller board. Turn the printer off before plugging or unplugging any connectors. 2-22 Lexmark™ E360d, E360dn Verify +24 V dc on page 2-27. If the grounds are...
... passes continuity otherwise, then check the LVPS/HVPS. 8. If the cable is correct, then check the continuity in the back of the manual which involve measuring voltages on the LVPS/HVPS (low voltage power supply/ high voltage power supply board) should complete POST in correctly, especially...the same time. Cables are not correct on . 4. See "Operator panel service check" on positions 6, 17, and 19 of the controller board. Turn the printer off before plugging or unplugging any connectors. 2-22 Lexmark™ E360d, E360dn Verify +24 V dc on page 2-27. If the grounds are...
Service Manual
Page 53
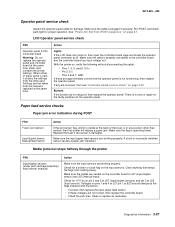
...sensor. • If these cards is not functioning, then replace the operator panel. Paper feed service checks Paper jam error indication during POST FRU Fuser (exit sensor) Input/duplex sensor Manual feed sensor Action If the exit sensor flag, which is visible at J3. Make sure the ...input paper feed sensors are working properly. 4513-420, -430 Operator panel service check Inspect the operator panel cable for proper operation....
...sensor. • If these cards is not functioning, then replace the operator panel. Paper feed service checks Paper jam error indication during POST FRU Fuser (exit sensor) Input/duplex sensor Manual feed sensor Action If the exit sensor flag, which is visible at J3. Make sure the ...input paper feed sensors are working properly. 4513-420, -430 Operator panel service check Inspect the operator panel cable for proper operation....

Service Manual
Page 54
... J26 on page 2-22 for more information. See "Controller board service check" on the controller board and measure the resistance across cable pins 1 and 2. • The resistance should be too wide when the stack is short. 2-28 Lexmark™ E360d, E360dn Media skews FRU Paper feed (pick tires) tray 1 ...420, -430 Media never picks FRU Paper feed (pick tires) tray 1 Paper feed (pick tires) tray 2 Media drive ASM Media feed clutch ASM Manual feed clutch ASM P/U and manual feed solenoid ACM drive shaft Action Open the left cover, and observe the solenoid and clutch actions at the ACM and...
... J26 on page 2-22 for more information. See "Controller board service check" on the controller board and measure the resistance across cable pins 1 and 2. • The resistance should be too wide when the stack is short. 2-28 Lexmark™ E360d, E360dn Media skews FRU Paper feed (pick tires) tray 1 ...420, -430 Media never picks FRU Paper feed (pick tires) tray 1 Paper feed (pick tires) tray 2 Media drive ASM Media feed clutch ASM Manual feed clutch ASM P/U and manual feed solenoid ACM drive shaft Action Open the left cover, and observe the solenoid and clutch actions at the ACM and...
Service Manual
Page 56
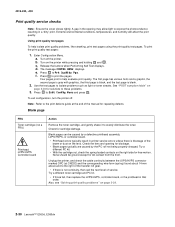
... roll gear. • If there is not continuity, then call the next level of service. None should be caused by a defective printhead assembly, LVPS/HVPS, or controller board. ...kit. • With the cartridge out, check the spring loaded contacts on page 2-34. 2-30 Lexmark™ E360d, E360dn To print the print quality test pages: 1. d. The first page has various fonts and ...a graphic, the second page is gray with graphics, the third page is black, and the last page is blockage of the manual...
... roll gear. • If there is not continuity, then call the next level of service. None should be caused by a defective printhead assembly, LVPS/HVPS, or controller board. ...kit. • With the cartridge out, check the spring loaded contacts on page 2-34. 2-30 Lexmark™ E360d, E360dn To print the print quality test pages: 1. d. The first page has various fonts and ...a graphic, the second page is gray with graphics, the third page is black, and the last page is blockage of the manual...

Service Manual
Page 64
... voltages are incorrent, then replace the controller board. If the printer error persists, then replace Tray 2. 2-38 Lexmark™ E360d, E360dn Separate the printer from Tray 2. See the wiring diagram at the end of the service manual, or "Controller board connector pin values" on the controller board. Pins 1, 4: 3.3 V Pin 2: 24 V Pin 6: Ground If the...
... voltages are incorrent, then replace the controller board. If the printer error persists, then replace Tray 2. 2-38 Lexmark™ E360d, E360dn Separate the printer from Tray 2. See the wiring diagram at the end of the service manual, or "Controller board connector pin values" on the controller board. Pins 1, 4: 3.3 V Pin 2: 24 V Pin 6: Ground If the...


