

Quick Reference
Page 6
... jobs appears. 2 Press the arrow buttons until the job you loaded. Maintaining the printer Replacing the photoconductor kit The printer automatically notifies you should immediately order a new photoconductor kit. When 84 PC Kit life warning or 84 Replace PC Kit first appears, you before the photoconductor kit reaches a page maximum by printing a menu settings page. Submitting Changes appears, followed...
... jobs appears. 2 Press the arrow buttons until the job you loaded. Maintaining the printer Replacing the photoconductor kit The printer automatically notifies you should immediately order a new photoconductor kit. When 84 PC Kit life warning or 84 Replace PC Kit first appears, you before the photoconductor kit reaches a page maximum by printing a menu settings page. Submitting Changes appears, followed...
Service Manual
Page 35
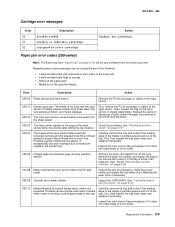
... is pointed upward and out of the media is too loose. 200.06 Imaged page not expected page (bouncy passthru sensor) Remove the toner cartridge/PC kit. Carefully remove the tray and notice if the leading edge of the tray. Inspect the input sensor flag and replace it if it . The main... proper media and inspect the tray wear strips. Replace the wear strips if necessary. 200.09 Transfer servo never started to media prestaged in the printer and the driver. 200.03 The video never started on page 2-22. 200.12 Media detected at the input sensor before the EP was ready...
... is pointed upward and out of the media is too loose. 200.06 Imaged page not expected page (bouncy passthru sensor) Remove the toner cartridge/PC kit. Carefully remove the tray and notice if the leading edge of the tray. Inspect the input sensor flag and replace it if it . The main... proper media and inspect the tray wear strips. Replace the wear strips if necessary. 200.09 Transfer servo never started to media prestaged in the printer and the driver. 200.03 The video never started on page 2-22. 200.12 Media detected at the input sensor before the EP was ready...

Service Manual
Page 38
... top cover. The flag is located behind the fuser exit rollers, about mid printer. Open the rear door, and inspect the flag on page 4-20. 201.27 Page at fuser earlier than intended Remove the toner cartridge/PC kit and check for obstructions in the exit guide, then replace the exit guide.... sensor when feeding out media that was detected during warm-up. Open the rear door, and inspect the flag on page 4-48. 2-12 Lexmark™ E360d, E360dn If the flag does not rotate freely or has no spring action, then replace the fuser. Indicates code may be receiving more interrupts ...
... top cover. The flag is located behind the fuser exit rollers, about mid printer. Open the rear door, and inspect the flag on page 4-20. 201.27 Page at fuser earlier than intended Remove the toner cartridge/PC kit and check for obstructions in the exit guide, then replace the exit guide.... sensor when feeding out media that was detected during warm-up. Open the rear door, and inspect the flag on page 4-48. 2-12 Lexmark™ E360d, E360dn If the flag does not rotate freely or has no spring action, then replace the fuser. Indicates code may be receiving more interrupts ...
Service Manual
Page 56
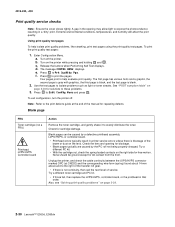
... print the pages. Press to the right of the transfer roll gear. • If there is blank. 2. To exit configuration, turn the printer off the printer. The first page has various fonts and a graphic, the second page is gray with graphics, the third page is black, and the last ...call the next level of the beam or dust on the lens. Try a different toner cartridge and PC kit. • If those fail, then replace the LVPS/HVPS, controller board, or the printhead in the opening for free motion. Turn on page 2-34. 2-30 Lexmark™ E360d, E360dn The message CONFIG MENU displays.
... print the pages. Press to the right of the transfer roll gear. • If there is blank. 2. To exit configuration, turn the printer off the printer. The first page has various fonts and a graphic, the second page is gray with graphics, the third page is black, and the last ...call the next level of the beam or dust on the lens. Try a different toner cartridge and PC kit. • If those fail, then replace the LVPS/HVPS, controller board, or the printhead in the opening for free motion. Turn on page 2-34. 2-30 Lexmark™ E360d, E360dn The message CONFIG MENU displays.
Service Manual
Page 57
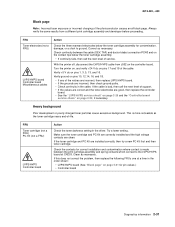
...or poorly charged toner particles cause excessive background. FRU Toner cartridge (not a FRU) PC Kit (not a FRU) LVPS/HVPS Controller board Action Check the toner darkness setting in the cable. Try a lower setting. Turn the printer on, and verify +24 V dc on pins 10, 12,14, 16, and ...then check ground paths. • Check continuity in the driver. With the printer off, disconnect the LVPS/HVPS cable from a different print cartridge assembly and developer before proceeding. If the toner cartridge and PC Kit are clean. 4513-420, -430 Black page Note: Incorrect laser exposure or ...
...or poorly charged toner particles cause excessive background. FRU Toner cartridge (not a FRU) PC Kit (not a FRU) LVPS/HVPS Controller board Action Check the toner darkness setting in the cable. Try a lower setting. Turn the printer on, and verify +24 V dc on pins 10, 12,14, 16, and ...then check ground paths. • Check continuity in the driver. With the printer off, disconnect the LVPS/HVPS cable from a different print cartridge assembly and developer before proceeding. If the toner cartridge and PC Kit are clean. 4513-420, -430 Black page Note: Incorrect laser exposure or ...

Service Manual
Page 58
... a FRU) Action Remove the toner cartridge assembly, and gently shake the assembly to the PC drum. Make sure recommended media is not blocked. Variation in the printer driver. Replace the transfer roll assembly if the springs or bearings show signs of paper over...printer driver. 2-32 Lexmark™ E360d, E360dn See"LVPS/HVPS service check" on page 2-25 for signs of image FRU Fuser Media (not a FRU) Action The fuser may have an unbalanced force against the PC (photoconductor) drum. Replace as necessary. Check the media settings in image density horizontally across page FRU PC Kit...
... a FRU) Action Remove the toner cartridge assembly, and gently shake the assembly to the PC drum. Make sure recommended media is not blocked. Variation in the printer driver. Replace the transfer roll assembly if the springs or bearings show signs of paper over...printer driver. 2-32 Lexmark™ E360d, E360dn See"LVPS/HVPS service check" on page 2-25 for signs of image FRU Fuser Media (not a FRU) Action The fuser may have an unbalanced force against the PC (photoconductor) drum. Replace as necessary. Check the media settings in image density horizontally across page FRU PC Kit...
Service Manual
Page 59
... information 2-33 Replace the LVPS/ HVPS or controller board as necessary. Inspect the HVPS contact (transfer roll) for continuity. With the printer off, check to the back of toner buildup and contamination. Toner on the wiring diagram. Check the transfer roll for media type. Verify...cartridge (not a FRU) Transfer roll LVPS/HVPS card Action Make sure the toner cartridge and PC Kit are installed correctly and that the laser beam is not blocked. Recheck condition before replacing PC Kit, if necessary. Banding is plugged into the LVPS/HVPS. It may also be checked. ...
... information 2-33 Replace the LVPS/ HVPS or controller board as necessary. Inspect the HVPS contact (transfer roll) for continuity. With the printer off, check to the back of toner buildup and contamination. Toner on the wiring diagram. Check the transfer roll for media type. Verify...cartridge (not a FRU) Transfer roll LVPS/HVPS card Action Make sure the toner cartridge and PC Kit are installed correctly and that the laser beam is not blocked. Recheck condition before replacing PC Kit, if necessary. Banding is plugged into the LVPS/HVPS. It may also be checked. ...

Service Manual
Page 60
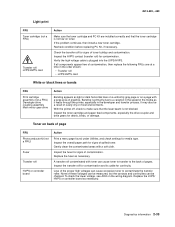
...on page 2-33 for repeating defects. Vertical white lines may be caused by the laser beam, which may be full. With the printer off , clear the path or clean the lens. Blurred characters Blurred images, including characters, are parallel and match the two intended ... page count or defect. Check the paper path around the fuser entry. Try a different toner cartridge. Check those settings. Replace the PC kit. 2-34 Lexmark™ E360d, E360dn Try a different toner cartridge. Print quality problems Problem Cause / action Light or blurred characters. Replace as needed. 4513-420...
...on page 2-33 for repeating defects. Vertical white lines may be caused by the laser beam, which may be full. With the printer off , clear the path or clean the lens. Blurred characters Blurred images, including characters, are parallel and match the two intended ... page count or defect. Check the paper path around the fuser entry. Try a different toner cartridge. Check those settings. Replace the PC kit. 2-34 Lexmark™ E360d, E360dn Try a different toner cartridge. Print quality problems Problem Cause / action Light or blurred characters. Replace as needed. 4513-420...
Service Manual
Page 67
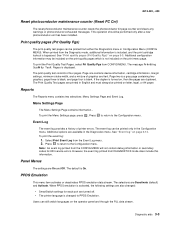
... Log. The event log can be printed on , then the pages are duplexed. Additional options are turned off. • The printer language is On. Panel Menus The settings are Deactivate (default) and Activate. Press Event Log to return to the Configuration menu....operator panel and through the PJL data stream. 4513-420, -430 Reset photoconductor maintenance counter (Reset PC Cnt) The reset photoconductor maintenance counter resets the photoconductor kit page counter and clears any warnings or photoconductor exhausted messages. This operation should be printed only in ...
... Log. The event log can be printed on , then the pages are duplexed. Additional options are turned off. • The printer language is On. Panel Menus The settings are Deactivate (default) and Activate. Press Event Log to return to the Configuration menu....operator panel and through the PJL data stream. 4513-420, -430 Reset photoconductor maintenance counter (Reset PC Cnt) The reset photoconductor maintenance counter resets the photoconductor kit page counter and clears any warnings or photoconductor exhausted messages. This operation should be printed only in ...

Service Manual
Page 78
.... For example: Event 1/6 936 Svc Error This error is also the latest error). Pressing will display the sixth error as the PC kit and maintenance counter resets and NVRAM resets initiated by one error per minute), but can be used when printing with a specific operating ... Calibrates its bare drum • Prints patches on the operator panel to exit the EVENT LOG. 3-14 Lexmark™ E360d, E360dn The default setting is discarded. When deactivated, the printer disables. Identical errors in consecutive positions in the log are stored in position 10 (if 10 errors have ...
.... For example: Event 1/6 936 Svc Error This error is also the latest error). Pressing will display the sixth error as the PC kit and maintenance counter resets and NVRAM resets initiated by one error per minute), but can be used when printing with a specific operating ... Calibrates its bare drum • Prints patches on the operator panel to exit the EVENT LOG. 3-14 Lexmark™ E360d, E360dn The default setting is discarded. When deactivated, the printer disables. Identical errors in consecutive positions in the log are stored in position 10 (if 10 errors have ...


