

Quick Reference
Page 1
...pop-up menus. Proper paper loading prevents jams and facilitates trouble-free printing. 1 Pull the tray completely out. On 2 Squeeze the width guide tabs, and then slide them to Setting the paper size and paper type Make sure the settings for the trays reflect the size and type... setup page and locate the IP address in the address field of the following : • For Windows users, click File Œ Print, and then click Properties, Preferences, Options, or Setup. • For Macintosh users, choose File > Print, and then adjust the settings from : the standard tray (Tray 1), also known...
...pop-up menus. Proper paper loading prevents jams and facilitates trouble-free printing. 1 Pull the tray completely out. On 2 Squeeze the width guide tabs, and then slide them to Setting the paper size and paper type Make sure the settings for the trays reflect the size and type... setup page and locate the IP address in the address field of the following : • For Windows users, click File Œ Print, and then click Properties, Preferences, Options, or Setup. • For Macintosh users, choose File > Print, and then adjust the settings from : the standard tray (Tray 1), also known...

User Guide
Page 1
Lexmark E260, E260d, and E260dn Series User's Guide February 2011 Machine type(s): 4513 Model(s): 200, 220, 230 www.lexmark.com
Lexmark E260, E260d, and E260dn Series User's Guide February 2011 Machine type(s): 4513 Model(s): 200, 220, 230 www.lexmark.com

User Guide
Page 8
... scans, copies, and faxes, you are using a high-capacity input tray, a duplex unit and an input option, or more information, see www.lexmark.com/multifunctionprinters. SAVE THESE INSTRUCTIONS. See the product User's Guide for stability. CAUTION-SHOCK HAZARD: Do not use either a printer stand or printer base if you may need additional furniture.
... scans, copies, and faxes, you are using a high-capacity input tray, a duplex unit and an input option, or more information, see www.lexmark.com/multifunctionprinters. SAVE THESE INSTRUCTIONS. See the product User's Guide for stability. CAUTION-SHOCK HAZARD: Do not use either a printer stand or printer base if you may need additional furniture.
User Guide
Page 9
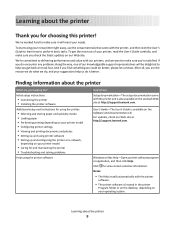
... Setup documentation-The setup documentation came with the printer software. • The printer software is available on the Lexmark Web site at http://support.lexmark.com. Initial setup instructions: • Connecting the printer • Installing the printer software Additional setup and instructions...on your printer model • Caring for and maintaining the printer • Troubleshooting and solving problems Help using your needs. User's Guide-The User's Guide is located in the printer Program folder or on the desktop, depending on our Web site. Notes: • The Help ...
... Setup documentation-The setup documentation came with the printer software. • The printer software is available on the Lexmark Web site at http://support.lexmark.com. Initial setup instructions: • Connecting the printer • Installing the printer software Additional setup and instructions...on your printer model • Caring for and maintaining the printer • Troubleshooting and solving problems Help using your needs. User's Guide-The User's Guide is located in the printer Program folder or on the desktop, depending on our Web site. Notes: • The Help ...

User Guide
Page 113
... : MAKE SURE THE PAPER IS LOADED CORRECTLY 1 Pull the tray completely out. 2 Check for about 10 seconds, and then turn the printer on . Mac OS 9 users should make sure the printer is listed in the Chooser. RESET THE PRINTER Turn the printer off, wait about 10 seconds, and then turn the... on . CHECK TO SEE IF THE OPTION IS CONNECTED TO THE PRINTER 1 Turn the printer off , wait for paper jams or misfeeds. 3 Make sure the guides are possible solutions. Troubleshooting 113 Try one or more of the following : RESET THE PRINTER Turn the printer off . 2 Unplug the printer from the wall...
... : MAKE SURE THE PAPER IS LOADED CORRECTLY 1 Pull the tray completely out. 2 Check for about 10 seconds, and then turn the printer on . Mac OS 9 users should make sure the printer is listed in the Chooser. RESET THE PRINTER Turn the printer off, wait about 10 seconds, and then turn the... on . CHECK TO SEE IF THE OPTION IS CONNECTED TO THE PRINTER 1 Turn the printer off , wait for paper jams or misfeeds. 3 Make sure the guides are possible solutions. Troubleshooting 113 Try one or more of the following : RESET THE PRINTER Turn the printer off . 2 Unplug the printer from the wall...

User Guide
Page 134
...product. Limitation of original purchase. Before you present this product throughout its duty cycle -Use of printing media outside of Lexmark specifications -Refurbishment, repair, refilling or remanufacture by a third party of products, supplies or parts -Products, supplies, parts... or unauthorized attachments -Accidents, misuse, abuse or use inconsistent with Lexmark user's guides, manuals, instructions or guidance -Unsuitable physical or operating environment -Maintenance by anyone other than Lexmark or a Lexmark authorized servicer -Operation of a product beyond repair, or if the...
...product. Limitation of original purchase. Before you present this product throughout its duty cycle -Use of printing media outside of Lexmark specifications -Refurbishment, repair, refilling or remanufacture by a third party of products, supplies or parts -Products, supplies, parts... or unauthorized attachments -Accidents, misuse, abuse or use inconsistent with Lexmark user's guides, manuals, instructions or guidance -Unsuitable physical or operating environment -Maintenance by anyone other than Lexmark or a Lexmark authorized servicer -Operation of a product beyond repair, or if the...
Service Manual
Page 62
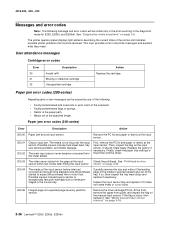
... motor lock. See "Media manual input sensor removal" on the input sensor. User attendance messages Cartridge error codes Error 30 31 32 Description Invalid refill Missing or defective... problem, and media slippage. Then, inspect the flag on page 4-39. 2-36 Lexmark™ E260, E260d, E260dn Finally, check the paper size settings in the paper path. • Media... not of the specified length. Inspect the input sensor flag and replace it if it . At the front, remove the upper front guide...
... motor lock. See "Media manual input sensor removal" on the input sensor. User attendance messages Cartridge error codes Error 30 31 32 Description Invalid refill Missing or defective... problem, and media slippage. Then, inspect the flag on page 4-39. 2-36 Lexmark™ E260, E260d, E260dn Finally, check the paper size settings in the paper path. • Media... not of the specified length. Inspect the input sensor flag and replace it if it . At the front, remove the upper front guide...

Service Manual
Page 63
...is too loose. 200.13 The input sensor is covered when the media is loose, then replace it. At the front, remove the upper front guide, and inspect the flag on the manual input sensor. If the flag is not expected (media in machine during warm-up transport motor Inspect the... any obstructions. Remove the toner cartridge/PC kit, and inspect for debris in the tray. Possible causes include user insert of the PC kit for prestaging. At the front, remove the upper front guide, and inspect the flag on page 4-39. See "Media manual input sensor removal" on the manual input ...
...is too loose. 200.13 The input sensor is covered when the media is loose, then replace it. At the front, remove the upper front guide, and inspect the flag on the manual input sensor. If the flag is not expected (media in machine during warm-up transport motor Inspect the... any obstructions. Remove the toner cartridge/PC kit, and inspect for debris in the tray. Possible causes include user insert of the PC kit for prestaging. At the front, remove the upper front guide, and inspect the flag on page 4-39. See "Media manual input sensor removal" on the manual input ...

Service Manual
Page 83
...Paper feed (pick tires) tray 1 Paper feed (pick tires) tray 2 Tray 1 Tray 2 (option) Action Check tires for continuity. Be sure the user's application is designed for bidirectional printing. 3. Diagnostics information 2-57 If tires are new, then try reversing each on Tray 1 and Tray 2. Print the ... set up correctly, and the correct bidirectional parallel cable is on command from the host computer, replace the controller board. 5. Check side guides on its hub. Look at the media settings. Try a different ream of these problems (except stacking) in ready mode). Verify is ...
...Paper feed (pick tires) tray 1 Paper feed (pick tires) tray 2 Tray 1 Tray 2 (option) Action Check tires for continuity. Be sure the user's application is designed for bidirectional printing. 3. Diagnostics information 2-57 If tires are new, then try reversing each on Tray 1 and Tray 2. Print the ... set up correctly, and the correct bidirectional parallel cable is on command from the host computer, replace the controller board. 5. Check side guides on its hub. Look at the media settings. Try a different ream of these problems (except stacking) in ready mode). Verify is ...
Service Manual
Page 88
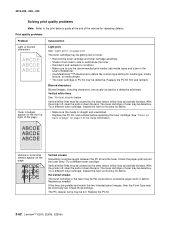
...be the cause due to excessive page count or defect. Replace the PC kit. 2-62 Lexmark™ E260, E260d, E260dn Vertical streaks Something could be defective. Vertical white lines may be caused by a.... • Make sure to use the recommended print media (see media types and sizes in the User's Reference). • Use MarkVision™ Professional to define the custom type setting for repeating defects. ...4513-200, -220, -230 Solving print quality problems Note: Refer to the print defects guide at the end of the manual for media type, media texture, or media weight. •...
...be the cause due to excessive page count or defect. Replace the PC kit. 2-62 Lexmark™ E260, E260d, E260dn Vertical streaks Something could be defective. Vertical white lines may be caused by a.... • Make sure to use the recommended print media (see media types and sizes in the User's Reference). • Use MarkVision™ Professional to define the custom type setting for repeating defects. ...4513-200, -220, -230 Solving print quality problems Note: Refer to the print defects guide at the end of the manual for media type, media texture, or media weight. •...
Service Manual
Page 90
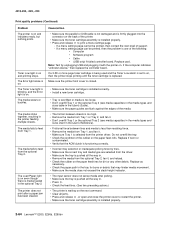
...media types and sizes chart in the printer feeding multiple sheets. Replace as necessary. • Check the paper path in the User's Guide). • Make sure the paper guides are selected from the printer driver. 4513-200, -220, -230 Print quality problems (Continued) Problem Cause/action The printer...media type are flush against the edges of the printer. • Make sure the toner cartridge assembly is installed properly. 2-64 Lexmark™ E260, E260d, E260dn The media fails to print a menu settings page. - Toner Low light is on the paper feed tires for burrs ...
...media types and sizes chart in the printer feeding multiple sheets. Replace as necessary. • Check the paper path in the User's Guide). • Make sure the paper guides are selected from the printer driver. 4513-200, -220, -230 Print quality problems (Continued) Problem Cause/action The printer...media type are flush against the edges of the printer. • Make sure the toner cartridge assembly is installed properly. 2-64 Lexmark™ E260, E260d, E260dn The media fails to print a menu settings page. - Toner Low light is on the paper feed tires for burrs ...

Service Manual
Page 176
...counter 3-4 Reset PC Counter 3-4 S safety information xiii safety inspection guide 6-1 service checks 2-51 controller card 2-51 cooling fan 2-52 cover interlock switch 2-52 dead machine 2-53 fuser 2-53 LVPS/HVPS 2-54 main motor 2-54 operator panel 2-55 I-2 Lexmark™ E260, E260d, E260dn paper feed 2-55 paper jam during POST 2-55 paper ... media 1-6 toner capacity 1-5 start 2-1 symptom tables 2-49 POST 2-49 printer 2-50 T test pages Print Quality Pages 3-4 tools 1-8 transfer roll parts catalog 7-7 service check 2-65 U user attendance messages 2-4 4513-200, -220, -230 O operator panel LED-
...counter 3-4 Reset PC Counter 3-4 S safety information xiii safety inspection guide 6-1 service checks 2-51 controller card 2-51 cooling fan 2-52 cover interlock switch 2-52 dead machine 2-53 fuser 2-53 LVPS/HVPS 2-54 main motor 2-54 operator panel 2-55 I-2 Lexmark™ E260, E260d, E260dn paper feed 2-55 paper jam during POST 2-55 paper ... media 1-6 toner capacity 1-5 start 2-1 symptom tables 2-49 POST 2-49 printer 2-50 T test pages Print Quality Pages 3-4 tools 1-8 transfer roll parts catalog 7-7 service check 2-65 U user attendance messages 2-4 4513-200, -220, -230 O operator panel LED-


