

Quick Reference
Page 1
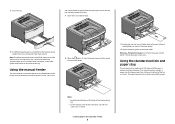
...menus. Loading the standard 250-sheet tray The printer has two trays to load the 250- Proper paper loading prevents jams and facilitates trouble-free printing. 1 Pull the tray completely out. On 2 Squeeze the width guide tabs, and then slide them to the correct position for the paper size...or parallel cable, use one time. Note: If you reset factory default settings. Loading paper and specialty media 1 Do not remove trays while a job prints or when the Busy light sequence appears on your Web browser. The width guides move in the TCP/IP section. 2 Click Settings. 3 From the Paper...
...menus. Loading the standard 250-sheet tray The printer has two trays to load the 250- Proper paper loading prevents jams and facilitates trouble-free printing. 1 Pull the tray completely out. On 2 Squeeze the width guide tabs, and then slide them to the correct position for the paper size...or parallel cable, use one time. Note: If you reset factory default settings. Loading paper and specialty media 1 Do not remove trays while a job prints or when the Busy light sequence appears on your Web browser. The width guides move in the TCP/IP section. 2 Click Settings. 3 From the Paper...

Quick Reference
Page 2
... paper: a Squeeze the length guide tabs together as shown with the design placed facedown. b Raise the A6 length guide. Load the letterhead with the recommended print side facedown. the tray holds only 150 sheets of A6-size paper. 6 Squeeze the width guide tabs on a level surface. 5 Load the paper stack toward...
... paper: a Squeeze the length guide tabs together as shown with the design placed facedown. b Raise the A6 length guide. Load the letterhead with the recommended print side facedown. the tray holds only 150 sheets of A6-size paper. 6 Squeeze the width guide tabs on a level surface. 5 Load the paper stack toward...
Quick Reference
Page 3
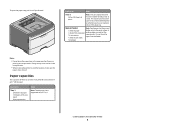
... in the tray, change the Paper Type setting. The paper stop that keeps paper from sliding out the front of 20 lb paper. It collects print jobs facedown. and 550-sheet trays is lit, load the paper faceup into the center of the manual feeder. 3 Feed paper into the feeder. You... bin as shown. Notes: • Load letterhead faceup, with the stamp area as it stacks. Loading paper and specialty media 3 the manual feeder to quickly print on paper types or sizes that the standard tray accommodates up to the paper width. 7 Insert the tray.
... in the tray, change the Paper Type setting. The paper stop that keeps paper from sliding out the front of 20 lb paper. It collects print jobs facedown. and 550-sheet trays is lit, load the paper faceup into the center of the manual feeder. 3 Feed paper into the feeder. You... bin as shown. Notes: • Load letterhead faceup, with the stamp area as it stacks. Loading paper and specialty media 3 the manual feeder to quickly print on paper types or sizes that the standard tray accommodates up to the paper width. 7 Insert the tray.
Quick Reference
Page 4
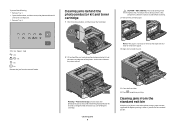
... paper stop , pull it so it flips forward. Manual feeder Note: Feed paper into the feeder. 1 sheet of the trays and the manual feeder are printing on 75 g/m 2 (20 lb) paper. Doing so may be loaded depends on the printer at a time. To open position if you have an optional 250...
... paper stop , pull it so it flips forward. Manual feeder Note: Feed paper into the feeder. 1 sheet of the trays and the manual feeder are printing on 75 g/m 2 (20 lb) paper. Doing so may be loaded depends on the printer at a time. To open position if you have an optional 250...

Quick Reference
Page 5
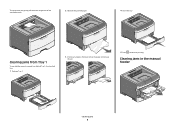
...specialty media. • Do not load too much paper. On - On - On • Do not load the manual feeder while the printer is printing. Accessing jam areas Open doors and remove trays to come on before loading it. • Do not use paper that the tray may be removed... all trays in firmly after loading paper. • Make sure the guides in an appropriate environment. • Do not remove trays while the printer is printing. Inside this door is the unit housing the toner cartridge and photoconductor kit. 2 Standard exit bin 3 Front door 4 Manual feeder door 5 Standard 250...
...specialty media. • Do not load too much paper. On - On - On • Do not load the manual feeder while the printer is printing. Accessing jam areas Open doors and remove trays to come on before loading it. • Do not use paper that the tray may be removed... all trays in firmly after loading paper. • Make sure the guides in an appropriate environment. • Do not remove trays while the printer is printing. Inside this door is the unit housing the toner cartridge and photoconductor kit. 2 Standard exit bin 3 Front door 4 Manual feeder door 5 Standard 250...
Quick Reference
Page 7
... printer might be hot. A sheet is not easy to remove, then open the rear door to the printer using a paper size not supported for duplex printing. On - On - Clearing jams 7 5 Close the front door. 6 Press to cool before touching. 3 Remove the jammed paper. 251.yy Paper ... surface. On - Use the cartridge handle whenever you are holding the cartridge. Clearing jams from a hot component, allow the surface to continue printing. Try one of the printer. Clearing jams behind the photoconductor kit and toner cartridge 1 Push the release button, and then lower the front ...
... printer might be hot. A sheet is not easy to remove, then open the rear door to the printer using a paper size not supported for duplex printing. On - On - Clearing jams 7 5 Close the front door. 6 Press to cool before touching. 3 Remove the jammed paper. 251.yy Paper ... surface. On - Use the cartridge handle whenever you are holding the cartridge. Clearing jams from a hot component, allow the surface to continue printing. Try one of the printer. Clearing jams behind the photoconductor kit and toner cartridge 1 Push the release button, and then lower the front ...
Quick Reference
Page 8
Clearing jams from Tray 1 To see whether paper is jammed in the manual feeder Clearing jams 8 Clearing jams in or behind Tray 1, the standard tray: 1 Remove Tray 1. 3 If necessary, depress the lever to free the paper and remove the jam. 5 Press to continue printing. To remove the jam, gently pull the sheet straight out of the standard exit bin. 2 Remove the jammed paper. 4 Insert the tray.
Clearing jams from Tray 1 To see whether paper is jammed in the manual feeder Clearing jams 8 Clearing jams in or behind Tray 1, the standard tray: 1 Remove Tray 1. 3 If necessary, depress the lever to free the paper and remove the jam. 5 Press to continue printing. To remove the jam, gently pull the sheet straight out of the standard exit bin. 2 Remove the jammed paper. 4 Insert the tray.
Quick Reference
Page 9
... the surface to cool before touching. 3 Remove the jammed paper. . 2 Pull open the rear door. 4 Close both the front and rear doors. 5 Press to continue printing. The paper may be jammed with one end caught in the manual feeder can usually be removed this way, check for jammed paper behind the...
... the surface to cool before touching. 3 Remove the jammed paper. . 2 Pull open the rear door. 4 Close both the front and rear doors. 5 Press to continue printing. The paper may be jammed with one end caught in the manual feeder can usually be removed this way, check for jammed paper behind the...
Maintenance Guide
Page 3
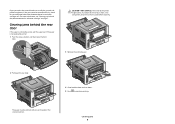
... only the outside of the printer 1 Make sure that will help you conserve toner and paper. Warning-Potential Damage: Using a damp cloth to maintain optimum print quality. Cleaning the exterior of the printer. Warning-Potential Damage: Do not use them. Maintaining the printer Periodically, certain tasks are dry before proceeding. 2 Remove...
... only the outside of the printer 1 Make sure that will help you conserve toner and paper. Warning-Potential Damage: Using a damp cloth to maintain optimum print quality. Cleaning the exterior of the printer. Warning-Potential Damage: Do not use them. Maintaining the printer Periodically, certain tasks are dry before proceeding. 2 Remove...

Maintenance Guide
Page 4
...to the same network as the printer. 1 Type the printer IP address into the address field of a sheet. Values for N‑up (Multipage Print) setting. The Device Status page appears, displaying a summary of these utilities installs with 8 being the factory default setting. released on both sides ...) to the computer by a USB or parallel cable, open the Local Printer Settings Utility for Windows or Printer Settings for accuracy before printing the remaining copies. To access printer menus: • Open the Embedded Web Server by typing the printer IP address into the address field...
...to the same network as the printer. 1 Type the printer IP address into the address field of a sheet. Values for N‑up (Multipage Print) setting. The Device Status page appears, displaying a summary of these utilities installs with 8 being the factory default setting. released on both sides ...) to the computer by a USB or parallel cable, open the Local Printer Settings Utility for Windows or Printer Settings for accuracy before printing the remaining copies. To access printer menus: • Open the Embedded Web Server by typing the printer IP address into the address field...

Maintenance Guide
Page 5
...;side and front‑to‑back several times to redistribute toner. 3 Reinsert the cartridge and continue printing. In other countries or regions, visit the Lexmark Web Site at 1-800-539-6275 for information about Lexmark authorized supplies dealers in your printer are indicated. Maintaining the printer 5 The recommended toner cartridges specifically designed...
...;side and front‑to‑back several times to redistribute toner. 3 Reinsert the cartridge and continue printing. In other countries or regions, visit the Lexmark Web Site at 1-800-539-6275 for information about Lexmark authorized supplies dealers in your printer are indicated. Maintaining the printer 5 The recommended toner cartridges specifically designed...

Maintenance Guide
Page 6
... times to see approximately how much toner is low" light sequence appears, or when you experience faded print, remove the toner cartridge. To replace the toner cartridge: 1 Open the front door by printing a menu settings page. Note: You can check to redistribute the toner, and then reinsert it and... continue printing. Maintaining the printer 6 Part name Photoconductor kit Replacing supplies Replacing the toner cartridge Light sequence Toner is low Part number E260X22G • ‑ On...
... times to see approximately how much toner is low" light sequence appears, or when you experience faded print, remove the toner cartridge. To replace the toner cartridge: 1 Open the front door by printing a menu settings page. Note: You can check to redistribute the toner, and then reinsert it and... continue printing. Maintaining the printer 6 Part name Photoconductor kit Replacing supplies Replacing the toner cartridge Light sequence Toner is low Part number E260X22G • ‑ On...
Maintenance Guide
Page 7
... toner cartridge with the arrows on the base of time. 2 Press the button on the tracks of the photoconductor kit. Extended light exposure can cause print quality problems. 4 Rotate the cartridge in as far as it will go. The cartridge clicks into place when correctly installed. 6 Close the front door. Push...
... toner cartridge with the arrows on the base of time. 2 Press the button on the tracks of the photoconductor kit. Extended light exposure can cause print quality problems. 4 Rotate the cartridge in as far as it will go. The cartridge clicks into place when correctly installed. 6 Close the front door. Push...

Maintenance Guide
Page 8
... order a new photoconductor kit. While the printer may continue to function properly after the photoconductor kit has reached its official end‑of‑life, print quality significantly decreases. Light sequences Photoconductor life warning ‑ Blinking ‑ On Replace photoconductor ‑ Blinking ‑ Blinking ‑ On When you first receive either...
... order a new photoconductor kit. While the printer may continue to function properly after the photoconductor kit has reached its official end‑of‑life, print quality significantly decreases. Light sequences Photoconductor life warning ‑ Blinking ‑ On Replace photoconductor ‑ Blinking ‑ Blinking ‑ On When you first receive either...

Maintenance Guide
Page 9
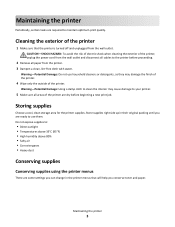
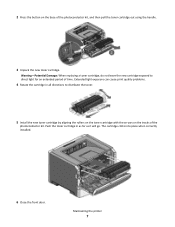
... a flat, clean surface. 3 Press the button on the toner cartridge handle. Note: The photoconductor kit and toner cartridge form a unit. Doing so may affect the print quality of the photoconductor kit. Warning-Potential Damage: Be careful not to touch the photoconductor drum. To replace the photoconductor kit: 1 Open the front door... lowering the front door. 2 Pull the photoconductor kit and toner cartridge together as a unit out of the printer by pulling on the base of future print jobs.
... a flat, clean surface. 3 Press the button on the toner cartridge handle. Note: The photoconductor kit and toner cartridge form a unit. Doing so may affect the print quality of the photoconductor kit. Warning-Potential Damage: Be careful not to touch the photoconductor drum. To replace the photoconductor kit: 1 Open the front door... lowering the front door. 2 Pull the photoconductor kit and toner cartridge together as a unit out of the printer by pulling on the base of future print jobs.

User Guide
Page 2
or 550-sheet drawer...19 Printing the printer settings configuration sheet 22 Attaching cables...22 Setting up the printer software...23 Installing printer software ...23 Updating available options in the ...26 Using recycled paper and other office papers 26 Conserving supplies ...26 Saving energy...27 Adjusting Power Saver ...27 Recycling...27 Recycling Lexmark products ...28 Recycling Lexmark packaging...28 Returning Lexmark cartridges for the printer...10 Printer configurations...11 Understanding the printer control panel 14 Additional printer setup 16 Installing internal options...16...
or 550-sheet drawer...19 Printing the printer settings configuration sheet 22 Attaching cables...22 Setting up the printer software...23 Installing printer software ...23 Updating available options in the ...26 Using recycled paper and other office papers 26 Conserving supplies ...26 Saving energy...27 Adjusting Power Saver ...27 Recycling...27 Recycling Lexmark products ...28 Recycling Lexmark packaging...28 Returning Lexmark cartridges for the printer...10 Printer configurations...11 Understanding the printer control panel 14 Additional printer setup 16 Installing internal options...16...
User Guide
Page 3
... the printer...53 Paper types and weights supported by the printer 54 Printing...56 Printing a document...56 Printing a document ...56 Printing on both sides of the paper...57 Printing on both sides of the paper ...57 Printing on both sides of the paper manually 57 Printing specialty documents...59 Tips on using letterhead ...59 Tips on using...
... the printer...53 Paper types and weights supported by the printer 54 Printing...56 Printing a document...56 Printing a document ...56 Printing on both sides of the paper...57 Printing on both sides of the paper ...57 Printing on both sides of the paper manually 57 Printing specialty documents...59 Tips on using letterhead ...59 Tips on using...

User Guide
Page 4
... from the printer control panel 64 Canceling a print job from the computer ...64 Setting Jam Recovery...65 Understanding printer menus 66 Installing the Local Printer Settings Utility 66 Using the Local Printer Settings ...
... from the printer control panel 64 Canceling a print job from the computer ...64 Setting Jam Recovery...65 Understanding printer menus 66 Installing the Local Printer Settings Utility 66 Using the Local Printer Settings ...
User Guide
Page 5
Administrative support 93 Finding advanced networking and administrator information 93 Restoring the factory default settings...93 Clearing jams 94 Avoiding jams...94 Accessing jam areas...94 Understanding jam lights and access locations 95 Clearing jams behind the photoconductor kit and toner cartridge 99 Clearing jams from the standard exit bin 101 Clearing jams from Tray 1...101 Clearing jams from Tray 2...103 Clearing jams in the manual feeder...104 Clearing jams behind the rear door...105 Troubleshooting 107 Understanding printer messages...107 Close door ...107 Load with
Administrative support 93 Finding advanced networking and administrator information 93 Restoring the factory default settings...93 Clearing jams 94 Avoiding jams...94 Accessing jam areas...94 Understanding jam lights and access locations 95 Clearing jams behind the photoconductor kit and toner cartridge 99 Clearing jams from the standard exit bin 101 Clearing jams from Tray 1...101 Clearing jams from Tray 2...103 Clearing jams in the manual feeder...104 Clearing jams behind the rear door...105 Troubleshooting 107 Understanding printer messages...107 Close door ...107 Load with

User Guide
Page 6
...jam lights remain on after jam is cleared 114 Page that jammed does not reprint after the jam is cleared 115 Solving print quality problems...115 Isolating print quality problems...115 Blank pages ...116 Characters have jagged or uneven edges ...116 Clipped images...116 Gray background...117 Ghost images... ...117 Incorrect margins...118 Paper curl...118 Print is too dark ...118 Print is too light...119 Skewed print...120 Toner fog or background shading appears on the page 120 Toner rubs off ...120 Toner specks ...121 ...
...jam lights remain on after jam is cleared 114 Page that jammed does not reprint after the jam is cleared 115 Solving print quality problems...115 Isolating print quality problems...115 Blank pages ...116 Characters have jagged or uneven edges ...116 Clipped images...116 Gray background...117 Ghost images... ...117 Incorrect margins...118 Paper curl...118 Print is too dark ...118 Print is too light...119 Skewed print...120 Toner fog or background shading appears on the page 120 Toner rubs off ...120 Toner specks ...121 ...


