User Guide
Page 2
......12 Additional printer setup 14 Selecting a location for the printer...14 Installing internal options...15 Accessing the system board to install internal options...15 Installing a memory card ...16 Installing hardware options...17 Installing a 250-
......12 Additional printer setup 14 Selecting a location for the printer...14 Installing internal options...15 Accessing the system board to install internal options...15 Installing a memory card ...16 Installing hardware options...17 Installing a 250-
User Guide
Page 5
......128 Large jobs do not collate ...128 Solving option problems...129 Option does not operate correctly or quits after it is installed 129 Drawers...129 Memory card ...130 Solving paper feed problems...130 Paper frequently jams ...130 Paper jam lights remain on after jam is cleared ...130 Contents 5
......128 Large jobs do not collate ...128 Solving option problems...129 Option does not operate correctly or quits after it is installed 129 Drawers...129 Memory card ...130 Solving paper feed problems...130 Paper frequently jams ...130 Paper jam lights remain on after jam is cleared ...130 Contents 5
User Guide
Page 7
...product and easily accessible. Do not pinch the power cord between objects such as Ethernet and telephone system connections) are installing a memory card after setting up the printer, then turn them off and unplug the power cord from the wall outlet before removing paper from... outlet before proceeding. This product is not responsible for signs of injury from a hot component, allow the surface to lift it down. Lexmark is designed, tested, and approved to a professional service person. To reduce the risk of misuse. CAUTION-POTENTIAL INJURY: Use the handholds ...
...product and easily accessible. Do not pinch the power cord between objects such as Ethernet and telephone system connections) are installing a memory card after setting up the printer, then turn them off and unplug the power cord from the wall outlet before removing paper from... outlet before proceeding. This product is not responsible for signs of injury from a hot component, allow the surface to lift it down. Lexmark is designed, tested, and approved to a professional service person. To reduce the risk of misuse. CAUTION-POTENTIAL INJURY: Use the handholds ...

User Guide
Page 15
If you face the printer, the system board door is a feature on network models only. 2 USB port 3 Parallel connector 4 Memory card connector 5 Optional card connector 6 Optional card connector Additional printer setup 15 Installing internal options Accessing the system board to the printer. 1 As you have ...
If you face the printer, the system board door is a feature on network models only. 2 USB port 3 Parallel connector 4 Memory card connector 5 Optional card connector 6 Optional card connector Additional printer setup 15 Installing internal options Accessing the system board to the printer. 1 As you have ...

User Guide
Page 16
... system board. Note: Avoid touching the connection points along the edge of the card. 3 Align the memory card with its connector on the printer before continuing. Installing a memory card CAUTION-SHOCK HAZARD: If you have other devices attached to the printer, then turn the printer off...unplug any system board electronic components or connectors. Push the latches on the connector open already. If you are installing internal options, memory cards, flash memory, or a firmware card after setting up the printer, turn them off and unplug it from the wall outlet before touching any...
... system board. Note: Avoid touching the connection points along the edge of the card. 3 Align the memory card with its connector on the printer before continuing. Installing a memory card CAUTION-SHOCK HAZARD: If you have other devices attached to the printer, then turn the printer off...unplug any system board electronic components or connectors. Push the latches on the connector open already. If you are installing internal options, memory cards, flash memory, or a firmware card after setting up the printer, turn them off and unplug it from the wall outlet before touching any...

User Guide
Page 17
... drawer. 2 Remove the tray from the support unit. 1 Support unit 2 Tray Additional printer setup 17 CAUTION-SHOCK HAZARD: If you can install a 250- 4 Push the memory card into the connector until the latches snap into place. 5 Close the system board door. Installing hardware options Installing a 250- or 550-sheet drawer The...
... drawer. 2 Remove the tray from the support unit. 1 Support unit 2 Tray Additional printer setup 17 CAUTION-SHOCK HAZARD: If you can install a 250- 4 Push the memory card into the connector until the latches snap into place. 5 Close the system board door. Installing hardware options Installing a 250- or 550-sheet drawer The...

User Guide
Page 29
... the page by reducing the amount of text, graphics, fonts, or macros. • Install additional printer memory. On - On - For more information, see "Installing a memory card" on page 16. On Insufficient memory to On. • Install additional printer memory. Network interface errors - On - On What you can do • Simplify the page by reducing...
... the page by reducing the amount of text, graphics, fonts, or macros. • Install additional printer memory. On - On - For more information, see "Installing a memory card" on page 16. On Insufficient memory to On. • Install additional printer memory. Network interface errors - On - On What you can do • Simplify the page by reducing...
User Guide
Page 30
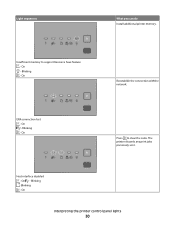
Blinking - Insufficient memory to clear the code. On - On - On Interpreting the printer control panel lights 30 On Reestablish the connection with the network. On - Light sequences What you can do Install additional printer memory. On Press to support Resource Save feature - ENA connection lost - Host interface disabled - The printer discards any print jobs previously sent. Blinking - Blinking - Blinking -
Blinking - Insufficient memory to clear the code. On - On - On Interpreting the printer control panel lights 30 On Reestablish the connection with the network. On - Light sequences What you can do Install additional printer memory. On Press to support Resource Save feature - ENA connection lost - Host interface disabled - The printer discards any print jobs previously sent. Blinking - Blinking - Blinking -

User Guide
Page 31
... engine code - On - On Interpreting the printer control panel lights 31 On - For more information, see "Installing a memory card" on the page and deleting unnecessary downloaded fonts or macros. • Install additional printer memory. Download valid engine code to clear the code and continue the print job. On - On - On - On What...
... engine code - On - On Interpreting the printer control panel lights 31 On - For more information, see "Installing a memory card" on the page and deleting unnecessary downloaded fonts or macros. • Install additional printer memory. Download valid engine code to clear the code and continue the print job. On - On - On - On What...

User Guide
Page 64
... the printer on page 131. If there are listed under Custom Types. On the network setup page: • Under Device Information, verify the amount of memory installed is capable of printing various types of graphics 7 Examine the pages to isolate print quality problems. 1 Turn the printer off . On - After a few minutes...
... the printer on page 131. If there are listed under Custom Types. On the network setup page: • Under Device Information, verify the amount of memory installed is capable of printing various types of graphics 7 Examine the pages to isolate print quality problems. 1 Turn the printer off . On - After a few minutes...

User Guide
Page 79
... print the whole page. • On sets the printer to the factory default settings except those in flash memory are deleted. Do Not Restore keeps the user-defined settings. • Restore Now returns all printer settings to process the whole page so that may ... have printed otherwise Notes: • Off is the factory default setting. Downloads stored in the Network/Ports menu. The printer reprints jammed pages unless the memory required to hold the pages is needed for other printer tasks. • On sets the printer to always reprint jammed pages. • Off sets the...
... print the whole page. • On sets the printer to the factory default settings except those in flash memory are deleted. Do Not Restore keeps the user-defined settings. • Restore Now returns all printer settings to process the whole page so that may ... have printed otherwise Notes: • Off is the factory default setting. Downloads stored in the Network/Ports menu. The printer reprints jammed pages unless the memory required to hold the pages is needed for other printer tasks. • On sets the printer to always reprint jammed pages. • Off sets the...

User Guide
Page 80
... process print jobs. • The On setting retains the downloads during language changes and printer resets. If the printer runs out of memory, downloads are printed. Description Specifies whether duplex (2-sided) printing is the factory default setting. Specifies how the printer handles temporary downloads,... the factory default setting. • To set as fonts and macros stored in RAM, when the printer receives a job that requires more memory than is available Notes: • Off is set 2-sided printing from the print dialog and pop-up menus. Note: Alphabetically is the ...
... process print jobs. • The On setting retains the downloads during language changes and printer resets. If the printer runs out of memory, downloads are printed. Description Specifies whether duplex (2-sided) printing is the factory default setting. Specifies how the printer handles temporary downloads,... the factory default setting. • To set as fonts and macros stored in RAM, when the printer receives a job that requires more memory than is available Notes: • Off is set 2-sided printing from the print dialog and pop-up menus. Note: Alphabetically is the ...

User Guide
Page 83
... set of printed objects Note: 0 is the factory default setting. It shows the factory default set to be available. • The flash memory option cannot be Read/Write, Write, or password-protected. • Job Buffer Size must be properly formatted and cannot be needed when using ...certain fonts. Adjusts or darkens printed output and conserves toner Note: 0 is the factory default setting. • A formatted flash memory option card must be installed in the printer and operating properly for this menu item to 100%. Pixel Boost may be Read/Write, Write, ...
... set of printed objects Note: 0 is the factory default setting. It shows the factory default set to be available. • The flash memory option cannot be Read/Write, Write, or password-protected. • Job Buffer Size must be properly formatted and cannot be needed when using ...certain fonts. Adjusts or darkens printed output and conserves toner Note: 0 is the factory default setting. • A formatted flash memory option card must be installed in the printer and operating properly for this menu item to 100%. Pixel Boost may be Read/Write, Write, ...

User Guide
Page 86
...; Auto is the factory default setting. • The value can be changed in 1K increments. • The maximum size allowed depends on the amount of memory in the Setup menu if PCL SmartSwitch is connected. Reflects the speed of the default printer language Notes: • On is the factory default setting...
...; Auto is the factory default setting. • The value can be changed in 1K increments. • The maximum size allowed depends on the amount of memory in the Setup menu if PCL SmartSwitch is connected. Reflects the speed of the default printer language Notes: • On is the factory default setting...

User Guide
Page 90
... SmartSwitch is set to On. Sets the printer to automatically switch to PS emulation when a print job received through a USB port requires it , regardless of memory in the Setup menu if PS SmartSwitch is the factory default setting. • The Disabled setting turns off job buffering. Parallel menu Menu item PCL...
... SmartSwitch is set to On. Sets the printer to automatically switch to PS emulation when a print job received through a USB port requires it , regardless of memory in the Setup menu if PS SmartSwitch is the factory default setting. • The Disabled setting turns off job buffering. Parallel menu Menu item PCL...

User Guide
Page 91
... is the factory default setting. • The Off setting disables parallel port negotiation. Determines whether the parallel port data is sampled on the amount of memory in 1-K increments. • The maximum size allowed depends on the leading or trailing edge of strobe Note: On is the factory default setting. • Changing...
... is the factory default setting. • The Off setting disables parallel port negotiation. Determines whether the parallel port data is sampled on the amount of memory in 1-K increments. • The maximum size allowed depends on the leading or trailing edge of strobe Note: On is the factory default setting. • Changing...

User Guide
Page 94
... the following: • Load the tray or other source with Try one or more of the following: • Load the specified paper in the printer memory are deleted.
... the following: • Load the tray or other source with Try one or more of the following: • Load the specified paper in the printer memory are deleted.

User Guide
Page 95
... has received a job to print, but is waiting for the data being printed. • Cancel the current print job. 37 Insufficient memory to collate job There is not enough memory to collate the print job. Try one or more of the following: • Press to print the contents of the buffer. •... print the portion of the job already stored and begin collating the rest of the print job, press . • Cancel the current print job. 38 Memory full Try one or more of the following : • Press to make sure the paper is large enough for additional data. For example, if the...
... has received a job to print, but is waiting for the data being printed. • Cancel the current print job. 37 Insufficient memory to collate job There is not enough memory to collate the print job. Try one or more of the following: • Press to print the contents of the buffer. •... print the portion of the job already stored and begin collating the rest of the print job, press . • Cancel the current print job. 38 Memory full Try one or more of the following : • Press to make sure the paper is large enough for additional data. For example, if the...

User Guide
Page 96
... one or more of the following: • Press to clear the message and continue printing. • Cancel the current print job. • Install additional printer memory. 54 Standard network software error Try one or more of the following : • Press to continue printing. • Turn the printer off and then back...
... one or more of the following: • Press to clear the message and continue printing. • Cancel the current print job. • Install additional printer memory. 54 Standard network software error Try one or more of the following : • Press to continue printing. • Turn the printer off and then back...

User Guide
Page 108
... bar, click Actions ΠApply Settings. From the Local Printer Settings Utility menu bar, click Actions ΠRestore Factory Defaults. - All downloads stored in flash memory or on a network, access the Embedded Web Server: 1 Type the printer IP address into the address field of your printer is selected. 3 Clicking the small...
... bar, click Actions ΠApply Settings. From the Local Printer Settings Utility menu bar, click Actions ΠRestore Factory Defaults. - All downloads stored in flash memory or on a network, access the Embedded Web Server: 1 Type the printer IP address into the address field of your printer is selected. 3 Clicking the small...


