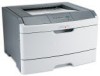

Quick Reference
Page 1
... the paper size and paper type used most frequently from each input source. 5 Click Submit. and 550-sheet trays, and the manual feeder. Loading paper and specialty media 1 Do not remove trays while a job prints or when the Busy light sequence appears on your operating system: • On a Windows computer, access the Paper menu through the Local Printer Settings Utility. • On a Macintosh computer, access the Paper menu through the Embedded Web Server if your printer is networked: 1 Type the printer IP address...
... the paper size and paper type used most frequently from each input source. 5 Click Submit. and 550-sheet trays, and the manual feeder. Loading paper and specialty media 1 Do not remove trays while a job prints or when the Busy light sequence appears on your operating system: • On a Windows computer, access the Paper menu through the Local Printer Settings Utility. • On a Macintosh computer, access the Paper menu through the Embedded Web Server if your printer is networked: 1 Type the printer IP address...

Maintenance Guide
Page 4
... adjust Lets you print on a sheet of your Web browser. The values range from a network computer Note: The computer must be connected to the computer by printing the first copy and checking it for N‑up (Multipage Print) setting. To access printer menus: • Open the Embedded Web Server by typing the printer IP address into the address field of these utilities installs with 8 being the factory default setting. The Device Status page appears, displaying a summary of toner the Toner...
... adjust Lets you print on a sheet of your Web browser. The values range from a network computer Note: The computer must be connected to the computer by printing the first copy and checking it for N‑up (Multipage Print) setting. To access printer menus: • Open the Embedded Web Server by typing the printer IP address into the address field of these utilities installs with 8 being the factory default setting. The Device Status page appears, displaying a summary of toner the Toner...
User Guide
Page 3
... on using transparencies ...61 Tips on using envelopes...61 Tips on using labels...62 Tips on using card stock...63 Printing a booklet ...63 Printing information pages...63 Printing the menu settings and network setup pages ...63 Printing the print quality test pages ...64 Setting Jam Recovery...65 Canceling a print job...65 Understanding printer menus 67 Menus on the Embedded Web Server...67 Using the Embedded Web Server...68 Installing the Local Printer Settings Utility...69 Using the Local Printer Settings Utility...69 Using the Finishing menu...70 Paper menu...71 Default Source menu...71...
... on using transparencies ...61 Tips on using envelopes...61 Tips on using labels...62 Tips on using card stock...63 Printing a booklet ...63 Printing information pages...63 Printing the menu settings and network setup pages ...63 Printing the print quality test pages ...64 Setting Jam Recovery...65 Canceling a print job...65 Understanding printer menus 67 Menus on the Embedded Web Server...67 Using the Embedded Web Server...68 Installing the Local Printer Settings Utility...69 Using the Local Printer Settings Utility...69 Using the Finishing menu...70 Paper menu...71 Default Source menu...71...
User Guide
Page 5
... supply notifications...111 Copying printer settings to other printers...111 Clearing jams 113 Avoiding jams...113 Accessing jam areas...114 Understanding jam lights and access locations...114 Clearing jams behind the photoconductor kit and toner cartridge 118 Clearing jams from the standard exit bin...120 Clearing jams from Tray 1...120 Clearing jams from Tray 2...122 Clearing jams in the manual feeder...123 Clearing jams behind the rear door...124 Troubleshooting 126 Solving basic printer problems...126 Solving printing problems...126 Jobs do not print...126 Multiple-language PDFs...
... supply notifications...111 Copying printer settings to other printers...111 Clearing jams 113 Avoiding jams...113 Accessing jam areas...114 Understanding jam lights and access locations...114 Clearing jams behind the photoconductor kit and toner cartridge 118 Clearing jams from the standard exit bin...120 Clearing jams from Tray 1...120 Clearing jams from Tray 2...122 Clearing jams in the manual feeder...123 Clearing jams behind the rear door...124 Troubleshooting 126 Solving basic printer problems...126 Solving printing problems...126 Jobs do not print...126 Multiple-language PDFs...
User Guide
Page 40
... address into the address field of paper loaded in .); Setting the paper size and paper type Make sure the settings for your paper: • Units of your Web browser. Configuring Universal paper settings The Universal Paper Size is on paper sizes that do one of the printer, then print a network setup page and locate the IP address in the address field of measure (inches or millimeters) • Portrait Width • Portrait Height Note: The smallest supported Universal size is connected to a computer by a USB or parallel cable, use...
... address into the address field of paper loaded in .); Setting the paper size and paper type Make sure the settings for your paper: • Units of your Web browser. Configuring Universal paper settings The Universal Paper Size is on paper sizes that do one of the printer, then print a network setup page and locate the IP address in the address field of measure (inches or millimeters) • Portrait Width • Portrait Height Note: The smallest supported Universal size is connected to a computer by a USB or parallel cable, use...

User Guide
Page 65
... Setup menu, make sure Jam Recovery is connected to a computer by a USB or parallel cable, open the Local Printer Settings Utility for Windows or Printer Settings for the light to Auto or On. For Windows users In Windows Vista: 1 Click . 2 Click Control Panel. 3 Click Hardware and Sound. 4 Click Printers. 5 Double-click the printer icon. 6 Select the job to cancel. 4 From the keyboard, press Delete. One of the following : • Open the Embedded Web Server: 1 Type the printer IP address into the address...
... Setup menu, make sure Jam Recovery is connected to a computer by a USB or parallel cable, open the Local Printer Settings Utility for Windows or Printer Settings for the light to Auto or On. For Windows users In Windows Vista: 1 Click . 2 Click Control Panel. 3 Click Hardware and Sound. 4 Click Printers. 5 Double-click the printer icon. 6 Select the job to cancel. 4 From the keyboard, press Delete. One of the following : • Open the Embedded Web Server: 1 Type the printer IP address into the address...

User Guide
Page 95
...; Remove the toner cartridge, and then reinstall it. • Remove the toner cartridge, and then install a new one. 32.yy Cartridge part number unsupported by device Remove the toner cartridge, and then install a supported one. 34 Short paper Try one or more of the buffer. • Cancel the current print job. 31.yy Replace defective or missing cartridge The toner cartridge is correctly set to Universal, make sure the print job is requesting the correct paper size and type. • Check that the paper size is either missing...
...; Remove the toner cartridge, and then reinstall it. • Remove the toner cartridge, and then install a new one. 32.yy Cartridge part number unsupported by device Remove the toner cartridge, and then install a supported one. 34 Short paper Try one or more of the buffer. • Cancel the current print job. 31.yy Replace defective or missing cartridge The toner cartridge is correctly set to Universal, make sure the print job is requesting the correct paper size and type. • Check that the paper size is either missing...

User Guide
Page 110
... time a protected menu is selected, the user will access each menu. The reports have the following subcategories: Device Statistics Device Settings Job Information Jobs by Document Length Other Job Data Media Sheet Count Paper Menu Reports Settings Network/Ports Reports Network Card TCP/IP IPv6 USB Menu Warnings Device Information Cartridge Information Device Information Page Count Installed Memory Processor Speed Serial Number Engine ID Loader Kernel Base Network Network Driver Engine Font Printer Server Setup Page Ethernet10/100 Standard Network Card Integrated Network Option...
... time a protected menu is selected, the user will access each menu. The reports have the following subcategories: Device Statistics Device Settings Job Information Jobs by Document Length Other Job Data Media Sheet Count Paper Menu Reports Settings Network/Ports Reports Network Card TCP/IP IPv6 USB Menu Warnings Device Information Cartridge Information Device Information Page Count Installed Memory Processor Speed Serial Number Engine ID Loader Kernel Base Network Network Driver Engine Font Printer Server Setup Page Ethernet10/100 Standard Network Card Integrated Network Option...
User Guide
Page 111
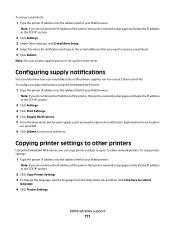
To configure supply notifications using the Embedded Web Server: 1 Type the printer IP address into the address field of your Web browser. To copy printer settings: 1 Type the printer IP address into the address field of -life. Note: If you do not know the IP address of the printer, then print a network setup page and locate the IP address in the TCP/IP section. 2 Click Settings. 3 Under Other Settings, click E-mail Alert Setup. 4 Select the items for notification and type in...
To configure supply notifications using the Embedded Web Server: 1 Type the printer IP address into the address field of your Web browser. To copy printer settings: 1 Type the printer IP address into the address field of -life. Note: If you do not know the IP address of the printer, then print a network setup page and locate the IP address in the TCP/IP section. 2 Click Settings. 3 Under Other Settings, click E-mail Alert Setup. 4 Select the items for notification and type in...

User Guide
Page 126
... your printer model. This often fixes the problem. MAKE SURE THE CORRECT PRINTER SOFTWARE IS INSTALLED Verify that the printer software is the most current, check the Lexmark Web site at www.lexmark.com. Make sure the model number of the software matches the model number of paper from the standard exit bin. Click Install printer and software on before sending a job to check which software is installed. Troubleshooting 126 CHECK TO SEE IF THE TRAY IS EMPTY Load paper in the tray. Solving printing problems Jobs do not print...
... your printer model. This often fixes the problem. MAKE SURE THE CORRECT PRINTER SOFTWARE IS INSTALLED Verify that the printer software is the most current, check the Lexmark Web site at www.lexmark.com. Make sure the model number of the software matches the model number of paper from the standard exit bin. Click Install printer and software on before sending a job to check which software is installed. Troubleshooting 126 CHECK TO SEE IF THE TRAY IS EMPTY Load paper in the tray. Solving printing problems Jobs do not print...

User Guide
Page 148
... only be a new or repaired item. The replacement item assumes the remaining warranty period of the warranty period. To obtain warranty service, you present this product for this statement is available to that feature or option is not free of products, supplies or parts -Products, supplies, parts, materials (such as shown on the World Wide Web at www.lexmark.com/support. Before you...
... only be a new or repaired item. The replacement item assumes the remaining warranty period of the warranty period. To obtain warranty service, you present this product for this statement is available to that feature or option is not free of products, supplies or parts -Products, supplies, parts, materials (such as shown on the World Wide Web at www.lexmark.com/support. Before you...
User Guide
Page 153
...-sheet drawer installing 17 251 paper jams, clearing from manual feeder 123 251.yy Paper jam 98 2-sided printing 58, 59 31.yy Replace defective or missing cartridge 95 32.yy Cartridge part number unsupported by device 95 34 Short paper 95 37 Insufficient memory to collate job 95 38 Memory full 95 39 Complex page, some data may not have printed 96 42.xy Cartridge region mismatch 96 54 Standard network software error 96 550-sheet drawer installing 17 84 PC Kit life warning...
...-sheet drawer installing 17 251 paper jams, clearing from manual feeder 123 251.yy Paper jam 98 2-sided printing 58, 59 31.yy Replace defective or missing cartridge 95 32.yy Cartridge part number unsupported by device 95 34 Short paper 95 37 Insufficient memory to collate job 95 38 Memory full 95 39 Complex page, some data may not have printed 96 42.xy Cartridge region mismatch 96 54 Standard network software error 96 550-sheet drawer installing 17 84 PC Kit life warning...

User Guide
Page 154
... using 69 M manual duplex printing 59 manual feeder loading 46 memory card installing 16 troubleshooting 130 menu settings loading on multiple printers 111 menu settings page printing 63 menus AppleTalk 88 Custom Types 76 Default Source 71 diagram of 67 Finishing 80 General settings 77 in Local Printer Settings Utility 69 IPv6 88 Network 85 Network Card 86 Paper Loading 75 Paper Texture 74 Paper Weight 75 parallel 90 PCL Emul 83 PostScript 83 Quality 82 Setup 79 Size/Type 71 TCP/IP 87 Universal Setup 76 USB 89 menus, accessing using the Embedded Web Server...
... using 69 M manual duplex printing 59 manual feeder loading 46 memory card installing 16 troubleshooting 130 menu settings loading on multiple printers 111 menu settings page printing 63 menus AppleTalk 88 Custom Types 76 Default Source 71 diagram of 67 Finishing 80 General settings 77 in Local Printer Settings Utility 69 IPv6 88 Network 85 Network Card 86 Paper Loading 75 Paper Texture 74 Paper Weight 75 parallel 90 PCL Emul 83 PostScript 83 Quality 82 Setup 79 Size/Type 71 TCP/IP 87 Universal Setup 76 USB 89 menus, accessing using the Embedded Web Server...
User Guide
Page 155
... Load manual feeder with 94 Not Ready 94 Power Saver 94 Programming Engine Code 94 Programming System Code 94 Ready 94 Remove paper from standard output bin 94 Restoring Factory Defaults 94 Waiting 95 printer options troubleshooting drawers 129 memory card 130 option not working 129 printer problems, solving basic 126 printer settings configuration sheet printing 38 printer status not ready 94 printing booklet 63 duplex (2-sided) 58, 59 duplex, manual 59 from Macintosh 57 from Windows 57 installing printer software 19 menu settings page 63 network setup page 63 on both sides of paper manually...
... Load manual feeder with 94 Not Ready 94 Power Saver 94 Programming Engine Code 94 Programming System Code 94 Ready 94 Remove paper from standard output bin 94 Restoring Factory Defaults 94 Waiting 95 printer options troubleshooting drawers 129 memory card 130 option not working 129 printer problems, solving basic 126 printer settings configuration sheet printing 38 printer status not ready 94 printing booklet 63 duplex (2-sided) 58, 59 duplex, manual 59 from Macintosh 57 from Windows 57 installing printer software 19 menu settings page 63 network setup page 63 on both sides of paper manually...
Service Manual
Page 38
... factory default is replaced. Action Remove the toner cartridge, and install a new toner cartridge that matches the region of the installed toner cartridge. Photoconductor kit life warning Meaning The photoconductor is full and must be replaced soon. Replace photoconductor (printer hard stop) Meaning The photoconductor kit is almost full and should be turned on in the driver for this message to appear. Action • Press and release Continue to print a photoconductor kit instruction page...
... factory default is replaced. Action Remove the toner cartridge, and install a new toner cartridge that matches the region of the installed toner cartridge. Photoconductor kit life warning Meaning The photoconductor is full and must be replaced soon. Replace photoconductor (printer hard stop) Meaning The photoconductor kit is almost full and should be turned on in the driver for this message to appear. Action • Press and release Continue to print a photoconductor kit instruction page...

Service Manual
Page 51
... the controller board or network card is invalid. Diagnostics information 2-25 Invalid network code 4513-200, -220, -230 Meaning The code either in the toner cartridge is getting low, or an invalid refill toner has been installed. It may be changed without calling Lexmark for a one-time change. Action Download the valid network code to extend the life, or replace the toner cartridge with a valid toner cartridge. • Replace the toner cartridge. • Turn the printer...
... the controller board or network card is invalid. Diagnostics information 2-25 Invalid network code 4513-200, -220, -230 Meaning The code either in the toner cartridge is getting low, or an invalid refill toner has been installed. It may be changed without calling Lexmark for a one-time change. Action Download the valid network code to extend the life, or replace the toner cartridge with a valid toner cartridge. • Replace the toner cartridge. • Turn the printer...
Service Manual
Page 60
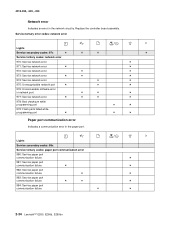
...61527; Paper port communication error Indicates a communication error in the network circuitry. Lights Service secondary codes: 98x Service tertiary codes: paper port communication error 980: Service paper port communication failure 981: Service paper port communication failure 982: Service paper port communication failure 983: Service paper port communication failure 984: Service paper port communication failure 2-34 Lexmark™ E260, E260d, E260dn Replace the controller board...
...61527; Paper port communication error Indicates a communication error in the network circuitry. Lights Service secondary codes: 98x Service tertiary codes: paper port communication error 980: Service paper port communication failure 981: Service paper port communication failure 982: Service paper port communication failure 983: Service paper port communication failure 984: Service paper port communication failure 2-34 Lexmark™ E260, E260d, E260dn Replace the controller board...
Service Manual
Page 81
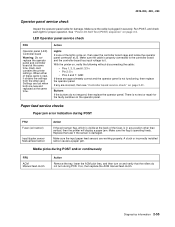
... is damaged. A stuck or incorrectly installed sensor causes a paper jam. If so, then replace the ACM manual feed clutch. Each card contains the printer settings. See "Power-On Self Test (POST) sequence" on page 2-51. Settings are lost when both are approximately correct and the operator panel is new, it . 4513-200, -220, -230 Operator panel service check Inspect the operator panel cable for proper operation. Buttons If the buttons do not turn during POST...
... is damaged. A stuck or incorrectly installed sensor causes a paper jam. If so, then replace the ACM manual feed clutch. Each card contains the printer settings. See "Power-On Self Test (POST) sequence" on page 2-51. Settings are lost when both are approximately correct and the operator panel is new, it . 4513-200, -220, -230 Operator panel service check Inspect the operator panel cable for proper operation. Buttons If the buttons do not turn during POST...
Service Manual
Page 88
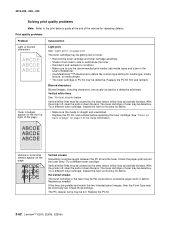
... low on the front or back of the manual for condition. • Make sure to use the recommended print media (see media types and sizes in the User's Reference). • Use MarkVision™ Professional to excessive page count or defect. Replace as needed. Vertical white lines may be caused by the laser beam, which may be incorrectly set. The toner cartridge or fuser may be defective. Try a different toner cartridge. Vertical white lines...
... low on the front or back of the manual for condition. • Make sure to use the recommended print media (see media types and sizes in the User's Reference). • Use MarkVision™ Professional to excessive page count or defect. Replace as needed. Vertical white lines may be caused by the laser beam, which may be incorrectly set. The toner cartridge or fuser may be defective. Try a different toner cartridge. Vertical white lines...

Service Manual
Page 96
... be cleared only when the photoconductor kit has been replaced. 3-4 Lexmark™ E260, E260d, E260dn Close the front access door once the Error light displays. Utilities Use the Utilities menu to troubleshoot printer problems. Setting Reset Factory Defaults Hex Trace Print Quality Test Pages Reset Photoconductor Maintenance Counter Use setting to Values Return the printer settings to the factory default values except: • All settings in the Parallel menu, Network menu, and USB menu. • All downloaded resources (fonts, macros, and symbol sets) in flash memory are missing...
... be cleared only when the photoconductor kit has been replaced. 3-4 Lexmark™ E260, E260d, E260dn Close the front access door once the Error light displays. Utilities Use the Utilities menu to troubleshoot printer problems. Setting Reset Factory Defaults Hex Trace Print Quality Test Pages Reset Photoconductor Maintenance Counter Use setting to Values Return the printer settings to the factory default values except: • All settings in the Parallel menu, Network menu, and USB menu. • All downloaded resources (fonts, macros, and symbol sets) in flash memory are missing...


