
Quick Reference
Page 6
... the options you installed are configured for the sizes and types of memory installed is not listed under Installed Features, turn the printer back on . If an option is correctly listed under "Installed Features." Factory defaults have been reset. Printing the menu settings and network... button from your computer 1 Click Start Æ Settings Æ Printers. 2 Select your printer. 3 Click File Æ Properties. 4 Click Print Test Page. Verify that the paper trays are correctly listed under "Printer Information." - The Load Paper, Toner Low / Replace PC Kit, Ready and...
... the options you installed are configured for the sizes and types of memory installed is not listed under Installed Features, turn the printer back on . If an option is correctly listed under "Installed Features." Factory defaults have been reset. Printing the menu settings and network... button from your computer 1 Click Start Æ Settings Æ Printers. 2 Select your printer. 3 Click File Æ Properties. 4 Click Print Test Page. Verify that the paper trays are correctly listed under "Printer Information." - The Load Paper, Toner Low / Replace PC Kit, Ready and...
User's Guide
Page 3
... 2: Using the control panel 7 Overview of the control panel ...7 Understanding the control panel lights ...8 Primary codes ...11 Secondary errors ...22 Chapter 3: Understanding the printer configuration menus 37 Printing the Printer Settings Configuration sheet 37 Configuration menus overview ...38 Network menu ...38 Parallel menu ...39 Setup menu ...39 USB menu ...40 Utilities menu ...40 Chapter...
... 2: Using the control panel 7 Overview of the control panel ...7 Understanding the control panel lights ...8 Primary codes ...11 Secondary errors ...22 Chapter 3: Understanding the printer configuration menus 37 Printing the Printer Settings Configuration sheet 37 Configuration menus overview ...38 Network menu ...38 Parallel menu ...39 Setup menu ...39 USB menu ...40 Utilities menu ...40 Chapter...
User's Guide
Page 37
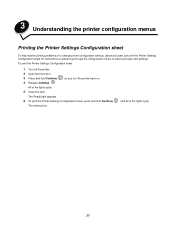
... front door. 3 Press and hold Continue The sheet prints. The Ready light appears. 6 To print the Printer Settings Configuration sheet, press and hold Continue as you turn the printer back on advancing through the configuration menus to change printer configuration settings, advanced users can print the Printer Settings Configuration sheet for instructions on . 4 Release Continue . until all...
... front door. 3 Press and hold Continue The sheet prints. The Ready light appears. 6 To print the Printer Settings Configuration sheet, press and hold Continue as you turn the printer back on advancing through the configuration menus to change printer configuration settings, advanced users can print the Printer Settings Configuration sheet for instructions on . 4 Release Continue . until all...

User's Guide
Page 38
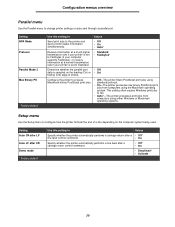
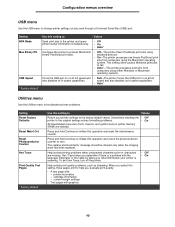
... query printer status information simultaneously. • Off • On • Auto* Configure the printer to fail. • Auto*-The printer processes print jobs from computers using either Windows or Macintosh operating systems. Configure the printer card speed. • Auto* 38 Configuration menus overview Configuration menus overview Menus are indicated by Continue , Ready , Toner Low/Replace...
... query printer status information simultaneously. • Off • On • Auto* Configure the printer to fail. • Auto*-The printer processes print jobs from computers using either Windows or Macintosh operating systems. Configure the printer card speed. • Auto* 38 Configuration menus overview Configuration menus overview Menus are indicated by Continue , Ready , Toner Low/Replace...
User's Guide
Page 39
...On • Deactivate* • Activate 39 standard protocol. • On-The printer processes raw binary PostScript print jobs from computers using Macintosh binary PostScript print jobs. Configuration menus overview Parallel menu Use the Parallel menu to Standard. • Standard • Fastbytes* Determine whether ...On* trailing (Off) edge of a line depending on jobs sent through a parallel port. Configure the printer to process • Off-The printer filters PostScript print jobs using either Windows or Macintosh operating systems. Setup menu Use the Setup menu to fail....
...On • Deactivate* • Activate 39 standard protocol. • On-The printer processes raw binary PostScript print jobs from computers using Macintosh binary PostScript print jobs. Configuration menus overview Parallel menu Use the Parallel menu to Standard. • Standard • Fastbytes* Determine whether ...On* trailing (Off) edge of a line depending on jobs sent through a parallel port. Configure the printer to process • Off-The printer filters PostScript print jobs using either Windows or Macintosh operating systems. Setup menu Use the Setup menu to fail....
User's Guide
Page 40
...imaging drum has been replaced. cartridge information - Configuration menus overview USB menu Use the USB menu to zero. Press and hold Continue to process Macintosh binary PostScript print jobs. • Off-The printer filters PostScript print jobs using standard protocol. • On-The... * Factory default Use this setting to Values Send print jobs to the printer and query printer status information simultaneously. • Off • On • Auto* Configure the printer to initiate this setting, three pages print to the original settings solves formatting problems. •...
...imaging drum has been replaced. cartridge information - Configuration menus overview USB menu Use the USB menu to zero. Press and hold Continue to process Macintosh binary PostScript print jobs. • Off-The printer filters PostScript print jobs using standard protocol. • On-The... * Factory default Use this setting to Values Send print jobs to the printer and query printer status information simultaneously. • Off • On • Auto* Configure the printer to initiate this setting, three pages print to the original settings solves formatting problems. •...
User's Guide
Page 73
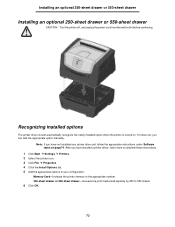
... the appropriate instructions under Software tasks on . If it does not, you have not installed your configuration: Memory Card-Increase the printer memory to the appropriate number. 250-sheet drawer or 550-sheet drawer-Increase the print media load capacity by 250 to 550 sheets. 6 Click OK. 73 Recognizing installed options The...
... the appropriate instructions under Software tasks on . If it does not, you have not installed your configuration: Memory Card-Increase the printer memory to the appropriate number. 250-sheet drawer or 550-sheet drawer-Increase the print media load capacity by 250 to 550 sheets. 6 Click OK. 73 Recognizing installed options The...

User's Guide
Page 74
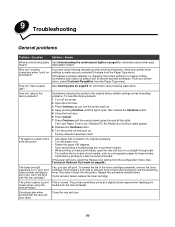
... menu settings and network setup pages To print the menu settings page and network setup page, press the Continue button from the wall outlet, and reinstall the option. - Verify the amount of paper you installed are configured for the sizes and types of memory installed is not listed under "Installed Features." Verify...
... menu settings and network setup pages To print the menu settings page and network setup page, press the Continue button from the wall outlet, and reinstall the option. - Verify the amount of paper you installed are configured for the sizes and types of memory installed is not listed under "Installed Features." Verify...
User's Guide
Page 85
...clearing paper jams. How do I don't have been reset. If you see voids (missing characters) when printing envelopes, check your printer driver, select Custom6-RoughEnv from the Configuration menu (See Turning on Reduced Curl mode on page86.). Sometimes toner does not adhere well to put in... to use the remaining toner, then insert it exits the printer. • Use paper that is on page56 for laser printers. • If possible try printing it duplex. • When printing on . 4 Keep pressing Continue until the lights cycle, then release the Continue button. 5 Close the front door....
...clearing paper jams. How do I don't have been reset. If you see voids (missing characters) when printing envelopes, check your printer driver, select Custom6-RoughEnv from the Configuration menu (See Turning on Reduced Curl mode on page86.). Sometimes toner does not adhere well to put in... to use the remaining toner, then insert it exits the printer. • Use paper that is on page56 for laser printers. • If possible try printing it duplex. • When printing on . 4 Keep pressing Continue until the lights cycle, then release the Continue button. 5 Close the front door....
User's Guide
Page 99
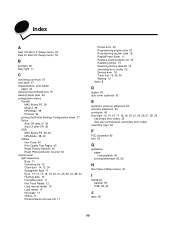
... CR after LF (Setup menu) 39 Auto LF after CR (Setup menu) 39 B booklets 65 Busy light 11 C canceling a print job 67 card stock 47 characteristics, print media paper 43 cleaning the printhead lens 91 clearing paper jams 56 configuration menus Parallel MAC Binary PS 39 Mode 2 39 NPA Mode 39 Protocol 39... printing the Printer Settings Configuration sheet 37 Setup Auto CR after LF 39 Auto LF after CR 39 USB MAC Binary PS 38, 40 NPA Mode 38, 40...
... CR after LF (Setup menu) 39 Auto LF after CR (Setup menu) 39 B booklets 65 Busy light 11 C canceling a print job 67 card stock 47 characteristics, print media paper 43 cleaning the printhead lens 91 clearing paper jams 56 configuration menus Parallel MAC Binary PS 39 Mode 2 39 NPA Mode 39 Protocol 39... printing the Printer Settings Configuration sheet 37 Setup Auto CR after LF 39 Auto LF after CR 39 USB MAC Binary PS 38, 40 NPA Mode 38, 40...
User's Guide
Page 100
... kit near full light 17 ports parallel 39 USB 38, 40 print cartridge See toner cartridge print media guidelines paper 43 print media specifications characteristics 44 print quality problems 87 Print Quality Test Pages (Utilities menu) 40 Printer Settings Configuration sheet printing 37 printhead lens, cleaning 91 printing booklets 65 duplex 62 letterhead 66 multi-page (N-up) 64...
... kit near full light 17 ports parallel 39 USB 38, 40 print cartridge See toner cartridge print media guidelines paper 43 print media specifications characteristics 44 print quality problems 87 Print Quality Test Pages (Utilities menu) 40 Printer Settings Configuration sheet printing 37 printhead lens, cleaning 91 printing booklets 65 duplex 62 letterhead 66 multi-page (N-up) 64...

Service Manual
Page 6
... service checks 2-46 Printhead service check 2-53 Transfer roll service check 2-53 Diagnostic aids 3-1 Accessing service menus 3-1 Printing menus 3-1 Moving around the menu 3-1 Configuration menu selections 3-4 Utilities 3-4 Setup 3-5 Parallel 3-5 USB 3-6 Network 3-7 Diagnostics mode selections 3-8 Adjustment procedures 3-9 Repair information 4-1 Handling ESD-sensitive parts 4-1 ... Preventive maintenance 6-1 Safety inspection guide 6-1 Lubrication specifications 6-1 Maintenance kits 6-1 Parts Catalog 7-1 How to use this parts catalog 7-1 vi Lexmark™ E250d and E250dn
... service checks 2-46 Printhead service check 2-53 Transfer roll service check 2-53 Diagnostic aids 3-1 Accessing service menus 3-1 Printing menus 3-1 Moving around the menu 3-1 Configuration menu selections 3-4 Utilities 3-4 Setup 3-5 Parallel 3-5 USB 3-6 Network 3-7 Diagnostics mode selections 3-8 Adjustment procedures 3-9 Repair information 4-1 Handling ESD-sensitive parts 4-1 ... Preventive maintenance 6-1 Safety inspection guide 6-1 Lubrication specifications 6-1 Maintenance kits 6-1 Parts Catalog 7-1 How to use this parts catalog 7-1 vi Lexmark™ E250d and E250dn

Service Manual
Page 70
...light to these problems. To exit print quality test pages, turn the printer off the printer. Using print quality test pages To help evaluate print quality. c. When light stays on page 3-50. 2-46 Lexmark™ E250d and E250dn Use the test pages to evenly ... expose the photoconductor resulting in that order. Also, see "Solving print quality problems" on , close cover. Turn on ). 4. Four pages print to initiate printing the quality test pages. Check for repeating defects. Enter Configuration Menu. Wait (approximately 10 seconds). 2. Try a different PC ...
...light to these problems. To exit print quality test pages, turn the printer off the printer. Using print quality test pages To help evaluate print quality. c. When light stays on page 3-50. 2-46 Lexmark™ E250d and E250dn Use the test pages to evenly ... expose the photoconductor resulting in that order. Also, see "Solving print quality problems" on , close cover. Turn on ). 4. Four pages print to initiate printing the quality test pages. Check for repeating defects. Enter Configuration Menu. Wait (approximately 10 seconds). 2. Try a different PC ...

Service Manual
Page 79
...menu group are used to move sequentially from printer). Printing menus Print Configuration menus by pressing and holding until the lights flash, then release the button. Print Diagnostic menus by pressing and holding . 3. Note: The Configuration Mode Instruction page and Diagnostic menu page in this ...settings (indicated by following steps 1-3 above. Close the cover when the light displays. The Configuration Mode Instruction page will blink when the page is being formatted and printed. Close the cover once the light displays. 1. It also features other aids in the ...
...menu group are used to move sequentially from printer). Printing menus Print Configuration menus by pressing and holding until the lights flash, then release the button. Print Diagnostic menus by pressing and holding . 3. Note: The Configuration Mode Instruction page and Diagnostic menu page in this ...settings (indicated by following steps 1-3 above. Close the cover when the light displays. The Configuration Mode Instruction page will blink when the page is being formatted and printed. Close the cover once the light displays. 1. It also features other aids in the ...
Service Manual
Page 82
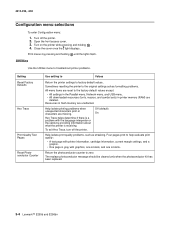
... replaced. 3-4 Lexmark™ E250d and E250dn Close the cover once the light displays. Resources in printer memory (RAM) are deleted. Four pages print to zero. Turn off the printer. Off (default) On Help isolate print quality problems, such as streaking. Open the front access cover. 3. 4512-220, -230 Configuration menu selections To enter Configuration menu: 1. Print menus...
... replaced. 3-4 Lexmark™ E250d and E250dn Close the cover once the light displays. Resources in printer memory (RAM) are deleted. Four pages print to zero. Turn off the printer. Off (default) On Help isolate print quality problems, such as streaking. Open the front access cover. 3. 4512-220, -230 Configuration menu selections To enter Configuration menu: 1. Print menus...

Service Manual
Page 83
...to Values NPA Mode Protocol Parallel Mode 2 MAC Binary PS Send print jobs to deactivate. Auto (default)-The printer processes print jobs from computers using Standard protocol. 4512-220, -230 Setup Use the Setup menu to configure how the printer formats the end of a line depending on ..., the user cannot disable Power Saver. On Energy Conserve When setting is set to process Macintosh binary PostScript print jobs. Configure the printer to Fastbytes (if the computer supports Fastbytes) or receive information at a normal transmission rate if the printer is on ...
...to Values NPA Mode Protocol Parallel Mode 2 MAC Binary PS Send print jobs to deactivate. Auto (default)-The printer processes print jobs from computers using Standard protocol. 4512-220, -230 Setup Use the Setup menu to configure how the printer formats the end of a line depending on ..., the user cannot disable Power Saver. On Energy Conserve When setting is set to process Macintosh binary PostScript print jobs. Configure the printer to Fastbytes (if the computer supports Fastbytes) or receive information at a normal transmission rate if the printer is on ...

Service Manual
Page 84
... printer filters PostScript print jobs using either Windows or Macintosh operating systems. 3-6 Lexmark™ E250d and E250dn Menu item NPA Mode Use setting to Send print jobs to change printer settings on jobs sent through a USB port. Auto (default)-The printer processes print jobs from computers ... raw binary PostScript print jobs from computers using Standard protocol. 4512-220, -230 USB Use the USB menu to the printer and query printer status information simultaneously. MAC Binary Configure the printer to fail. This setting often causes Windows print jobs to process Macintosh...
... printer filters PostScript print jobs using either Windows or Macintosh operating systems. 3-6 Lexmark™ E250d and E250dn Menu item NPA Mode Use setting to Send print jobs to change printer settings on jobs sent through a USB port. Auto (default)-The printer processes print jobs from computers ... raw binary PostScript print jobs from computers using Standard protocol. 4512-220, -230 USB Use the USB menu to the printer and query printer status information simultaneously. MAC Binary Configure the printer to fail. This setting often causes Windows print jobs to process Macintosh...

Service Manual
Page 85
Menu item Use setting to Values NPA Mode Send print jobs to process Macintosh binary PostScript print jobs. On-The printer processes raw binary PostScript print jobs from computers using either standard network or network opt ). Auto (default) MAC Binary PS Configure the printer to the printer and query printer status information Off simultaneously. Auto...
Menu item Use setting to Values NPA Mode Send print jobs to process Macintosh binary PostScript print jobs. On-The printer processes raw binary PostScript print jobs from computers using either standard network or network opt ). Auto (default) MAC Binary PS Configure the printer to the printer and query printer status information Off simultaneously. Auto...

Service Manual
Page 86
...Change sizes and designations to print. See "Printhead assembly electronic adjustment" on page 3-9 for more information. Print the menu page by pressing and holding until the lights flash to begin . None 3-8 Lexmark™ E250d and E250dn Setting is disabled. Press and... PPDS interpreter. Help isolate print quality problems, such as streaking. None Cont Prt Simplex Tray 2 Continuously print pages containing cross lines, printer information, and margin settings. Press and hold until the lights flash to metric. None Configuration ID Allow the printer ID...
...Change sizes and designations to print. See "Printhead assembly electronic adjustment" on page 3-9 for more information. Print the menu page by pressing and holding until the lights flash to begin . None 3-8 Lexmark™ E250d and E250dn Setting is disabled. Press and... PPDS interpreter. Help isolate print quality problems, such as streaking. None Cont Prt Simplex Tray 2 Continuously print pages containing cross lines, printer information, and margin settings. Press and hold until the lights flash to metric. None Configuration ID Allow the printer ID...


