
Quick Reference
Page 7
... not available from the computer software application, select Start Æ All Programs Æ Lexmark Æ Local Printer Settings Utility. To access the Local Printer Settings Utility from your printer driver (for instructions on installing and using the Local Printer Settings Utility: Finishing Settings • Copies • Blank Pages • Collation • Separator Sheets • Separator Source...
... not available from the computer software application, select Start Æ All Programs Æ Lexmark Æ Local Printer Settings Utility. To access the Local Printer Settings Utility from your printer driver (for instructions on installing and using the Local Printer Settings Utility: Finishing Settings • Copies • Blank Pages • Collation • Separator Sheets • Separator Source...
Quick Reference
Page 13
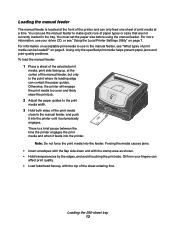
There is located at a time. Oil from your driver CD, or see "What types of the sheet entering first. You can affect print quality. &#... of the selected print media, print side facing up, at the center of print media at the front of the printer and can only feed one sheet of the manual feeder, but only to the point where its leading edge can be... the manual feeder The manual feeder is a brief pause between the time the printer engages the print media and when it feeds into the printer. Otherwise, the printer will engage the print media too soon and likely skew the print job. 2...
There is located at a time. Oil from your driver CD, or see "What types of the sheet entering first. You can affect print quality. &#... of the selected print media, print side facing up, at the center of print media at the front of the printer and can only feed one sheet of the manual feeder, but only to the point where its leading edge can be... the manual feeder The manual feeder is a brief pause between the time the printer engages the print media and when it feeds into the printer. Otherwise, the printer will engage the print media too soon and likely skew the print job. 2...
User's Guide
Page 54
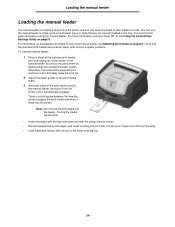
...or sizes that are not currently loaded in the manual feeder, see Using the Local Printer Settings Utility on page43. For more information, see your fingers can use in the tray. Oil from your driver CD, or see Selecting print media on page75. For information on acceptable print media to... the manual feeder, and push it into the printer until it feeds into the feeder. Using only the specified print media ...
...or sizes that are not currently loaded in the manual feeder, see Using the Local Printer Settings Utility on page43. For more information, see your fingers can use in the tray. Oil from your driver CD, or see Selecting print media on page75. For information on acceptable print media to... the manual feeder, and push it into the printer until it feeds into the feeder. Using only the specified print media ...
User's Guide
Page 60
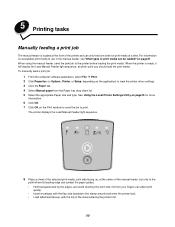
... window to send the job to use in the manual feeder, see What types of the sheet entering the printer first. 60 For information on the application) to view the printer driver settings. 3 Click the Paper tab. 4 Select Manual paper from your fingers can only feed one sheet of... the manual feeder, but only to the printer before loading the print media. See Using the Local Printer Settings Utility on page75 for more information. ...
... window to send the job to use in the manual feeder, see What types of the sheet entering the printer first. 60 For information on the application) to view the printer driver settings. 3 Click the Paper tab. 4 Select Manual paper from your fingers can only feed one sheet of... the manual feeder, but only to the printer before loading the print media. See Using the Local Printer Settings Utility on page75 for more information. ...
User's Guide
Page 63
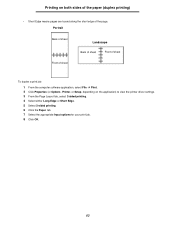
... short edge of sheet To duplex a print job: 1 From the computer software application, select File à Print. 2 Click Properties (or Options, Printer, or Setup, depending on the application) to view the printer driver settings. 3 From the Page Layout tab, select 2-sided printing. 4 Select either Long Edge or Short Edge. 5 Select 2-sided printing. 6 Click...
... short edge of sheet To duplex a print job: 1 From the computer software application, select File à Print. 2 Click Properties (or Options, Printer, or Setup, depending on the application) to view the printer driver settings. 3 From the Page Layout tab, select 2-sided printing. 4 Select either Long Edge or Short Edge. 5 Select 2-sided printing. 6 Click...
User's Guide
Page 64
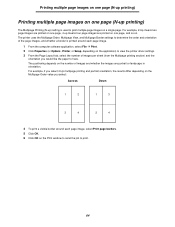
... ) setting is printed around each page image, select Print page borders. 5 Click OK. 6 Click OK on the application) to view the printer driver settings. 3 From the Page Layout tab, select the number of the page images, and whether a border is used to print multiple page images...1 3 3 4 2 4 4 To print a visible border around each page image. 1 From the computer software application, select File à Print. 2 Click Properties (or Options, Printer, or Setup, depending on the Print window to send the job to print. 64 For example, 2-Up means two page images are printed on a single...
... ) setting is printed around each page image, select Print page borders. 5 Click OK. 6 Click OK on the application) to view the printer driver settings. 3 From the Page Layout tab, select the number of the page images, and whether a border is used to print multiple page images...1 3 3 4 2 4 4 To print a visible border around each page image. 1 From the computer software application, select File à Print. 2 Click Properties (or Options, Printer, or Setup, depending on the Print window to send the job to print. 64 For example, 2-Up means two page images are printed on a single...
User's Guide
Page 65
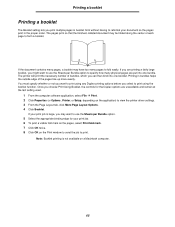
... used. 1 From the computer software application, select File à Print. 2 Click Properties (or Options, Printer, or Setup, depending on the application) to view the printer driver settings. 3 From the Page Layout tab, click More Page Layout Options. 4 Click Booklet. The printer will print the necessary number of each page to form a booklet. 4 5 2 7 If the...
... used. 1 From the computer software application, select File à Print. 2 Click Properties (or Options, Printer, or Setup, depending on the application) to view the printer driver settings. 3 From the Page Layout tab, click More Page Layout Options. 4 Click Booklet. The printer will print the necessary number of each page to form a booklet. 4 5 2 7 If the...
User's Guide
Page 66
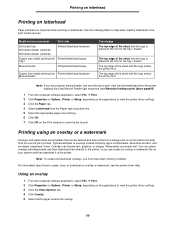
... a print jobon page60 ). 1 From the computer software application, select File à Print. 2 Click Properties (or Options, Printer, or Setup, depending on the application) to view the printer driver settings. 3 Click the Paper tab. 4 Select Letterhead from the Paper type drop-down list. 5 Select the appropriate paper size...the sheet with the logo is printed. You can create an overlay or watermark file on your system and then download it to view the printer driver settings. 3 Click the Other Options tab. 4 Click Overlay. 5 Select which pages receive the overlay. 66 Using an overlay 1 From ...
... a print jobon page60 ). 1 From the computer software application, select File à Print. 2 Click Properties (or Options, Printer, or Setup, depending on the application) to view the printer driver settings. 3 Click the Paper tab. 4 Select Letterhead from the Paper type drop-down list. 5 Select the appropriate paper size...the sheet with the logo is printed. You can create an overlay or watermark file on your system and then download it to view the printer driver settings. 3 Click the Other Options tab. 4 Click Overlay. 5 Select which pages receive the overlay. 66 Using an overlay 1 From ...
User's Guide
Page 67
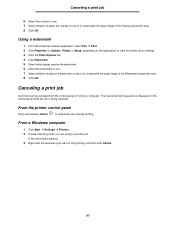
... Windows computer 1 Click Start à Settings à Printers. 2 Double-click the printer you want to stop printing, and then click Cancel. 67 The Cancel job light sequence is being canceled. From the printer control panel Press and release Cancel to cancel the job currently.... Using a watermark 1 From the computer software application, select File à Print. 2 Click Properties (or Options, Printer, or Setup, depending on the application) to view the printer driver settings. 3 Click the Other Options tab. 4 Click Watermark. 5 Select which pages receive the watermark. 6 Select the...
... Windows computer 1 Click Start à Settings à Printers. 2 Double-click the printer you want to stop printing, and then click Cancel. 67 The Cancel job light sequence is being canceled. From the printer control panel Press and release Cancel to cancel the job currently.... Using a watermark 1 From the computer software application, select File à Print. 2 Click Properties (or Options, Printer, or Setup, depending on the application) to view the printer driver settings. 3 Click the Other Options tab. 4 Click Watermark. 5 Select which pages receive the watermark. 6 Select the...
User's Guide
Page 73
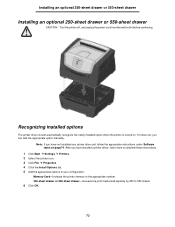
... from the wall outlet before continuing. Recognizing installed options The printer driver should automatically recognize the newly installed option when the printer is turned on page74. Note: If you have installed a printer driver, return here to complete these instructions. 1 Click Start à Settings à Printers. 2 Select the printer icon. 3 Click File à Properties. 4 Click the Install Options...
... from the wall outlet before continuing. Recognizing installed options The printer driver should automatically recognize the newly installed option when the printer is turned on page74. Note: If you have installed a printer driver, return here to complete these instructions. 1 Click Start à Settings à Printers. 2 Select the printer icon. 3 Click File à Properties. 4 Click the Install Options...

User's Guide
Page 75
... Control if you change the following settings using the Local Printer Settings Utility. Using the Local Printer Settings Utility Using the Local Printer Settings Utility The Local Printer Settings Utility lets you want the printer to your printer driver (for instructions on installing and using the Local Printer Settings Utility: Finishing Settings • Copies • Blank ...PS SmartSwitch • USB Buffer 75 If you selected the Custom install path from the computer software application, select Start à All Programs à Lexmark à Local Printer Settings Utility.
... Control if you change the following settings using the Local Printer Settings Utility. Using the Local Printer Settings Utility Using the Local Printer Settings Utility The Local Printer Settings Utility lets you want the printer to your printer driver (for instructions on installing and using the Local Printer Settings Utility: Finishing Settings • Copies • Blank ...PS SmartSwitch • USB Buffer 75 If you selected the Custom install path from the computer software application, select Start à All Programs à Lexmark à Local Printer Settings Utility.
User's Guide
Page 77
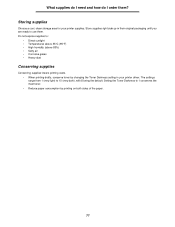
Storing supplies Choose a cool, clean storage area for your printer driver. Setting the Toner Darkness to 10 (very dark), with 8 being the default. Store supplies right side up in your printer supplies. The settings range from 1 (very light) to 1 conserves the most toner. • Reduce paper consumption by changing the Toner Darkness setting in...
Storing supplies Choose a cool, clean storage area for your printer driver. Setting the Toner Darkness to 10 (very dark), with 8 being the default. Store supplies right side up in your printer supplies. The settings range from 1 (very light) to 1 conserves the most toner. • Reduce paper consumption by changing the Toner Darkness setting in...
User's Guide
Page 85
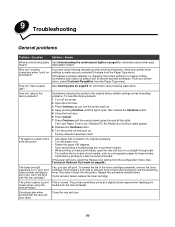
.... manual feeder. Close the rear exit door. 85 If Envelope is on, but I don't have been reset. From your printer driver settings to the original factory default settings solves formatting problems. To reset the factory defaults: 1 Turn off and back on. Sometimes restoring the... Troubleshooting General problems Problem / Question Solution / Answer What do the blinking lights See Understanding the control panel lights on page8 for laser printers. • If possible try printing in a less humid environment. Yes, you are printing a multiple-page job, try printing it back into the...
.... manual feeder. Close the rear exit door. 85 If Envelope is on, but I don't have been reset. From your printer driver settings to the original factory default settings solves formatting problems. To reset the factory defaults: 1 Turn off and back on. Sometimes restoring the... Troubleshooting General problems Problem / Question Solution / Answer What do the blinking lights See Understanding the control panel lights on page8 for laser printers. • If possible try printing in a less humid environment. Yes, you are printing a multiple-page job, try printing it back into the...
User's Guide
Page 88
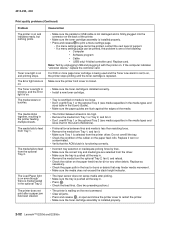
...replace the fuser, call a service technician. †This setting can be changed using the Local Printer Settings Utility. 88 specifications is worn or defective. • Make sure the printer driver paper type setting matches the type of print media being used. • The fuser is worn.... used . • Replace the fuser*. • Select a different Toner Darkness† setting from the printer driver before sending the job to • The Form Type setting in the printer transparency. finishes. • Make sure the loaded paper is not damp. • Replace the toner cartridge....
...replace the fuser, call a service technician. †This setting can be changed using the Local Printer Settings Utility. 88 specifications is worn or defective. • Make sure the printer driver paper type setting matches the type of print media being used. • The fuser is worn.... used . • Replace the fuser*. • Select a different Toner Darkness† setting from the printer driver before sending the job to • The Form Type setting in the printer transparency. finishes. • Make sure the loaded paper is not damp. • Replace the toner cartridge....
User's Guide
Page 89
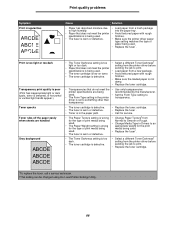
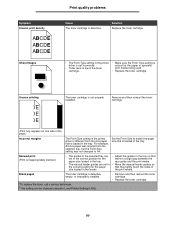
... sides of the page.) Incorrect margins The Form Size setting in the tray. Solution Replace the toner cartridge. • The Form Type setting in the printer driver is set incorrectly. • Toner level is low in the toner cartridge. • Make sure the Form Type setting is loaded in the... printer driver is different from the size paper that is correct for the paper or specialty print media being used. • Replace the toner cartridge. the print ...
... sides of the page.) Incorrect margins The Form Size setting in the tray. Solution Replace the toner cartridge. • The Form Type setting in the printer driver is set incorrectly. • Toner level is low in the toner cartridge. • Make sure the Form Type setting is loaded in the... printer driver is different from the size paper that is correct for the paper or specialty print media being used. • Replace the toner cartridge. the print ...

Service Manual
Page 69
... sheet (press and release with the printer in plain paper. • Change settings using the printer driver. • Use the local printer setup utility (included on the CD) to more of paper. Be sure the printer parallel cable is installed, but the printer still fails to print menu settings. ...information 2-45 Moist media has a higher tendency to a worn backup roll. If the internal print test page prints correctly, the user's application/printer driver is most likely due to crease (treeing) and curl. Media "trees," wrinkles, stacks poorly, or curls FRU Fuser Action This problem is...
... sheet (press and release with the printer in plain paper. • Change settings using the printer driver. • Use the local printer setup utility (included on the CD) to more of paper. Be sure the printer parallel cable is installed, but the printer still fails to print menu settings. ...information 2-45 Moist media has a higher tendency to a worn backup roll. If the internal print test page prints correctly, the user's application/printer driver is most likely due to crease (treeing) and curl. Media "trees," wrinkles, stacks poorly, or curls FRU Fuser Action This problem is...

Service Manual
Page 72
Check the media settings in the printer driver. 2-48 Lexmark™ E250d and E250dn Place a sheet of image FRU Fuser Media (not a FRU) Action The fuser may not be operating at its ends. Poor fusing of paper over the ... image density horizontally across page FRU PC Kit (not a FRU) Transfer roll Action The charge roll may require higher heat to make sure that the laser light path is being used . The bearing assemblies should support the transfer roll, applying evenly distributed forces to evenly distribute the toner. See"LVPS/HVPS...
Check the media settings in the printer driver. 2-48 Lexmark™ E250d and E250dn Place a sheet of image FRU Fuser Media (not a FRU) Action The fuser may not be operating at its ends. Poor fusing of paper over the ... image density horizontally across page FRU PC Kit (not a FRU) Transfer roll Action The charge roll may require higher heat to make sure that the laser light path is being used . The bearing assemblies should support the transfer roll, applying evenly distributed forces to evenly distribute the toner. See"LVPS/HVPS...

Service Manual
Page 75
...is expecting. • Choose a different fill pattern in the software program. • Remove the toner cartridge, and gently shake it from the printer driver. • Try a different type of paper. Media designed for copiers gives the best quality fusing. Diagnostic information 2-51 The light displays. ...The print is low on POR. Re-initialize the printer by turning it is getting light, but the printer has not indicated it off and back on page 3-46. If special media is becoming low in the driver. Paper designed for copiers gives the best quality. •...
...is expecting. • Choose a different fill pattern in the software program. • Remove the toner cartridge, and gently shake it from the printer driver. • Try a different type of paper. Media designed for copiers gives the best quality fusing. Diagnostic information 2-51 The light displays. ...The print is low on POR. Re-initialize the printer by turning it is getting light, but the printer has not indicated it off and back on page 3-46. If special media is becoming low in the driver. Paper designed for copiers gives the best quality. •...
Service Manual
Page 76
... the paper path in . • Remove the media from Tray 1, and fan it. • Make sure Tray 1 is installed properly. 2-52 Lexmark™ E250d and E250dn The Toner Low light is blinking, and the Error light is one of support. - If a menu settings page can be printed, contact the next... and sizes table in the User's Guide). • Make sure the paper guides are selected from the driver. • Make sure the tray is too high. • Remove the media from the printer driver. The media fails to feed from the optional Tray 2. The media fails to feed from Tray 1. If...
... the paper path in . • Remove the media from Tray 1, and fan it. • Make sure Tray 1 is installed properly. 2-52 Lexmark™ E250d and E250dn The Toner Low light is blinking, and the Error light is one of support. - If a menu settings page can be printed, contact the next... and sizes table in the User's Guide). • Make sure the paper guides are selected from the driver. • Make sure the tray is too high. • Remove the media from the printer driver. The media fails to feed from the optional Tray 2. The media fails to feed from Tray 1. If...

Service Manual
Page 77
Cause/action • Ensure correct printer driver is being used . • Select hex trace mode to prevent damage from J8 and J15 on solid. Printhead service check FRU Printhead Note: New printhead ... Print quality problems (Continued) Problem Unexpected characters print or characters are not printing, and the error light is on the controller card. Action Turn the printer off. Transfer roll service check FRU Transfer roll Action Note: Do not touch the transfer roll except at J8 and +5 V dc on page 3-9. Replace as...
Cause/action • Ensure correct printer driver is being used . • Select hex trace mode to prevent damage from J8 and J15 on solid. Printhead service check FRU Printhead Note: New printhead ... Print quality problems (Continued) Problem Unexpected characters print or characters are not printing, and the error light is on the controller card. Action Turn the printer off. Transfer roll service check FRU Transfer roll Action Note: Do not touch the transfer roll except at J8 and +5 V dc on page 3-9. Replace as...


