User's Guide
Page 4
... pages 94 How to print a test page 94 Windows 94 Macintosh 94 How to configure for TCP/IP 95 Assigning a printer IP address 95 Verifying the IP settings 95 How to set up the printer for network printing 96 Windows 96 Macintosh 100 UNIX/Linux 102 NetWare 102 Using the...when you need new supplies 106 Checking the toner and photoconductor levels 106 Recognizing the operator panel light sequences 107 How to change a toner cartridge 108 Lexmark Return Program 111 Refilled toner cartridge notice 111 Recycling Lexmark products 111 How to change a photoconductor kit 112 Contents 4
... pages 94 How to print a test page 94 Windows 94 Macintosh 94 How to configure for TCP/IP 95 Assigning a printer IP address 95 Verifying the IP settings 95 How to set up the printer for network printing 96 Windows 96 Macintosh 100 UNIX/Linux 102 NetWare 102 Using the...when you need new supplies 106 Checking the toner and photoconductor levels 106 Recognizing the operator panel light sequences 107 How to change a toner cartridge 108 Lexmark Return Program 111 Refilled toner cartridge notice 111 Recycling Lexmark products 111 How to change a photoconductor kit 112 Contents 4
User's Guide
Page 28
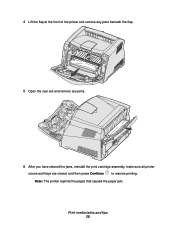
Print media tasks and tips 28 Note: The printer reprints the pages that caused the paper jam. 4 Lift the flap at the front of the printer and remove any jams beneath the flap. 5 Open the rear exit and remove any jams. 6 After you have cleared the jams, reinstall the print cartridge assembly, make sure all printer covers and trays are closed, and then press Continue to resume printing.
Print media tasks and tips 28 Note: The printer reprints the pages that caused the paper jam. 4 Lift the flap at the front of the printer and remove any jams beneath the flap. 5 Open the rear exit and remove any jams. 6 After you have cleared the jams, reinstall the print cartridge assembly, make sure all printer covers and trays are closed, and then press Continue to resume printing.
User's Guide
Page 53
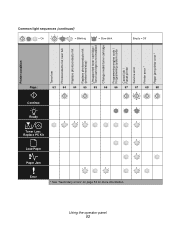
... Toner low Photoconductor kit near full Replace photoconductor kit Replace photoconductor kit (printer hard stop) Unsupported toner cartridge / Toner cartridge is not installed Change invalid toner cartridge Programming engine code / Programming system code Cancel job / Reset printer Service error Printer error * Paper jam printer error * Empty = Off Common light sequences (continued) Page: Continue Ready Toner Low / Replace...
... Toner low Photoconductor kit near full Replace photoconductor kit Replace photoconductor kit (printer hard stop) Unsupported toner cartridge / Toner cartridge is not installed Change invalid toner cartridge Programming engine code / Programming system code Cancel job / Reset printer Service error Printer error * Paper jam printer error * Empty = Off Common light sequences (continued) Page: Continue Ready Toner Low / Replace...
User's Guide
Page 63
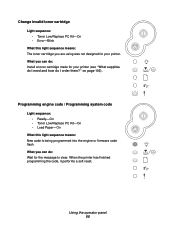
... Continue to print the menu settings page for a list of current printer settings. • Remove the toner cartridge and shake it to extend the life of the cartridge. • Replace the toner cartridge. (See "How to change a toner cartridge" on if the starter toner cartridge is getting low. Press Continue twice quickly to the internal print...
... Continue to print the menu settings page for a list of current printer settings. • Remove the toner cartridge and shake it to extend the life of the cartridge. • Replace the toner cartridge. (See "How to change a toner cartridge" on if the starter toner cartridge is getting low. Press Continue twice quickly to the internal print...
User's Guide
Page 65
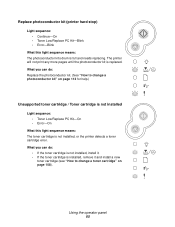
.... (See "How to change a photoconductor kit" on page 108). The printer will not print any more pages until the photoconductor kit is full and needs replacing. What you can do : • If the toner cartridge is not installed, install it. • If the toner cartridge is installed, remove it and install a new toner...
.... (See "How to change a photoconductor kit" on page 108). The printer will not print any more pages until the photoconductor kit is full and needs replacing. What you can do : • If the toner cartridge is not installed, install it. • If the toner cartridge is installed, remove it and install a new toner...
User's Guide
Page 66
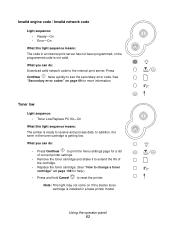
...PC Kit-On • Load Paper-On What this light sequence means: The toner cartridge you are using was not designed for your printer (see "What supplies do I need and how do I order them?" When the printer has finished programming the code, it performs a soft reset. What you can do :... Wait for your printer. on page 105). What you can do : Install a toner cartridge made for the message to clear. Using the operator panel 66 Change invalid toner cartridge Light sequence: • Toner Low/Replace PC Kit-On • Error-Blink...
...PC Kit-On • Load Paper-On What this light sequence means: The toner cartridge you are using was not designed for your printer (see "What supplies do I need and how do I order them?" When the printer has finished programming the code, it performs a soft reset. What you can do :... Wait for your printer. on page 105). What you can do : Install a toner cartridge made for the message to clear. Using the operator panel 66 Change invalid toner cartridge Light sequence: • Toner Low/Replace PC Kit-On • Error-Blink...
User's Guide
Page 87
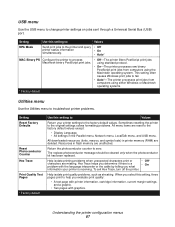
... problems when unexpected characters print or • Off* characters are unaffected. To exit Hex Trace, turn off the printer. Understanding the printer configuration menus 87 The replace photoconductor message should be cleared only when the photoconductor kit has been replaced. Hex Trace helps... in flash memory are missing. USB menu Use the USB menu to help you evaluate print quality: • A text page with printer information, cartridge information, current margin settings, and a graphic. • Two pages with the language interpreter or the cable by telling you what &#...
... problems when unexpected characters print or • Off* characters are unaffected. To exit Hex Trace, turn off the printer. Understanding the printer configuration menus 87 The replace photoconductor message should be cleared only when the photoconductor kit has been replaced. Hex Trace helps... in flash memory are missing. USB menu Use the USB menu to help you evaluate print quality: • A text page with printer information, cartridge information, current margin settings, and a graphic. • Two pages with the language interpreter or the cable by telling you what &#...
User's Guide
Page 105
Within the United States or Canada, you can order Lexmark supplies from 1 (very light) to be replaced more frequently. In other countries, visit the Lexmark online store at approximately 5% coverage), whereas the toner cartridge has to be replaced on your printer supplies. Storing supplies Choose a cool, clean storage area for your print jobs. Setting the...
Within the United States or Canada, you can order Lexmark supplies from 1 (very light) to be replaced more frequently. In other countries, visit the Lexmark online store at approximately 5% coverage), whereas the toner cartridge has to be replaced on your printer supplies. Storing supplies Choose a cool, clean storage area for your print jobs. Setting the...
User's Guide
Page 106
... the photoconductor kit has reached a maximum of 40,000 pages. While the printer may continue to decrease as the toner level decreases. You can determine approximately how much toner is left in your cartridge and how full the photoconductor kit is nearly empty. To ensure print quality ...and to avoid damage to the printer, the printer stops operating after the photoconductor kit has reached its official end-of-life ...
... the photoconductor kit has reached a maximum of 40,000 pages. While the printer may continue to decrease as the toner level decreases. You can determine approximately how much toner is left in your cartridge and how full the photoconductor kit is nearly empty. To ensure print quality ...and to avoid damage to the printer, the printer stops operating after the photoconductor kit has reached its official end-of-life ...
User's Guide
Page 108
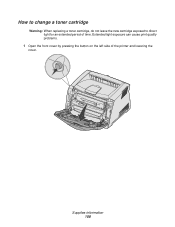
Extended light exposure can cause print quality problems. 1 Open the front cover by pressing the button on the left side of time. How to change a toner cartridge Warning: When replacing a toner cartridge, do not leave the new cartridge exposed to direct light for an extended period of the printer and lowering the cover. Supplies information 108
Extended light exposure can cause print quality problems. 1 Open the front cover by pressing the button on the left side of time. How to change a toner cartridge Warning: When replacing a toner cartridge, do not leave the new cartridge exposed to direct light for an extended period of the printer and lowering the cover. Supplies information 108
User's Guide
Page 111
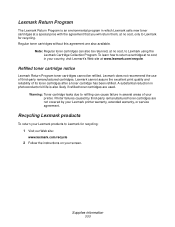
Supplies information 111 Refilled toner cartridge notice Lexmark Return Program toner cartridges cannot be returned, at no cost in your country, visit Lexmark's Web site at www.lexmark.com/recycle. Recycling Lexmark products To return your printer. Note: Regular toner cartridges can cause failure in several areas of your Lexmark products to Lexmark for recycling. Lexmark does not recommend the use of...
Supplies information 111 Refilled toner cartridge notice Lexmark Return Program toner cartridges cannot be returned, at no cost in your country, visit Lexmark's Web site at www.lexmark.com/recycle. Recycling Lexmark products To return your printer. Note: Regular toner cartridges can cause failure in several areas of your Lexmark products to Lexmark for recycling. Lexmark does not recommend the use of...
User's Guide
Page 112
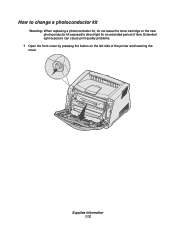
Extended light exposure can cause print quality problems. 1 Open the front cover by pressing the button on the left side of time. Supplies information 112 How to change a photoconductor kit Warning: When replacing a photoconductor kit, do not leave the toner cartridge or the new photoconductor kit exposed to direct light for an extended period of the printer and lowering the cover.
Extended light exposure can cause print quality problems. 1 Open the front cover by pressing the button on the left side of time. Supplies information 112 How to change a photoconductor kit Warning: When replacing a photoconductor kit, do not leave the toner cartridge or the new photoconductor kit exposed to direct light for an extended period of the printer and lowering the cover.
User's Guide
Page 113
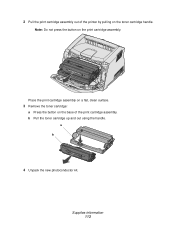
b Pull the toner cartridge up and out using the handle. a b 4 Unpack the new photoconductor kit. Note: Do not press the button on the base of the printer by pulling on the toner cartridge handle. Place the print cartridge assembly on a flat, clean surface. 3 Remove the toner cartridge: a Press the button on the print cartridge assembly. Supplies information 113 2 Pull the print cartridge assembly out of the print cartridge assembly.
b Pull the toner cartridge up and out using the handle. a b 4 Unpack the new photoconductor kit. Note: Do not press the button on the base of the printer by pulling on the toner cartridge handle. Place the print cartridge assembly on a flat, clean surface. 3 Remove the toner cartridge: a Press the button on the print cartridge assembly. Supplies information 113 2 Pull the print cartridge assembly out of the print cartridge assembly.

User's Guide
Page 114
... kit's counter, refer to the instruction sheet that shipped with the new kit. Supplies information 114 5 Install the toner cartridge into the printer by aligning the white rollers on the toner cartridge with the white arrows on the tracks in the printer and pushing the print cartridge assembly in as far as it will go .
... kit's counter, refer to the instruction sheet that shipped with the new kit. Supplies information 114 5 Install the toner cartridge into the printer by aligning the white rollers on the toner cartridge with the white arrows on the tracks in the printer and pushing the print cartridge assembly in as far as it will go .
User's Guide
Page 116
...52 for information about what each light pattern means. Can I still print with your printer. Solution / Answer See "Understanding the operator panel lights" on , but I don't have another cartridge to put in all directions to distribute the toner, then insert it in yet. .... If Envelope is normal. From your printer and port, and make sure you toner cartridge somewhat, remove the cartridge, rotate it back into your computer. 2 Click Printer Software. 3 Click Agree. 4 Select Local Printer Install, and then click Next. 5 Select your printer driver, select Custom 6-Rough Env from ...
...52 for information about what each light pattern means. Can I still print with your printer. Solution / Answer See "Understanding the operator panel lights" on , but I don't have another cartridge to put in all directions to distribute the toner, then insert it in yet. .... If Envelope is normal. From your printer and port, and make sure you toner cartridge somewhat, remove the cartridge, rotate it back into your computer. 2 Click Printer Software. 3 Click Agree. 4 Select Local Printer Install, and then click Next. 5 Select your printer driver, select Custom 6-Rough Env from ...
User's Guide
Page 118
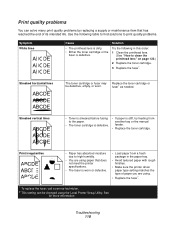
... rough finishes. • Make sure the printer driver paper type setting matches the type of paper you are using the Local Printer Setup Utility. Streaked horizontal lines ABCDE ABCDE ABCDE The toner cartridge or fuser may Replace the toner cartridge or be changed using paper that has reached... the end of its intended life. See "Using the Local Printer Setup Utility" on page 122.) 2 Replace the toner cartridge. 3 Replace the fuser*. Try the ...
... rough finishes. • Make sure the printer driver paper type setting matches the type of paper you are using the Local Printer Setup Utility. Streaked horizontal lines ABCDE ABCDE ABCDE The toner cartridge or fuser may Replace the toner cartridge or be changed using paper that has reached... the end of its intended life. See "Using the Local Printer Setup Utility" on page 122.) 2 Replace the toner cartridge. 3 Replace the fuser*. Try the ...

User's Guide
Page 119
.... • Select a different Toner Darkness† setting from the printer driver before sending the job to print. • Replace the toner cartridge. • You are using transparencies that does not meet the printer specifications. • The toner cartridge is low on toner. • The toner cartridge is defective. • Select a different Toner Darkness† setting...
.... • Select a different Toner Darkness† setting from the printer driver before sending the job to print. • Replace the toner cartridge. • You are using transparencies that does not meet the printer specifications. • The toner cartridge is low on toner. • The toner cartridge is defective. • Select a different Toner Darkness† setting...
User's Guide
Page 120
...size loaded in the tray. See "Using the Local Printer Setup Utility" on one side of the paper. * To replace the fuser, call a service technician. † This setting can be changed using . • Replace the toner cartridge. Symptom Uneven print density ABCDE ABCDE ABCDE Ghost Images ...Cause Solution • The toner cartridge is defective. • Replace the toner cartridge. • The Form Type setting in the printer driver is set the Form Size to A4. Set the...
...size loaded in the tray. See "Using the Local Printer Setup Utility" on one side of the paper. * To replace the fuser, call a service technician. † This setting can be changed using . • Replace the toner cartridge. Symptom Uneven print density ABCDE ABCDE ABCDE Ghost Images ...Cause Solution • The toner cartridge is defective. • Replace the toner cartridge. • The Form Type setting in the printer driver is set the Form Size to A4. Set the...
User's Guide
Page 121
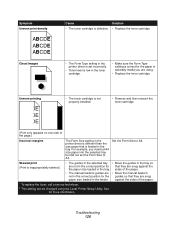
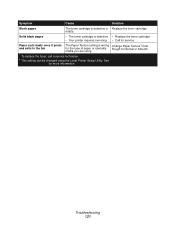
... wrong Change Paper Texture† from and exits to the bin for more information. Solid black pages • The toner cartridge is defective or Replace the toner cartridge. empty. Troubleshooting 121 Symptom Cause Solution Blank pages The toner cartridge is defective. • Replace the toner cartridge. • Your printer requires servicing. • Call for service.
... wrong Change Paper Texture† from and exits to the bin for more information. Solid black pages • The toner cartridge is defective or Replace the toner cartridge. empty. Troubleshooting 121 Symptom Cause Solution Blank pages The toner cartridge is defective. • Replace the toner cartridge. • Your printer requires servicing. • Call for service.
User's Guide
Page 123
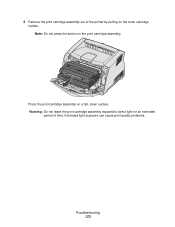
Extended light exposure can cause print quality problems. Troubleshooting 123 3 Remove the print cartridge assembly out of time. Warning: Do not leave the print cartridge assembly exposed to direct light for an extended period of the printer by pulling on the toner cartridge handle. Place the print cartridge assembly on the print cartridge assembly. Note: Do not press the button on a flat, clean surface.
Extended light exposure can cause print quality problems. Troubleshooting 123 3 Remove the print cartridge assembly out of time. Warning: Do not leave the print cartridge assembly exposed to direct light for an extended period of the printer by pulling on the toner cartridge handle. Place the print cartridge assembly on the print cartridge assembly. Note: Do not press the button on a flat, clean surface.


