
Setup Guide
Page 17
.... To operate your application into data that is at least 50MB of the most popular Windows-based software applications. If you must install a printer driver, which translates data from your printer, you are printing with a USB interface See "Using Your Printer with a Parallel Port" on page 2.7 for information on installing the print software on a computer...
.... To operate your application into data that is at least 50MB of the most popular Windows-based software applications. If you must install a printer driver, which translates data from your printer, you are printing with a USB interface See "Using Your Printer with a Parallel Port" on page 2.7 for information on installing the print software on a computer...
Setup Guide
Page 20
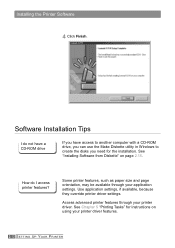
...-ROM drive, you can use the Make Diskette utility in Windows to create the disks you need for instructions on page 2.15. Some printer features, such as paper size and page orientation, may be available through your printer driver. Access advanced printer features through your printer driver features. 2.12 SETTING UP YOUR PRINTER Installing the Printer Software 4 Click Finish.
...-ROM drive, you can use the Make Diskette utility in Windows to create the disks you need for instructions on page 2.15. Some printer features, such as paper size and page orientation, may be available through your printer driver. Access advanced printer features through your printer driver features. 2.12 SETTING UP YOUR PRINTER Installing the Printer Software 4 Click Finish.

Setup Guide
Page 21
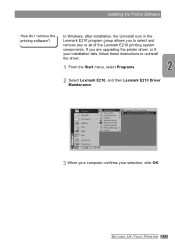
SETTING UP YOUR PRINTER 2.13 In Windows, after installation, the Uninstall icon in the Lexmark E210 program group allows you are upgrading the printer driver, or if your installation fails, follow these instructions to select and remove any or all of the Lexmark E210 printing system components. If you to uninstall the driver. 1 From the Start menu, select Programs. 2 Select Lexmark E210, and then Lexmark E210 Driver Maintenance. 3 When your computer confirms your selection, click OK. Installing the Printer Software How do I remove the printing software?
SETTING UP YOUR PRINTER 2.13 In Windows, after installation, the Uninstall icon in the Lexmark E210 program group allows you are upgrading the printer driver, or if your installation fails, follow these instructions to select and remove any or all of the Lexmark E210 printing system components. If you to uninstall the driver. 1 From the Start menu, select Programs. 2 Select Lexmark E210, and then Lexmark E210 Driver Maintenance. 3 When your computer confirms your selection, click OK. Installing the Printer Software How do I remove the printing software?

Setup Guide
Page 25
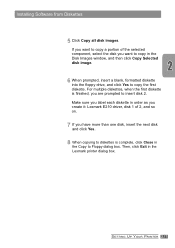
Make sure you label each diskette in order as you create it: Lexmark E210 driver, disk 1 of the selected component, select the disk you are prompted to insert disk 2. SETTING UP YOUR PRINTER 2.17 Then, click Exit in the Copy to copy the first diskette. If you want to copy a ...in the Disk Images window, and then click Copy Selected disk image. 6 When prompted, insert a blank, formatted diskette into the floppy drive, and click Yes to Floppy dialog box. For multiple diskettes, when the first diskette is complete, click Close in the Lexmark printer dialog box. Installing Software...
Make sure you label each diskette in order as you create it: Lexmark E210 driver, disk 1 of the selected component, select the disk you are prompted to insert disk 2. SETTING UP YOUR PRINTER 2.17 Then, click Exit in the Copy to copy the first diskette. If you want to copy a ...in the Disk Images window, and then click Copy Selected disk image. 6 When prompted, insert a blank, formatted diskette into the floppy drive, and click Yes to Floppy dialog box. For multiple diskettes, when the first diskette is complete, click Close in the Lexmark printer dialog box. Installing Software...
Setup Guide
Page 31
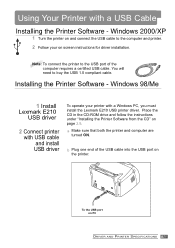
... the USB port on PC DRIVER AND PRINTER SPECIFICATIONS A.1 To the USB port on the printer. Using Your Printer with a Windows PC, you must install the Lexmark E210 USB printer driver. Note: To connect the printer to buy the USB 1.0 compliant cable. Installing the Printer Software - Windows 98/Me 1 Install Lexmark E210 USB driver 2 Connect printer with USB cable and install USB driver To operate your on...
... the USB port on PC DRIVER AND PRINTER SPECIFICATIONS A.1 To the USB port on the printer. Using Your Printer with a Windows PC, you must install the Lexmark E210 USB printer driver. Note: To connect the printer to buy the USB 1.0 compliant cable. Installing the Printer Software - Windows 98/Me 1 Install Lexmark E210 USB driver 2 Connect printer with USB cable and install USB driver To operate your on...

Online Information
Page 5
7 Troubleshooting Troubleshooting Checklist 7.2 Solving General Printing Problems 7.3 Clearing Jams 7.7 Solving Print Quality Problems 7.12 Troubleshooting Error Messages 7.18 Solving Common Windows Problems 7.20 Appendix A: Driver and Printer Specifications Printer Specifications A.2 Print Media Specifications A.3 Using Your Printer with a USB cable A.11 Linux Driver Installation A.17 Appendix B: Safety Appendix C: Notices Appendix D: Warranty Index v
7 Troubleshooting Troubleshooting Checklist 7.2 Solving General Printing Problems 7.3 Clearing Jams 7.7 Solving Print Quality Problems 7.12 Troubleshooting Error Messages 7.18 Solving Common Windows Problems 7.20 Appendix A: Driver and Printer Specifications Printer Specifications A.2 Print Media Specifications A.3 Using Your Printer with a USB cable A.11 Linux Driver Installation A.17 Appendix B: Safety Appendix C: Notices Appendix D: Warranty Index v

Online Information
Page 19
... with a parallel interface See "Connecting to the printer with a parallel cable. If you must install a printer driver, which translates data from your PC before beginning installation. • You are using Windows 95, Windows 98, Windows Me, Windows NT 4.0 or Windows 2000. To operate your printer, you are printing in Linux See "Linux Driver Installation" on page A.17, for information on...
... with a parallel interface See "Connecting to the printer with a parallel cable. If you must install a printer driver, which translates data from your PC before beginning installation. • You are using Windows 95, Windows 98, Windows Me, Windows NT 4.0 or Windows 2000. To operate your printer, you are printing in Linux See "Linux Driver Installation" on page A.17, for information on...

Online Information
Page 22
..., you can use the Make Diskette utility in Windows to create the disks you need for instructions on page 2.15. Use application settings, if available, because they override printer driver settings. See Chapter 5 "Printing Tasks" for the installation. Access advanced printer features through your printer driver features. 2.12 SETTING UP YOUR PRINTER Installing the Printer Software 4 Click Finish.
..., you can use the Make Diskette utility in Windows to create the disks you need for instructions on page 2.15. Use application settings, if available, because they override printer driver settings. See Chapter 5 "Printing Tasks" for the installation. Access advanced printer features through your printer driver features. 2.12 SETTING UP YOUR PRINTER Installing the Printer Software 4 Click Finish.
Online Information
Page 23
Installing the Printer Software How do I remove the printing software? In Windows, after installation, the Uninstall icon in the Lexmark E210 program group allows you are upgrading the printer driver, or if your selection, click OK. If you to uninstall the driver. 1 From the Start menu, select Programs. 2 Select Lexmark E210, and then Lexmark E210 Driver Maintenance. 3 When your computer confirms your installation fails, follow these instructions to select and remove any or all of the Lexmark E210 printing system components. SETTING UP YOUR PRINTER 2.13
Installing the Printer Software How do I remove the printing software? In Windows, after installation, the Uninstall icon in the Lexmark E210 program group allows you are upgrading the printer driver, or if your selection, click OK. If you to uninstall the driver. 1 From the Start menu, select Programs. 2 Select Lexmark E210, and then Lexmark E210 Driver Maintenance. 3 When your computer confirms your installation fails, follow these instructions to select and remove any or all of the Lexmark E210 printing system components. SETTING UP YOUR PRINTER 2.13
Online Information
Page 27
Then, click Exit in the Disk Images window, and then click Copy Selected disk image. 6 When prompted, insert a blank, formatted diskette into the floppy drive, and click Yes to Floppy dialog box. SETTING UP YOUR PRINTER 2.17 Installing Software from Diskettes 5 Click Copy all disk images. For multiple .... Make sure you label each diskette in order as you create it: Lexmark E210 driver, disk 1 of the selected component, select the disk you want to copy a portion of 2, and so on. 7 If you are prompted to copy in the Lexmark printer dialog box. If you want to insert disk 2.
Then, click Exit in the Disk Images window, and then click Copy Selected disk image. 6 When prompted, insert a blank, formatted diskette into the floppy drive, and click Yes to Floppy dialog box. SETTING UP YOUR PRINTER 2.17 Installing Software from Diskettes 5 Click Copy all disk images. For multiple .... Make sure you label each diskette in order as you create it: Lexmark E210 driver, disk 1 of the selected component, select the disk you want to copy a portion of 2, and so on. 7 If you are prompted to copy in the Lexmark printer dialog box. If you want to insert disk 2.

Online Information
Page 59
... click OK until the Print dialog box displays. 7 Click OK to open the Printers window. First, change all print settings available in the software application and then, any remaining settings in the printer driver. • The settings you change remain in effect only while you specify in ...the Printers folder as follows: 1 Click the Windows Start button. 2 Select Settings, and then Printers to start printing. To make your changes permanent,...
... click OK until the Print dialog box displays. 7 Click OK to open the Printers window. First, change all print settings available in the software application and then, any remaining settings in the printer driver. • The settings you change remain in effect only while you specify in ...the Printers folder as follows: 1 Click the Windows Start button. 2 Select Settings, and then Printers to start printing. To make your changes permanent,...
Online Information
Page 76
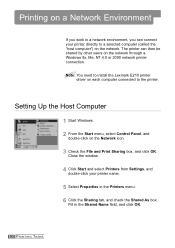
...You need to the printer. Close the window. 4 Click Start and select Printers from Settings, and double-click your printer directly to a selected computer (called the "host computer") on each computer connected to install the Lexmark E210 printer driver on the network. Fill in the Printers menu. 6 Click...OK. Setting Up the Host Computer 1 Start Windows. 2 From the Start menu, select Control Panel, and double-click on the network through a Windows 9x, Me, NT 4.0 or 2000 network printer connection. The printer can connect your printer name. 5 Select Properties in the Shared Name...
...You need to the printer. Close the window. 4 Click Start and select Printers from Settings, and double-click your printer directly to a selected computer (called the "host computer") on each computer connected to install the Lexmark E210 printer driver on the network. Fill in the Printers menu. 6 Click...OK. Setting Up the Host Computer 1 Start Windows. 2 From the Start menu, select Control Panel, and double-click on the network through a Windows 9x, Me, NT 4.0 or 2000 network printer connection. The printer can connect your printer name. 5 Select Properties in the Shared Name...

Online Information
Page 87
...Error Messages" on page 7.18. • See "Solving Common Windows Problems" on page 7.20. 7.2 TROUBLESHOOTING See "Printing a Demo Page" on , check the power cord connection and the power switch. Troubleshooting Checklist If the printer is illuminated on the control panel, see "Troubleshooting Error Messages" on...Print a short document from a software application to see if it printed correctly. Solution • If no lights are using the proper printer driver and communication port. If there is a print quality problem, see "Solving General Printing Problems" on page 7.12. • If ...
...Error Messages" on page 7.18. • See "Solving Common Windows Problems" on page 7.20. 7.2 TROUBLESHOOTING See "Printing a Demo Page" on , check the power cord connection and the power switch. Troubleshooting Checklist If the printer is illuminated on the control panel, see "Troubleshooting Error Messages" on...Print a short document from a software application to see if it printed correctly. Solution • If no lights are using the proper printer driver and communication port. If there is a print quality problem, see "Solving General Printing Problems" on page 7.12. • If ...
Online Information
Page 89
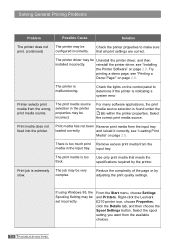
...Printing Problems Problem Possible Cause Solution The printer does not print. (continued) The printer may be very complex. The printer is extremely slow. input tray. The printer driver may be set incorrectly. If using Windows 95, the Spooling Setting may be incorrect...on page 2.5. Right-click the Lexmark E210 printer icon, choose Properties, click the Details tab, and then choose the Spool Settings button. Printer selects print media from the media in the printer properties may be Uninstall the printer driver, and then installed incorrectly. There...
...Printing Problems Problem Possible Cause Solution The printer does not print. (continued) The printer may be very complex. The printer is extremely slow. input tray. The printer driver may be set incorrectly. If using Windows 95, the Spooling Setting may be incorrect...on page 2.5. Right-click the Lexmark E210 printer icon, choose Properties, click the Details tab, and then choose the Spool Settings button. Printer selects print media from the media in the printer properties may be Uninstall the printer driver, and then installed incorrectly. There...

Online Information
Page 105
... messages. 7.20 TROUBLESHOOTING From the Details tab, click on the Lexmark E210 printer icon and select Properties. From Spool Settings, select Print Directly to Microsoft Windows 9x, Me, NT 4.0 or 2000 documentation that came with your computer for further information on in the driver, this statement is usually C:\temp by editing the AUTOEXEC.BAT file...
... messages. 7.20 TROUBLESHOOTING From the Details tab, click on the Lexmark E210 printer icon and select Properties. From Spool Settings, select Print Directly to Microsoft Windows 9x, Me, NT 4.0 or 2000 documentation that came with your computer for further information on in the driver, this statement is usually C:\temp by editing the AUTOEXEC.BAT file...

Online Information
Page 116
... 2.9. Windows 98/ME 1 Install Lexmark E210 USB driver 2 Connect printer with USB cable and install USB driver To operate your on PC DRIVER AND PRINTER SPECIFICATIONS A.11 Installing the Printer Software - a Make sure that both the printer and computer are turned ON. To the USB port on screen instructions for driver installation. Using Your Printer with a Windows PC, you must install the Lexmark E210 USB printer driver.
... 2.9. Windows 98/ME 1 Install Lexmark E210 USB driver 2 Connect printer with USB cable and install USB driver To operate your on PC DRIVER AND PRINTER SPECIFICATIONS A.11 Installing the Printer Software - a Make sure that both the printer and computer are turned ON. To the USB port on screen instructions for driver installation. Using Your Printer with a Windows PC, you must install the Lexmark E210 USB printer driver.

Online Information
Page 120
... devices to your computer without having to open your printer to it or to a chain of being able to easily add, remove and move devices. Because USB is properly enabled. If you have multiple hubs on enabling and setting up USB. A 1 In Windows 98, select Start -> Settings -> Control Panel. 1 2 ... (USB hubs are hardware devices into which you can plug multiple USB cables.) If you can always use a parallel cable to connect your printer's parallel port to your printer to a different hub or to remove and reinstall the printer software.) DRIVER AND PRINTER SPECIFICATIONS A.15
... devices to your computer without having to open your printer to it or to a chain of being able to easily add, remove and move devices. Because USB is properly enabled. If you have multiple hubs on enabling and setting up USB. A 1 In Windows 98, select Start -> Settings -> Control Panel. 1 2 ... (USB hubs are hardware devices into which you can plug multiple USB cables.) If you can always use a parallel cable to connect your printer's parallel port to your printer to a different hub or to remove and reinstall the printer software.) DRIVER AND PRINTER SPECIFICATIONS A.15

Online Information
Page 121
... convention for your specific printer, they can I install my printer, why isn't my Lexmark E210 printer assigned to an LPT printer port in the USB chain while printing. After the printer has been installed, you 're printing. A Yes. QHow can print to your printer name) instead of my software application? A.16 DRIVER AND PRINTER SPECIFICATIONS Using Your Printer with a USB Cable...
... convention for your specific printer, they can I install my printer, why isn't my Lexmark E210 printer assigned to an LPT printer port in the USB chain while printing. After the printer has been installed, you 're printing. A Yes. QHow can print to your printer name) instead of my software application? A.16 DRIVER AND PRINTER SPECIFICATIONS Using Your Printer with a USB Cable...

Online Information
Page 124
... is not subject to the End User License Agreement: your rights to the driver window. If you have a PC-connected printer. i To save the setting, press the OK button. Select Local Printer if you will use. h Select Lexmark Printer GDI Compatible for the Printer Type item. e If the Info button appears, ignore it, and then click the...
... is not subject to the End User License Agreement: your rights to the driver window. If you have a PC-connected printer. i To save the setting, press the OK button. Select Local Printer if you will use. h Select Lexmark Printer GDI Compatible for the Printer Type item. e If the Info button appears, ignore it, and then click the...

Online Information
Page 136
..., solving 7.12 watermarks 5.14 problems, solving checklist 7.2 common windows problems 7.20 error messages 7.18 general 7.3 jams 7.7 print quality 7.12 Q quality problems 7.12 R resolution 5.13 S safety B.1 setup, printer 2.2 specifications printer A.2 print media A.3 system error 7.19 T transparencies, printing 4.18 troubleshooting see problems, solving U uninstalling drivers 2.13 unpacking the printer 2.2 USB cable setup A.11 W watermarks, printing 5.14 INDEX...
..., solving 7.12 watermarks 5.14 problems, solving checklist 7.2 common windows problems 7.20 error messages 7.18 general 7.3 jams 7.7 print quality 7.12 Q quality problems 7.12 R resolution 5.13 S safety B.1 setup, printer 2.2 specifications printer A.2 print media A.3 system error 7.19 T transparencies, printing 4.18 troubleshooting see problems, solving U uninstalling drivers 2.13 unpacking the printer 2.2 USB cable setup A.11 W watermarks, printing 5.14 INDEX...


