User Guide
Page 3
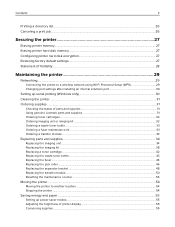
......31 Checking the status of parts and supplies ...31 Using genuine Lexmark parts and supplies ...31 Ordering toner cartridges ...32 Ordering imaging unit or imaging kit ...32 Ordering a waste toner bottle...33 Ordering a fuser maintenance kit ...33 Ordering a transfer module ...33 Replacing parts and...the imaging unit ...34 Replacing the imaging kit...38 Replacing a toner cartridge ...42 Replacing the waste toner bottle ...43 Replacing the fuser ...44 Replacing the pick roller...46 Replacing the separator bracket ...48 Replacing the transfer module...50 Resetting the maintenance counter ...54 ...
......31 Checking the status of parts and supplies ...31 Using genuine Lexmark parts and supplies ...31 Ordering toner cartridges ...32 Ordering imaging unit or imaging kit ...32 Ordering a waste toner bottle...33 Ordering a fuser maintenance kit ...33 Ordering a transfer module ...33 Replacing parts and...the imaging unit ...34 Replacing the imaging kit...38 Replacing a toner cartridge ...42 Replacing the waste toner bottle ...43 Replacing the fuser ...44 Replacing the pick roller...46 Replacing the separator bracket ...48 Replacing the transfer module...50 Resetting the maintenance counter ...54 ...

User Guide
Page 22
To avoid printing issues, match the paper type settings in the printer with the paper loaded in the tray. Note: To unlink trays, make sure that no trays have the same paper size or type. 4 Save the settings. Note: You can also change the paper size and type settings from the printer control panel. Loading paper and specialty media 22 3 Match the paper size and type for the trays you are linking. Warning-Potential Damage: The temperature of the fuser varies according to the specified paper type.
To avoid printing issues, match the paper type settings in the printer with the paper loaded in the tray. Note: To unlink trays, make sure that no trays have the same paper size or type. 4 Save the settings. Note: You can also change the paper size and type settings from the printer control panel. Loading paper and specialty media 22 3 Match the paper size and type for the trays you are linking. Warning-Potential Damage: The temperature of the fuser varies according to the specified paper type.
User Guide
Page 33
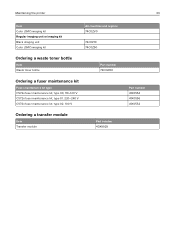
Maintaining the printer 33 Item Color (CMY) imaging kit Regular imaging unit or imaging kit Black imaging unit Color (CMY) imaging kit All countries and regions 74C0ZV0 74C0Z10 74C0Z50 Ordering a waste toner bottle Item Waste toner bottle Part number 74C0W00 Ordering a fuser maintenance kit Fuser maintenance kit type CS72x fuser maintenance kit, type 00, 110-120 V CS72x fuser maintenance kit, type 01, 220-240 V CS72x fuser maintenance kit, type 02, 100 V Ordering a transfer module Item Transfer module Part number 40X9929 Part number 41X0554 41X0556 41X0552
Maintaining the printer 33 Item Color (CMY) imaging kit Regular imaging unit or imaging kit Black imaging unit Color (CMY) imaging kit All countries and regions 74C0ZV0 74C0Z10 74C0Z50 Ordering a waste toner bottle Item Waste toner bottle Part number 74C0W00 Ordering a fuser maintenance kit Fuser maintenance kit type CS72x fuser maintenance kit, type 00, 110-120 V CS72x fuser maintenance kit, type 01, 220-240 V CS72x fuser maintenance kit, type 02, 100 V Ordering a transfer module Item Transfer module Part number 40X9929 Part number 41X0554 41X0556 41X0552
User Guide
Page 44
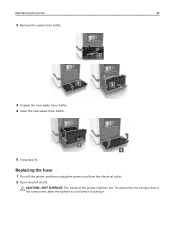
To reduce the risk of the printer might be hot. CAUTION-HOT SURFACE: The inside of injury from the electrical outlet. 2 Open doors A and D. Maintaining the printer 44 2 Remove the waste toner bottle. 3 Unpack the new waste toner bottle. 4 Insert the new waste toner bottle. 5 Close door B. Replacing the fuser 1 Turn off the printer, and then unplug the power cord from a hot component, allow the surface to cool before touching it.
To reduce the risk of the printer might be hot. CAUTION-HOT SURFACE: The inside of injury from the electrical outlet. 2 Open doors A and D. Maintaining the printer 44 2 Remove the waste toner bottle. 3 Unpack the new waste toner bottle. 4 Insert the new waste toner bottle. 5 Close door B. Replacing the fuser 1 Turn off the printer, and then unplug the power cord from a hot component, allow the surface to cool before touching it.
User Guide
Page 45
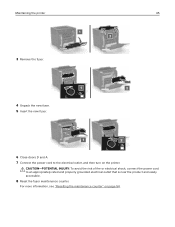
CAUTION-POTENTIAL INJURY: To avoid the risk of fire or electrical shock, connect the power cord to the electrical outlet, and then turn on page 54. For more information, see "Resetting the maintenance counter" on the printer. Maintaining the printer 45 3 Remove the fuser. 4 Unpack the new fuser. 5 Insert the new fuser. 6 Close doors D and A. 7 Connect the power cord to an appropriately rated and properly grounded electrical outlet that is near the product and easily accessible. 8 Reset the fuser maintenance counter.
CAUTION-POTENTIAL INJURY: To avoid the risk of fire or electrical shock, connect the power cord to the electrical outlet, and then turn on page 54. For more information, see "Resetting the maintenance counter" on the printer. Maintaining the printer 45 3 Remove the fuser. 4 Unpack the new fuser. 5 Insert the new fuser. 6 Close doors D and A. 7 Connect the power cord to an appropriately rated and properly grounded electrical outlet that is near the product and easily accessible. 8 Reset the fuser maintenance counter.
User Guide
Page 54
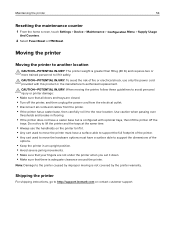
... shock, use the handholds on the printer to lift it. • Any cart used to move the printer must have a surface able to http://support.lexmark.com or contact customer support. Use caution when passing over thresholds and breaks in an upright position. • Avoid severe jarring movements. • Make sure.... Maintaining the printer 54 Resetting the maintenance counter 1 From the home screen, touch Settings > Device > Maintenance > Configuration Menu > Supply Usage And Counters. 2 Select Fuser Reset or ITM Reset.
... shock, use the handholds on the printer to lift it. • Any cart used to move the printer must have a surface able to http://support.lexmark.com or contact customer support. Use caution when passing over thresholds and breaks in an upright position. • Avoid severe jarring movements. • Make sure.... Maintaining the printer 54 Resetting the maintenance counter 1 From the home screen, touch Settings > Device > Maintenance > Configuration Menu > Supply Usage And Counters. 2 Select Fuser Reset or ITM Reset.
User Guide
Page 58
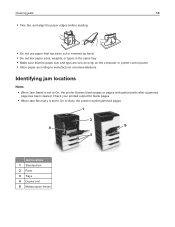
Jam locations 1 Standard bin 2 Fuser 3 Trays 4 Duplex unit 5 Multipurpose feeder Identifying jam locations Notes: • When Jam Assist is set to On or Auto, the printer reprints jammed pages. Clearing ...
Jam locations 1 Standard bin 2 Fuser 3 Trays 4 Duplex unit 5 Multipurpose feeder Identifying jam locations Notes: • When Jam Assist is set to On or Auto, the printer reprints jammed pages. Clearing ...
User Guide
Page 61
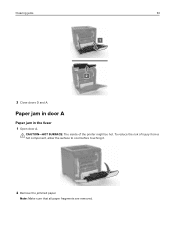
Note: Make sure that all paper fragments are removed. CAUTION-HOT SURFACE: The inside of injury from a hot component, allow the surface to cool before touching it. 2 Remove the jammed paper. Clearing jams 61 3 Close doors D and A. Paper jam in door A Paper jam in the fuser 1 Open door A. To reduce the risk of the printer might be hot.
Note: Make sure that all paper fragments are removed. CAUTION-HOT SURFACE: The inside of injury from a hot component, allow the surface to cool before touching it. 2 Remove the jammed paper. Clearing jams 61 3 Close doors D and A. Paper jam in door A Paper jam in the fuser 1 Open door A. To reduce the risk of the printer might be hot.
User Guide
Page 62
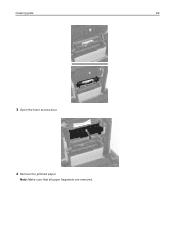
Clearing jams 62 3 Open the fuser access door. 4 Remove the jammed paper. Note: Make sure that all paper fragments are removed.
Clearing jams 62 3 Open the fuser access door. 4 Remove the jammed paper. Note: Make sure that all paper fragments are removed.
User Guide
Page 85
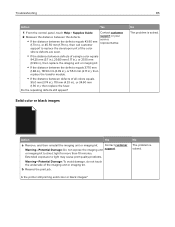
... the transfer module. • If the distance between the defects equals 43.90 mm (1.73 in.), or 45.50 mm (1.79 in .), then replace the fuser. b Resend the print job. or imaging kit to replace the developer unit of the imaging unit or imaging kit.
... the transfer module. • If the distance between the defects equals 43.90 mm (1.73 in.), or 45.50 mm (1.79 in .), then replace the fuser. b Resend the print job. or imaging kit to replace the developer unit of the imaging unit or imaging kit.
User Guide
Page 114
... firmware card 94 flash drive printing from 23 font sample list printing 25 forms printing 23 Forms and Favorites setting up 16 fuser replacing 44 fuser maintenance kit ordering 33 G green settings Eco‑Mode 55 hibernate mode 55 sleep mode 55 H hardware options trays 107 hardware options, adding print...
... firmware card 94 flash drive printing from 23 font sample list printing 25 forms printing 23 Forms and Favorites setting up 16 fuser replacing 44 fuser maintenance kit ordering 33 G green settings Eco‑Mode 55 hibernate mode 55 sleep mode 55 H hardware options trays 107 hardware options, adding print...
User Guide
Page 115
...jam, clearing multipurpose feeder 60 trays 59 jams avoiding 57 locating jam areas 58 locations 58 jams, clearing in the duplex unit 61 in the fuser 61 L light print 82 linking trays 21 loading card stock 20 envelopes 20 multipurpose feeder 20 loading trays 18 M maintenance counter resetting 54 ... 28 erasing 27 notices 112, 113 O optional card installing 101 options firmware cards 94 internal solutions port 96 memory card 94 ordering fuser maintenance kit 33 imaging kit 32 imaging unit 32 toner cartridges 32 transfer module 33 ordering supplies waste toner bottle 33 P paper Universal size ...
...jam, clearing multipurpose feeder 60 trays 59 jams avoiding 57 locating jam areas 58 locations 58 jams, clearing in the duplex unit 61 in the fuser 61 L light print 82 linking trays 21 loading card stock 20 envelopes 20 multipurpose feeder 20 loading trays 18 M maintenance counter resetting 54 ... 28 erasing 27 notices 112, 113 O optional card installing 101 options firmware cards 94 internal solutions port 96 memory card 94 ordering fuser maintenance kit 33 imaging kit 32 imaging unit 32 toner cartridges 32 transfer module 33 ordering supplies waste toner bottle 33 P paper Universal size ...
User Guide
Page 116
... flash drive 23 printing held jobs from a Macintosh computer 25 from Windows 25 Push Button method 29 R recycling Lexmark packaging 56 Lexmark products 55 toner cartridges 56 repeat print jobs 25 printing from a Macintosh computer 25 printing from Windows 25 repeating print defects...the waste toner bottle 43 replacing toner cartridge 42 reserve print jobs printing from a Macintosh computer 25 printing from Windows 25 resetting the fuser page count 54 resetting the maintenance counter 54 resetting the transfer module page count 54 restoring factory default settings 27 S safety information ...
... flash drive 23 printing held jobs from a Macintosh computer 25 from Windows 25 Push Button method 29 R recycling Lexmark packaging 56 Lexmark products 55 toner cartridges 56 repeat print jobs 25 printing from a Macintosh computer 25 printing from Windows 25 repeating print defects...the waste toner bottle 43 replacing toner cartridge 42 reserve print jobs printing from a Macintosh computer 25 printing from Windows 25 resetting the fuser page count 54 resetting the maintenance counter 54 resetting the transfer module page count 54 restoring factory default settings 27 S safety information ...


