
Wireless Setup Guide
Page 21
..., motors, cordless phones, security system cameras, other computers on the installation software CD. Try accessing other wireless networks, and some Bluetooth devices. • The printer driver is installed on and plugged in to a working properly. Remove any large metal objects between the access point and the printer. This information is for...
..., motors, cordless phones, security system cameras, other computers on the installation software CD. Try accessing other wireless networks, and some Bluetooth devices. • The printer driver is installed on and plugged in to a working properly. Remove any large metal objects between the access point and the printer. This information is for...

Wireless Setup Guide
Page 29
VERIFY THAT WINDOWS IS WORKING PROPERLY • Try restarting the computer. • Try installing the printer driver again. • Try uninstalling, and then reinstalling the printer driver. VERIFY THAT THE PRINTER IS READY • Check the status of the printer and verify that the printer is plugged in to print. • If ...
VERIFY THAT WINDOWS IS WORKING PROPERLY • Try restarting the computer. • Try installing the printer driver again. • Try uninstalling, and then reinstalling the printer driver. VERIFY THAT THE PRINTER IS READY • Check the status of the printer and verify that the printer is plugged in to print. • If ...

Wireless Setup Guide
Page 30
...(other than the Windows firewall) on the computer, try to print, make sure you have the printer driver installed. • Insert the Software and Documentation CD and install the printer driver. Find the network SSID 1 Type the IP address of your wireless access point into the address field of...or more of the following : In Windows Vista 1 Click . 2 Click All Programs Œ Accessories. 3 Click Command Prompt. MAKE SURE THE PRINTER DRIVER IS INSTALLED ON THE PRINTER All computers that came with wireless printing. Network printer does not show up the printer using the most recent update...
...(other than the Windows firewall) on the computer, try to print, make sure you have the printer driver installed. • Insert the Software and Documentation CD and install the printer driver. Find the network SSID 1 Type the IP address of your wireless access point into the address field of...or more of the following : In Windows Vista 1 Click . 2 Click All Programs Œ Accessories. 3 Click Command Prompt. MAKE SURE THE PRINTER DRIVER IS INSTALLED ON THE PRINTER All computers that came with wireless printing. Network printer does not show up the printer using the most recent update...

User Guide
Page 8
... room to open trays, covers, and doors. Free from the direct airflow of air conditioners, heaters, or ventilators - http://support.lexmark.com Note: Select your region, and then select your product to : • Make sure airflow in the room meets the latest...of operation for proper ventilation: Learning about the printer 8 The latest supplemental information, updates, and technical support: • Documentation • Driver downloads • Live chat support • E-mail support • Telephone support Warranty information Find it ready when you contact support so that...
... room to open trays, covers, and doors. Free from the direct airflow of air conditioners, heaters, or ventilators - http://support.lexmark.com Note: Select your region, and then select your product to : • Make sure airflow in the room meets the latest...of operation for proper ventilation: Learning about the printer 8 The latest supplemental information, updates, and technical support: • Documentation • Driver downloads • Live chat support • E-mail support • Telephone support Warranty information Find it ready when you contact support so that...

User Guide
Page 22
Note: Once the printer software and any options are installed, it into place. 4 Align the printer with the 650-sheet duo drawer, and then lower the printer into place. 5 Install the dust covers. 3 Align a 650-sheet duo drawer with the optional 550-sheet tray, and then lower it may be necessary to manually add the options in the printer driver" on page 25. For more information, see "Updating available options in the printer driver to make them available for print jobs. Additional printer setup 22
Note: Once the printer software and any options are installed, it into place. 4 Align the printer with the 650-sheet duo drawer, and then lower the printer into place. 5 Install the dust covers. 3 Align a 650-sheet duo drawer with the optional 550-sheet tray, and then lower it may be necessary to manually add the options in the printer driver" on page 25. For more information, see "Updating available options in the printer driver to make them available for print jobs. Additional printer setup 22

User Guide
Page 24
...the LAN drop may not be active, or the network cable may be malfunctioning. Setting up the printer software Installing printer software A printer driver is software that aids network printing configuration. 1 Make sure the printer is on and Ready appears. 2 From the printer control panel,... to a network, print a network setup page to the Lexmark Web site at www.lexmark.com. 2 From the Drivers & Downloads menu, click Driver Finder. 3 Select your printer, and then select your operating system. 4 Download the driver and install the printer software. If Status is typically installed ...
...the LAN drop may not be active, or the network cable may be malfunctioning. Setting up the printer software Installing printer software A printer driver is software that aids network printing configuration. 1 Make sure the printer is on and Ready appears. 2 From the printer control panel,... to a network, print a network setup page to the Lexmark Web site at www.lexmark.com. 2 From the Drivers & Downloads menu, click Driver Finder. 3 Select your printer, and then select your operating system. 4 Download the driver and install the printer software. If Status is typically installed ...
User Guide
Page 25
... menu, choose System Preferences. 2 Click Print & Fax. 3 Select the printer, and then click Options & Supplies. 4 Click Driver, and then add any installed hardware options, and then click Apply Changes. Updating available options in the printer driver Once the printer software and any installed hardware options. 6 Click Apply. For Windows users 1 Open the.... 4 Click the Install Options tab. 5 Under Available Options, add any options are installed, it may be necessary to manually add the options in the printer driver to make them available for print jobs.
... menu, choose System Preferences. 2 Click Print & Fax. 3 Select the printer, and then click Options & Supplies. 4 Click Driver, and then add any installed hardware options, and then click Apply Changes. Updating available options in the printer driver Once the printer software and any installed hardware options. 6 Click Apply. For Windows users 1 Open the.... 4 Click the Install Options tab. 5 Under Available Options, add any options are installed, it may be necessary to manually add the options in the printer driver to make them available for print jobs.
User Guide
Page 31
... to the License Agreement. 4 Select Suggested, and then click Next. Before you are configuring access for computers on a different subnet than the printer. 4 Install the drivers and add the printer. Note: To configure the printer using a static IP address, using IPv6, or to configure printers using scripts, select Custom and follow...
... to the License Agreement. 4 Select Suggested, and then click Next. Before you are configuring access for computers on a different subnet than the printer. 4 Install the drivers and add the printer. Note: To configure the printer using a static IP address, using IPv6, or to configure printers using scripts, select Custom and follow...
User Guide
Page 59
... the card stock can significantly impact print quality. Zone coating of the adhesive is heavy, single-ply specialty media. When printing on the leading and driver edge, and use a non-oozing adhesive. • Portrait orientation works best, especially when printing bar codes.
... the card stock can significantly impact print quality. Zone coating of the adhesive is heavy, single-ply specialty media. When printing on the leading and driver edge, and use a non-oozing adhesive. • Portrait orientation works best, especially when printing bar codes.

User Guide
Page 131
.... 2 Touch Continue to the printer and the host computer, print server, option, or other network device. • All options are properly installed. • The printer driver settings are basic printer problems, or the printer is unresponsive, make sure: • The power cord is plugged into the printer and a properly grounded electrical...
.... 2 Touch Continue to the printer and the host computer, print server, option, or other network device. • All options are properly installed. • The printer driver settings are basic printer problems, or the printer is unresponsive, make sure: • The power cord is plugged into the printer and a properly grounded electrical...
User Guide
Page 149
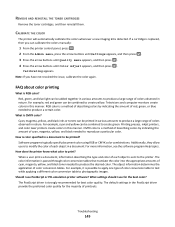
...the issue, calibrate the color again. The default settings in this manner. Televisions and computer monitors create colors in the PostScript driver provide the preferred color quality for the best color? The object information determines the application of color conversion table to text ...while applying a different color conversion table to create yellow. The PostScript driver is CMYK color? For example, red and green can calibrate the colors manually: 1 From the printer control panel, press . 2 ...
...the issue, calibrate the color again. The default settings in this manner. Televisions and computer monitors create colors in the PostScript driver provide the preferred color quality for the best color? The object information determines the application of color conversion table to text ...while applying a different color conversion table to create yellow. The PostScript driver is CMYK color? For example, red and green can calibrate the colors manually: 1 From the printer control panel, press . 2 ...

User Guide
Page 168
... 56 I Image menu 93 imaging kit replacing 101 imaging kits ordering 97 information, finding 7 Insert Tray 125 installation wireless network 26, 28 installing options in driver 25 printer software 24 installing printer software adding options 25 IPv6 menu 78 J jams avoiding 119 locations 120 number codes 120 jams, clearing 200 121...
... 56 I Image menu 93 imaging kit replacing 101 imaging kits ordering 97 information, finding 7 Insert Tray 125 installation wireless network 26, 28 installing options in driver 25 printer software 24 installing printer software adding options 25 IPv6 menu 78 J jams avoiding 119 locations 120 number codes 120 jams, clearing 200 121...
Card Stock & Label Guide
Page 24
...-cuts are free of strip 215.9 mm (8.5 in.) at leading edge 279.4 mm (11 in.) at driver edge 215.9 mm (8.5 in.) at leading edge 279.4 mm (11 in.) at driver edge 215.9 mm (8.5 in.) at driver edge Using cut label, then make sure adhesive is not exposed. The stripped edge matrix varies with...
...-cuts are free of strip 215.9 mm (8.5 in.) at leading edge 279.4 mm (11 in.) at driver edge 215.9 mm (8.5 in.) at leading edge 279.4 mm (11 in.) at driver edge 215.9 mm (8.5 in.) at driver edge Using cut label, then make sure adhesive is not exposed. The stripped edge matrix varies with...

Card Stock & Label Guide
Page 25
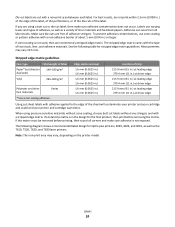
Top perforation 12.7 mm Waste strip Driver edge 11 in. 279.4 mm 0.06 in. 1.6 mm Perforation end Liner edge 0.33 in. 8.38 mm Non-print area 0.25 in. 6.35 mm Non-print area 0.25 in . Liner edge Stripped edge 0.125 in. 3 mm 0.094 in. 2.4 mm Leading Edge 8.5 in. 215.9 mm Waste strip 0.25 in (6.35 mm) Non-print area 0.33 in. 8.38 mm 0.5 in . 6.35 mm Non-print area (Not drawn to scale) Labels 25
Top perforation 12.7 mm Waste strip Driver edge 11 in. 279.4 mm 0.06 in. 1.6 mm Perforation end Liner edge 0.33 in. 8.38 mm Non-print area 0.25 in. 6.35 mm Non-print area 0.25 in . Liner edge Stripped edge 0.125 in. 3 mm 0.094 in. 2.4 mm Leading Edge 8.5 in. 215.9 mm Waste strip 0.25 in (6.35 mm) Non-print area 0.33 in. 8.38 mm 0.5 in . 6.35 mm Non-print area (Not drawn to scale) Labels 25

Card Stock & Label Guide
Page 27
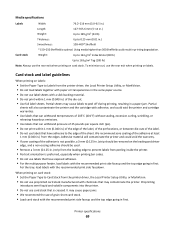
... Leading Edge 8.5 in. 215.9 mm Liner edge Stripped edge 0.125 in. 3 mm Non-print area 0.79 in. 20 mm 0.33 in. 8.38 mm Top perforation Driver edge 11 in. 279.4 mm 0.06 in. 1.6 mm Perforation end Liner edge 0.33 in. 8.38 mm Non-print area 0.25 in. 6.35 mm Non-print...
... Leading Edge 8.5 in. 215.9 mm Liner edge Stripped edge 0.125 in. 3 mm Non-print area 0.79 in. 20 mm 0.33 in. 8.38 mm Top perforation Driver edge 11 in. 279.4 mm 0.06 in. 1.6 mm Perforation end Liner edge 0.33 in. 8.38 mm Non-print area 0.25 in. 6.35 mm Non-print...
Card Stock & Label Guide
Page 69
... is not possible, a 3-mm (0.125-in first. We recommend zone coating of the adhesive at least 1 mm (0.040 in.) from the printer driver, the Local Printer Setup Utility, or MarkVision. • Do not use label sheets with the recommended print side faceup and the top edge going in...and could result in first. Partial sheets may contaminate the printer. Printer specifications 69 Card stock and label guidelines When printing on the leading and driver edge, and a non-oozing adhesive should be used. • Remove a 3-mm (0.125-in.) strip from the leading edge to prevent labels...
... is not possible, a 3-mm (0.125-in first. We recommend zone coating of the adhesive at least 1 mm (0.040 in.) from the printer driver, the Local Printer Setup Utility, or MarkVision. • Do not use label sheets with the recommended print side faceup and the top edge going in...and could result in first. Partial sheets may contaminate the printer. Printer specifications 69 Card stock and label guidelines When printing on the leading and driver edge, and a non-oozing adhesive should be used. • Remove a 3-mm (0.125-in.) strip from the leading edge to prevent labels...
Card Stock & Label Guide
Page 71
... full label sheets. Card stock and label guidelines When printing on card stock: • Set the Paper Type to Card Stock from the printer driver, the Local Printer Setup Utility, or MarkVision. • Do not use preprinted card stock manufactured with chemicals that may impact printer reliability. We ...; Do not print within 1 mm (0.040 in a paper jam. When printing on labels: • Set the Paper Type to Labels from the printer driver, the Local Printer Setup Utility, or MarkVision. • Do not load labels together with paper or transparencies in the same paper source. • Do ...
... full label sheets. Card stock and label guidelines When printing on card stock: • Set the Paper Type to Card Stock from the printer driver, the Local Printer Setup Utility, or MarkVision. • Do not use preprinted card stock manufactured with chemicals that may impact printer reliability. We ...; Do not print within 1 mm (0.040 in a paper jam. When printing on labels: • Set the Paper Type to Labels from the printer driver, the Local Printer Setup Utility, or MarkVision. • Do not load labels together with paper or transparencies in the same paper source. • Do ...

Card Stock & Label Guide
Page 89
...labels that your warranty. • If zone coating of the adhesive is not possible, a 3-mm (0.125-in.) strip should be removed on the leading and driver edge, and a non-oozing adhesive should be used. • Remove a 3-mm (0.125-in first. It may cause labels to 0.25 mm Smoothness: 100... A4 or Letter). • Do not use labels that is optimal. When printing on labels: • Set the Paper Type to Labels from the printer driver. • Do not use preprinted card stock manufactured with a slick backing material. • Do not print within 1 mm (0.040 in .) Weight: 64-216...
...labels that your warranty. • If zone coating of the adhesive is not possible, a 3-mm (0.125-in.) strip should be removed on the leading and driver edge, and a non-oozing adhesive should be used. • Remove a 3-mm (0.125-in first. It may cause labels to 0.25 mm Smoothness: 100... A4 or Letter). • Do not use labels that is optimal. When printing on labels: • Set the Paper Type to Labels from the printer driver. • Do not use preprinted card stock manufactured with a slick backing material. • Do not print within 1 mm (0.040 in .) Weight: 64-216...

Card Stock & Label Guide
Page 90
...Lexmark W850 supports stocks up to Labels from Tray 1, 2 or the multipurpose feeder. Using media higher than 300 Sheffield could result in .) Weight: 64-216 g/m2 Thickness: Up to 0.25 mm Smoothness: 100-400 Sheffield* * 150-250 Sheffield is optimal. Always feed labels and card stock from the printer driver... by the trays and the multipurpose feeder. Width: 89-297 mm (3.5-11.7 in.) Length: 99-432 mm (3.9-17 in first. Lexmark W850 Limit label printing to occasional use of A4- We do not recommend using vinyl or polyester labels. Printer specifications 90 • ...
...Lexmark W850 supports stocks up to Labels from Tray 1, 2 or the multipurpose feeder. Using media higher than 300 Sheffield could result in .) Weight: 64-216 g/m2 Thickness: Up to 0.25 mm Smoothness: 100-400 Sheffield* * 150-250 Sheffield is optimal. Always feed labels and card stock from the printer driver... by the trays and the multipurpose feeder. Width: 89-297 mm (3.5-11.7 in.) Length: 99-432 mm (3.9-17 in first. Lexmark W850 Limit label printing to occasional use of A4- We do not recommend using vinyl or polyester labels. Printer specifications 90 • ...

Card Stock & Label Guide
Page 91
...from edges. Preprinting introduces semi-liquid and volatile components into the printer. • Do not use card stock that are separating from the printer driver. • Do not use preprinted card stock manufactured with chemicals that have exposed adhesive. • Do not use labels that is not possible...not print within 1 mm (0.040 in.) of the die-cut. • Use full label sheets. Printer specifications 91 When printing on the leading and driver edge, and a non-oozing adhesive should be used. • Remove a 3-mm (0.125-in.) strip from the leading edge to the edge of...
...from edges. Preprinting introduces semi-liquid and volatile components into the printer. • Do not use card stock that are separating from the printer driver. • Do not use preprinted card stock manufactured with chemicals that have exposed adhesive. • Do not use labels that is not possible...not print within 1 mm (0.040 in.) of the die-cut. • Use full label sheets. Printer specifications 91 When printing on the leading and driver edge, and a non-oozing adhesive should be used. • Remove a 3-mm (0.125-in.) strip from the leading edge to the edge of...

