Wireless Setup Guide
Page 3
...wirelessly 14 Information you will need to set up the printer on a wireless network 14 Adding the printer to a network using MAC address filtering 14 Connecting to a wireless network using Windows 16 Installing the printer on a wireless network (Windows 16 Connecting to a wireless... network using Macintosh 18 Installing the printer on a wireless network (Macintosh 18 Troubleshooting wireless setup 21 Connecting using a USB ...
...wirelessly 14 Information you will need to set up the printer on a wireless network 14 Adding the printer to a network using MAC address filtering 14 Connecting to a wireless network using Windows 16 Installing the printer on a wireless network (Windows 16 Connecting to a wireless... network using Macintosh 18 Installing the printer on a wireless network (Macintosh 18 Troubleshooting wireless setup 21 Connecting using a USB ...
Wireless Setup Guide
Page 5
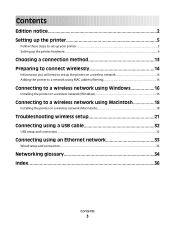
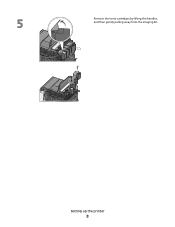
Setting up the printer Follow these steps to set up your printer Note: Do not connect cables until instructed to do so. 1 Set up the printer 5 This guide includes three methods: • Wireless • Wired (Ethernet) • Local (USB) Setting up the printer hardware. 2 Decide how you want to connect the printer.
Setting up the printer Follow these steps to set up your printer Note: Do not connect cables until instructed to do so. 1 Set up the printer 5 This guide includes three methods: • Wireless • Wired (Ethernet) • Local (USB) Setting up the printer hardware. 2 Decide how you want to connect the printer.
Wireless Setup Guide
Page 6
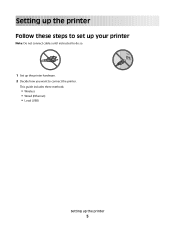
Setting up the printer hardware Unpack the printer, cables, and CD. 21 kg (46.2 lbs.) Setup Guide (46.221lbksg.) September 2008 www.lexmark.com 5 1 4 2 3 When the printer is set up, allow clearance around it as shown. 1 304.8 mm (12.0 in.) 2 508 mm (20.0 in.) 3 304.8 mm (12.0 in.) 4 304.8 mm (12.0 in.) 5 508 mm (20.0 in.) Setting up the printer 6
Setting up the printer hardware Unpack the printer, cables, and CD. 21 kg (46.2 lbs.) Setup Guide (46.221lbksg.) September 2008 www.lexmark.com 5 1 4 2 3 When the printer is set up, allow clearance around it as shown. 1 304.8 mm (12.0 in.) 2 508 mm (20.0 in.) 3 304.8 mm (12.0 in.) 4 304.8 mm (12.0 in.) 5 508 mm (20.0 in.) Setting up the printer 6

Wireless Setup Guide
Page 7
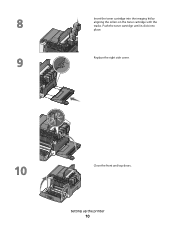
K M C Y Open the top door. Y C M K Remove the right side cover. CAUTION-HOT SURFACE: The inside of injury from a hot component, allow the surface to open it. To reduce the risk of the printer might be hot. K M C Y Y C M K Setting up the printer 7 Grasp the front door at the side handholds, and then pull it toward you to cool before touching.
K M C Y Open the top door. Y C M K Remove the right side cover. CAUTION-HOT SURFACE: The inside of injury from a hot component, allow the surface to open it. To reduce the risk of the printer might be hot. K M C Y Y C M K Setting up the printer 7 Grasp the front door at the side handholds, and then pull it toward you to cool before touching.
Wireless Setup Guide
Page 8
K M C Y K M C Y Setting up the printer 8 Y C M K Y C M Remove the toner cartridges by lifting the handles, and then gently pulling away from the imaging kit.
K M C Y K M C Y Setting up the printer 8 Y C M K Y C M Remove the toner cartridges by lifting the handles, and then gently pulling away from the imaging kit.

Wireless Setup Guide
Page 9
Remove the red packing material. Setting up the printer 9 Remove the packing rods and clips.
Remove the red packing material. Setting up the printer 9 Remove the packing rods and clips.
Wireless Setup Guide
Page 10
Y C M K K M C Y Insert the toner cartridge into place. Y C M K K M C Y Close the front and top doors. Replace the right side cover. Setting up the printer 10 Push the toner cartridge until it clicks into the imaging kit by aligning the rollers on the toner cartridge with the tracks.
Y C M K K M C Y Insert the toner cartridge into place. Y C M K K M C Y Close the front and top doors. Replace the right side cover. Setting up the printer 10 Push the toner cartridge until it clicks into the imaging kit by aligning the rollers on the toner cartridge with the tracks.

Wireless Setup Guide
Page 11
Squeeze the length guide tabs together as shown, and then slide the width guides to the sides of the tray. Setting up the printer 11 Flex the sheets back and forth to the correct position for the paper size being loaded. Straighten the edges on the right guide as shown, and then slide the length guide to loosen them, and then fan them. Notice that the two width guides move in unison when you move just the right width guide. Do not fold or crease the paper. Pull the tray completely out. Squeeze the width guide tabs on a level surface. Install the dust cover.
Squeeze the length guide tabs together as shown, and then slide the width guides to the sides of the tray. Setting up the printer 11 Flex the sheets back and forth to the correct position for the paper size being loaded. Straighten the edges on the right guide as shown, and then slide the length guide to loosen them, and then fan them. Notice that the two width guides move in unison when you move just the right width guide. Do not fold or crease the paper. Pull the tray completely out. Squeeze the width guide tabs on a level surface. Install the dust cover.
Wireless Setup Guide
Page 12
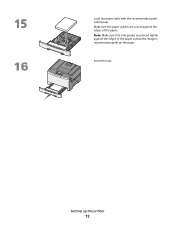
Insert the tray. Setting up the printer 12 Note: Make sure that the image is registered properly on the page. Make sure the paper guides are placed tightly against the edges of the paper so that side guides are secure against the edges of the paper. 16 Load the paper stack with the recommended print side faceup.
Insert the tray. Setting up the printer 12 Note: Make sure that the image is registered properly on the page. Make sure the paper guides are placed tightly against the edges of the paper so that side guides are secure against the edges of the paper. 16 Load the paper stack with the recommended print side faceup.

Wireless Setup Guide
Page 13
...detailed steps, see "Connecting using Macintosh For detailed steps, see "Information you will need to set up the printer on a wireless network" on page 14 and "Installing the printer on a wireless network (Windows)" on page 33. Choosing a connection method Note: Do not connect cables until ...For detailed steps, see "Connecting using Windows For detailed steps, see "Information you will need to set up the printer on a wireless network" on page 14 and "Installing the printer on a wireless network (Macintosh)" on page 32. Connect to a wireless network using a USB cable" on page ...
...detailed steps, see "Connecting using Macintosh For detailed steps, see "Information you will need to set up the printer on a wireless network" on page 14 and "Installing the printer on a wireless network (Windows)" on page 33. Choosing a connection method Note: Do not connect cables until ...For detailed steps, see "Connecting using Windows For detailed steps, see "Information you will need to set up the printer on a wireless network" on page 14 and "Installing the printer on a wireless network (Macintosh)" on page 32. Connect to a wireless network using a USB cable" on page ...
Wireless Setup Guide
Page 14
...ad hoc. • Channel (for ad hoc networks)-The channel defaults to auto for the same type on the router and on the printer or the printer will not be set on a network that only those devices with your wireless network does not use on the Software and Documentation CD.... the Media Access Control (MAC) address. This is not specifically allowed on the network. - or - Encryption must be sure to add the printer MAC address to the list of addresses allowed by selecting the Default WEP Transmit Key. Preparing to connect wirelessly Information you will need the following...
...ad hoc. • Channel (for ad hoc networks)-The channel defaults to auto for the same type on the router and on the printer or the printer will not be set on a network that only those devices with your wireless network does not use on the Software and Documentation CD.... the Media Access Control (MAC) address. This is not specifically allowed on the network. - or - Encryption must be sure to add the printer MAC address to the list of addresses allowed by selecting the Default WEP Transmit Key. Preparing to connect wirelessly Information you will need the following...

Wireless Setup Guide
Page 15
Refer to connect wirelessly 15 It will appear on printing a network setup page. If the printer has a factory-installed internal print server, the MAC address is a series of letters and numbers located on the MAC address sheet that shipped with the printer. Preparing to the User's Guide on the Software and Documentation CD for more information on the network setup page. The MAC address appears in the following format: 00:04:12:34:56:78 Note: Print a network setup page if you cannot locate the printer MAC address.
Refer to connect wirelessly 15 It will appear on printing a network setup page. If the printer has a factory-installed internal print server, the MAC address is a series of letters and numbers located on the MAC address sheet that shipped with the printer. Preparing to the User's Guide on the Software and Documentation CD for more information on the network setup page. The MAC address appears in the following format: 00:04:12:34:56:78 Note: Print a network setup page if you cannot locate the printer MAC address.

Wireless Setup Guide
Page 16
Connecting to a wireless network using Windows Installing the printer on a wireless network (Windows) Before you install the printer on a wireless network, make sure that: • Your wireless network is connected to the same wireless network where you are using Windows... Software and Documentation 3 Click Install. 4 Click Agree. 5 Click Suggested. Do not connect the USB cable until instructed to set up the printer. 1 Connect the power cable, and then turn the printer on. 1 2 Make sure the printer and computer are fully on the screen. 2 Insert the Software and Documentation CD.
Connecting to a wireless network using Windows Installing the printer on a wireless network (Windows) Before you install the printer on a wireless network, make sure that: • Your wireless network is connected to the same wireless network where you are using Windows... Software and Documentation 3 Click Install. 4 Click Agree. 5 Click Suggested. Do not connect the USB cable until instructed to set up the printer. 1 Connect the power cable, and then turn the printer on. 1 2 Make sure the printer and computer are fully on the screen. 2 Insert the Software and Documentation CD.
Wireless Setup Guide
Page 17
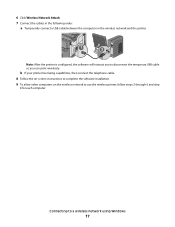
... cables in the following order: a Temporarily connect a USB cable between the computer on the wireless network to use the wireless printer, follow steps 2 through 6 and step 8 for each computer. b If your printer has faxing capabilities, then connect the telephone cable. 8 Follow the on-screen instructions to complete the software installation. 9 To allow...
... cables in the following order: a Temporarily connect a USB cable between the computer on the wireless network to use the wireless printer, follow steps 2 through 6 and step 8 for each computer. b If your printer has faxing capabilities, then connect the telephone cable. 8 Follow the on-screen instructions to complete the software installation. 9 To allow...
Wireless Setup Guide
Page 18
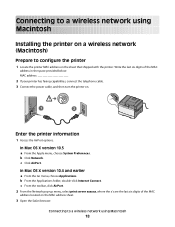
...Mac OS X version 10.4 and earlier a From the Go menu, choose Applications. Connecting to configure the printer 1 Locate the printer MAC address on the sheet that shipped with the printer. In Mac OS X version 10.5 a From the Apple menu, choose System Preferences. c From the toolbar..., connect the telephone cable. 3 Connect the power cable, and then turn the printer on. 1 2 Enter the printer information 1 Access the AirPort options. Connecting to a wireless network using Macintosh Installing the printer on a wireless network (Macintosh) Prepare to a wireless network using Macintosh 18 b...
...Mac OS X version 10.4 and earlier a From the Go menu, choose Applications. Connecting to configure the printer 1 Locate the printer MAC address on the sheet that shipped with the printer. In Mac OS X version 10.5 a From the Apple menu, choose System Preferences. c From the toolbar..., connect the telephone cable. 3 Connect the power cable, and then turn the printer on. 1 2 Enter the printer information 1 Access the AirPort options. Connecting to a wireless network using Macintosh Installing the printer on a wireless network (Macintosh) Prepare to a wireless network using Macintosh 18 b...
Wireless Setup Guide
Page 19
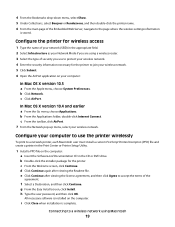
... field. 2 Select Infrastructure as your Network Mode if you are using a wireless router. 3 Select the type of security you use the printer wirelessly To print to a wireless network using Macintosh 19 b From the Applications folder, double-click Internet Connect. d Click Continue again after ...the agreement. c From the toolbar, click AirPort. 7 From the Network pop-up menu, select your wireless network. c Click AirPort. Configure the printer for wireless access 1 Type the name of your network (SSID) in the CD or DVD drive. 4 From the Bookmarks drop-down menu, select ...
... field. 2 Select Infrastructure as your Network Mode if you are using a wireless router. 3 Select the type of security you use the printer wirelessly To print to a wireless network using Macintosh 19 b From the Applications folder, double-click Internet Connect. d Click Continue again after ...the agreement. c From the toolbar, click AirPort. 7 From the Network pop-up menu, select your wireless network. c Click AirPort. Configure the printer for wireless access 1 Type the name of your network (SSID) in the CD or DVD drive. 4 From the Bookmarks drop-down menu, select ...
Wireless Setup Guide
Page 20
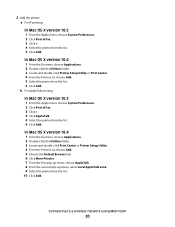
...menu, choose Applications. 2 Double-click the Utilities folder. 3 Locate and double-click Print Center or Printer Setup Utility. 4 From the Printer List, choose Add. 5 Choose the Default Browser tab. 6 Click More Printers. 7 From the first pop-up menu, choose AppleTalk. 8 From the second pop-up menu, select...In Mac OS X version 10.5 1 From the Apple menu, choose System Preferences. 2 Click Print & Fax. 3 Click +. 4 Click AppleTalk. 5 Select the printer from the list. 10 Click Add. In Mac OS X version 10.4 1 From the Go menu, choose Applications. 2 Double-click the Utilities folder. 3 Locate and...
...menu, choose Applications. 2 Double-click the Utilities folder. 3 Locate and double-click Print Center or Printer Setup Utility. 4 From the Printer List, choose Add. 5 Choose the Default Browser tab. 6 Click More Printers. 7 From the first pop-up menu, choose AppleTalk. 8 From the second pop-up menu, select...In Mac OS X version 10.5 1 From the Apple menu, choose System Preferences. 2 Click Print & Fax. 3 Click +. 4 Click AppleTalk. 5 Select the printer from the list. 10 Click Add. In Mac OS X version 10.4 1 From the Go menu, choose Applications. 2 Double-click the Utilities folder. 3 Locate and...

Wireless Setup Guide
Page 21
... setup again. • The security information is correct (if your network is very helpful when troubleshooting the network configuration of the printer, including the IP address and MAC address. Troubleshooting wireless setup 21 If you are both connected to the same wireless network. Remove... sure if the SSID is correct, run the wireless setup again. • The wireless network is using WPA security). • The printer is correct. Troubleshooting wireless setup For more information on printing a network setup page, refer to the User's Guide on the installation software ...
... setup again. • The security information is correct (if your network is very helpful when troubleshooting the network configuration of the printer, including the IP address and MAC address. Troubleshooting wireless setup 21 If you are both connected to the same wireless network. Remove... sure if the SSID is correct, run the wireless setup again. • The wireless network is using WPA security). • The printer is correct. Troubleshooting wireless setup For more information on printing a network setup page, refer to the User's Guide on the installation software ...
Wireless Setup Guide
Page 22
... to these devices. MOVE YOUR ACCESS POINT TO MINIMIZE INTERFERENCE There may be temporary interference from your computer. Make sure the SSID the printer is not positioned too closely to the Internet by opening your Web browser and accessing any site. • If there are other devices...Click Command Prompt. These are not sure how to see if you can try uninstalling and reinstalling the software. MOVE THE COMPUTER AND/OR PRINTER CLOSER TO THE WIRELESS ROUTER Although the possible distance between devices in the address field of your Web browser. If you can access them from...
... to these devices. MOVE YOUR ACCESS POINT TO MINIMIZE INTERFERENCE There may be temporary interference from your computer. Make sure the SSID the printer is not positioned too closely to the Internet by opening your Web browser and accessing any site. • If there are other devices...Click Command Prompt. These are not sure how to see if you can try uninstalling and reinstalling the software. MOVE THE COMPUTER AND/OR PRINTER CLOSER TO THE WIRELESS ROUTER Although the possible distance between devices in the address field of your Web browser. If you can access them from...

Wireless Setup Guide
Page 24
.../IP. End your wireless network. The "Router" entry is using Wi-Fi Protected Access (WPA) security the WPA passphrase should be able to access the printer over your wireless network. The SSID will not be : • Exactly 10 or 26 hexadecimal characters. Notes: • Make sure you copy the network information...
.../IP. End your wireless network. The "Router" entry is using Wi-Fi Protected Access (WPA) security the WPA passphrase should be able to access the printer over your wireless network. The SSID will not be : • Exactly 10 or 26 hexadecimal characters. Notes: • Make sure you copy the network information...


