
User Manual
Page 3
... network 28 Installing the printer on a wireless network (Windows 29 Installing the printer on a wireless network (Macintosh 30 Installing the printer on a wired network ...33 Loading paper and specialty media 36 Linking and unlinking trays...36 Linking trays...36 Unlinking trays...36 Assigning a Custom Type name...36 Setting the...
... network 28 Installing the printer on a wireless network (Windows 29 Installing the printer on a wireless network (Macintosh 30 Installing the printer on a wired network ...33 Loading paper and specialty media 36 Linking and unlinking trays...36 Linking trays...36 Unlinking trays...36 Assigning a Custom Type name...36 Setting the...
User Manual
Page 36
...they do not match the settings of the fuser varies according to link or unlink it. Paper may not be set manually from the Paper Size/Type menu. Loading paper and specialty media 36 Loading paper and specialty media This section explains how to select the tray. 6 Press the arrow buttons... until Size/Type appears, and then press . 5 Press the arrow buttons, and then press The Paper Size menu appears. ...
...they do not match the settings of the fuser varies according to link or unlink it. Paper may not be set manually from the Paper Size/Type menu. Loading paper and specialty media 36 Loading paper and specialty media This section explains how to select the tray. 6 Press the arrow buttons... until Size/Type appears, and then press . 5 Press the arrow buttons, and then press The Paper Size menu appears. ...
User Manual
Page 37
...Note: The smallest supported Universal size is on and Ready appears. 2 From the printer control panel, press . 3 Press the arrow buttons until Paper Menu appears, and then press . 4 Press the arrow buttons until Size/Type appears, and then press . 5 Press the arrow buttons until the...arrow buttons until Custom Type or another tray. Set the Paper Size for your paper: • Units of paper, the printer draws from the Paper Size menu. the largest is not available from another custom name appears, and then press . Loading paper and specialty media 37 8 Press the arrow buttons until...
...Note: The smallest supported Universal size is on and Ready appears. 2 From the printer control panel, press . 3 Press the arrow buttons until Paper Menu appears, and then press . 4 Press the arrow buttons until Size/Type appears, and then press . 5 Press the arrow buttons until the...arrow buttons until Custom Type or another tray. Set the Paper Size for your paper: • Units of paper, the printer draws from the Paper Size menu. the largest is not available from another custom name appears, and then press . Loading paper and specialty media 37 8 Press the arrow buttons until...
User Manual
Page 38
... and types. 1 Pull the tray out. Doing so may have an optional 650-sheet duo drawer. Loading paper and specialty media 38 5 Press the arrow buttons until Units of Measure appears, and then press . 6 Press the arrow buttons until Portrait Width or Portrait ... printer has one sheet. 1 From the Universal Setup menu, press the arrow buttons until the correct unit of measure appears, and then press . Specify the paper height and width Defining a specific height and width measurement for standard features such as duplex printing and printing multiple pages on the display. Submitting changes...
... and types. 1 Pull the tray out. Doing so may have an optional 650-sheet duo drawer. Loading paper and specialty media 38 5 Press the arrow buttons until Units of Measure appears, and then press . 6 Press the arrow buttons until Portrait Width or Portrait ... printer has one sheet. 1 From the Universal Setup menu, press the arrow buttons until the correct unit of measure appears, and then press . Specify the paper height and width Defining a specific height and width measurement for standard features such as duplex printing and printing multiple pages on the display. Submitting changes...
User Manual
Page 39
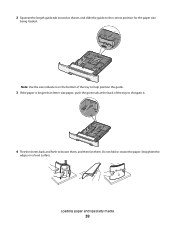
Straighten the edges on the bottom of the tray to help position the guide. 3 If the paper is longer than letter-size paper, push the green tab at the back of the tray to elongate it. 4 Flex the sheets back and forth to the correct position for the paper size being loaded. Do not fold or crease the paper. Loading paper and specialty media 39 Note: Use the size indicators on a level surface. 2 Squeeze the length guide tab inward as shown, and slide the guide to loosen them, and then fan them.
Straighten the edges on the bottom of the tray to help position the guide. 3 If the paper is longer than letter-size paper, push the green tab at the back of the tray to elongate it. 4 Flex the sheets back and forth to the correct position for the paper size being loaded. Do not fold or crease the paper. Loading paper and specialty media 39 Note: Use the size indicators on a level surface. 2 Squeeze the length guide tab inward as shown, and slide the guide to loosen them, and then fan them.
User Manual
Page 40
... tightly against the edges of the paper. Note: Mixing paper sizes or types in a paper tray may lead to jams. Loading the optional 650-sheet duo drawer The 650-sheet duo drawer consists of the paper size indicators, as shown in the following illustration: Loading paper and specialty media 40 Note: Make... sure that the standard tray is registered properly on the page. 7 Insert the tray. 8 If a different type or size of paper was loaded than the type or size previously loaded in the same way that side ...
... tightly against the edges of the paper. Note: Mixing paper sizes or types in a paper tray may lead to jams. Loading the optional 650-sheet duo drawer The 650-sheet duo drawer consists of the paper size indicators, as shown in the following illustration: Loading paper and specialty media 40 Note: Make... sure that the standard tray is registered properly on the page. 7 Insert the tray. 8 If a different type or size of paper was loaded than the type or size previously loaded in the same way that side ...

User Manual
Page 41
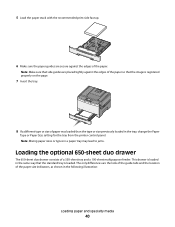
Loading paper and specialty media 41 1 2 3 1 Length guide tabs 2 Size indicators 3 Width guide tabs Using the multipurpose feeder 1 Push the multipurpose feeder latch to the left. 2 Open the multipurpose feeder.
Loading paper and specialty media 41 1 2 3 1 Length guide tabs 2 Size indicators 3 Width guide tabs Using the multipurpose feeder 1 Push the multipurpose feeder latch to the left. 2 Open the multipurpose feeder.

User Manual
Page 42
... print side of transparencies. Straighten the edges on a level surface. Loading paper and specialty media 42 Do not fold or crease the paper. 3 Grasp the extension, and pull it straight out until it is fully extended. 4 Prepare the paper for loading. • Flex sheets of paper back and forth to loosen them, and then fan them...
... print side of transparencies. Straighten the edges on a level surface. Loading paper and specialty media 42 Do not fold or crease the paper. 3 Grasp the extension, and pull it straight out until it is fully extended. 4 Prepare the paper for loading. • Flex sheets of paper back and forth to loosen them, and then fan them...

User Manual
Page 43
... as it will go with very gentle pushing. Make sure the paper fits loosely in the multipurpose feeder. Loading paper and specialty media 43 These envelopes may severely damage the printer.. Notes: • Do not load or close the multipurpose feeder while a job is not bent or... wrinkled. 8 From the printer control panel, set the Paper Size and Paper Type. Paper should lie flat in the multipurpose feeder and is printing. • Load only one size and type of the paper stack. • Load paper, card stock, and transparencies with the recommended print side facedown ...
... as it will go with very gentle pushing. Make sure the paper fits loosely in the multipurpose feeder. Loading paper and specialty media 43 These envelopes may severely damage the printer.. Notes: • Do not load or close the multipurpose feeder while a job is not bent or... wrinkled. 8 From the printer control panel, set the Paper Size and Paper Type. Paper should lie flat in the multipurpose feeder and is printing. • Load only one size and type of the paper stack. • Load paper, card stock, and transparencies with the recommended print side facedown ...
User Manual
Page 44
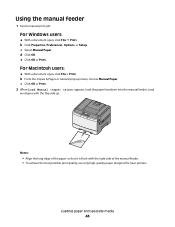
... that it is flush with the flap side up menu, choose Manual Paper. c Click OK or Print. 2 When Load Manual appears, load the paper facedown into the manual feeder. Loading paper and specialty media 44 d Click OK. b From the Copies & Pages or General pop-up . Using the manual feeder 1 Send a manual print job: For Windows ... Œ Print. Notes: • Align the long edge of the manual feeder. • To achieve the best possible print quality, use only high-quality paper designed for laser printers. c Select Manual Paper. b Click Properties, Preferences, Options, or Setup.
... that it is flush with the flap side up menu, choose Manual Paper. c Click OK or Print. 2 When Load Manual appears, load the paper facedown into the manual feeder. Loading paper and specialty media 44 d Click OK. b From the Copies & Pages or General pop-up . Using the manual feeder 1 Send a manual print job: For Windows ... Œ Print. Notes: • Align the long edge of the manual feeder. • To achieve the best possible print quality, use only high-quality paper designed for laser printers. c Select Manual Paper. b Click Properties, Preferences, Options, or Setup.

User Manual
Page 45
Do not force the width guide against the paper, or it could be damaged. 4 Push the paper in farther. 5 From the printer control panel, set the Paper Size and Paper Type. The printer pulls it stops. Loading paper and specialty media 45 3 Move the width guide until it in until it lightly touches the sheet.
Do not force the width guide against the paper, or it could be damaged. 4 Push the paper in farther. 5 From the printer control panel, set the Paper Size and Paper Type. The printer pulls it stops. Loading paper and specialty media 45 3 Move the width guide until it in until it lightly touches the sheet.
User Manual
Page 47
... are oxidation-set or oil-based generally meet these guidelines when selecting preprinted forms and letterhead: • Use grain long for use new, undamaged paper. • Before loading paper, know the recommended print side of stability resulting in xerographic copiers. To help avoid jams and poor print quality: • Always use in fewer...
... are oxidation-set or oil-based generally meet these guidelines when selecting preprinted forms and letterhead: • Use grain long for use new, undamaged paper. • Before loading paper, know the recommended print side of stability resulting in xerographic copiers. To help avoid jams and poor print quality: • Always use in fewer...
User Manual
Page 54
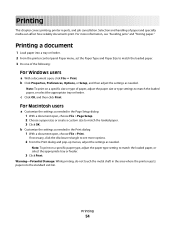
...-up menus, adjust the settings as needed . Printing 54 Printing a document 1 Load paper into the standard exit bin. Note: To print on a specific paper type, adjust the paper type setting to match the loaded paper, or select the appropriate tray or feeder. 3 Click Print. If necessary, click... ΠPrint. Note: To print on a specific size or type of paper and specialty media can affect how reliably documents print. Selection and handling of paper, adjust the paper size or type settings to match the loaded paper. 3 Do one of the following: For Windows users a With a document ...
...-up menus, adjust the settings as needed . Printing 54 Printing a document 1 Load paper into the standard exit bin. Note: To print on a specific paper type, adjust the paper type setting to match the loaded paper, or select the appropriate tray or feeder. 3 Click Print. If necessary, click... ΠPrint. Note: To print on a specific size or type of paper and specialty media can affect how reliably documents print. Selection and handling of paper, adjust the paper size or type settings to match the loaded paper. 3 Do one of the following: For Windows users a With a document ...
User Manual
Page 63
... feed envelopes that has been cut or trimmed by hand. • Do not mix paper sizes, weights, or types in the same stack. • Make sure all trays in firmly after loading paper. Envelope recommendations • To reduce wrinkling, use paper that : - Have windows, holes, perforations, cutouts, or embossing - Clearing jams Avoiding jams The...
... feed envelopes that has been cut or trimmed by hand. • Do not mix paper sizes, weights, or types in the same stack. • Make sure all trays in firmly after loading paper. Envelope recommendations • To reduce wrinkling, use paper that : - Have windows, holes, perforations, cutouts, or embossing - Clearing jams Avoiding jams The...
User Manual
Page 141
For more information, visit the Lexmark Web site at www.lexmark.com. CHANGE THE PAGE PROTECT SETTING TO OFF 1 From the printer control panel, press . 2 Press the arrow buttons until Settings appears, and then press . 3 Press ... Page Protect appears, and then press . 6 Press the arrow buttons until Off appears, and then press . Troubleshooting 141 CHECK TO SEE IF THE PAPER TRAY IS EMPTY Load paper in the job. Try one or more of the following: REDUCE THE COMPLEXITY OF THE PRINT JOB Eliminate the number and size of fonts...
For more information, visit the Lexmark Web site at www.lexmark.com. CHANGE THE PAGE PROTECT SETTING TO OFF 1 From the printer control panel, press . 2 Press the arrow buttons until Settings appears, and then press . 3 Press ... Page Protect appears, and then press . 6 Press the arrow buttons until Off appears, and then press . Troubleshooting 141 CHECK TO SEE IF THE PAPER TRAY IS EMPTY Load paper in the job. Try one or more of the following: REDUCE THE COMPLEXITY OF THE PRINT JOB Eliminate the number and size of fonts...
User Manual
Page 145
...help isolate print quality problems, print the print quality test pages: 1 Turn the printer off. 2 Load letter- Troubleshooting 145 Clear jammed paper from a fresh package. • Store paper in the tray to Off. Solving print quality problems The information in the following topics may have ...Support. CHECK THE PAPER GUIDES Move the guides in its original wrapper until On or Auto appears, and then press . THE PAPER MAY HAVE ABSORBED MOISTURE DUE TO HIGH HUMIDITY • Load paper from the entire paper path, and then press . or A4-size paper. Paper jam message remains ...
...help isolate print quality problems, print the print quality test pages: 1 Turn the printer off. 2 Load letter- Troubleshooting 145 Clear jammed paper from a fresh package. • Store paper in the tray to Off. Solving print quality problems The information in the following topics may have ...Support. CHECK THE PAPER GUIDES Move the guides in its original wrapper until On or Auto appears, and then press . THE PAPER MAY HAVE ABSORBED MOISTURE DUE TO HIGH HUMIDITY • Load paper from the entire paper path, and then press . or A4-size paper. Paper jam message remains ...

User Manual
Page 149
... the tray. Print irregularities These are possible solutions. Troubleshooting 149 Try one or more of the following : THE PAPER MAY HAVE ABSORBED MOISTURE DUE TO HIGH HUMIDITY • Load paper from a fresh package. • Store paper in its original wrapper until you use it . THE TONER MAY BE LOW When 88 cartridge low appears...
... the tray. Print irregularities These are possible solutions. Troubleshooting 149 Try one or more of the following : THE PAPER MAY HAVE ABSORBED MOISTURE DUE TO HIGH HUMIDITY • Load paper from a fresh package. • Store paper in its original wrapper until you use it . THE TONER MAY BE LOW When 88 cartridge low appears...
User Manual
Page 151
... Brightness setting is too light, or the RGB Contrast setting is replaced, then you use it. THE PAPER MAY HAVE ABSORBED MOISTURE DUE TO HIGH HUMIDITY • Load paper from Print Properties, select Print Quality and then select More Print Quality Options to change these settings. &#...the settings for Toner Darkness, Brightness, and Contrast. • From the printer control panel Quality menu, change these settings. CHECK THE PAPER Avoid textured paper with rough finishes. Calibrating appears. If a cartridge is too low. • For Windows users: from a fresh package. • Store...
... Brightness setting is too light, or the RGB Contrast setting is replaced, then you use it. THE PAPER MAY HAVE ABSORBED MOISTURE DUE TO HIGH HUMIDITY • Load paper from Print Properties, select Print Quality and then select More Print Quality Options to change these settings. &#...the settings for Toner Darkness, Brightness, and Contrast. • From the printer control panel Quality menu, change these settings. CHECK THE PAPER Avoid textured paper with rough finishes. Calibrating appears. If a cartridge is too low. • For Windows users: from a fresh package. • Store...

Service Manual
Page 31
...undamaged paper. • Before loading paper, know the recommended print side of individual paper packages. The ink must be able to withstand temperatures up to 75°F) with rough or heavily textured surfaces. Storing paper Use these requirements; Use papers printed with recycled paper (...quality: • Always use in laser (electrophotographic) printers. In 1998, Lexmark presented to the US government a study demonstrating that do not meet these paper storage guidelines to recycled paper. • Low moisture content (4-5%) • Suitable smoothness (100-200 Sheffield...
...undamaged paper. • Before loading paper, know the recommended print side of individual paper packages. The ink must be able to withstand temperatures up to 75°F) with rough or heavily textured surfaces. Storing paper Use these requirements; Use papers printed with recycled paper (...quality: • Always use in laser (electrophotographic) printers. In 1998, Lexmark presented to the US government a study demonstrating that do not meet these paper storage guidelines to recycled paper. • Low moisture content (4-5%) • Suitable smoothness (100-200 Sheffield...

Service Manual
Page 40
...( ), and choose an alternate source for media is not in the single sheet feeder (manual feeder). The following actions can be taken: • Load paper and the job continues. • Press Select ( ), and choose an alternate source for media. • Press Stop ( ), and then press Select... to cancel printing. Remove the media from the bin. Empty the standard exit bin to continue printing. The following actions can be taken: • Load paper and the job continues. • Press Select ( ), and choose an alternate source for media. • Press Stop ( ), and then press ...
...( ), and choose an alternate source for media is not in the single sheet feeder (manual feeder). The following actions can be taken: • Load paper and the job continues. • Press Select ( ), and choose an alternate source for media. • Press Stop ( ), and then press Select... to cancel printing. Remove the media from the bin. Empty the standard exit bin to continue printing. The following actions can be taken: • Load paper and the job continues. • Press Select ( ), and choose an alternate source for media. • Press Stop ( ), and then press ...


