Printer Languages and Interfaces Technical Reference
Page 72
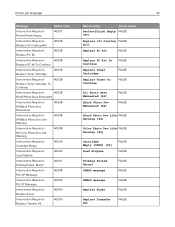
... Intervention Required Replace PC Kit 40038 Intervention Required - 40038 Replace PC Kit To Continue Intervention Required Replace Toner Cartridge 40038 Intervention Required - 40038 Replace Toner Cartridge To Continue Intervention Required - 40038 84 All Photo Devs Exhausted Intervention Required - 84 Black Photo Dev ...PerfectFinish Empty FALSE [87] Replace Oil Coating FALSE Roll Replace PC Kit FALSE Replace PC Kit To Continue Replace Toner Cartridge Replace Toner To Continue FALSE FALSE FALSE All Photo Devs Exhausted [84] Black Photo Dev Exhausted [84] FALSE FALSE Black ...
... Intervention Required Replace PC Kit 40038 Intervention Required - 40038 Replace PC Kit To Continue Intervention Required Replace Toner Cartridge 40038 Intervention Required - 40038 Replace Toner Cartridge To Continue Intervention Required - 40038 84 All Photo Devs Exhausted Intervention Required - 84 Black Photo Dev ...PerfectFinish Empty FALSE [87] Replace Oil Coating FALSE Roll Replace PC Kit FALSE Replace PC Kit To Continue Replace Toner Cartridge Replace Toner To Continue FALSE FALSE FALSE All Photo Devs Exhausted [84] Black Photo Dev Exhausted [84] FALSE FALSE Black ...
Printer Languages and Interfaces Technical Reference
Page 79
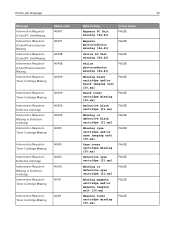
... 40407 40407 40408 40408 40409 Intervention Required Toner Cartridge Missing Intervention Required Defective Cartridge Intervention Required Missing or Defective Cartridge Intervention Required Toner Cartridge Missing 40409 40409 40409 40410 Intervention Required Toner Cartridge Missing Intervention Required Defective Cartridge Intervention Required Missing or Defective Cartridge Intervention Required Toner Cartridge Missing 40410 40410 40410 40411 Intervention Required Toner Cartridge Missing 40411 Return string Magenta PC Unit...
... 40407 40407 40408 40408 40409 Intervention Required Toner Cartridge Missing Intervention Required Defective Cartridge Intervention Required Missing or Defective Cartridge Intervention Required Toner Cartridge Missing 40409 40409 40409 40410 Intervention Required Toner Cartridge Missing Intervention Required Defective Cartridge Intervention Required Missing or Defective Cartridge Intervention Required Toner Cartridge Missing 40410 40410 40410 40411 Intervention Required Toner Cartridge Missing 40411 Return string Magenta PC Unit...

Printer Languages and Interfaces Technical Reference
Page 80
Printer job language 80 Message Intervention Required Defective Cartridge Intervention Required Missing or Defective Cartridge Intervention Required Toner Cartridge Missing Status code 40411 40411 40412 Intervention Required Toner Cartridge Missing 40412 Intervention Required Defective Cartridge 40412 Intervention Required - Missing or Defective Cartridge 40412 Intervention Required Fuser Missing 40416 Intervention Required Fuser Missing 40416 Intervention Required Fuser Missing 40416 Intervention...
Printer job language 80 Message Intervention Required Defective Cartridge Intervention Required Missing or Defective Cartridge Intervention Required Toner Cartridge Missing Status code 40411 40411 40412 Intervention Required Toner Cartridge Missing 40412 Intervention Required Defective Cartridge 40412 Intervention Required - Missing or Defective Cartridge 40412 Intervention Required Fuser Missing 40416 Intervention Required Fuser Missing 40416 Intervention Required Fuser Missing 40416 Intervention...

Paper and Specialty Media Guide PDF
Page 19
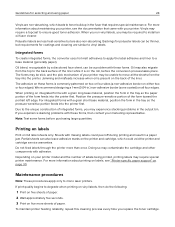
...for use labels that affect printing. To prevent labels from peeling off labels could cause jams. The label or adhesive could void the printer and toner cartridge warranties. • Flex, fan, and align the label edges before loading. • Use only label sheets that remain bent may contaminate the ... to the edge of three basic parts: the liner, the adhesive, and the face sheet. Partial sheets also contaminate the printer and the cartridge with a converter or a vendor who has extensive knowledge about label support for each of labels continuously. • Do not use with high...
...for use labels that affect printing. To prevent labels from peeling off labels could cause jams. The label or adhesive could void the printer and toner cartridge warranties. • Flex, fan, and align the label edges before loading. • Use only label sheets that remain bent may contaminate the ... to the edge of three basic parts: the liner, the adhesive, and the face sheet. Partial sheets also contaminate the printer and the cartridge with a converter or a vendor who has extensive knowledge about label support for each of labels continuously. • Do not use with high...
Paper and Specialty Media Guide PDF
Page 24
... unique construction of the liner while it is commonly patterned on two or four sides (a non‑adhesive border on the printer and cartridge, which leads to install an oil fuser cleaner. Note: Test some forms before the conversion process takes place. Sheets with adhesive. Doing...Polyester labels are less heat‑sensitive but requirements for coatings and cleaning are similar to the back surface of integrated forms, you replace the toner cartridge. We recommend designing a 1‑mm (0.04‑in the output bin. The forms may be slick, and the pick mechanism of ...
... unique construction of the liner while it is commonly patterned on two or four sides (a non‑adhesive border on the printer and cartridge, which leads to install an oil fuser cleaner. Note: Test some forms before the conversion process takes place. Sheets with adhesive. Doing...Polyester labels are less heat‑sensitive but requirements for coatings and cleaning are similar to the back surface of integrated forms, you replace the toner cartridge. We recommend designing a 1‑mm (0.04‑in the output bin. The forms may be slick, and the pick mechanism of ...
Users Guide PDF
Page 53
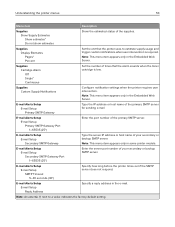
... notifications when user intervention is low. Supplies Display Estimates Pages* Percent Set the unit that the alarm sounds when the toner cartridge is required. Note: This menu item appears only in some printer models. E‑mail Alerts Setup E‑mail Setup SMTP Timeout...not respond. Supplies Custom Supply Notifications Configure notification settings when the printer requires user intervention. Supplies Cartridge Alarm Off Single* Continuous Set the number of the primary SMTP server. E‑mail Alerts Setup E‑mail Setup Secondary SMTP...
... notifications when user intervention is low. Supplies Display Estimates Pages* Percent Set the unit that the alarm sounds when the toner cartridge is required. Note: This menu item appears only in some printer models. E‑mail Alerts Setup E‑mail Setup SMTP Timeout...not respond. Supplies Custom Supply Notifications Configure notification settings when the printer requires user intervention. Supplies Cartridge Alarm Off Single* Continuous Set the number of the primary SMTP server. E‑mail Alerts Setup E‑mail Setup Secondary SMTP...

Users Guide PDF
Page 104
...results if third-party parts and supplies are designed to function best with genuine Lexmark parts and supplies. Lexmark MS821, MS822, MS823, MS725, MS825, and MS826 Return Program toner cartridges Item United States and Canada European Economic Area Asia Pacific Latin America Rest... of parts and supplies. Use of the printer and its associated components. For more information, contact your Lexmark printer or its imaging components....
...results if third-party parts and supplies are designed to function best with genuine Lexmark parts and supplies. Lexmark MS821, MS822, MS823, MS725, MS825, and MS826 Return Program toner cartridges Item United States and Canada European Economic Area Asia Pacific Latin America Rest... of parts and supplies. Use of the printer and its associated components. For more information, contact your Lexmark printer or its imaging components....
Users Guide PDF
Page 105
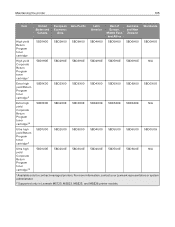
... system administrator. 2 Supported only in Lexmark MS725, MS823, MS825, and MS826 printer models. Maintaining the printer 105 Item United States and Canada European Economic Area Asia Pacific Latin America Rest of Europe, Middle East, and Africa Australia and New Zealand Worldwide High yield Return Program toner cartridge 58D1H00 58D2H00 58D3H00 58D4H00 58D5H00...
... system administrator. 2 Supported only in Lexmark MS725, MS823, MS825, and MS826 printer models. Maintaining the printer 105 Item United States and Canada European Economic Area Asia Pacific Latin America Rest of Europe, Middle East, and Africa Australia and New Zealand Worldwide High yield Return Program toner cartridge 58D1H00 58D2H00 58D3H00 58D4H00 58D5H00...
Users Guide PDF
Page 106
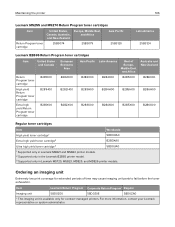
..., Australia, and Africa and New Zealand Asia Pacific Return Program toner cartridge 25B3074 25B3079 25B3120 Latin America 25B3124 Lexmark B2865 Return Program toner cartridges Item United States and Canada European Economic Area Return Program toner cartridge High yield Return Program toner cartridge Extra high yield Return Program toner cartridge B281000 B281H00 B281X00 B282000 B282H00 B282X00 Asia Pacific B283000 Latin America...
..., Australia, and Africa and New Zealand Asia Pacific Return Program toner cartridge 25B3074 25B3079 25B3120 Latin America 25B3124 Lexmark B2865 Return Program toner cartridges Item United States and Canada European Economic Area Return Program toner cartridge High yield Return Program toner cartridge Extra high yield Return Program toner cartridge B281000 B281H00 B281X00 B282000 B282H00 B282X00 Asia Pacific B283000 Latin America...

Users Guide PDF
Page 107
... number 35S8500 Ordering a maintenance kit To identify the fuser type, open door A, and then remove the toner cartridge and imaging unit. Extended exposure to direct light for example, 00 or 01. Return Program fuser maintenance kits Fuser maintenance kit type Type 00 Type ...
... number 35S8500 Ordering a maintenance kit To identify the fuser type, open door A, and then remove the toner cartridge and imaging unit. Extended exposure to direct light for example, 00 or 01. Return Program fuser maintenance kits Fuser maintenance kit type Type 00 Type ...

Users Guide PDF
Page 108
... Supplies menu, click Custom Supply Notifications. 4 Select a notification for each supply item. 5 Apply the changes. Replacing parts and supplies Replacing the toner cartridge 1 Open door A. Notes: • View the printer IP address on the printer home screen. The IP address appears as four sets of the printer. Maintaining...
... Supplies menu, click Custom Supply Notifications. 4 Select a notification for each supply item. 5 Apply the changes. Replacing parts and supplies Replacing the toner cartridge 1 Open door A. Notes: • View the printer IP address on the printer home screen. The IP address appears as four sets of the printer. Maintaining...

Users Guide PDF
Page 109
Warning-Potential Damage: To prevent damage from electrostatic discharge, touch any exposed metal frame of the printer before accessing or touching interior areas of the printer. Maintaining the printer 109 2 Remove the used toner cartridge. 3 Unpack the new toner cartridge, and then shake it to redistribute the toner. 4 Insert the new toner cartridge. 5 Close the door. Replacing the imaging unit 1 Open door A.
Warning-Potential Damage: To prevent damage from electrostatic discharge, touch any exposed metal frame of the printer before accessing or touching interior areas of the printer. Maintaining the printer 109 2 Remove the used toner cartridge. 3 Unpack the new toner cartridge, and then shake it to redistribute the toner. 4 Insert the new toner cartridge. 5 Close the door. Replacing the imaging unit 1 Open door A.

Users Guide PDF
Page 110
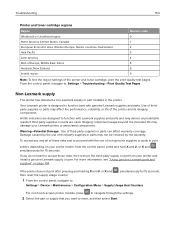
Maintaining the printer 110 2 Remove the toner cartridge. 3 Remove the used imaging unit.
Maintaining the printer 110 2 Remove the toner cartridge. 3 Remove the used imaging unit.
Users Guide PDF
Page 112
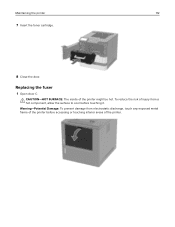
Maintaining the printer 112 7 Insert the toner cartridge. 8 Close the door. Replacing the fuser 1 Open door C. Warning-Potential Damage: To prevent damage from a hot component, allow the surface to cool before accessing or touching interior areas of the printer. To reduce the risk of injury from electrostatic discharge, touch any exposed metal frame of the printer might be hot. CAUTION-HOT SURFACE: The inside of the printer before touching it.
Maintaining the printer 112 7 Insert the toner cartridge. 8 Close the door. Replacing the fuser 1 Open door C. Warning-Potential Damage: To prevent damage from a hot component, allow the surface to cool before accessing or touching interior areas of the printer. To reduce the risk of injury from electrostatic discharge, touch any exposed metal frame of the printer might be hot. CAUTION-HOT SURFACE: The inside of the printer before touching it.
Users Guide PDF
Page 117
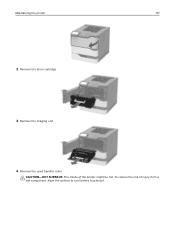
Maintaining the printer 117 2 Remove the toner cartridge. 3 Remove the imaging unit. 4 Remove the used transfer roller. CAUTION-HOT SURFACE: The inside of injury from a hot component, allow the surface to cool before touching it. To reduce the risk of the printer might be hot.
Maintaining the printer 117 2 Remove the toner cartridge. 3 Remove the imaging unit. 4 Remove the used transfer roller. CAUTION-HOT SURFACE: The inside of injury from a hot component, allow the surface to cool before touching it. To reduce the risk of the printer might be hot.
Users Guide PDF
Page 119
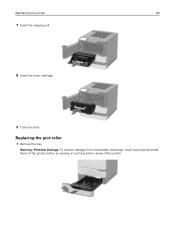
Warning-Potential Damage: To prevent damage from electrostatic discharge, touch any exposed metal frame of the printer before accessing or touching interior areas of the printer. Replacing the pick roller 1 Remove the tray. Maintaining the printer 119 7 Insert the imaging unit. 8 Insert the toner cartridge. 9 Close the door.
Warning-Potential Damage: To prevent damage from electrostatic discharge, touch any exposed metal frame of the printer before accessing or touching interior areas of the printer. Replacing the pick roller 1 Remove the tray. Maintaining the printer 119 7 Insert the imaging unit. 8 Insert the toner cartridge. 9 Close the door.
Users Guide PDF
Page 134
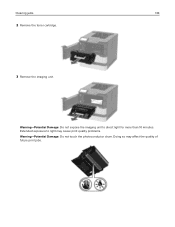
Warning-Potential Damage: Do not expose the imaging unit to light may affect the quality of future print jobs. Doing so may cause print quality problems. Warning-Potential Damage: Do not touch the photoconductor drum. Extended exposure to direct light for more than 10 minutes. Clearing jams 134 2 Remove the toner cartridge. 3 Remove the imaging unit.
Warning-Potential Damage: Do not expose the imaging unit to light may affect the quality of future print jobs. Doing so may cause print quality problems. Warning-Potential Damage: Do not touch the photoconductor drum. Extended exposure to direct light for more than 10 minutes. Clearing jams 134 2 Remove the toner cartridge. 3 Remove the imaging unit.

Users Guide PDF
Page 136
CAUTION-HOT SURFACE: The inside of the printer. 2 Remove the jammed paper from a hot component, allow the surface to cool before touching it. Warning-Potential Damage: To prevent damage from electrostatic discharge, touch any of the following areas: Note: Make sure that all paper fragments are removed. Paper jam in door C 1 Open door C. To reduce the risk of injury from any exposed metal frame of the printer before accessing or touching interior areas of the printer might be hot. Clearing jams 136 8 Insert the toner cartridge. 9 Close the door.
CAUTION-HOT SURFACE: The inside of the printer. 2 Remove the jammed paper from a hot component, allow the surface to cool before touching it. Warning-Potential Damage: To prevent damage from electrostatic discharge, touch any of the following areas: Note: Make sure that all paper fragments are removed. Paper jam in door C 1 Open door C. To reduce the risk of injury from any exposed metal frame of the printer before accessing or touching interior areas of the printer might be hot. Clearing jams 136 8 Insert the toner cartridge. 9 Close the door.
Users Guide PDF
Page 153
... third-party supplies or parts can affect warranty coverage. Warning-Potential Damage: Use of the printer and toner cartridge, print the print quality test pages. From the control panel, navigate to function with genuine Lexmark supplies and parts. Use of thirdparty supplies or parts may not be covered by the use of non...
... third-party supplies or parts can affect warranty coverage. Warning-Potential Damage: Use of the printer and toner cartridge, print the print quality test pages. From the control panel, navigate to function with genuine Lexmark supplies and parts. Use of thirdparty supplies or parts may not be covered by the use of non...
Users Guide PDF
Page 157
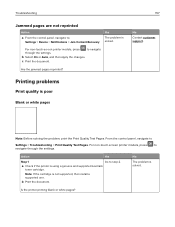
...-screen printer models, press through the settings. a Check if the printer is solved. No The problem is using a genuine and supported Lexmark toner cartridge. Troubleshooting 157 Jammed pages are not reprinted Action a From the control panel, navigate to navigate b Select On or Auto, and then... supported, then install a supported one. Action Yes Step 1 Go to Settings > Troubleshooting > Print Quality Test Pages. Note: If the cartridge is poor Blank or white pages Note: Before solving the problem, print the Print Quality Test Pages. From the control panel, navigate to step...
...-screen printer models, press through the settings. a Check if the printer is solved. No The problem is using a genuine and supported Lexmark toner cartridge. Troubleshooting 157 Jammed pages are not reprinted Action a From the control panel, navigate to navigate b Select On or Auto, and then... supported, then install a supported one. Action Yes Step 1 Go to Settings > Troubleshooting > Print Quality Test Pages. Note: If the cartridge is poor Blank or white pages Note: Before solving the problem, print the Print Quality Test Pages. From the control panel, navigate to step...


