Troubleshooting Guide
Page 1
... OK. 6 Press repeatedly until Admin Menu appears, and then press OK. Multiple-language PDFs do not print These are using Windows 98/ME, Windows 2000, Windows XP, or Windows Server 2003 compatible printer software. For more of the following : • Load both Tray 2 and Tray 3 with the...and the host computer, print server, option, or other network device. Lexmark™ X560 Troubleshooting Guide Solving printing problems Online customer support Customer support is available on the Lexmark Web site at www.lexmark.com Checking an unresponsive printer If your print job by any switch ...
... OK. 6 Press repeatedly until Admin Menu appears, and then press OK. Multiple-language PDFs do not print These are using Windows 98/ME, Windows 2000, Windows XP, or Windows Server 2003 compatible printer software. For more of the following : • Load both Tray 2 and Tray 3 with the...and the host computer, print server, option, or other network device. Lexmark™ X560 Troubleshooting Guide Solving printing problems Online customer support Customer support is available on the Lexmark Web site at www.lexmark.com Checking an unresponsive printer If your print job by any switch ...
Troubleshooting Guide
Page 7
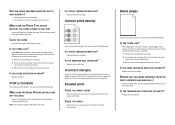
... before sending the job to extend the life of the following: CHECK TO SEE IF MARKS OCCUR REPEATEDLY ONLY IN ONE COLOR AND MULTIPLE TIMES ON A PAGE Replace the print cartridge if the defects occur every: • 22 mm (.87 in...CARTRIDGE DEFECTIVE? Replace the fuser. Try feeding from another tray. Try one or more of the following : CLEAN THE LASER LENS The laser lens may be dirty. Note: This solution applies to redistribute toner. 3 Reinsert the print cartridge and continue printing....2 Firmly shake the cartridge side-to-side and front-to-back several times to Windows users only.
... before sending the job to extend the life of the following: CHECK TO SEE IF MARKS OCCUR REPEATEDLY ONLY IN ONE COLOR AND MULTIPLE TIMES ON A PAGE Replace the print cartridge if the defects occur every: • 22 mm (.87 in...CARTRIDGE DEFECTIVE? Replace the fuser. Try feeding from another tray. Try one or more of the following : CLEAN THE LASER LENS The laser lens may be dirty. Note: This solution applies to redistribute toner. 3 Reinsert the print cartridge and continue printing....2 Firmly shake the cartridge side-to-side and front-to-back several times to Windows users only.
Troubleshooting Guide
Page 8
... DEFECTIVE OR EMPTY? MAKE SURE THE PAPER TYPE SETTING MATCHES THE PAPER LOADED IN THE TRAY From Print Properties, change the Paper Type setting to Windows users only. Note: This solution applies to match the paper loaded in the tray. Try one or more of the print cartridge: 1 Remove the specified...
... DEFECTIVE OR EMPTY? MAKE SURE THE PAPER TYPE SETTING MATCHES THE PAPER LOADED IN THE TRAY From Print Properties, change the Paper Type setting to Windows users only. Note: This solution applies to match the paper loaded in the tray. Try one or more of the print cartridge: 1 Remove the specified...

User's Guide
Page 4
... ...54 Supported paper types...55 Supported paper weights...56 Paper capacities...56 Printing 58 Installing printer software...58 Printing a document from Windows...58 Printing a document from a Macintosh computer 58 Printing the configuration page...58 Printing the demo page...59 Using Secure printing...59... a print job...60 Canceling a print job from the printer control panel ...60 Canceling a print job from the Windows taskbar ...61 Canceling a print job from the Windows desktop...61 Canceling a print job from Mac OS X...61 Copying 62 Making a copy...62 Customizing copy settings...63 ...
... ...54 Supported paper types...55 Supported paper weights...56 Paper capacities...56 Printing 58 Installing printer software...58 Printing a document from Windows...58 Printing a document from a Macintosh computer 58 Printing the configuration page...58 Printing the demo page...59 Using Secure printing...59... a print job...60 Canceling a print job from the printer control panel ...60 Canceling a print job from the Windows taskbar ...61 Canceling a print job from the Windows desktop...61 Canceling a print job from Mac OS X...61 Copying 62 Making a copy...62 Customizing copy settings...63 ...
User's Guide
Page 5
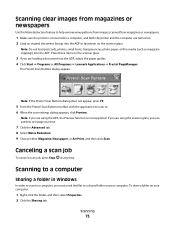
... computer...71 Scanning clear images from magazines or newspapers 73 Canceling a scan job...73 Scanning to a computer...73 Sharing a folder in Windows...73 Creating a computer address using Address Book Editor 74 Creating a computer address using the Embedded Web Server 75 Setting up scanning to ...address...81 Customizing the default scan settings from the printer control panel 81 Adjusting the auto exposure of scanned images ...81 Adjusting the color saturation of a scanned image ...82 Adjusting the image compression of a scanned image 82 Adjusting the scan resolution ...82 Adjusting the ...
... computer...71 Scanning clear images from magazines or newspapers 73 Canceling a scan job...73 Scanning to a computer...73 Sharing a folder in Windows...73 Creating a computer address using Address Book Editor 74 Creating a computer address using the Embedded Web Server 75 Setting up scanning to ...address...81 Customizing the default scan settings from the printer control panel 81 Adjusting the auto exposure of scanned images ...81 Adjusting the color saturation of a scanned image ...82 Adjusting the image compression of a scanned image 82 Adjusting the scan resolution ...82 Adjusting the ...
User's Guide
Page 31
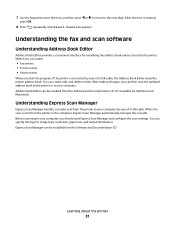
... to your computer by way of a USB cable. Understanding the fax and scan software Understanding Address Book Editor Address Book Editor provides a convenient interface for Windows and Macintosh. When the scan is connected by way of a USB cable, the Address Book Editor reads the printer address book. It is entered, press...
... to your computer by way of a USB cable. Understanding the fax and scan software Understanding Address Book Editor Address Book Editor provides a convenient interface for Windows and Macintosh. When the scan is connected by way of a USB cable, the Address Book Editor reads the printer address book. It is entered, press...

User's Guide
Page 51
... Paper and specialty media guide 51 Have metal clasps, string ties, or folding bars - Have windows, holes, perforations, cutouts, or embossing - Have any way - Using envelopes Print samples on the... for use envelopes made from sticking together. • We recommend Lexmark part number 12A8240 for letter-size and Lexmark part number 12A8241 for A4-size transparencies. When printing on envelopes:...finishes • Adjust the width guide to 105 g/m2 (28 lb bond) weight for laser printers. Load them with the manufacturer or vendor to ensure the envelopes can withstand temperatures up...
... Paper and specialty media guide 51 Have metal clasps, string ties, or folding bars - Have windows, holes, perforations, cutouts, or embossing - Have any way - Using envelopes Print samples on the... for use envelopes made from sticking together. • We recommend Lexmark part number 12A8240 for letter-size and Lexmark part number 12A8241 for A4-size transparencies. When printing on envelopes:...finishes • Adjust the width guide to 105 g/m2 (28 lb bond) weight for laser printers. Load them with the manufacturer or vendor to ensure the envelopes can withstand temperatures up...

User's Guide
Page 58
... or repeatedly until Information Pages appears, and then press OK. 4 Press or repeatedly until Configuration appears, and then press OK. Printing 58 Printing a document from Windows 1 With a document open the online Help for more information, see all of paper and specialty media can affect how reliably documents print. Click Properties, Preferences...
... or repeatedly until Information Pages appears, and then press OK. 4 Press or repeatedly until Configuration appears, and then press OK. Printing 58 Printing a document from Windows 1 With a document open the online Help for more information, see all of paper and specialty media can affect how reliably documents print. Click Properties, Preferences...
User's Guide
Page 61
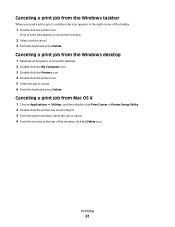
... When you are printing to. 3 From the printer window, select the job to cancel. 4 From the icon bar at the top of print jobs appears in the right corner of the taskbar. 1 Double-click ... the printer you send a job to print, a small printer icon appears in the printer window. 2 Select a job to cancel. 3 From the keyboard, press Delete. Printing 61 A list of the window, click the Delete icon. Canceling a print job from the Windows desktop 1 Minimize all programs to reveal the desktop. 2 Double-click the My Computer...
... When you are printing to. 3 From the printer window, select the job to cancel. 4 From the icon bar at the top of print jobs appears in the right corner of the taskbar. 1 Double-click ... the printer you send a job to print, a small printer icon appears in the printer window. 2 Select a job to cancel. 3 From the keyboard, press Delete. Printing 61 A list of the window, click the Delete icon. Canceling a print job from the Windows desktop 1 Minimize all programs to reveal the desktop. 2 Double-click the My Computer...
User's Guide
Page 72
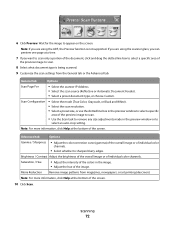
... only a portion of the document, click and drag the dotted line box to appear on the screen. Saturation / Hue • Adjust the intensity of the colors in the image. • Adjust the hue of the preview image to scan. • Use the Scan task to remove any size adjustments made in... the preview window to sharpen blurry edges. Wait for the image to select a specific area of the screen. 10 Click Scan. 6 Click Preview. Note: For more information, click...
... only a portion of the document, click and drag the dotted line box to appear on the screen. Saturation / Hue • Adjust the intensity of the colors in the image. • Adjust the hue of the preview image to scan. • Use the Scan task to remove any size adjustments made in... the preview window to sharpen blurry edges. Wait for the image to select a specific area of the screen. 10 Click Scan. 6 Click Preview. Note: For more information, click...
User's Guide
Page 73
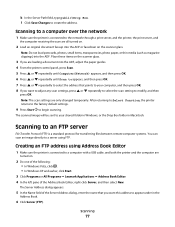
... your computer: 1 Right-click the folder, and then select Properties. 2 Click the Sharing tab. Scan Buttons dialog appears. PageManager. Scanning to a computer Sharing a folder in Windows In order to scan to a computer, you are loading a document into the ADF. Note: If the Presto! If you must send the files to . 6 When..., transparencies, photo paper, or thin media (such as magazine clippings) into the ADF, adjust the paper guides. 4 Click Start ΠPrograms or All Programs ΠLexmark Applications ΠPresto!
... your computer: 1 Right-click the folder, and then select Properties. 2 Click the Sharing tab. Scan Buttons dialog appears. PageManager. Scanning to a computer Sharing a folder in Windows In order to scan to a computer, you are loading a document into the ADF. Note: If the Presto! If you must send the files to . 6 When..., transparencies, photo paper, or thin media (such as magazine clippings) into the ADF, adjust the paper guides. 4 Click Start ΠPrograms or All Programs ΠLexmark Applications ΠPresto!
User's Guide
Page 74
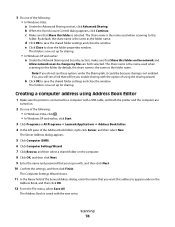
...Address Book is not enabled. Scanning 74 The Share name is the name used when scanning to save the shared folder settings and close the window. If so, you will let you want this folder is the same as the folder name. b When the User Account Control dialog appears... 7 Click Browse, and then select a shared folder on . 2 Do one of the following : • In Windows Vista, click . • In Windows XP and earlier, click Start. 3 Click Programs or All Programs Œ Lexmark Applications Œ Address Book Editor. 4 In the left pane of the Address Book Editor, right-click Server, and...
...Address Book is not enabled. Scanning 74 The Share name is the name used when scanning to save the shared folder settings and close the window. If so, you will let you want this folder is the same as the folder name. b When the User Account Control dialog appears... 7 Click Browse, and then select a shared folder on . 2 Do one of the following : • In Windows Vista, click . • In Windows XP and earlier, click Start. 3 Click Programs or All Programs Œ Lexmark Applications Œ Address Book Editor. 4 In the left pane of the Address Book Editor, right-click Server, and...
User's Guide
Page 75
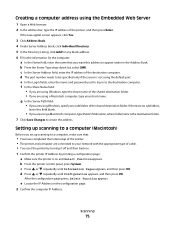
... the IP Address on and Select Function appears. f In the Share Name field: • If you are using Windows, type the share name of the shared destination folder. • If you are using Windows, specify any blank address. 6 Fill in the information for any subfolders of the shared destination folder. d Press or...
... the IP Address on and Select Function appears. f In the Share Name field: • If you are using Windows, type the share name of the shared destination folder. • If you are using Windows, specify any blank address. 6 Fill in the information for any subfolders of the shared destination folder. d Press or...
User's Guide
Page 76
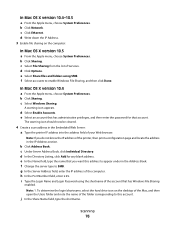
...shortname, select the hard drive icon on the computer: In Mac OS X version 10.5 a From the Apple menu, choose System Preferences. c Select Windows Sharing. e Select an account that has administrative privileges, and then enter the password for any blank address. f Change the server type to enable... Windows File Sharing, and then click Done. g In the Server Address field, enter the IP address of Services. d Select Enable Accounts. The ...
...shortname, select the hard drive icon on the computer: In Mac OS X version 10.5 a From the Apple menu, choose System Preferences. c Select Windows Sharing. e Select an account that has administrative privileges, and then enter the password for any blank address. f Change the server type to enable... Windows File Sharing, and then click Done. g In the Server Address field, enter the IP address of Services. d Select Enable Accounts. The ...
User's Guide
Page 77
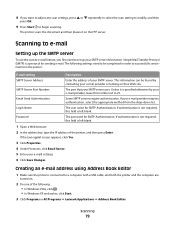
...and then press OK. 8 If you want to adjust any scan settings, press or repeatedly to select the scan setting to your shared folder in Windows, or the Drop Box folder in the Address Book. 6 Click Server (FTP). Place these items on the scanner glass. Scanning 77 Note: The... scan settings are turned on. 2 Do one of the following: • In Windows Vista, click . • In Windows XP and earlier, click Start. 3 Click Programs or All Programs Œ Lexmark Applications Œ Address Book Editor. 4 In the left pane of the Server Address dialog, enter the name...
...and then press OK. 8 If you want to adjust any scan settings, press or repeatedly to select the scan setting to your shared folder in Windows, or the Drop Box folder in the Address Book. 6 Click Server (FTP). Place these items on the scanner glass. Scanning 77 Note: The... scan settings are turned on. 2 Do one of the following: • In Windows Vista, click . • In Windows XP and earlier, click Start. 3 Click Programs or All Programs Œ Lexmark Applications Œ Address Book Editor. 4 In the left pane of the Server Address dialog, enter the name...
User's Guide
Page 79
8 If you first need to successfully send email from the drop-down list. The following : • In Windows Vista, click . • In Windows XP and earlier, click Start. 3 Click Programs or All Programs Œ Lexmark Applications Œ Address Book Editor. Email Send Authentication Some SMTP servers require authentication. If authentication is not required, this...
8 If you first need to successfully send email from the drop-down list. The following : • In Windows Vista, click . • In Windows XP and earlier, click Start. 3 Click Programs or All Programs Œ Lexmark Applications Œ Address Book Editor. Email Send Authentication Some SMTP servers require authentication. If authentication is not required, this...
User's Guide
Page 88
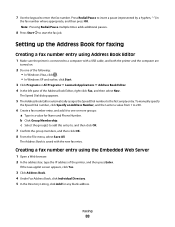
... from 1 to 200. 6 Create a fax number entry, and add it to one of the following: • In Windows Vista, click . • In Windows XP and earlier, click Start. 3 Click Programs or All Programs Œ Lexmark Applications Œ Address Book Editor. 4 In the left pane of the printer, and then press Enter. If the...
... from 1 to 200. 6 Create a fax number entry, and add it to one of the following: • In Windows Vista, click . • In Windows XP and earlier, click Start. 3 Click Programs or All Programs Œ Lexmark Applications Œ Address Book Editor. 4 In the left pane of the printer, and then press Enter. If the...

User's Guide
Page 89
... this address to the ten One Touch Buttons found on . 2 Do one of the following: • In Windows Vista, click . • In Windows XP and earlier, click Start. 3 Click Programs or All Programs Œ Lexmark Applications Œ Address Book Editor. 4 In the left side of the screen, click Add to add them to...
... this address to the ten One Touch Buttons found on . 2 Do one of the following: • In Windows Vista, click . • In Windows XP and earlier, click Start. 3 Click Programs or All Programs Œ Lexmark Applications Œ Address Book Editor. 4 In the left side of the screen, click Add to add them to...
User's Guide
Page 174
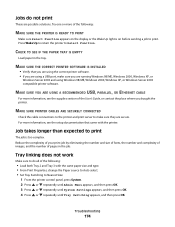
... or more information, see the setup documentation that you are using the correct printer software. • If you are using Windows 98/ME, Windows 2000, Windows XP, or Windows Server 2003 compatible printer software. MAKE SURE YOU ARE USING A RECOMMENDED USB, PARALLEL, OR ETHERNET CABLE For more of the...number and complexity of images, and the number of the User's Guide, or contact the place where you are running Windows 98/ME, Windows 2000, Windows XP, or Windows Server 2003 and using a USB port, make sure they are possible solutions. Troubleshooting 174 MAKE SURE PRINTER CABLES ARE ...
... or more information, see the setup documentation that you are using the correct printer software. • If you are using Windows 98/ME, Windows 2000, Windows XP, or Windows Server 2003 compatible printer software. MAKE SURE YOU ARE USING A RECOMMENDED USB, PARALLEL, OR ETHERNET CABLE For more of the...number and complexity of images, and the number of the User's Guide, or contact the place where you are running Windows 98/ME, Windows 2000, Windows XP, or Windows Server 2003 and using a USB port, make sure they are possible solutions. Troubleshooting 174 MAKE SURE PRINTER CABLES ARE ...
User's Guide
Page 186
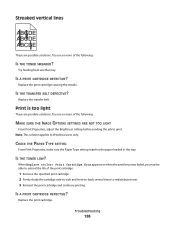
... the life of the print cartridge: 1 Remove the specified print cartridge. 2 Firmly shake the cartridge side-to-side and front-to-back several times to Windows users only. IS A PRINT CARTRIDGE DEFECTIVE? Replace the transfer belt. CHECK THE PAPER TYPE SETTING From Print Properties, make sure the Paper Type setting matches...
... the life of the print cartridge: 1 Remove the specified print cartridge. 2 Firmly shake the cartridge side-to-side and front-to-back several times to Windows users only. IS A PRINT CARTRIDGE DEFECTIVE? Replace the transfer belt. CHECK THE PAPER TYPE SETTING From Print Properties, make sure the Paper Type setting matches...


