User's Guide
Page 3
... service ...37 Understanding the control panel...37 Using the control panel ...37 Saving settings...40 Installing another language control panel...41 Installing the printer software...42 Installing the optional XPS driver (Windows Vista users only 42 Understanding the printer software...43 Turning printing voice notification on or off...46 Security Information...46 General networking 47...
... service ...37 Understanding the control panel...37 Using the control panel ...37 Saving settings...40 Installing another language control panel...41 Installing the printer software...42 Installing the optional XPS driver (Windows Vista users only 42 Understanding the printer software...43 Turning printing voice notification on or off...46 Security Information...46 General networking 47...
User's Guide
Page 7
...113 Setting up a fax footer ...114 Blocking junk faxes...115 Blocking unwanted changes to fax settings...115 Using the Fax Solutions Software ...116 Setting up a dialing prefix ...117 Setting the distinctive ring...117 Setting the number of rings before receiving a fax ...Printing fax activity reports...119 Maintaining the printer 120 Replacing print cartridges...120 Installing print cartridges...120 Removing a used print cartridge ...121 Refilling print cartridges...122 Using genuine Lexmark print cartridges...122 Aligning print cartridges...122 Cleaning the print cartridge nozzles...123...
...113 Setting up a fax footer ...114 Blocking junk faxes...115 Blocking unwanted changes to fax settings...115 Using the Fax Solutions Software ...116 Setting up a dialing prefix ...117 Setting the distinctive ring...117 Setting the number of rings before receiving a fax ...Printing fax activity reports...119 Maintaining the printer 120 Replacing print cartridges...120 Installing print cartridges...120 Removing a used print cartridge ...121 Refilling print cartridges...122 Using genuine Lexmark print cartridges...122 Aligning print cartridges...122 Cleaning the print cartridge nozzles...123...
User's Guide
Page 8
... appears on the display...128 Power button is not lit ...128 Software does not install...129 Page does not print...130 Solving printer communication problems ...131 Understanding Warning levels ...132 Removing and reinstalling the software ...132 Enabling the USB port...132 Print troubleshooting...133 Improving print ... too quickly ...138 A blank or incorrect page prints...138 Characters on printout are missing or unexpected ...138 Colors on printout are faded or differ from colors on the screen 139 Copied item does not match the original item...139 Glossy photo paper or transparencies stick ...
... appears on the display...128 Power button is not lit ...128 Software does not install...129 Page does not print...130 Solving printer communication problems ...131 Understanding Warning levels ...132 Removing and reinstalling the software ...132 Enabling the USB port...132 Print troubleshooting...133 Improving print ... too quickly ...138 A blank or incorrect page prints...138 Characters on printout are missing or unexpected ...138 Colors on printout are faded or differ from colors on the screen 139 Copied item does not match the original item...139 Glossy photo paper or transparencies stick ...
User's Guide
Page 14
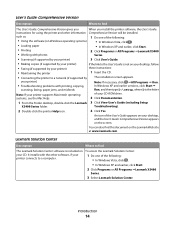
... View User's Guide (including Setup X5400 Series folder. You can also find The Lexmark Solution Center software is included on To access the Lexmark Solution Center: your CD. It installs with the other information Comprehensive Version will be installed. your printer) • Troubleshooting problems with photos Series. • Scanning (if supported by your printer) 3 Click...
... View User's Guide (including Setup X5400 Series folder. You can also find The Lexmark Solution Center software is included on To access the Lexmark Solution Center: your CD. It installs with the other information Comprehensive Version will be installed. your printer) • Troubleshooting problems with photos Series. • Scanning (if supported by your printer) 3 Click...
User's Guide
Page 16
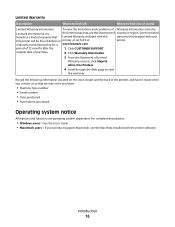
... ready when you contact us so that shipped with the printer software. Record the following information (located on the store receipt and ...country or region. this limited warranty, see the Mac Help installed with your product supports Macintosh, see the Statement of Limited Warranty section, click Inkjet & All-In-One Printers. 4 Scroll through the Web... included with this printer will be free of Warranty information varies by Lexmark International, Inc. materials and workmanship for a www.lexmark.com. For complete descriptions: • Windows users-See the User's...
... ready when you contact us so that shipped with the printer software. Record the following information (located on the store receipt and ...country or region. this limited warranty, see the Mac Help installed with your product supports Macintosh, see the Statement of Limited Warranty section, click Inkjet & All-In-One Printers. 4 Scroll through the Web... included with this printer will be free of Warranty information varies by Lexmark International, Inc. materials and workmanship for a www.lexmark.com. For complete descriptions: • Windows users-See the User's...
User's Guide
Page 18
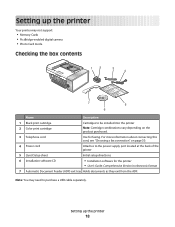
... printer Your printer may need to be installed into the printer 2 Color print cartridge Note: Cartridge combinations vary depending on page 30. 4 Power cord Attaches to the power supply port located at the back of the printer 5 Quick Setup sheet Initial setup directions 6 Installation software CD • Installation software for faxing. For more information about connecting...
... printer Your printer may need to be installed into the printer 2 Color print cartridge Note: Cartridge combinations vary depending on page 30. 4 Power cord Attaches to the power supply port located at the back of the printer 5 Quick Setup sheet Initial setup directions 6 Installation software CD • Installation software for faxing. For more information about connecting...
User's Guide
Page 42
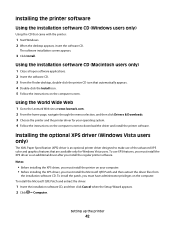
The software installation screen appears. 3 Click Install. To use of the advanced XPS color and graphics features that came with the printer: 1 Start Windows. 2 When the desktop appears, insert the software CD. Setting up the printer 42 Installing the optional XPS ...installation software CD (Macintosh users only) 1 Close all open software applications. 2 Insert the software CD. 3 From the Finder desktop, double-click the printer CD icon that automatically appears. 4 Double-click the Install icon. 5 Follow the instructions on the computer screen to the Lexmark Web site at www.lexmark...
The software installation screen appears. 3 Click Install. To use of the advanced XPS color and graphics features that came with the printer: 1 Start Windows. 2 When the desktop appears, insert the software CD. Setting up the printer 42 Installing the optional XPS ...installation software CD (Macintosh users only) 1 Close all open software applications. 2 Insert the software CD. 3 From the Finder desktop, double-click the printer CD icon that automatically appears. 4 Double-click the Install icon. 5 Follow the instructions on the computer screen to the Lexmark Web site at www.lexmark...
User's Guide
Page 43
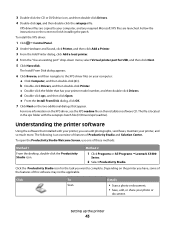
...disk. b Double-click Drivers, and then double-click Printer. c Double-click the folder that appear. For more . Understanding the printer software Using the software that installed with the setupxps batch file (D:\Drivers\xps\readme). 3 Double-click the CD or DVD drive icon, and then double-click Drivers. 4 ...: Method 1 From the desktop, double-click the Productivity Studio icon. Method 2 1 Click Programs or All Programs ŒLexmark X5400 Series. 2 Select Productivity Studio. XPS driver files are launched. d Double-click xps, and then click Open. Depending on the...
...disk. b Double-click Drivers, and then double-click Printer. c Double-click the folder that appear. For more . Understanding the printer software Using the software that installed with the setupxps batch file (D:\Drivers\xps\readme). 3 Double-click the CD or DVD drive icon, and then double-click Drivers. 4 ...: Method 1 From the desktop, double-click the Productivity Studio icon. Method 2 1 Click Programs or All Programs ŒLexmark X5400 Series. 2 Select Productivity Studio. XPS driver files are launched. d Double-click xps, and then click Open. Depending on the...
User's Guide
Page 45
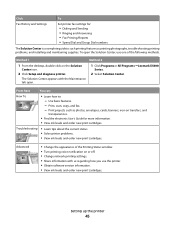
... with the Maintenance tab open the Solution Center, use the printer. • Obtain software version information. • View ink levels and order new print cartridges. From here You...Solution Center icon. 2 Click Setup and diagnose printer. 1 Click Programs or All Programs ŒLexmark X5400 Series. 2 Select Solution Center. Troubleshooting • Learn tips about the current status. ...projects such as printing photographs, troubleshooting printing problems, and installing and maintaining supplies. Setting up the printer 45 Advanced • Change the appearance of the following...
... with the Maintenance tab open the Solution Center, use the printer. • Obtain software version information. • View ink levels and order new print cartridges. From here You...Solution Center icon. 2 Click Setup and diagnose printer. 1 Click Programs or All Programs ŒLexmark X5400 Series. 2 Select Solution Center. Troubleshooting • Learn tips about the current status. ...projects such as printing photographs, troubleshooting printing problems, and installing and maintaining supplies. Setting up the printer 45 Advanced • Change the appearance of the following...
User's Guide
Page 46
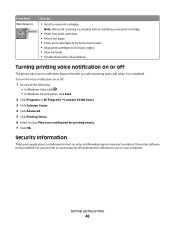
...8226; Troubleshoot other ink problems. Turning printing voice notification on or off The printer has a voice notification feature that tells you about the printer software being installed. To turn the voice notification on or off : 1 Do one of the following: • In Windows Vista, click . •... In Windows XP and earlier, click Start. 2 Click Programs or All Programs ŒLexmark X5400 Series. 3 Click Solution Center. 4 Click Advanced. 5 Click Printing Status. 6...
...8226; Troubleshoot other ink problems. Turning printing voice notification on or off The printer has a voice notification feature that tells you about the printer software being installed. To turn the voice notification on or off : 1 Do one of the following: • In Windows Vista, click . •... In Windows XP and earlier, click Start. 2 Click Programs or All Programs ŒLexmark X5400 Series. 3 Click Solution Center. 4 Click Advanced. 5 Click Printing Status. 6...
User's Guide
Page 47
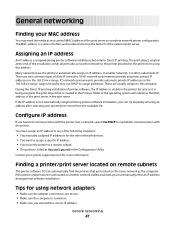
... situations: • You manually assigned IP addresses for Direct IP printing. You must manually enter an IP address during printer software installation. The print object that are located on the same network as Unconfigured in the Configuration Utility. Finding a printer/print server ...list only as it is turned on. • Make sure you can automatically find the printers that is not automatically assigned during printer software installation, but only for the other network devices. • You want to assign a specific IP address. • You move the printer ...
... situations: • You manually assigned IP addresses for Direct IP printing. You must manually enter an IP address during printer software installation. The print object that are located on the same network as Unconfigured in the Configuration Utility. Finding a printer/print server ...list only as it is turned on. • Make sure you can automatically find the printers that is not automatically assigned during printer software installation, but only for the other network devices. • You want to assign a specific IP address. • You move the printer ...
User's Guide
Page 48
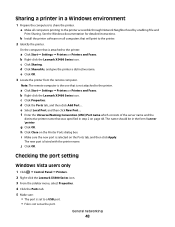
... ΠPrinters or Printers and Faxes. d Click Shared As, and give the printer a distinctive name. b Right-click the Lexmark X5400 Series icon. b Install the printer software on the Printer Ports dialog box. c Click Sharing. a Click Start ΠSettings ΠPrinters or Printers and Faxes.... e Select Local Port, and then click New Port.... b Right-click the Lexmark X5400 Series icon. d Click the Ports tab...
... ΠPrinters or Printers and Faxes. d Click Shared As, and give the printer a distinctive name. b Right-click the Lexmark X5400 Series icon. b Install the printer software on the Printer Ports dialog box. c Click Sharing. a Click Start ΠSettings ΠPrinters or Printers and Faxes.... e Select Local Port, and then click New Port.... b Right-click the Lexmark X5400 Series icon. d Click the Ports tab...
User's Guide
Page 49
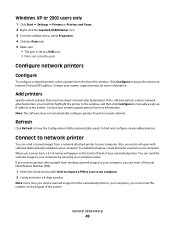
... name. Click Configure to your computer. Add printers Specify remote subnets that is already installed on the Control Panel of the printer. Refresh Click Refresh to have direct network attached...users only 1 Click Start ΠSettings ΠPrinters or Printers and Faxes. 2 Right-click the Lexmark X5400 Series icon. 3 From the sidebar menu, select Properties. 4 Click the Ports tab. 5 Make ...to your computer by selecting your system support person for more information. Note: The software does not automatically configure printers found on the keypad of your computer. If you...
... name. Click Configure to your computer. Add printers Specify remote subnets that is already installed on the Control Panel of the printer. Refresh Click Refresh to have direct network attached...users only 1 Click Start ΠSettings ΠPrinters or Printers and Faxes. 2 Right-click the Lexmark X5400 Series icon. 3 From the sidebar menu, select Properties. 4 Click the Ports tab. 5 Make ...to your computer by selecting your system support person for more information. Note: The software does not automatically configure printers found on the keypad of your computer. If you...
User's Guide
Page 94
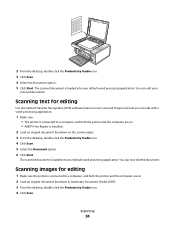
... sure the printer is installed. 2 Load an original document facedown on . 2 Load an original document facedown in Automatic Document Feeder (ADF). 3 From the desktop, double-click the Productivity Studio icon. 4 Click Scan. You can edit your scanned document. Scanning images for editing Use the Optical Character Recognition (OCR) software feature to turn...
... sure the printer is installed. 2 Load an original document facedown on . 2 Load an original document facedown in Automatic Document Feeder (ADF). 3 From the desktop, double-click the Productivity Studio icon. 4 Click Scan. You can edit your scanned document. Scanning images for editing Use the Optical Character Recognition (OCR) software feature to turn...
User's Guide
Page 129
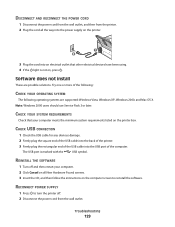
... end of the USB cable into an electrical outlet that your computer meets the minimum system requirements listed on the printer box. Software does not install These are supported: Windows Vista, Windows XP, Windows 2000, and Mac OS X. Troubleshooting 129 RECONNECT POWER SUPPLY 1 Press to...computer. CHECK YOUR SYSTEM REQUIREMENTS Check that other electrical devices have been using. 4 If the light is marked with the USB symbol. REINSTALL THE SOFTWARE 1 Turn off . 2 Disconnect the power cord from the printer. 2 Plug the cord all New Hardware Found screens. 3 Insert the CD...
... end of the USB cable into an electrical outlet that your computer meets the minimum system requirements listed on the printer box. Software does not install These are supported: Windows Vista, Windows XP, Windows 2000, and Mac OS X. Troubleshooting 129 RECONNECT POWER SUPPLY 1 Press to...computer. CHECK YOUR SYSTEM REQUIREMENTS Check that other electrical devices have been using. 4 If the light is marked with the USB symbol. REINSTALL THE SOFTWARE 1 Turn off . 2 Disconnect the power cord from the printer. 2 Plug the cord all New Hardware Found screens. 3 Insert the CD...
User's Guide
Page 130
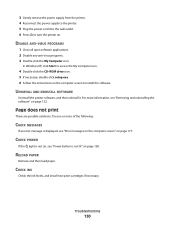
...message is not lit" on . CHECK INK Check the ink levels, and install new print cartridges if necessary. Try one or more information, see "Error messages on the computer screen" on page 177. UNINSTALL AND REINSTALL SOFTWARE Uninstall the printer software, and then reinstall it. CHECK POWER If the light is not on..., see "Power button is displayed, see "Removing and reinstalling the software" on the computer screen to access the My Computer icon. 4 Double-click the CD-ROM drive icon. 5 If necessary, double-click setup.exe. 6 Follow ...
...message is not lit" on . CHECK INK Check the ink levels, and install new print cartridges if necessary. Try one or more information, see "Error messages on the computer screen" on page 177. UNINSTALL AND REINSTALL SOFTWARE Uninstall the printer software, and then reinstall it. CHECK POWER If the light is not on..., see "Power button is displayed, see "Removing and reinstalling the software" on the computer screen to access the My Computer icon. 4 Double-click the CD-ROM drive icon. 5 If necessary, double-click setup.exe. 6 Follow ...
User's Guide
Page 132
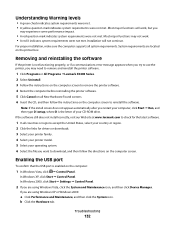
...Windows Vista, click Œ Control Panel. Installation will work . • A red X indicates system requirements were not met. If the software still does not install correctly, visit our Web site at www.lexmark.com to reinstall the software. If you may need to remove and reinstall... the printer software. 1 Click Programs or All Programs ŒLexmark X5400 Series. 2 Select Uninstall. 3 Follow...
...Windows Vista, click Œ Control Panel. Installation will work . • A red X indicates system requirements were not met. If the software still does not install correctly, visit our Web site at www.lexmark.com to reinstall the software. If you may need to remove and reinstall... the printer software. 1 Click Programs or All Programs ŒLexmark X5400 Series. 2 Select Uninstall. 3 Follow...
User's Guide
Page 135
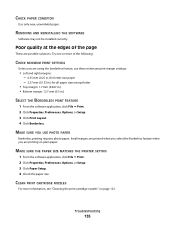
...requires photo paper. CLEAN PRINT CARTRIDGE NOZZLES For more of the page These are possible solutions. REMOVING AND REINSTALLING THE SOFTWARE Software may not be installed correctly. Try one or more information, see "Cleaning the print cartridge nozzles" on plain paper. MAKE SURE THE PAPER... SIZE MATCHES THE PRINTER SETTING 1 From the software application, click File ΠPrint. 2 Click Properties, Preferences, Options, or Setup. 3 Click Paper Setup. 4...
...requires photo paper. CLEAN PRINT CARTRIDGE NOZZLES For more of the page These are possible solutions. REMOVING AND REINSTALLING THE SOFTWARE Software may not be installed correctly. Try one or more information, see "Cleaning the print cartridge nozzles" on plain paper. MAKE SURE THE PAPER... SIZE MATCHES THE PRINTER SETTING 1 From the software application, click File ΠPrint. 2 Click Properties, Preferences, Options, or Setup. 3 Click Paper Setup. 4...
User's Guide
Page 137
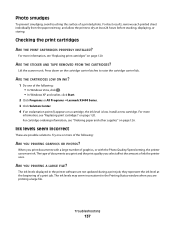
... 120. Photo smudges To prevent smudging, avoid touching the surface of ink the printer uses. Install a new cartridge. Ink levels seem incorrect These are printing a large file. they represent the...click . • In Windows XP and earlier, click Start. 2 Click Programs or All Programs ŒLexmark X5400 Series. 3 Click Solution Center. 4 If an exclamation point (!) appears on page 120. Troubleshooting 137 ...to raise the cartridge carrier lids. The ink levels may seem inconsistent in the printer software are not updated during a print job; For more ink. For more of documents ...
... 120. Photo smudges To prevent smudging, avoid touching the surface of ink the printer uses. Install a new cartridge. Ink levels seem incorrect These are printing a large file. they represent the...click . • In Windows XP and earlier, click Start. 2 Click Programs or All Programs ŒLexmark X5400 Series. 3 Click Solution Center. 4 If an exclamation point (!) appears on page 120. Troubleshooting 137 ...to raise the cartridge carrier lids. The ink levels may seem inconsistent in the printer software are not updated during a print job; For more ink. For more of documents ...
User's Guide
Page 199
...nozzles, cleaning 123 print cartridges aligning 122 cleaning 123 installing 120 ordering 126 preserving 124 refilling 122 removing 121 using genuine Lexmark 122 wiping 123 print is dark or smudged 141 print...media 157 printer plugged in but does not print 149 printer receives blank fax 168 printer software installing 42 reinstalling 132 removing 132 updating 151 printer status checking 143 printing all photos from a...removable storage device using the computer 79 photos from the Productivity Studio 80 photos using color effects 85 photos using the proof sheet 81 postcards 61 poster 62 posters 62 ...
...nozzles, cleaning 123 print cartridges aligning 122 cleaning 123 installing 120 ordering 126 preserving 124 refilling 122 removing 121 using genuine Lexmark 122 wiping 123 print is dark or smudged 141 print...media 157 printer plugged in but does not print 149 printer receives blank fax 168 printer software installing 42 reinstalling 132 removing 132 updating 151 printer status checking 143 printing all photos from a...removable storage device using the computer 79 photos from the Productivity Studio 80 photos using color effects 85 photos using the proof sheet 81 postcards 61 poster 62 posters 62 ...


