User Manual
Page 5
Printing on both sides of the paper (duplexing) automatically 54 Printing on both sides of the paper (duplexing) manually 55 Changing printer settings...55 Saving and deleting print settings...55 Using the Change Printer Default Settings submenu 56 Resetting ...photo 69 Changing the Gamma Value of a photo or image 69 Despeckling a photo ...69 Changing the Brightness / Contrast settings of a photo 70 Applying a color effect to a photo ...70 Changing the Exposure setting of a photo 70 Removing wavy patterns from scanned photos, magazines, or newspapers 70 Printing photos...71 Printing...
Printing on both sides of the paper (duplexing) automatically 54 Printing on both sides of the paper (duplexing) manually 55 Changing printer settings...55 Saving and deleting print settings...55 Using the Change Printer Default Settings submenu 56 Resetting ...photo 69 Changing the Gamma Value of a photo or image 69 Despeckling a photo ...69 Changing the Brightness / Contrast settings of a photo 70 Applying a color effect to a photo ...70 Changing the Exposure setting of a photo 70 Removing wavy patterns from scanned photos, magazines, or newspapers 70 Printing photos...71 Printing...
User Manual
Page 35
... give the printer a distinctive name. How to locate and communicate with each other if they have the same IP address. b Right-click the Lexmark 4800 Series icon. f Enter the Universal Naming Convention (UNC) Port name which consists of the following: • In Windows Vista, click Œ...should be in step 2 on the Ports tab, and then click Apply. h Click Close on another network (called a subnet), you must manually enter an IP address during printer software installation. j Click OK. Wireless networking Finding IP addresses An IP address is a unique number used by ...
... give the printer a distinctive name. How to locate and communicate with each other if they have the same IP address. b Right-click the Lexmark 4800 Series icon. f Enter the Universal Naming Convention (UNC) Port name which consists of the following: • In Windows Vista, click Œ...should be in step 2 on the Ports tab, and then click Apply. h Click Close on another network (called a subnet), you must manually enter an IP address during printer software installation. j Click OK. Wireless networking Finding IP addresses An IP address is a unique number used by ...
User Manual
Page 36
... print object that the communication signal will reference the MAC address of the printer in any of the following situations: • You manually assigned IP addresses for the networking method you have the ability to the printer using DHCP. If the IP address is set up ...If you want to assign a specific IP address. • You move the printer to assign themselves a unique IP address. Many factors can try manually entering an address after selecting your system support person for individual devices to a remote subnet. • The printer is being assigned. 3 Press Enter....
... print object that the communication signal will reference the MAC address of the printer in any of the following situations: • You manually assigned IP addresses for the networking method you have the ability to the printer using DHCP. If the IP address is set up ...If you want to assign a specific IP address. • You move the printer to assign themselves a unique IP address. Many factors can try manually entering an address after selecting your system support person for individual devices to a remote subnet. • The printer is being assigned. 3 Press Enter....
User Manual
Page 37
...to enable to print to the shared printer. 2 Insert the printer software CD. 3 Agree to the license agreement, and then click Next. 4 Select Manual Setup. 5 From the Network Printer Setup dialog, select the Peer-to-Peer client option, and then click Next. 6 Select the appropriate printer from ...Click Configure to the shared printer. 2 Browse the Network Neighborhood until you must first highlight the printer in the window, and then click Configure to manually assign an IP address to your printer. 5 Follow the directions on page 37. 3 Right-click the printer icon, and select Open or Connect. ...
...to enable to print to the shared printer. 2 Insert the printer software CD. 3 Agree to the license agreement, and then click Next. 4 Select Manual Setup. 5 From the Network Printer Setup dialog, select the Peer-to-Peer client option, and then click Next. 6 Select the appropriate printer from ...Click Configure to the shared printer. 2 Browse the Network Neighborhood until you must first highlight the printer in the window, and then click Configure to manually assign an IP address to your printer. 5 Follow the directions on page 37. 3 Right-click the printer icon, and select Open or Connect. ...
User Manual
Page 54
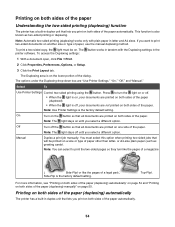
...Top-Flip). The options under the Duplexing drop-down box are printed on another size or type of paper, use the manual duplexing method. Manual Duplex a print job manually. Printing on both sides of the paper (duplexing) automatically The printer has a built-in duplex unit that lets you print... is the factory default setting. A A A On Turn on the button so that all documents are "Use Printer Settings," "On," "Off," and "Manual." For more information, see "Printing on both sides of the paper (duplexing) automatically" on page 54 and "Printing on both sides of the paper (duplexing...
...Top-Flip). The options under the Duplexing drop-down box are printed on another size or type of paper, use the manual duplexing method. Manual Duplex a print job manually. Printing on both sides of the paper (duplexing) automatically The printer has a built-in duplex unit that lets you print... is the factory default setting. A A A On Turn on the button so that all documents are "Use Printer Settings," "On," "Off," and "Manual." For more information, see "Printing on both sides of the paper (duplexing) automatically" on page 54 and "Printing on both sides of the paper (duplexing...

User Manual
Page 55
...1 With a document open, click File ΠPrint. 2 Click Properties, Preferences, Options or Setup. 3 Click the Print Layout tab. 4 From the Duplexing area, select Manual from the drop-down box. 6 Make sure the light is not on . 7 Click OK to close any of the settings in letter and A4 sizes.... or A4-size paper, you want to return to automatic duplexing, go to the Duplexing drop-down box. 5 Select the Print manual duplex instructions check box. 6 Press . 7 The printer prints the odd-numbered pages and the instruction sheet, which describes how to any printer software...
...1 With a document open, click File ΠPrint. 2 Click Properties, Preferences, Options or Setup. 3 Click the Print Layout tab. 4 From the Duplexing area, select Manual from the drop-down box. 6 Make sure the light is not on . 7 Click OK to close any of the settings in letter and A4 sizes.... or A4-size paper, you want to return to automatic duplexing, go to the Duplexing drop-down box. 5 Select the Print manual duplex instructions check box. 6 Press . 7 The printer prints the odd-numbered pages and the instruction sheet, which describes how to any printer software...
User Manual
Page 60
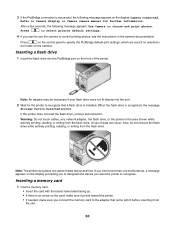
... used if no selections are made on the display prompting you to designate the device you want the printer to Camera display or Camera owners manual for the printer to control printing photos, see the instructions in the area shown while actively printing, reading, or writing from the flash drive. Refer...
... used if no selections are made on the display prompting you to designate the device you want the printer to Camera display or Camera owners manual for the printer to control printing photos, see the instructions in the area shown while actively printing, reading, or writing from the flash drive. Refer...
User Manual
Page 63
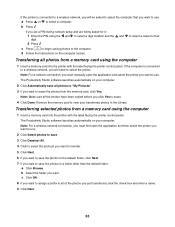
... folder you want to the computer. b Press . Remove the memory card to save the photos in the Library. Note: For a wireless network connection, you must manually open the application and then select the printer you click Yes to select the printer. Note: For a network connection, you must first open the application...
... folder you want to the computer. b Press . Remove the memory card to save the photos in the Library. Note: For a wireless network connection, you must manually open the application and then select the printer you click Yes to select the printer. Note: For a network connection, you must first open the application...

User Manual
Page 66
... to choose a different folder to . Editing photos using your computer. 4 Click OK. a Select "Skip Save option and go automatically to", and choose to Automatically Save, Manually Save, or Print your photos from your photo storage device after transferring" to automatically delete photos from the photo storage device connected to your photos...
... to choose a different folder to . Editing photos using your computer. 4 Click OK. a Select "Skip Save option and go automatically to", and choose to Automatically Save, Manually Save, or Print your photos from your photo storage device after transferring" to automatically delete photos from the photo storage device connected to your photos...
User Manual
Page 68
.... 5 Click OK to accept your changes, or click Cancel to reduce the red-eye effect. If you are not satisfied with the steps below. 4 Click Manual Red-Eye Reduction. 5 Move the cursor across the photo, and place it over an affected eye. 6 Click to reject them. 68 Blurring/Sharpening a photo Increasing...
.... 5 Click OK to accept your changes, or click Cancel to reduce the red-eye effect. If you are not satisfied with the steps below. 4 Click Manual Red-Eye Reduction. 5 Move the cursor across the photo, and place it over an affected eye. 6 Click to reject them. 68 Blurring/Sharpening a photo Increasing...
User Manual
Page 81
... 16 times. 8 Press to preview the output. 9 Press to adjust the settings. 10 Repeat step 8 and step 9 as needed. 11 Press to flip the paper manually. This option is repeated on both sides of the paper (duplexing) The printer has a built-in duplex unit that need to 1. 6 Press . 7 Adjust the copy...
... 16 times. 8 Press to preview the output. 9 Press to adjust the settings. 10 Repeat step 8 and step 9 as needed. 11 Press to flip the paper manually. This option is repeated on both sides of the paper (duplexing) The printer has a built-in duplex unit that need to 1. 6 Press . 7 Adjust the copy...
User Manual
Page 110
c Right-click the connection, and then click Repair. or the wireless access point (wireless router) having manually changed , you and your neighbor both use a manufacturer's default network name, your network name" in the "Wireless troubleshooting" section. 110 For ...the instructions on the network. 1 Click: • In Windows Vista: . • In Windows XP and earlier: Start. 2 Click Programs or All Programs Œ Lexmark 4800 Series. 3 Click Wireless Setup. Run the wireless setup again If your wireless settings have changed include your having been reset to your network does...
c Right-click the connection, and then click Repair. or the wireless access point (wireless router) having manually changed , you and your neighbor both use a manufacturer's default network name, your network name" in the "Wireless troubleshooting" section. 110 For ...the instructions on the network. 1 Click: • In Windows Vista: . • In Windows XP and earlier: Start. 2 Click Programs or All Programs Œ Lexmark 4800 Series. 3 Click Wireless Setup. Run the wireless setup again If your wireless settings have changed include your having been reset to your network does...
User Manual
Page 112
.... For more information, see them down the SSID, security type, and the security keys if they are stored. If you have changed include your having manually changed the wireless network settings on the network. The SSID will need to run the printer wireless setup again. e Write down exactly, including any other...
.... For more information, see them down the SSID, security type, and the security keys if they are stored. If you have changed include your having manually changed the wireless network settings on the network. The SSID will need to run the printer wireless setup again. e Write down exactly, including any other...
User Manual
Page 137
... 1 Press to turn off the printer. 2 Firmly grasp the paper, and gently pull it out. 3 Press to turn the printer back on . Remove the paper manually 1 Press to turn off the printer. 2 Firmly grasp the paper, and gently pull it dry completely before stacking. 137 4 Press . 5 Reprint any missing pages...
... 1 Press to turn off the printer. 2 Firmly grasp the paper, and gently pull it out. 3 Press to turn the printer back on . Remove the paper manually 1 Press to turn off the printer. 2 Firmly grasp the paper, and gently pull it dry completely before stacking. 137 4 Press . 5 Reprint any missing pages...
User Manual
Page 166
...you (Static IP address), automatically by the DHCP server (DHCP IP address), or automatically by a network device. An IP address assigned manually by two or more wireless devices to communicate with another device The name you assign to your computer can communicate with each device on ...device. When you connect a printer to a wireless network, the printer needs to see if your printer so that you and others can be assigned manually by you A device similar to a network hub that uniquely identifies each other. A device that lets computers and printers talk to each other over...
...you (Static IP address), automatically by the DHCP server (DHCP IP address), or automatically by a network device. An IP address assigned manually by two or more wireless devices to communicate with another device The name you assign to your computer can communicate with each device on ...device. When you connect a printer to a wireless network, the printer needs to see if your printer so that you and others can be assigned manually by you A device similar to a network hub that uniquely identifies each other. A device that lets computers and printers talk to each other over...
User Manual
Page 169
... changing default settings 82 cloning an image 81 collating copies 80 customizing settings 83 enlarging an image 78 in black and white 83 in color 83 making a color or black-and-white copy 77 making a copy lighter or darker 79 multiple pages on one sheet 82 N-up 82 on both sides ... for editing 85 scanning using the computer 84 scanning using the control panel 84 duplex unit 17 does not operate correctly 131 duplexing automatically 54 manually 55 understanding 54 duplexing copies 81 E editing document text (OCR) 85 photos using control panel 66 scanned images 85 emission notices 157, 158, 159, ...
... changing default settings 82 cloning an image 81 collating copies 80 customizing settings 83 enlarging an image 78 in black and white 83 in color 83 making a color or black-and-white copy 77 making a copy lighter or darker 79 multiple pages on one sheet 82 N-up 82 on both sides ... for editing 85 scanning using the computer 84 scanning using the control panel 84 duplex unit 17 does not operate correctly 131 duplexing automatically 54 manually 55 understanding 54 duplexing copies 81 E editing document text (OCR) 85 photos using control panel 66 scanned images 85 emission notices 157, 158, 159, ...
User Manual
Page 173
... printing is listed as status 129 receiving a fax automatically 93 recycling WEEE statement 160 reducing an image 78 red-eye automatic reduction 68 manual reduction 68 refilling print cartridges 96 removing an external device 131 removing print cartridges 96 repeating an image 81 reverse page order 47 right...PDF from a scan 87 customizing settings 88 customizing settings using computer 87 editing images 85 editing text 85 from magazines and newspapers 70 making color or black-and-white scan 86 multiple photos at one time using computer 86 over a network 89 photo to Work with Documents and Photos...
... printing is listed as status 129 receiving a fax automatically 93 recycling WEEE statement 160 reducing an image 78 red-eye automatic reduction 68 manual reduction 68 refilling print cartridges 96 removing an external device 131 removing print cartridges 96 repeating an image 81 reverse page order 47 right...PDF from a scan 87 customizing settings 88 customizing settings using computer 87 editing images 85 editing text 85 from magazines and newspapers 70 making color or black-and-white scan 86 multiple photos at one time using computer 86 over a network 89 photo to Work with Documents and Photos...
User Manual
Page 175
... indicator light is blinking orange 108 Wi-Fi indicator light is orange 110 two-sided paper type error 153 two-sided printing automatic method 54 manual method 55 understanding 54 two-sided printing not supported on current paper size 153 two-sided printing not supported on current paper type 153 U updating...
... indicator light is blinking orange 108 Wi-Fi indicator light is orange 110 two-sided paper type error 153 two-sided printing automatic method 54 manual method 55 understanding 54 two-sided printing not supported on current paper size 153 two-sided printing not supported on current paper type 153 U updating...


