User's Guide
Page 5
... Improving print quality...54 Aligning the print cartridge using the computer 54 Cleaning the print cartridge nozzles...54 Wiping the print cartridge nozzles and contacts 55 Preserving the print cartridge...56 Cleaning the scanner glass...56 Ordering supplies...56 Using genuine Lexmark print cartridges 56 Refilling a print cartridge...57 Recycling Lexmark products...57 Troubleshooting...58 Setup troubleshooting...58...
... Improving print quality...54 Aligning the print cartridge using the computer 54 Cleaning the print cartridge nozzles...54 Wiping the print cartridge nozzles and contacts 55 Preserving the print cartridge...56 Cleaning the scanner glass...56 Ordering supplies...56 Using genuine Lexmark print cartridges 56 Refilling a print cartridge...57 Recycling Lexmark products...57 Troubleshooting...58 Setup troubleshooting...58...
User's Guide
Page 6
... card is inserted 70 Error messages on display...70 Error messages...71 Alignment problem...71 Cartridge Error...71 Cartridge missing...72 Change paper or photo size setting 72 Clear the carrier jam...72 Clear the paper jam...72 Color ink low...72 Could not detect a proof sheet 72 Computer not connected...73 Insert...
... card is inserted 70 Error messages on display...70 Error messages...71 Alignment problem...71 Cartridge Error...71 Cartridge missing...72 Change paper or photo size setting 72 Clear the carrier jam...72 Clear the paper jam...72 Color ink low...72 Could not detect a proof sheet 72 Computer not connected...73 Insert...
User's Guide
Page 10
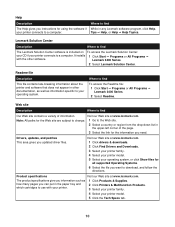
...for the Web site are subject to change. 1 Go to a computer. Product specifications Visit our Web site at www.lexmark.com. Where to find Our Web site contains a variety of the page. 3 Select the link for using the software ...if your operating system. Visit our Web site at www.lexmark.com. Visit our Web site at www.lexmark.com. 1 Click drivers & downloads. 2 Click Find Drivers and Downloads. 3 Select your printer family. 4 ...Web site Description Where to find While in the paper tray and which cartridges to a computer.
...for the Web site are subject to change. 1 Go to a computer. Product specifications Visit our Web site at www.lexmark.com. Where to find Our Web site contains a variety of the page. 3 Select the link for using the software ...if your operating system. Visit our Web site at www.lexmark.com. Visit our Web site at www.lexmark.com. 1 Click drivers & downloads. 2 Click Find Drivers and Downloads. 3 Select your printer family. 4 ...Web site Description Where to find While in the paper tray and which cartridges to a computer.
User's Guide
Page 11
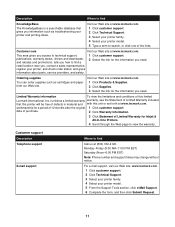
... you access to search, or click one of the links. tells you information such as cartridges and paper from our Web site. furnishes a limited warranty warranty, see the Statement of ...included that gives you how to find a 1 Click customer support. 2 Select the link for Inkjet & All-In-One Printers. 4 Scroll through the Web page to view the warranty. Customer support... Description Telephone support E-mail support Where to find Call us at www.lexmark.com. Ordering supplies You can order supplies such as troubleshooting your printer model. 5 Type a...
... you access to search, or click one of the links. tells you information such as cartridges and paper from our Web site. furnishes a limited warranty warranty, see the Statement of ...included that gives you how to find a 1 Click customer support. 2 Select the link for Inkjet & All-In-One Printers. 4 Scroll through the Web page to view the warranty. Customer support... Description Telephone support E-mail support Where to find Call us at www.lexmark.com. Ordering supplies You can order supplies such as troubleshooting your printer model. 5 Type a...
User's Guide
Page 13
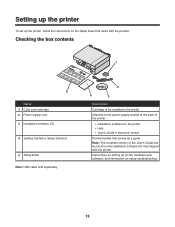
... instructions on the Setup sheet that shipped with the product. Checking the box contents 1 ?? ? 5 Name 1 Color print cartridge 2 Power supply cord 3 Installation software CD 4 Getting Started or Setup Solutions 5 Setup sheet Note: USB cable sold separately 2 4 3 Description Cartridge to be installed in the printer Attaches to the power supply located at the back...
... instructions on the Setup sheet that shipped with the product. Checking the box contents 1 ?? ? 5 Name 1 Color print cartridge 2 Power supply cord 3 Installation software CD 4 Getting Started or Setup Solutions 5 Setup sheet Note: USB cable sold separately 2 4 3 Description Cartridge to be installed in the printer Attaches to the power supply located at the back...
User's Guide
Page 15
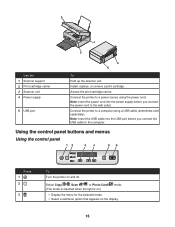
.... Connect the printer to a computer using the power cord. Access the print cartridge carrier. Connect the printer to a power source using a USB cable (sometimes sold separately). 3 1 2 Use the 1 Scanner support 2 Print cartridge carrier 3 Scanner unit 4 Power supply 5 USB port 4 5 To Hold up... the scanner unit. Install, replace, or remove a print cartridge. Note: Insert the power cord into the USB port before you connect the USB...
.... Connect the printer to a computer using the power cord. Access the print cartridge carrier. Connect the printer to a power source using a USB cable (sometimes sold separately). 3 1 2 Use the 1 Scanner support 2 Print cartridge carrier 3 Scanner unit 4 Power supply 5 USB port 4 5 To Hold up... the scanner unit. Install, replace, or remove a print cartridge. Note: Insert the power cord into the USB port before you connect the USB...
User's Guide
Page 18
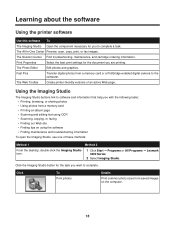
...: Method 1 Method 2 From the desktop, double-click the Imaging Studio icon. 1 Click Start Œ Programs or All Programs Œ Lexmark 3400 Series. 2 Select Imaging Studio. Click the Imaging Studio button for the task you with the following tasks: • Printing, browsing, or... photos from a memory card or a PictBridge-enabled digital camera to complete. The Solution Center Find troubleshooting, maintenance, and cartridge ordering information. Using the Imaging Studio The Imaging Studio buttons link to software and information that help you want to the computer.
...: Method 1 Method 2 From the desktop, double-click the Imaging Studio icon. 1 Click Start Œ Programs or All Programs Œ Lexmark 3400 Series. 2 Select Imaging Studio. Click the Imaging Studio button for the task you with the following tasks: • Printing, browsing, or... photos from a memory card or a PictBridge-enabled digital camera to complete. The Solution Center Find troubleshooting, maintenance, and cartridge ordering information. Using the Imaging Studio The Imaging Studio buttons link to software and information that help you want to the computer.
User's Guide
Page 22
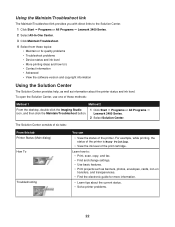
...consists of six tabs: From this tab Printer Status (Main dialog) How To Troubleshooting You can • View the status of the print cartridge. For example, while printing, the status of the printer is Busy Printing. • View the ink level of the printer. To open ...the Maintain/Troubleshoot link The Maintain/Troubleshoot link provides you with direct links to the Solution Center. 1 Click Start Œ Programs or All Programs Œ Lexmark 3400 Series. 2 Select All-In-One Center. 3 Click Maintain/Troubleshoot. 4 Select from these methods: Method 1 Method 2 From the desktop, double-...
...consists of six tabs: From this tab Printer Status (Main dialog) How To Troubleshooting You can • View the status of the print cartridge. For example, while printing, the status of the printer is Busy Printing. • View the ink level of the printer. To open ...the Maintain/Troubleshoot link The Maintain/Troubleshoot link provides you with direct links to the Solution Center. 1 Click Start Œ Programs or All Programs Œ Lexmark 3400 Series. 2 Select All-In-One Center. 3 Click Maintain/Troubleshoot. 4 Select from these methods: Method 1 Method 2 From the desktop, double-...
User's Guide
Page 23
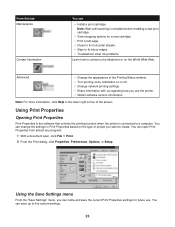
... Opening Print Properties Print Properties is the software that controls the printing function when the printer is complete before installing a new print cartridge. • View shopping options for future use the printer. • Obtain software version information. You can change the settings in... . Note: Wait until scanning is connected to five custom settings. 23 You can name and save the current Print Properties settings for a new cartridge. • Print a test page. • Clean to fix horizontal streaks. • Align to fix blurry edges. • Troubleshoot other ...
... Opening Print Properties Print Properties is the software that controls the printing function when the printer is complete before installing a new print cartridge. • View shopping options for future use the printer. • Obtain software version information. You can change the settings in... . Note: Wait until scanning is connected to five custom settings. 23 You can name and save the current Print Properties settings for a new cartridge. • Print a test page. • Clean to fix horizontal streaks. • Align to fix blurry edges. • Troubleshoot other ...
User's Guide
Page 52
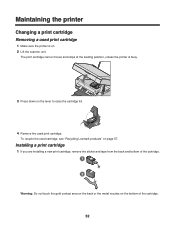
...the sticker and tape from the back and bottom of the cartridge. 52 The print cartridge carrier moves and stops at the loading position, unless the printer is on. 2 Lift the scanner unit. To recycle the used print cartridge. Warning: Do not touch the gold contact area on ...the back or the metal nozzles on the bottom of the cartridge. Maintaining the printer Changing a print cartridge Removing a used print cartridge 1 Make sure the printer is busy. 3 Press down on the lever to raise the cartridge lid. 4 Remove the used cartridge, see "Recycling Lexmark products" on page 57.
...the sticker and tape from the back and bottom of the cartridge. 52 The print cartridge carrier moves and stops at the loading position, unless the printer is on. 2 Lift the scanner unit. To recycle the used print cartridge. Warning: Do not touch the gold contact area on ...the back or the metal nozzles on the bottom of the cartridge. Maintaining the printer Changing a print cartridge Removing a used print cartridge 1 Make sure the printer is busy. 3 Press down on the lever to raise the cartridge lid. 4 Remove the used cartridge, see "Recycling Lexmark products" on page 57.
User's Guide
Page 53
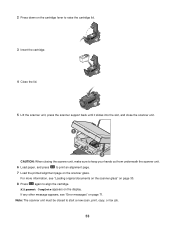
... appears, see "Loading original documents on the scanner glass" on page 30. 8 Press again to align the cartridge. Alignment Complete appears on page 71. 2 Press down on the cartridge lever to raise the cartridge lid. 3 Insert the cartridge. 4 Close the lid. 5 Lift the scanner unit, press the scanner support back until it slides into...
... appears, see "Loading original documents on the scanner glass" on page 30. 8 Press again to align the cartridge. Alignment Complete appears on page 71. 2 Press down on the cartridge lever to raise the cartridge lid. 3 Insert the cartridge. 4 Close the lid. 5 Lift the scanner unit, press the scanner support back until it slides into...
User's Guide
Page 54
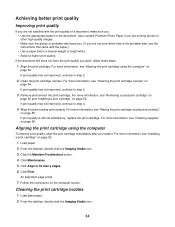
...54. An alignment page prints. 7 Follow the instructions on page 55. For more information, see "Wiping the print cartridge nozzles and contacts" on the computer screen. Use Lexmark Premium Photo Paper if you are printing photos or other high-quality images. • Make sure the glossy or printable... side faces you. (If you are not satisfied with the paper.) • Use a paper that is still not satisfactory, replace the print cartridge. If ...
...54. An alignment page prints. 7 Follow the instructions on page 55. For more information, see "Wiping the print cartridge nozzles and contacts" on the computer screen. Use Lexmark Premium Photo Paper if you are printing photos or other high-quality images. • Make sure the glossy or printable... side faces you. (If you are not satisfied with the paper.) • Use a paper that is still not satisfactory, replace the print cartridge. If ...
User's Guide
Page 55
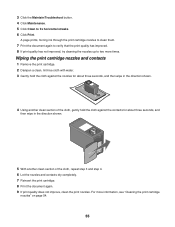
... shown. 5 With another clean section of the cloth, repeat step 3 and step 4. 6 Let the nozzles and contacts dry completely. 7 Reinsert the print cartridge. 8 Print the document again. 9 If print quality does not improve, clean the print nozzles. For more times. A page prints, forcing ink through the print... cartridge nozzles to clean them. 7 Print the document again to verify that the print quality has improved. 8 If print quality has not improved, try ...
... shown. 5 With another clean section of the cloth, repeat step 3 and step 4. 6 Let the nozzles and contacts dry completely. 7 Reinsert the print cartridge. 8 Print the document again. 9 If print quality does not improve, clean the print nozzles. For more times. A page prints, forcing ink through the print... cartridge nozzles to clean them. 7 Print the document again to verify that the print quality has improved. 8 If print quality has not improved, try ...
User's Guide
Page 56
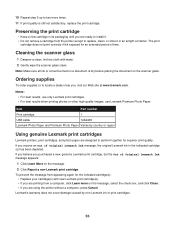
... not print correctly if left exposed for an extended period of Original Lexmark Ink message, the original Lexmark ink in the indicated cartridge (s) has been depleted. Lexmark's warranty does not cover damage caused by country or region Using genuine Lexmark print cartridges Lexmark printers, print cartridges, and photo paper are designed to locate a dealer near you are printing...
... not print correctly if left exposed for an extended period of Original Lexmark Ink message, the original Lexmark ink in the indicated cartridge (s) has been depleted. Lexmark's warranty does not cover damage caused by country or region Using genuine Lexmark print cartridges Lexmark printers, print cartridges, and photo paper are designed to locate a dealer near you are printing...

User's Guide
Page 57
Lexmark does not recommend use Lexmark supplies. Recycling Lexmark products To return Lexmark products to the printer. For best results, use of failures or damage caused by a refilled cartridge. Refilling a cartridge can affect print quality and may cause damage to Lexmark for recycling: 1 Visit our Web site at www.lexmark.com/recycle. 2 Follow the instructions on the computer screen. 57 Refilling a print cartridge The warranty does not cover repair of a refilled cartridge.
Lexmark does not recommend use Lexmark supplies. Recycling Lexmark products To return Lexmark products to the printer. For best results, use of failures or damage caused by a refilled cartridge. Refilling a cartridge can affect print quality and may cause damage to Lexmark for recycling: 1 Visit our Web site at www.lexmark.com/recycle. 2 Follow the instructions on the computer screen. 57 Refilling a print cartridge The warranty does not cover repair of a refilled cartridge.
User's Guide
Page 60
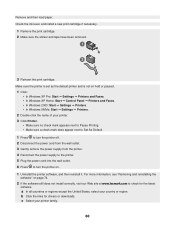
... the wall outlet. 6 Press to turn the printer on page 74. 2 If the software still does not install correctly, visit our Web site at www.lexmark.com to check for drivers or downloads. For more information, see "Removing and reinstalling the software" on . 1 Uninstall the printer software, and then reinstall it.... c Select your printer family. 60 b Click the links for the latest software. Check the ink level, and install a new print cartridge if necessary. 1 Remove the print cartridge. 2 Make sure the sticker and tape have been removed. 3 Reinsert the print...
... the wall outlet. 6 Press to turn the printer on page 74. 2 If the software still does not install correctly, visit our Web site at www.lexmark.com to check for drivers or downloads. For more information, see "Removing and reinstalling the software" on . 1 Uninstall the printer software, and then reinstall it.... c Select your printer family. 60 b Click the links for the latest software. Check the ink level, and install a new print cartridge if necessary. 1 Remove the print cartridge. 2 Make sure the sticker and tape have been removed. 3 Reinsert the print...
User's Guide
Page 61
... has not improved, continue to download, and then follow these steps: 1 Align the print cartridge. If print quality is PictBridge-enabled. e Select your printer model. The printer can only read one media device at a time. Use Lexmark Premium Photo Paper if you are printing photos or other high-quality images. • Make...
... has not improved, continue to download, and then follow these steps: 1 Align the print cartridge. If print quality is PictBridge-enabled. e Select your printer model. The printer can only read one media device at a time. Use Lexmark Premium Photo Paper if you are printing photos or other high-quality images. • Make...

User's Guide
Page 62
...and reinstalling the software" on page 74. 2 If the software still does not install correctly, visit our Web site at www.lexmark.com to dry: • Document with color variations. b Click the links for the latest software. Use only new, unwrinkled paper. 1 Uninstall the printer software, and then...print • Skewed lines • Smudges • Streaks • White lines in print Check the ink level, and install a new print cartridge if necessary. Each paper brand accepts ink differently and prints with graphics or images • Photo paper • Heavy weight matte or glossy paper ...
...and reinstalling the software" on page 74. 2 If the software still does not install correctly, visit our Web site at www.lexmark.com to dry: • Document with color variations. b Click the links for the latest software. Use only new, unwrinkled paper. 1 Uninstall the printer software, and then...print • Skewed lines • Smudges • Streaks • White lines in print Check the ink level, and install a new print cartridge if necessary. Each paper brand accepts ink differently and prints with graphics or images • Photo paper • Heavy weight matte or glossy paper ...
User's Guide
Page 65
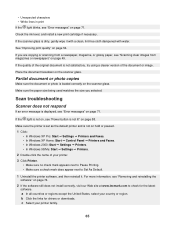
... more information, see "Removing and reinstalling the software" on page 74. 2 If the software still does not install correctly, visit our Web site at www.lexmark.com to Set As Default. 1 Uninstall the printer software, and then reinstall it with a clean, lint-free cloth dampened with water. c Select your country or... from a newspaper, magazine, or glossy paper, see "Scanning clear images from magazines or newspapers" on page 58. Check the ink level, and install a new print cartridge if necessary.
... more information, see "Removing and reinstalling the software" on page 74. 2 If the software still does not install correctly, visit our Web site at www.lexmark.com to Set As Default. 1 Uninstall the printer software, and then reinstall it with a clean, lint-free cloth dampened with water. c Select your country or... from a newspaper, magazine, or glossy paper, see "Scanning clear images from magazines or newspapers" on page 58. Check the ink level, and install a new print cartridge if necessary.
User's Guide
Page 68
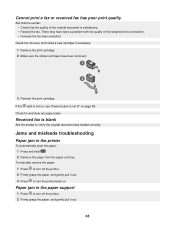
...the sender to turn off the printer. 2 Firmly grasp the paper, and gently pull it out. 68 There may have been removed. 3 Reinsert the print cartridge. To manually remove the paper: 1 Press to turn off the printer. 2 Firmly grasp the paper, and gently pull it out. 3 Press to verify ... troubleshooting Paper jam in the paper support 1 Press to turn the printer back on page 58. Check the ink level, and install a new cartridge if necessary. 1 Remove the print cartridge. 2 Make sure the sticker and tape have been a problem with the quality of the original document is not lit" on .
...the sender to turn off the printer. 2 Firmly grasp the paper, and gently pull it out. 68 There may have been removed. 3 Reinsert the print cartridge. To manually remove the paper: 1 Press to turn off the printer. 2 Firmly grasp the paper, and gently pull it out. 3 Press to verify ... troubleshooting Paper jam in the paper support 1 Press to turn the printer back on page 58. Check the ink level, and install a new cartridge if necessary. 1 Remove the print cartridge. 2 Make sure the sticker and tape have been a problem with the quality of the original document is not lit" on .

