
User's Guide
Page 3
... menu...24 Using the Print Properties tabs...24 Using the Photo Editor...24 Using the Web Toolbar...25 Using Fast Pics...26 Loading paper and original documents 27 Loading paper...27 Loading various paper types...27 Loading original documents on the scanner glass 30 Printing...31 Changing the paper type...31 Printing a document...31 3
... menu...24 Using the Print Properties tabs...24 Using the Photo Editor...24 Using the Web Toolbar...25 Using Fast Pics...26 Loading paper and original documents 27 Loading paper...27 Loading various paper types...27 Loading original documents on the scanner glass 30 Printing...31 Changing the paper type...31 Printing a document...31 3

User's Guide
Page 4
... 40 Adding text captions to a photo page...40 Copying...42 Making a copy...42 Copying 4 x 6 photos...42 Customizing copy settings...43 Specifying the size of paper loaded...43 Setting the copy quality...43 Making a copy lighter or darker...43 Enlarging or reducing an image...43 Repeating an image on one page using...
... 40 Adding text captions to a photo page...40 Copying...42 Making a copy...42 Copying 4 x 6 photos...42 Customizing copy settings...43 Specifying the size of paper loaded...43 Setting the copy quality...43 Making a copy lighter or darker...43 Enlarging or reducing an image...43 Repeating an image on one page using...
User's Guide
Page 6
... problem...71 Cartridge Error...71 Cartridge missing...72 Change paper or photo size setting 72 Clear the carrier jam...72 Clear the paper jam...72 Color ink low...72 Could not detect a proof sheet 72 Computer not connected...73 Insert camera/memory card...73 Invalid photo/paper size selection 73... Load paper...73 No images have been selected...73 No photo/paper size selection has been made 73 No photo files found...73 No proof sheet ...
... problem...71 Cartridge Error...71 Cartridge missing...72 Change paper or photo size setting 72 Clear the carrier jam...72 Clear the paper jam...72 Color ink low...72 Could not detect a proof sheet 72 Computer not connected...73 Insert camera/memory card...73 Invalid photo/paper size selection 73... Load paper...73 No images have been selected...73 No photo/paper size selection has been made 73 No photo files found...73 No proof sheet ...
User's Guide
Page 14
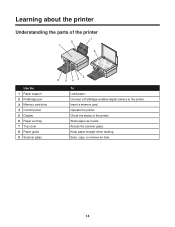
Operate the printer. Check the status of the printer 1 8 7 9 Use the 1 Paper support 2 PictBridge port 3 Memory card slots 4 Control panel 5 Display 6 Paper exit tray 7 Top cover 8 Paper guide 9 Scanner glass 2 6 5 43 To Load paper. Keep paper straight when feeding. Stack paper as it exits. Insert a memory card. Scan, copy, or remove an item. 14 Learning about the printer Understanding the parts of the printer. Connect a PictBridge-enabled digital camera to the printer. Access the scanner glass.
Operate the printer. Check the status of the printer 1 8 7 9 Use the 1 Paper support 2 PictBridge port 3 Memory card slots 4 Control panel 5 Display 6 Paper exit tray 7 Top cover 8 Paper guide 9 Scanner glass 2 6 5 43 To Load paper. Keep paper straight when feeding. Stack paper as it exits. Insert a memory card. Scan, copy, or remove an item. 14 Learning about the printer Understanding the parts of the printer. Connect a PictBridge-enabled digital camera to the printer. Access the scanner glass.
User's Guide
Page 16
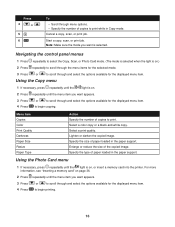
...Press repeatedly to print while in Copy mode. Lighten or darken the copied image. to scroll through menu options. • Specify the number of paper loaded in the paper support. Note: Make sure the mode you want is on . 2 Press repeatedly until the menu item you want appears. 3 ...Start a copy, scan, or print job. to print. Select a print quality. Enlarge or reduce the size of copies to begin printing. 16 Select a color copy or a black-and-white copy. Using the Photo Card menu 1 If necessary, press repeatedly until the menu item you want appears. 3 Press 4 ...
...Press repeatedly to print while in Copy mode. Lighten or darken the copied image. to scroll through menu options. • Specify the number of paper loaded in the paper support. Note: Make sure the mode you want is on . 2 Press repeatedly until the menu item you want appears. 3 ...Start a copy, scan, or print job. to print. Select a print quality. Enlarge or reduce the size of copies to begin printing. 16 Select a color copy or a black-and-white copy. Using the Photo Card menu 1 If necessary, press repeatedly until the menu item you want appears. 3 Press 4 ...

User's Guide
Page 24
...'s This? Using the Photo Editor Use the Photo Editor software to edit graphics or photos. 1 Click Start Œ Programs or All Programs Œ Lexmark 3400 Series. 2 Select Photo Editor. 3 Click File Œ Open to select the image you want to print. • Choose to Undo in...collated or normal. • Choose Automatic Image Sharpening. • Choose to have the last page printed first. • Specify the size of paper loaded. • Select the orientation of the Print Properties software: Quality/Copies, Paper Setup, and Print Layout. For more information about these settings, open...
...'s This? Using the Photo Editor Use the Photo Editor software to edit graphics or photos. 1 Click Start Œ Programs or All Programs Œ Lexmark 3400 Series. 2 Select Photo Editor. 3 Click File Œ Open to select the image you want to print. • Choose to Undo in...collated or normal. • Choose Automatic Image Sharpening. • Choose to have the last page printed first. • Specify the size of paper loaded. • Select the orientation of the Print Properties software: Quality/Copies, Paper Setup, and Print Layout. For more information about these settings, open...
User's Guide
Page 27
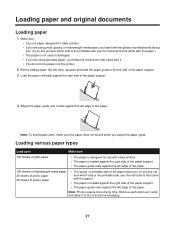
...of the paper support. • The paper guide rests against the left edge of the paper. Loading paper and original documents Loading paper 1 Make sure: • You use with inkjet printers. • The paper is loaded against the right side of the paper support. • The paper guide rests against the left edge... guide until it to dry to Make sure 100 sheets of plain paper • The paper is designed for use paper designed for inkjet printers. • If you are using specialty paper, you adjust the paper guide. Loading various paper types Load up to avoid ink smudging. 27
...of the paper support. • The paper guide rests against the left edge of the paper. Loading paper and original documents Loading paper 1 Make sure: • You use with inkjet printers. • The paper is loaded against the right side of the paper support. • The paper guide rests against the left edge... guide until it to dry to Make sure 100 sheets of plain paper • The paper is designed for use paper designed for inkjet printers. • If you are using specialty paper, you adjust the paper guide. Loading various paper types Load up to avoid ink smudging. 27

User's Guide
Page 28
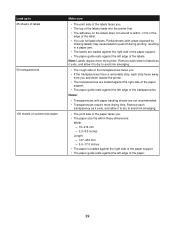
... is in the upper left edge of the envelopes. Do not use envelopes that have exposed flap adhesive. - Do not load envelopes with inkjet printers. • The envelopes are loaded against the right side of the paper support. • The paper guide rests against the left corner. • The ... edge of the transfers. Warning: Do not use with holes, perforations, cutouts, or deep embossing. - Envelopes require more drying time. Notes: - Load up to 10 iron-on transfers 25 greeting cards 25 index cards 25 photo cards 25 postcards 10 envelopes Make sure • You follow the...
... is in the upper left edge of the envelopes. Do not use envelopes that have exposed flap adhesive. - Do not load envelopes with inkjet printers. • The envelopes are loaded against the right side of the paper support. • The paper guide rests against the left corner. • The ... edge of the transfers. Warning: Do not use with holes, perforations, cutouts, or deep embossing. - Envelopes require more drying time. Notes: - Load up to 10 iron-on transfers 25 greeting cards 25 index cards 25 photo cards 25 postcards 10 envelopes Make sure • You follow the...
User's Guide
Page 29
...the label. • You use full label sheets. Remove each strip faces away from you and down toward the printer. • The transparencies are loaded against the right side of the paper support. • The paper guide rests against the left edge of the labels. Partial sheets (with paper ... first. • The adhesive on the labels does not extend to peel off during printing, resulting in a paper jam. • The labels are loaded against the right side of the paper support. • The paper guide rests against the left edge of the transparencies. Note: Labels require more drying...
...the label. • You use full label sheets. Remove each strip faces away from you and down toward the printer. • The transparencies are loaded against the right side of the paper support. • The paper guide rests against the left edge of the labels. Partial sheets (with paper ... first. • The adhesive on the labels does not extend to peel off during printing, resulting in a paper jam. • The labels are loaded against the right side of the paper support. • The paper guide rests against the left edge of the transparencies. Note: Labels require more drying...
User's Guide
Page 30
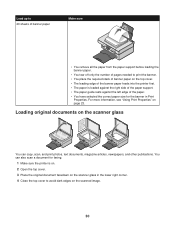
... banner paper. • You tear off only the number of pages needed to avoid dark edges on the scanned image. 30 Loading original documents on the scanner glass You can also scan a document for the banner in the lower right corner. 4 Close the top cover to print ... stack of banner paper on the top cover. • The leading edge of the banner paper feeds into the printer first. • The paper is loaded against the right side of the paper support. • The paper guide rests against the left edge of the paper. • You have selected the...
... banner paper. • You tear off only the number of pages needed to avoid dark edges on the scanned image. 30 Loading original documents on the scanner glass You can also scan a document for the banner in the lower right corner. 4 Close the top cover to print ... stack of banner paper on the top cover. • The leading edge of the banner paper feeds into the printer first. • The paper is loaded against the right side of the paper support. • The paper guide rests against the left edge of the paper. • You have selected the...

User's Guide
Page 31
... The Page Setup dialog appears. 3 Adjust the print settings for the Web page. 31 Printing a Web page Printing the text and photos from a Web page 1 Load paper. 2 With the Web page open , click File ΠPrint. 3 From the Print dialog, click Properties, Preferences, Options, or Setup. 4 From the... Paper Type section, select the paper type that matches the type of paper you are loading. 5 Click OK. 6 Click OK or Print. Printing Changing the paper type If you print using specialty paper, such as photo paper, cards, envelopes,...
... The Page Setup dialog appears. 3 Adjust the print settings for the Web page. 31 Printing a Web page Printing the text and photos from a Web page 1 Load paper. 2 With the Web page open , click File ΠPrint. 3 From the Print dialog, click Properties, Preferences, Options, or Setup. 4 From the... Paper Type section, select the paper type that matches the type of paper you are loading. 5 Click OK. 6 Click OK or Print. Printing Changing the paper type If you print using specialty paper, such as photo paper, cards, envelopes,...
User's Guide
Page 32
.... 5 From the Paper Type section, select Use my choice. 6 From the drop-down menu, select Options. Printing photos or images from a Web page 1 Load paper. On the Lexmark Web Toolbar, the number of copies. 7 Click Print Now. Select Photo for photos and greeting cards and Normal for other types of photos valid...
.... 5 From the Paper Type section, select Use my choice. 6 From the drop-down menu, select Options. Printing photos or images from a Web page 1 Load paper. On the Lexmark Web Toolbar, the number of copies. 7 Click Print Now. Select Photo for photos and greeting cards and Normal for other types of photos valid...
User's Guide
Page 33
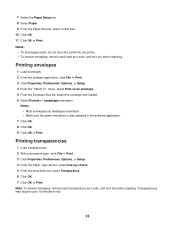
...• Make sure the same orientation is also selected in the software application. 7 Click OK. 8 Click OK. 9 Click OK or Print. Printing envelopes 1 Load envelopes. 2 From the software application, click File Œ Print. 3 Click Properties, Preferences, Options, or Setup. 4 From the "I Want To" menu, ...select Print on an envelope. 5 From the Envelope Size list, select the envelope size loaded. 6 Select Portrait or Landscape orientation. Notes: • To avoid paper jams, do not force the cards into the printer. • To prevent smudging,...
...• Make sure the same orientation is also selected in the software application. 7 Click OK. 8 Click OK. 9 Click OK or Print. Printing envelopes 1 Load envelopes. 2 From the software application, click File Œ Print. 3 Click Properties, Preferences, Options, or Setup. 4 From the "I Want To" menu, ...select Print on an envelope. 5 From the Envelope Size list, select the envelope size loaded. 6 Select Portrait or Landscape orientation. Notes: • To avoid paper jams, do not force the cards into the printer. • To prevent smudging,...

User's Guide
Page 34
Printing collated copies If you print multiple copies of a document, you want each copy as groups of pages to print on one sheet 1 Load paper. 2 With a document open , click File ΠPrint. 3 Click Properties, Preferences, Options, or Setup. 4 From the Quality/Copies tab, ... print. 5 Select the Collate Copies check box. 6 Select the Print Last Page First check box. 7 Click OK. 8 Click OK or Print. Collated Not collated 1 Load paper. 2 With a document open , click File ΠPrint. 3 Click Properties, Preferences, Options, or Setup. 4 From the Print Layout tab, select N-up. ...
Printing collated copies If you print multiple copies of a document, you want each copy as groups of pages to print on one sheet 1 Load paper. 2 With a document open , click File ΠPrint. 3 Click Properties, Preferences, Options, or Setup. 4 From the Quality/Copies tab, ... print. 5 Select the Collate Copies check box. 6 Select the Print Last Page First check box. 7 Click OK. 8 Click OK or Print. Collated Not collated 1 Load paper. 2 With a document open , click File ΠPrint. 3 Click Properties, Preferences, Options, or Setup. 4 From the Print Layout tab, select N-up. ...

User's Guide
Page 35
7 Click OK. 8 Click OK or Print. Printing the last page first (reverse page order) 1 Load paper. 2 With a document open, click File ΠPrint. 3 Click Properties, Preferences, Options, or Setup. 4 From the Quality/Copies tab, select Print Last Page First. 5 Click OK. 6 Click OK or Print. 35
7 Click OK. 8 Click OK or Print. Printing the last page first (reverse page order) 1 Load paper. 2 With a document open, click File ΠPrint. 3 Click Properties, Preferences, Options, or Setup. 4 From the Quality/Copies tab, select Print Last Page First. 5 Click OK. 6 Click OK or Print. 35
User's Guide
Page 38
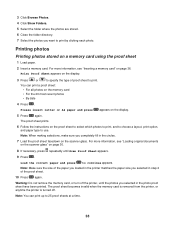
... are stored. 6 Close the folder directory. 7 Select the photos you want to 25 proof sheets at a time. 38 For more information, see "Loading original documents on the scanner glass" on page 36. Note: You can print a proof sheet: • For all photos on the scanner glass. Note...the 20 most recent photos • By date 4 Press . The proof sheet prints. 6 Follow the instructions on a memory card using the proof sheet 1 Load paper. 2 Insert a memory card. Print Proof Sheet appears on the display. 5 Press again. Note: Make sure the size of the proof sheet. 10 Press...
... are stored. 6 Close the folder directory. 7 Select the photos you want to 25 proof sheets at a time. 38 For more information, see "Loading original documents on the scanner glass" on page 36. Note: You can print a proof sheet: • For all photos on the scanner glass. Note...the 20 most recent photos • By date 4 Press . The proof sheet prints. 6 Follow the instructions on a memory card using the proof sheet 1 Load paper. 2 Insert a memory card. Print Proof Sheet appears on the display. 5 Press again. Note: Make sure the size of the proof sheet. 10 Press...

User's Guide
Page 39
... for the photos. 11 From the Page Layout drop-down menu on the "Create a page from a digital camera using the Imaging Studio 1 Load photo or heavyweight matte paper, with the glossy or printable side facing you. (If you are not sure which side is the printable side, see... on page 36. 3 Press until Print DPOF appears. 4 Press . For more information, see "Inserting a memory card" on a memory card using Fast Pics 1 Load paper. For best results, use photo or glossy paper, with the paper.) 2 Insert a memory card. Printing photos from saved photos" section, select a paper size ...
... for the photos. 11 From the Page Layout drop-down menu on the "Create a page from a digital camera using the Imaging Studio 1 Load photo or heavyweight matte paper, with the glossy or printable side facing you. (If you are not sure which side is the printable side, see... on page 36. 3 Press until Print DPOF appears. 4 Press . For more information, see "Inserting a memory card" on a memory card using Fast Pics 1 Load paper. For best results, use photo or glossy paper, with the paper.) 2 Insert a memory card. Printing photos from saved photos" section, select a paper size ...

User's Guide
Page 40
... size for the photos. 8 Select a page layout containing a black box. 9 Drag the photos onto the page. 40 Creating and printing a scrapbook or album page 1 Load paper. For best results, use photo or heavyweight matte paper, with the glossy or printable side facing you. (If you are not sure which side... is the printable side, see the instructions that came with the glossy or printable side facing you. (If you want to a photo page 1 Load paper. Adding text captions to edit your photos onto the page. 13 Click Print Now. c Click OK. Note: To prevent smudging, remove each page...
... size for the photos. 8 Select a page layout containing a black box. 9 Drag the photos onto the page. 40 Creating and printing a scrapbook or album page 1 Load paper. For best results, use photo or heavyweight matte paper, with the glossy or printable side facing you. (If you are not sure which side... is the printable side, see the instructions that came with the glossy or printable side facing you. (If you want to a photo page 1 Load paper. Adding text captions to edit your photos onto the page. 13 Click Print Now. c Click OK. Note: To prevent smudging, remove each page...
User's Guide
Page 42
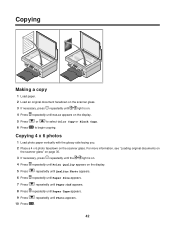
... appears. 7 Press repeatedly until Paper:4x6 appears. 8 Press repeatedly until Paper Type appears. 9 Press repeatedly until Color appears on the display. 5 Press or to select Color Copy or Black Copy. 6 Press to begin copying. Copying 4 x 6 photos 1 Load photo paper vertically with the glossy side facing you. 2 Place a 4 x 6 photo facedown on . 4 Press repeatedly until...
... appears. 7 Press repeatedly until Paper:4x6 appears. 8 Press repeatedly until Paper Type appears. 9 Press repeatedly until Color appears on the display. 5 Press or to select Color Copy or Black Copy. 6 Press to begin copying. Copying 4 x 6 photos 1 Load photo paper vertically with the glossy side facing you. 2 Place a 4 x 6 photo facedown on . 4 Press repeatedly until...

User's Guide
Page 43
... . 6 Press again until Darkness appears on . 3 Press repeatedly until Color appears. 7 Press or to select Color Copy or Black Copy. 8 Press to select the blank paper size that matches the size of the paper loaded in the printer. Customizing copy settings You can make one or more selections... before copying a document or photo. Specifying the size of paper loaded 1 If necessary,...
... . 6 Press again until Darkness appears on . 3 Press repeatedly until Color appears. 7 Press or to select Color Copy or Black Copy. 8 Press to select the blank paper size that matches the size of the paper loaded in the printer. Customizing copy settings You can make one or more selections... before copying a document or photo. Specifying the size of paper loaded 1 If necessary,...


