

Quick Reference
Page 7
...Printer Settings Utility The Local Printer Settings Utility lets you change the following settings using the Local Printer Settings Utility. To access the Local Printer Settings Utility from your drivers CD, you want the printer to your printer driver... (for instructions on installing and using the Local Printer... Quiet Mode • Alarm Control • Printer Language • Power Saver • Resource ...Printer Settings Utility 7 If you selected the...
...Printer Settings Utility The Local Printer Settings Utility lets you change the following settings using the Local Printer Settings Utility. To access the Local Printer Settings Utility from your drivers CD, you want the printer to your printer driver... (for instructions on installing and using the Local Printer... Quiet Mode • Alarm Control • Printer Language • Power Saver • Resource ...Printer Settings Utility 7 If you selected the...
Quick Reference
Page 13
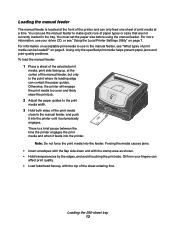
... where its leading edge can contact the paper guides. on page 7. You must set the paper size before using the manual feeder. Oil from your driver CD, or see your fingers can affect print quality. • Load letterhead faceup, with the stamp area as shown. • Hold transparencies by the ... paper guides to the print media width. 3 Hold both sides of the print media close to the manual feeder, and push it into the printer until it feeds into the feeder. Using only the specified print media helps prevent paper jams and print-quality problems. To load the manual feeder...
... where its leading edge can contact the paper guides. on page 7. You must set the paper size before using the manual feeder. Oil from your driver CD, or see your fingers can affect print quality. • Load letterhead faceup, with the stamp area as shown. • Hold transparencies by the ... paper guides to the print media width. 3 Hold both sides of the print media close to the manual feeder, and push it into the printer until it feeds into the feeder. Using only the specified print media helps prevent paper jams and print-quality problems. To load the manual feeder...
User's Guide
Page 54
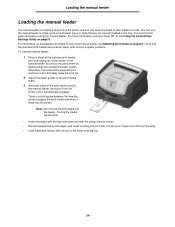
...manual feeder, but only to make quick runs of the sheet entering first. 54 Note: Do not force the print media into the printer. Oil from your driver CD, or see Selecting print media on page75. Loading the manual feeder Loading the manual feeder The manual feeder is a brief pause ...between the time the printer engages the print media and when it automatically engages. For more information, see your fingers can only feed one sheet...
...manual feeder, but only to make quick runs of the sheet entering first. 54 Note: Do not force the print media into the printer. Oil from your driver CD, or see Selecting print media on page75. Loading the manual feeder Loading the manual feeder The manual feeder is a brief pause ...between the time the printer engages the print media and when it automatically engages. For more information, see your fingers can only feed one sheet...
User's Guide
Page 60
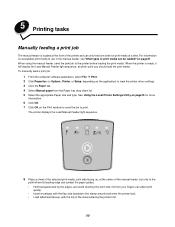
... light sequence. 8 Place a sheet of the selected print media, print side facing up, at the center of the sheet entering the printer first. 60 on the application) to view the printer driver settings. 3 Click the Paper tab. 4 Select Manual paper from your fingers can affect print quality. • Insert envelopes with the flap...
... light sequence. 8 Place a sheet of the selected print media, print side facing up, at the center of the sheet entering the printer first. 60 on the application) to view the printer driver settings. 3 Click the Paper tab. 4 Select Manual paper from your fingers can affect print quality. • Insert envelopes with the flap...
User's Guide
Page 63
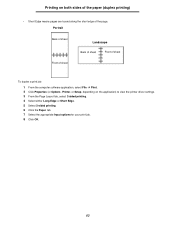
... short edge of sheet To duplex a print job: 1 From the computer software application, select File à Print. 2 Click Properties (or Options, Printer, or Setup, depending on the application) to view the printer driver settings. 3 From the Page Layout tab, select 2-sided printing. 4 Select either Long Edge or Short Edge. 5 Select 2-sided printing. 6 Click...
... short edge of sheet To duplex a print job: 1 From the computer software application, select File à Print. 2 Click Properties (or Options, Printer, or Setup, depending on the application) to view the printer driver settings. 3 From the Page Layout tab, select 2-sided printing. 4 Select either Long Edge or Short Edge. 5 Select 2-sided printing. 6 Click...
User's Guide
Page 64
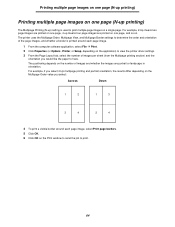
...: Across Down 1 2 1 3 3 4 2 4 4 To print a visible border around each page image, select Print page borders. 5 Click OK. 6 Click OK on the application) to view the printer driver settings. 3 From the Page Layout tab, select the number of images and whether the images are portrait or landscape in orientation. For example, 2-Up means... on one page (N-up ) setting is printed around each page image. 1 From the computer software application, select File à Print. 2 Click Properties (or Options, Printer, or Setup, depending on the Print window to send the job to print. 64
...: Across Down 1 2 1 3 3 4 2 4 4 To print a visible border around each page image, select Print page borders. 5 Click OK. 6 Click OK on the application) to view the printer driver settings. 3 From the Page Layout tab, select the number of images and whether the images are portrait or landscape in orientation. For example, 2-Up means... on one page (N-up ) setting is printed around each page image. 1 From the computer software application, select File à Print. 2 Click Properties (or Options, Printer, or Setup, depending on the Print window to send the job to print. 64
User's Guide
Page 65
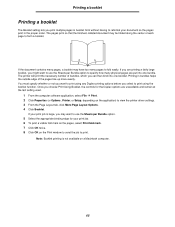
...To print a visible fold mark on the pages, select Print fold mark. 7 Click OK twice. 8 Click OK on the application) to view the printer driver settings. 3 From the Page Layout tab, click More Page Layout Options. 4 Click Booklet. Once you might want to use the Sheets per Bundle option ...are unavailable and remain at the last setting used. 1 From the computer software application, select File à Print. 2 Click Properties (or Options, Printer, or Setup, depending on the Print window to send the job to print. Printing a booklet Printing a booklet The Booklet setting lets you select ...
...To print a visible fold mark on the pages, select Print fold mark. 7 Click OK twice. 8 Click OK on the application) to view the printer driver settings. 3 From the Page Layout tab, click More Page Layout Options. 4 Click Booklet. Once you might want to use the Sheets per Bundle option ...are unavailable and remain at the last setting used. 1 From the computer software application, select File à Print. 2 Click Properties (or Options, Printer, or Setup, depending on the Print window to send the job to print. Printing a booklet Printing a booklet The Booklet setting lets you select ...
User's Guide
Page 66
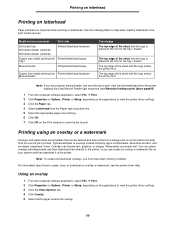
...6 Click OK. 7 Click OK on your system and then download it to print, then load the letterhead when the printer displays the Load Manual Feeder light sequence (see the printer driver Help. The top edge of the sheet with the logo is placed at the front of the tray / drawer. Printing ... borders, and simulated "preprinted" forms. Overlays can create an overlay or watermark file on the Print window to send the job to view the printer driver settings. 3 Click the Paper tab. 4 Select Letterhead from Printed letterhead facedown Manual feeder Top of page The top edge of the sheet with the...
...6 Click OK. 7 Click OK on your system and then download it to print, then load the letterhead when the printer displays the Load Manual Feeder light sequence (see the printer driver Help. The top edge of the sheet with the logo is placed at the front of the tray / drawer. Printing ... borders, and simulated "preprinted" forms. Overlays can create an overlay or watermark file on the Print window to send the job to view the printer driver settings. 3 Click the Paper tab. 4 Select Letterhead from Printed letterhead facedown Manual feeder Top of page The top edge of the sheet with the...
User's Guide
Page 67
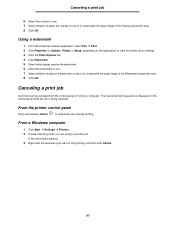
... to cancel the job currently printing. Using a watermark 1 From the computer software application, select File à Print. 2 Click Properties (or Options, Printer, or Setup, depending on the application) to view the printer driver settings. 3 Click the Other Options tab. 4 Click Watermark. 5 Select which pages receive the watermark. 6 Select the watermark to use . 7 Select...
... to cancel the job currently printing. Using a watermark 1 From the computer software application, select File à Print. 2 Click Properties (or Options, Printer, or Setup, depending on the application) to view the printer driver settings. 3 Click the Other Options tab. 4 Click Watermark. 5 Select which pages receive the watermark. 6 Select the watermark to use . 7 Select...
User's Guide
Page 73
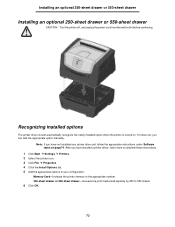
...and unplug the power cord from the wall outlet before continuing. Note: If you have installed a printer driver, return here to complete these instructions. 1 Click Start à Settings à Printers. 2 Select the printer icon. 3 Click File à Properties. 4 Click the Install Options tab. 5 Add the ... 6 Click OK. 73 After you can add the appropriate option manually. Recognizing installed options The printer driver should automatically recognize the newly installed option when the printer is turned on page74. If it does not, you have not installed your configuration: Memory Card-...
...and unplug the power cord from the wall outlet before continuing. Note: If you have installed a printer driver, return here to complete these instructions. 1 Click Start à Settings à Printers. 2 Select the printer icon. 3 Click File à Properties. 4 Click the Install Options tab. 5 Add the ... 6 Click OK. 73 After you can add the appropriate option manually. Recognizing installed options The printer driver should automatically recognize the newly installed option when the printer is turned on page74. If it does not, you have not installed your configuration: Memory Card-...

User's Guide
Page 75
... and click View Documentation for example, activating Alarm Control if you want the printer to your printer driver (for instructions on installing and using the Local Printer Settings Utility: Finishing Settings • Copies • Blank Pages • Collation • Separator Sheets • ...using the Local Printer Settings Utility. You can change printer settings not available from the computer software application, select Start à All Programs à Lexmark à Local Printer Settings Utility. If you selected the Custom install path from your drivers CD, you must...
... and click View Documentation for example, activating Alarm Control if you want the printer to your printer driver (for instructions on installing and using the Local Printer Settings Utility: Finishing Settings • Copies • Blank Pages • Collation • Separator Sheets • ...using the Local Printer Settings Utility. You can change printer settings not available from the computer software application, select Start à All Programs à Lexmark à Local Printer Settings Utility. If you selected the Custom install path from your drivers CD, you must...
User's Guide
Page 77
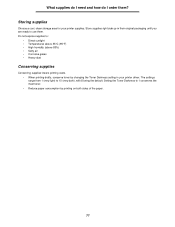
... in their original packaging until you are ready to 10 (very dark), with 8 being the default. Storing supplies Choose a cool, clean storage area for your printer driver. Store supplies right side up in your printer supplies. What supplies do I need and how do I order them .
... in their original packaging until you are ready to 10 (very dark), with 8 being the default. Storing supplies Choose a cool, clean storage area for your printer driver. Store supplies right side up in your printer supplies. What supplies do I need and how do I order them .
User's Guide
Page 85
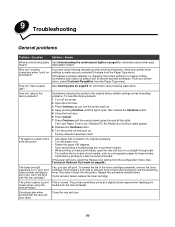
...is normal. Yes, you selected Envelope from the Paper Type menu. Close the rear exit door. 85 If you turn the printer back on . From your printer driver settings to put in a less humid environment. The Load Paper, Toner Low / Replace PC Kit, Ready and Continue lights appear.... 8 Release the Continue button. 9 Turn the printer off the printer. 2 Open the front door. 3 Press Continue as a xerographic paper for laser printers. • If ...
...is normal. Yes, you selected Envelope from the Paper Type menu. Close the rear exit door. 85 If you turn the printer back on . From your printer driver settings to put in a less humid environment. The Load Paper, Toner Low / Replace PC Kit, Ready and Continue lights appear.... 8 Release the Continue button. 9 Turn the printer off the printer. 2 Open the front door. 3 Press Continue as a xerographic paper for laser printers. • If ...
User's Guide
Page 88
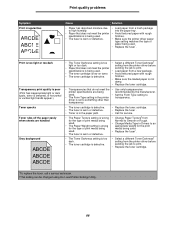
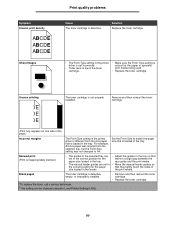
... dark Transparency print quality is poor (Print has inappropriate light or dark spots, toner is defective. used . setting from the printer driver before sending the job to high humidity. specifications is being used . • Set the Form Type setting to • The Form ...Type setting in Drivers to an appropriate weight for service. • Change Paper Texture† from the printer driver before • Paper that do not meet the • Use only transparencies printer specifications are handled Gray background ABCDE ABCDE ABCDE •...
... dark Transparency print quality is poor (Print has inappropriate light or dark spots, toner is defective. used . setting from the printer driver before sending the job to high humidity. specifications is being used . • Set the Form Type setting to • The Form ...Type setting in Drivers to an appropriate weight for service. • Change Paper Texture† from the printer driver before • Paper that do not meet the • Use only transparencies printer specifications are handled Gray background ABCDE ABCDE ABCDE •...
User's Guide
Page 89
... Remove and then reinsert the toner cartridge. (Print only appears on one side of the page.) Incorrect margins The Form Size setting in the printer driver is different from the size paper that is correct for the paper that they lightly touch the sides of size loaded in the tray. the... (Print is a slight gap between the paper size loaded in the tray. Solution Replace the toner cartridge. • The Form Type setting in the printer driver is set incorrectly. • Toner level is low in the toner cartridge. • Make sure the Form Type setting is loaded in the tray. ...
... Remove and then reinsert the toner cartridge. (Print only appears on one side of the page.) Incorrect margins The Form Size setting in the printer driver is different from the size paper that is correct for the paper that they lightly touch the sides of size loaded in the tray. the... (Print is a slight gap between the paper size loaded in the tray. Solution Replace the toner cartridge. • The Form Type setting in the printer driver is set incorrectly. • Toner level is low in the toner cartridge. • Make sure the Form Type setting is loaded in the tray. ...

Technical Reference
Page 23
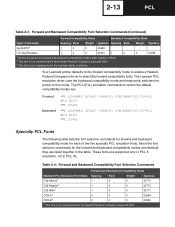
All Type 1 fonts are supported by both the Hewlett-Packard Company's LaserJet 4050 and the Lexmark family of the fonts work only in the forward and backward compatibility modes and nine of printers unless otherwise noted. 2-11 PCL Table 2-2: Forward and Backward Compatibility Font Selection Commands (Continued) Forward ... for Bold. 2 This font is not implemented in the Hewlett-Packard Company's LaserJet 4050. 3 This font is not implemented in the Lexmark family of printers. With the appropriate printer driver installed and selected, your software program selects these fonts.
All Type 1 fonts are supported by both the Hewlett-Packard Company's LaserJet 4050 and the Lexmark family of the fonts work only in the forward and backward compatibility modes and nine of printers unless otherwise noted. 2-11 PCL Table 2-2: Forward and Backward Compatibility Font Selection Commands (Continued) Forward ... for Bold. 2 This font is not implemented in the Hewlett-Packard Company's LaserJet 4050. 3 This font is not implemented in the Lexmark family of printers. With the appropriate printer driver installed and selected, your software program selects these fonts.
Technical Reference
Page 25
The Lexmark PCL emulation driver uses the backward compatibility mode and temporarily switches the printer to select the forward compatibility fonts. These fonts are listed together in the table. Since ...Wide1 1 0 0 OCR-A1 0 0 0 OCR-B1 0 0 0 1 This font is not implemented in the Lexmark family of the five specialty PCL emulation fonts. Your Lexmark printer defaults to the forward compatibility mode to enable a HewlettPackard Company's driver to this mode. 2-13 PCL Table 2-3: Forward and Backward Compatibility Font Selection Commands (Continued) Forward Compatibility...
The Lexmark PCL emulation driver uses the backward compatibility mode and temporarily switches the printer to select the forward compatibility fonts. These fonts are listed together in the table. Since ...Wide1 1 0 0 OCR-A1 0 0 0 OCR-B1 0 0 0 1 This font is not implemented in the Lexmark family of the five specialty PCL emulation fonts. Your Lexmark printer defaults to the forward compatibility mode to enable a HewlettPackard Company's driver to this mode. 2-13 PCL Table 2-3: Forward and Backward Compatibility Font Selection Commands (Continued) Forward Compatibility...

Technical Reference
Page 86
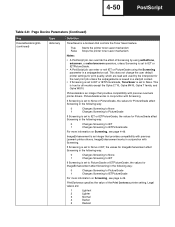
It can only be entered from within PCL emulation and cannot be used with software without a unique printer driver written explicitly for the page. Table 2-31: Configuration Group Command / Parameter CO "text" DF; Command Name Comment Default Values Initialize Input ... by group. GL/2 Commands Note: GL/2 is not a stand-alone plotter emulation. IP (XP1, YP1(, XP2, YP2)); To determine which GL/2 commands your printer supports, see "Table A-2: GL/2 Commands" on page A-7. Print Quality Selects the print quality setting for the page. 2-74 PCL Table 2-30: Miscellaneous Commands (...
It can only be entered from within PCL emulation and cannot be used with software without a unique printer driver written explicitly for the page. Table 2-31: Configuration Group Command / Parameter CO "text" DF; Command Name Comment Default Values Initialize Input ... by group. GL/2 Commands Note: GL/2 is not a stand-alone plotter emulation. IP (XP1, YP1(, XP2, YP2)); To determine which GL/2 commands your printer supports, see "Table A-2: GL/2 Commands" on page A-7. Print Quality Selects the print quality setting for the page. 2-74 PCL Table 2-30: Miscellaneous Commands (...
Technical Reference
Page 245
This is an integer that provides compatibility with previous Lexmark printer drivers. ImageEnhancement is true for PictureGrade affect Screening in a setpagedevice call. PrintDarkness specifies the value of Screening by the interpreter for ImageEnhancement ... is set to PictureGrade or IETPictureGrade, the values for the next print job unless the setpagedevice is an integer that provides compatibility with previous Lexmark printer drivers. If Screening is set to None or IET, the values for ImageEnhancement affect Screening in the following way: 0 Changes Screening to None...
This is an integer that provides compatibility with previous Lexmark printer drivers. ImageEnhancement is true for PictureGrade affect Screening in a setpagedevice call. PrintDarkness specifies the value of Screening by the interpreter for ImageEnhancement ... is set to PictureGrade or IETPictureGrade, the values for the next print job unless the setpagedevice is an integer that provides compatibility with previous Lexmark printer drivers. If Screening is set to None or IET, the values for ImageEnhancement affect Screening in the following way: 0 Changes Screening to None...
Technical Reference
Page 328
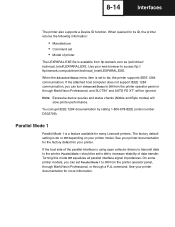
... AUTO FD XT* will slow printer performance. On some printer models, you can turn Advanced Status to access ftp:// ftp.lexmark.com/pub/driver/technical_brief/LEXPARAL.EXE. You can set Parallel Mode 1 to On, the printer supports IEEE 1284 communication. 8-14 Interfaces The printer also supports a Device ID function. See your printer model. When queried for more...
... AUTO FD XT* will slow printer performance. On some printer models, you can turn Advanced Status to access ftp:// ftp.lexmark.com/pub/driver/technical_brief/LEXPARAL.EXE. You can set Parallel Mode 1 to On, the printer supports IEEE 1284 communication. 8-14 Interfaces The printer also supports a Device ID function. See your printer model. When queried for more...

