

Quick Reference
Page 1
Quick Reference Printer Overview 7 6 5 4 1 1 150-sheet output bin 2 250-sheet tray 3 550-sheet drawer (optional) 4 Manual feeder 5 Front door 6 Control panel 7 Paper support 2 3 1 2 3 4 5 6 7 1 Rear exit 2 Power button 3 Power cord connect 4 Dust cover (not available for some models) 5 USB connect 6 Parallel connect 7 Ethernet connect Quick Reference 1
Quick Reference Printer Overview 7 6 5 4 1 1 150-sheet output bin 2 250-sheet tray 3 550-sheet drawer (optional) 4 Manual feeder 5 Front door 6 Control panel 7 Paper support 2 3 1 2 3 4 5 6 7 1 Rear exit 2 Power button 3 Power cord connect 4 Dust cover (not available for some models) 5 USB connect 6 Parallel connect 7 Ethernet connect Quick Reference 1
Quick Reference
Page 2
...; Press and release Cancel to cancel the job currently printing. • Press and hold Cancel until all of the lights come on to reset the printer.
...; Press and release Cancel to cancel the job currently printing. • Press and hold Cancel until all of the lights come on to reset the printer.
Quick Reference
Page 3
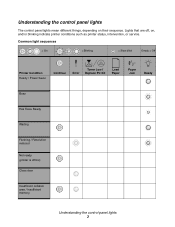
... Ready / Power Saver Continue Toner Low / Error Replace PC Kit Load Paper Paper Jam Ready Busy Hex Trace Ready Waiting Flushing / Resolution reduced Not ready (printer is offline) Close door Insufficient collation area / Insufficient memory Understanding the control panel lights 3 Lights that are off, on their sequence. Understanding the control panel...
... Ready / Power Saver Continue Toner Low / Error Replace PC Kit Load Paper Paper Jam Ready Busy Hex Trace Ready Waiting Flushing / Resolution reduced Not ready (printer is offline) Close door Insufficient collation area / Insufficient memory Understanding the control panel lights 3 Lights that are off, on their sequence. Understanding the control panel...

Quick Reference
Page 4
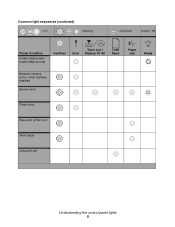
Common light sequences (continued) = On = Blinking = Slow blink Empty = Off Printer Condition Complex page Continue Toner Low / Error Replace PC Kit Load Paper Paper Jam Ready Cancel job/ Reset printer Load print media Load manual feeder Toner low Toner cartridge region mismatch Photoconductor kit life warning Replace photoconductor (printer hard stop) Programming engine code/ Programming system code Understanding the control panel lights 4
Common light sequences (continued) = On = Blinking = Slow blink Empty = Off Printer Condition Complex page Continue Toner Low / Error Replace PC Kit Load Paper Paper Jam Ready Cancel job/ Reset printer Load print media Load manual feeder Toner low Toner cartridge region mismatch Photoconductor kit life warning Replace photoconductor (printer hard stop) Programming engine code/ Programming system code Understanding the control panel lights 4
Quick Reference
Page 5
Common light sequences (continued) = On = Blinking = Slow blink Empty = Off Printer Condition Invalid engine code / Invalid network code Continue Toner Low / Error Replace PC Kit Load Paper Paper Jam Ready Network interface errors / Host interface disabled Service error Printer error Paper jam printer error Short paper Output bin full Understanding the control panel lights 5
Common light sequences (continued) = On = Blinking = Slow blink Empty = Off Printer Condition Invalid engine code / Invalid network code Continue Toner Low / Error Replace PC Kit Load Paper Paper Jam Ready Network interface errors / Host interface disabled Service error Printer error Paper jam printer error Short paper Output bin full Understanding the control panel lights 5

Quick Reference
Page 6
...On the menu settings page: - Printing the menu settings and network setup pages 6 button from your computer 1 Click Start Æ Settings Æ Printers. 2 Select your printer. 3 Click File Æ Properties. 4 Click Print Test Page. Verify that the options you turn off and back on . 4 Keep pressing .... The Load Paper, Toner Low / Replace PC Kit, Ready and Continue lights appear. 8 Release the Continue button. 9 Turn the printer off the printer, unplug the power cord from the wall outlet, and reinstall the option. - Printing the menu settings and network setup pages To print ...
...On the menu settings page: - Printing the menu settings and network setup pages 6 button from your computer 1 Click Start Æ Settings Æ Printers. 2 Select your printer. 3 Click File Æ Properties. 4 Click Print Test Page. Verify that the options you turn off and back on . 4 Keep pressing .... The Load Paper, Toner Low / Replace PC Kit, Ready and Continue lights appear. 8 Release the Continue button. 9 Turn the printer off the printer, unplug the power cord from the wall outlet, and reinstall the option. - Printing the menu settings and network setup pages To print ...

Quick Reference
Page 7
... Resolution • Toner Darkness • Small Font Enhancer Setup Settings • Eco-mode • Quiet Mode • Alarm Control • Printer Language • Power Saver • Resource Save • Download Target • Print Timeout • Wait Timeout • Auto Continue •... if you change the following settings using the Local Printer Settings Utility. You can change printer settings not available from the computer software application, select Start Æ All Programs Æ Lexmark Æ Local Printer Settings Utility. If you selected the Custom install path...
... Resolution • Toner Darkness • Small Font Enhancer Setup Settings • Eco-mode • Quiet Mode • Alarm Control • Printer Language • Power Saver • Resource Save • Download Target • Print Timeout • Wait Timeout • Auto Continue •... if you change the following settings using the Local Printer Settings Utility. You can change printer settings not available from the computer software application, select Start Æ All Programs Æ Lexmark Æ Local Printer Settings Utility. If you selected the Custom install path...
Quick Reference
Page 8
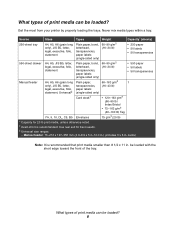
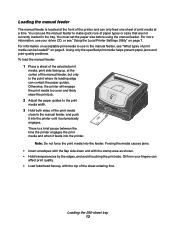
.... † Grain short is recommended that print media smaller than 8 1/2 x 11 in . What types of print media can be loaded? Get the most from your printer by properly loading the trays. Manual feeder: 76-216 x 127-356 mm (3.0-8.5 x 5.0-14.0 in.) (includes 3 x 5 in . What types of the tray. cards) Note: It is...
.... † Grain short is recommended that print media smaller than 8 1/2 x 11 in . What types of print media can be loaded? Get the most from your printer by properly loading the trays. Manual feeder: 76-216 x 127-356 mm (3.0-8.5 x 5.0-14.0 in.) (includes 3 x 5 in . What types of the tray. cards) Note: It is...

Quick Reference
Page 9
...paper, extend the length of paper, transparency, envelope, paper label, card stock, or index card. Where can print media be loaded in the printer? The output bin on page 12. You can increase paper capacity by purchasing an optional 550-sheet drawer. maximum paper fill indicator maximum paper ...fill indicator Note: To load legal- Use the 250-sheet tray for legal- Your printer has two standard paper sources: a 250-sheet tray and a single-sheet manual feeder. For more information, see "Extending the tray for most ...
...paper, extend the length of paper, transparency, envelope, paper label, card stock, or index card. Where can print media be loaded in the printer? The output bin on page 12. You can increase paper capacity by purchasing an optional 550-sheet drawer. maximum paper fill indicator maximum paper ...fill indicator Note: To load legal- Use the 250-sheet tray for legal- Your printer has two standard paper sources: a 250-sheet tray and a single-sheet manual feeder. For more information, see "Extending the tray for most ...

Quick Reference
Page 12
... also keeps the tray from the environment. Attach the dust cover to the back of the printer by aligning the tabs on the cover to protect the tray while it is extended. 1 Press down on the printer, then snap the cover into place. or folio-size paper, extend the tray. Note: This... feature may also attach a dust cover (if available on your printer model) on the back of the printer to the holes on the latch at the back of position while it is extended. or folio-size paper To load legal...
... also keeps the tray from the environment. Attach the dust cover to the back of the printer by aligning the tabs on the cover to protect the tray while it is extended. 1 Press down on the printer, then snap the cover into place. or folio-size paper, extend the tray. Note: This... feature may also attach a dust cover (if available on your printer model) on the back of the printer to the holes on the latch at the back of position while it is extended. or folio-size paper To load legal...
Quick Reference
Page 13
... quality. • Load letterhead faceup, with the stamp area as shown. • Hold transparencies by the edges, and avoid touching the print side. Otherwise, the printer will engage the print media too soon and likely skew the print job. 2 Adjust the paper guides to the print media width. 3 Hold both sides... on acceptable print media to make quick runs of the manual feeder, but only to the manual feeder, and push it into the printer until it feeds into the printer. on page 7. Loading the 250-sheet tray 13 You must set the paper size before using the manual feeder. Note: Do not...
... quality. • Load letterhead faceup, with the stamp area as shown. • Hold transparencies by the edges, and avoid touching the print side. Otherwise, the printer will engage the print media too soon and likely skew the print job. 2 Adjust the paper guides to the print media width. 3 Hold both sides... on acceptable print media to make quick runs of the manual feeder, but only to the manual feeder, and push it into the printer until it feeds into the printer. on page 7. Loading the 250-sheet tray 13 You must set the paper size before using the manual feeder. Note: Do not...

Quick Reference
Page 14
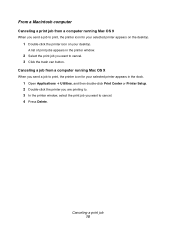
... rear exit 14 To use the rear exit, open , the print speed may slow down. From a Windows computer 1 Click Start Æ Settings Æ Printers. 2 Double-click the printer you print a multiple-page job with the rear exit door open the rear exit door. Note: If you are using to help reduce curling... the job is displayed on top of print jobs appears. 3 Right-click the document you want to cancel the job currently printing. A list of the printer. From the printer control panel Press and release Cancel to stop printing, and then click Cancel.
... rear exit 14 To use the rear exit, open , the print speed may slow down. From a Windows computer 1 Click Start Æ Settings Æ Printers. 2 Double-click the printer you print a multiple-page job with the rear exit door open the rear exit door. Note: If you are using to help reduce curling... the job is displayed on top of print jobs appears. 3 Right-click the document you want to cancel the job currently printing. A list of the printer. From the printer control panel Press and release Cancel to stop printing, and then click Cancel.
Quick Reference
Page 15
...4 Press Delete. Canceling a job from a computer running Mac OS X When you send a job to print, the printer icon for your selected printer appears on the desktop. 1 Double-click the printer icon on your selected printer appears in the dock. 1 Open Applications Æ Utilities, and then double-click Print Center or... Printer Setup. 2 Double-click the printer you are printing to. 3 In the printer window, select the print job you want to cancel. 3 Click the trash can button. A list of print jobs appears in the printer window. 2 Select the print job you ...
...4 Press Delete. Canceling a job from a computer running Mac OS X When you send a job to print, the printer icon for your selected printer appears on the desktop. 1 Double-click the printer icon on your selected printer appears in the dock. 1 Open Applications Æ Utilities, and then double-click Print Center or... Printer Setup. 2 Double-click the printer you are printing to. 3 In the printer window, select the print job you want to cancel. 3 Click the trash can button. A list of print jobs appears in the printer window. 2 Select the print job you ...

Quick Reference
Page 16
For more information, see the Software and Documentation CD that came with your printer. We recommend clearing the entire paper path when a paper jam occurs. 1 Remove all paper from the 150-sheet output bin. 2 If you are feeding paper from the 250-sheet tray, remove the tray. 3 Remove the jammed pages. Clearing jams When a paper jam occurs, the printer stops and the control panel Paper Jam and Continue lights come on. Clearing jams 16
For more information, see the Software and Documentation CD that came with your printer. We recommend clearing the entire paper path when a paper jam occurs. 1 Remove all paper from the 150-sheet output bin. 2 If you are feeding paper from the 250-sheet tray, remove the tray. 3 Remove the jammed pages. Clearing jams When a paper jam occurs, the printer stops and the control panel Paper Jam and Continue lights come on. Clearing jams 16
Quick Reference
Page 18
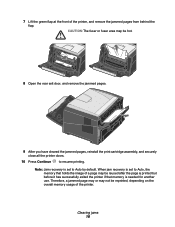
When jam recovery is set to Auto by default. Therefore, a jammed page may or may be reprinted, depending on the overall memory usage of the printer, and remove the jammed pages from behind the flap. Clearing jams 18 Note: Jam recovery is needed for another use. CAUTION:The fuser or fuser ...rear exit door, and remove the jammed pages. 9 After you have cleared the jammed pages, reinstall the print cartridge assembly, and securely close all the printer doors. 10 Press Continue to Auto, the memory that holds the image of a page may not be reused after the page is printed but before...
When jam recovery is set to Auto by default. Therefore, a jammed page may or may be reprinted, depending on the overall memory usage of the printer, and remove the jammed pages from behind the flap. Clearing jams 18 Note: Jam recovery is needed for another use. CAUTION:The fuser or fuser ...rear exit door, and remove the jammed pages. 9 After you have cleared the jammed pages, reinstall the print cartridge assembly, and securely close all the printer doors. 10 Press Continue to Auto, the memory that holds the image of a page may not be reused after the page is printed but before...
User's Guide
Page 3
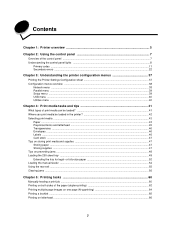
...of the control panel ...7 Understanding the control panel lights ...8 Primary codes ...11 Secondary errors ...22 Chapter 3: Understanding the printer configuration menus 37 Printing the Printer Settings Configuration sheet 37 Configuration menus overview ...38 Network menu ...38 Parallel menu ...39 Setup menu ...39 USB menu ...40... print job ...60 Printing on both sides of print media can be loaded? ...41 Where can print media be loaded in the printer 42 Selecting print media ...43 Paper ...43 Preprinted forms and letterhead ...45 Transparencies ...46 Envelopes ...46 Labels ...46 Card stock ...
...of the control panel ...7 Understanding the control panel lights ...8 Primary codes ...11 Secondary errors ...22 Chapter 3: Understanding the printer configuration menus 37 Printing the Printer Settings Configuration sheet 37 Configuration menus overview ...38 Network menu ...38 Parallel menu ...39 Setup menu ...39 USB menu ...40... print job ...60 Printing on both sides of print media can be loaded? ...41 Where can print media be loaded in the printer 42 Selecting print media ...43 Paper ...43 Preprinted forms and letterhead ...45 Transparencies ...46 Envelopes ...46 Labels ...46 Card stock ...
User's Guide
Page 4
... ...85 Lexmark Status Messenger Utility ...86 Selecting printer operating mode ...86 Turning on Reduced Curl mode ...86 Print quality problems ...87 Cleaning the printhead lens ...91 Notices ...93 Conventions ...93 Electronic emission notices ...93 Noise emission levels ...95 Product energy consumption ...95 Waste from Electrical and Electronic Equipment (WEEE) directive 96 Laser notice...
... ...85 Lexmark Status Messenger Utility ...86 Selecting printer operating mode ...86 Turning on Reduced Curl mode ...86 Print quality problems ...87 Cleaning the printhead lens ...91 Notices ...93 Conventions ...93 Electronic emission notices ...93 Noise emission levels ...95 Product energy consumption ...95 Waste from Electrical and Electronic Equipment (WEEE) directive 96 Laser notice...
User's Guide
Page 5
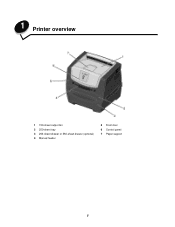
1 Printer overview 1 150-sheet output bin 2 250-sheet tray 3 250-sheet drawer or 550-sheet drawer (optional) 4 Manual feeder 5 Front door 6 Control panel 7 Paper support 5
1 Printer overview 1 150-sheet output bin 2 250-sheet tray 3 250-sheet drawer or 550-sheet drawer (optional) 4 Manual feeder 5 Front door 6 Control panel 7 Paper support 5

User's Guide
Page 6
Printer overview 1 Rear exit 5 USB connect 2 Power button 6 Parallel connect 3 Power connect 7 Ethernet connect 4 Dust cover (not available for some models) 6
Printer overview 1 Rear exit 5 USB connect 2 Power button 6 Parallel connect 3 Power connect 7 Ethernet connect 4 Dust cover (not available for some models) 6
User's Guide
Page 7
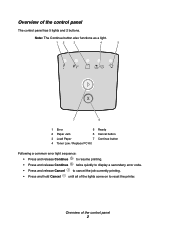
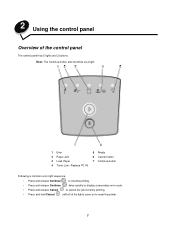
2 Using the control panel Overview of the lights come on to reset the printer. 7 Note: The Continue button also functions as a light. 1 Error 2 Paper Jam 3 Load Paper 4 Toner Low / Replace PC Kit 5 Ready 6 Cancel button 7 Continue button Following a common ...
2 Using the control panel Overview of the lights come on to reset the printer. 7 Note: The Continue button also functions as a light. 1 Error 2 Paper Jam 3 Load Paper 4 Toner Low / Replace PC Kit 5 Ready 6 Cancel button 7 Continue button Following a common ...

