
Service Manual
Page 10
4479-XXX x Service Manual
4479-XXX x Service Manual
Service Manual
Page 11
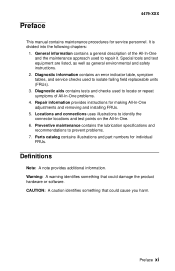
.... 5. Special tools and test equipment are listed, as well as general environmental and safety instructions. 2. Definitions Note: A note provides additional information. Preface 4479-XXX This manual contains maintenance procedures for service personnel. It is divided into the following chapters: 1. Preventive maintenance contains the lubrication specifications and recommendations to isolate failing field...
.... 5. Special tools and test equipment are listed, as well as general environmental and safety instructions. 2. Definitions Note: A note provides additional information. Preface 4479-XXX This manual contains maintenance procedures for service personnel. It is divided into the following chapters: 1. Preventive maintenance contains the lubrication specifications and recommendations to isolate failing field...
Service Manual
Page 14
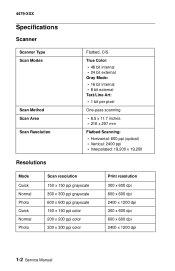
4479-XXX Specifications Scanner Scanner Type Scan Modes Scan Method Scan Area Scan Resolution Flatbed, CIS True Color: • 48 bit internal • 24 bit external Gray Mode: • 16 bit internal • 8 bit external Text/Line Art: • 1 bit per pixel One-... Quick Normal Photo Quick Normal Photo Scan resolution 150 x 150 ppi grayscale 300 x 300 ppi grayscale 600 x 600 ppi grayscale 150 x 150 ppi color 200 x 200 ppi color 300 x 300 ppi color Print resolution 300 x 600 dpi 600 x 600 dpi 2400 x 1200 dpi 300 x 600 dpi 600 x 600 dpi 2400 x 1200 dpi 1-2 Service...
4479-XXX Specifications Scanner Scanner Type Scan Modes Scan Method Scan Area Scan Resolution Flatbed, CIS True Color: • 48 bit internal • 24 bit external Gray Mode: • 16 bit internal • 8 bit external Text/Line Art: • 1 bit per pixel One-... Quick Normal Photo Quick Normal Photo Scan resolution 150 x 150 ppi grayscale 300 x 300 ppi grayscale 600 x 600 ppi grayscale 150 x 150 ppi color 200 x 200 ppi color 300 x 300 ppi color Print resolution 300 x 600 dpi 600 x 600 dpi 2400 x 1200 dpi 300 x 600 dpi 600 x 600 dpi 2400 x 1200 dpi 1-2 Service...

Service Manual
Page 16
..., the +/buttons are used to make a selection. The All-In-One is equipped with a green Color Copy button. The Scan button has no function defined for non-host attached operation. 1-4 Service Manual The All-In-One stays on the LCD is also used to scroll through the available menus. For... the All-In-One Center to initiate grayscale copies when the All-In-One is equipped with a Black Copy button. 4479-XXX Buttons Cancel +/Arrow Color Copy Black Copy Scan Functions During a computer print job, the Cancel button cancels the job by sending a "scan abort" command to the computer. ...
..., the +/buttons are used to make a selection. The All-In-One is equipped with a green Color Copy button. The Scan button has no function defined for non-host attached operation. 1-4 Service Manual The All-In-One stays on the LCD is also used to scroll through the available menus. For... the All-In-One Center to initiate grayscale copies when the All-In-One is equipped with a Black Copy button. 4479-XXX Buttons Cancel +/Arrow Color Copy Black Copy Scan Functions During a computer print job, the Cancel button cancels the job by sending a "scan abort" command to the computer. ...

Service Manual
Page 17
Use the error codes, symptom tables, service checks, and diagnostic aids to determine the symptom and repair the failure. After you to the correct field replaceable unit (FRU) or part. 4479-XXX Maintenance approach The diagnostic information in this manual leads you complete the repair, perform tests as needed to verify the repair. Tools required for service • Flat-blade screwdriver • #1 Phillips screwdriver • #2 Phillips screwdriver • Spring hook • Analog or digital multimeter General information 1-5
Use the error codes, symptom tables, service checks, and diagnostic aids to determine the symptom and repair the failure. After you to the correct field replaceable unit (FRU) or part. 4479-XXX Maintenance approach The diagnostic information in this manual leads you complete the repair, perform tests as needed to verify the repair. Tools required for service • Flat-blade screwdriver • #1 Phillips screwdriver • #2 Phillips screwdriver • Spring hook • Analog or digital multimeter General information 1-5
Service Manual
Page 18
... Manufacturer Power-On Self Test Read Only Memory Single Byte Character Set Universal Serial Bus Volts alternating current Volts direct current Zero Insertion Force 1-6 Service Manual
... Manufacturer Power-On Self Test Read Only Memory Single Byte Character Set Universal Serial Bus Volts alternating current Volts direct current Zero Insertion Force 1-6 Service Manual
Service Manual
Page 20
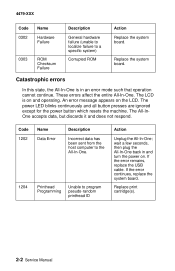
... appears on . wait a few seconds, then plug the All-In-One back in an error mode such that operation cannot continue. Replace print cartridge(s). 2-2 Service Manual The power LED blinks continuously and all button presses are ignored except for the power button which resets the machine. The All-InOne accepts data...
... appears on . wait a few seconds, then plug the All-In-One back in an error mode such that operation cannot continue. Replace print cartridge(s). 2-2 Service Manual The power LED blinks continuously and all button presses are ignored except for the power button which resets the machine. The All-InOne accepts data...
Service Manual
Page 22
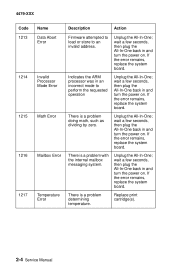
... invalid address. Unplug the All-In-One; There is a problem determining temperature. There is a problem with the internal mailbox messaging system. Replace print cartridge(s). 2-4 Service Manual wait a few seconds, then plug the All-In-One back in and turn the power on . There is a problem doing math, such as dividing by...
... invalid address. Unplug the All-In-One; There is a problem determining temperature. There is a problem with the internal mailbox messaging system. Replace print cartridge(s). 2-4 Service Manual wait a few seconds, then plug the All-In-One back in and turn the power on . There is a problem doing math, such as dividing by...
Service Manual
Page 24
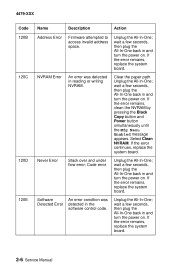
... the All-In-One back in and turn the power on . Unplug the All-In-One; If the error remains, replace the system board. 2-6 Service Manual wait a few seconds, then plug the All-In-One back in and turn the power on . If the error remains, replace the system board. Unplug...
... the All-In-One back in and turn the power on . Unplug the All-In-One; If the error remains, replace the system board. 2-6 Service Manual wait a few seconds, then plug the All-In-One back in and turn the power on . If the error remains, replace the system board. Unplug...
Service Manual
Page 26
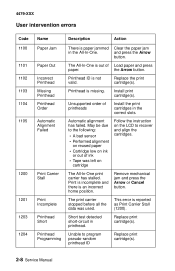
...: • A bad sensor • Performed alignment on reused paper • Cartridge low on the LCD to program pseudo-random printhead ID Replace print cartridge(s). 2-8 Service Manual This error is an incorrect home position. Automatic alignment has failed. Remove mechanical jam and press the Arrow or Cancel button. Replace print cartridge(s). Printhead...
...: • A bad sensor • Performed alignment on reused paper • Cartridge low on the LCD to program pseudo-random printhead ID Replace print cartridge(s). 2-8 Service Manual This error is an incorrect home position. Automatic alignment has failed. Remove mechanical jam and press the Arrow or Cancel button. Replace print cartridge(s). Printhead...
Service Manual
Page 28
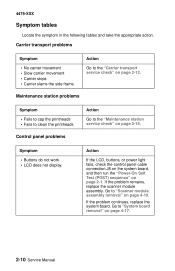
... to cap the printheads • Fails to clean the printheads Control panel problems Action Go to "Scanner module assembly removal" on page 4-17. 2-10 Service Manual Go to the "Maintenance station service check" on page 2-1.
... to cap the printheads • Fails to clean the printheads Control panel problems Action Go to "Scanner module assembly removal" on page 4-17. 2-10 Service Manual Go to the "Maintenance station service check" on page 2-1.
Service Manual
Page 30
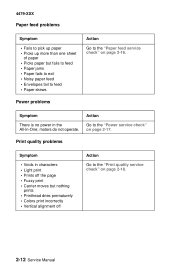
... power in characters • Light print • Prints off Action Go to the "Print quality service check" on page 2-18. 2-12 Service Manual motors do not operate. Print quality problems Symptom • Voids in the All-In-One; Action Go to the "Power service check" on page ...to pick up paper • Picks up more than one sheet of paper • Picks paper but nothing prints • Printhead dries prematurely • Colors print incorrectly • Vertical alignment off the page • Fuzzy print • Carrier moves but fails to feed • Paper jams • Paper...
... power in characters • Light print • Prints off Action Go to the "Print quality service check" on page 2-18. 2-12 Service Manual motors do not operate. Print quality problems Symptom • Voids in the All-In-One; Action Go to the "Power service check" on page ...to pick up paper • Picks up more than one sheet of paper • Picks paper but nothing prints • Printhead dries prematurely • Colors print incorrectly • Vertical alignment off the page • Fuzzy print • Carrier moves but fails to feed • Paper jams • Paper...

Service Manual
Page 32
..." on page 4-17. If the lamp does not come on as the CIS module assembly is scanning, check connector J10 on page 4-10. 2-14 Service Manual Go to clean the contacts. If any of the printhead carrier for wear or damage: • Printhead cartridge latch • Latch spring • Carrier •...
..." on page 4-17. If the lamp does not come on as the CIS module assembly is scanning, check connector J10 on page 4-10. 2-14 Service Manual Go to clean the contacts. If any of the printhead carrier for wear or damage: • Printhead cartridge latch • Latch spring • Carrier •...
Service Manual
Page 34
... motor turns in the paper. If the pick roller is incorrect, replace the system board. Go to "System board removal" on page 4-13. 2-16 Service Manual Go to "System board removal" on page 2-1. Remove the paper feed motor and check the shaft for a loose or worn motor gear.
... motor turns in the paper. If the pick roller is incorrect, replace the system board. Go to "System board removal" on page 4-13. 2-16 Service Manual Go to "System board removal" on page 2-1. Remove the paper feed motor and check the shaft for a loose or worn motor gear.
Service Manual
Page 36
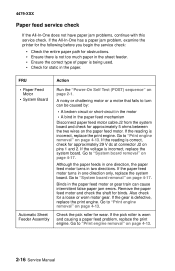
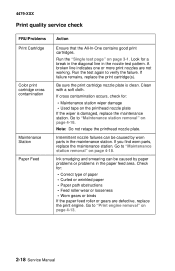
Run the "Single test page" on page 4-13. 2-18 Service Manual If failure remains, replace the print cartridge(s). Intermittent nozzle failures can be caused by paper problems or problems in the maintenance station. If you find ... paper feed area. Clean with a soft cloth. Go to "Maintenance station removal" on page 4-18. 4479-XXX Print quality service check FRU/Problems Print Cartridge Color print cartridge cross contamination Maintenance Station Paper Feed Action Ensure that the All-In-One contains good print cartridges. Go to "Print engine removal" on...
Run the "Single test page" on page 4-13. 2-18 Service Manual If failure remains, replace the print cartridge(s). Intermittent nozzle failures can be caused by paper problems or problems in the maintenance station. If you find ... paper feed area. Clean with a soft cloth. Go to "Maintenance station removal" on page 4-18. 4479-XXX Print quality service check FRU/Problems Print Cartridge Color print cartridge cross contamination Maintenance Station Paper Feed Action Ensure that the All-In-One contains good print cartridges. Go to "Print engine removal" on...
Service Manual
Page 38
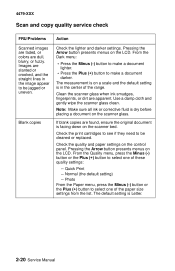
... quality settings: - The default setting is facing down on the scanner bed. Images are found, ensure the original document is Letter. 2-20 Service Manual Blank copies If blank copies are slanted or crooked, and the straight lines in the center of the paper size settings from the list. Quick...Pressing the Arrow button presents menus on the LCD. 4479-XXX Scan and copy quality service check FRU/Problems Action Scanned images are faded, or colors are apparent. Check the lighter and darker settings. Use a damp cloth and gently wipe the scanner glass clean. Check the quality and paper ...
... quality settings: - The default setting is facing down on the scanner bed. Images are found, ensure the original document is Letter. 2-20 Service Manual Blank copies If blank copies are slanted or crooked, and the straight lines in the center of the paper size settings from the list. Quick...Pressing the Arrow button presents menus on the LCD. 4479-XXX Scan and copy quality service check FRU/Problems Action Scanned images are faded, or colors are apparent. Check the lighter and darker settings. Use a damp cloth and gently wipe the scanner glass clean. Check the quality and paper ...
Service Manual
Page 40
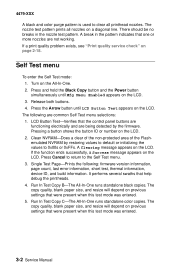
... appears on previous settings that were present when this test mode was entered. 3-2 Service Manual Single Test Page-Prints the following are not working. Run In Test Copy C-The All-In-One runs standalone color copies. The copy quality, blank paper size, and resize will depend on previous settings... the nozzle test pattern. A Clearing message appears on page 2-18. Self Test menu To enter the Self Test mode: 1. 4479-XXX A black and color purge pattern is used to clear all nozzles on a diagonal line. The nozzle test pattern prints all printhead nozzles. There should be no breaks in...
... appears on previous settings that were present when this test mode was entered. 3-2 Service Manual Single Test Page-Prints the following are not working. Run In Test Copy C-The All-In-One runs standalone color copies. The copy quality, blank paper size, and resize will depend on previous settings... the nozzle test pattern. A Clearing message appears on page 2-18. Self Test menu To enter the Self Test mode: 1. 4479-XXX A black and color purge pattern is used to clear all nozzles on a diagonal line. The nozzle test pattern prints all printhead nozzles. There should be no breaks in...

Service Manual
Page 42
4479-XXX 3-4 Service Manual
4479-XXX 3-4 Service Manual

Service Manual
Page 44
... cartridges and close the scanner module assembly. 3. After the page prints, Automatic alignment complete appears. Press the Arrow button to which it is latched. 4-2 Service Manual release them carefully. Releasing plastic latches Many of the parts are arranged according to align the print cartridges when they are installed or replaced. 1. During...
... cartridges and close the scanner module assembly. 3. After the page prints, Automatic alignment complete appears. Press the Arrow button to which it is latched. 4-2 Service Manual release them carefully. Releasing plastic latches Many of the parts are arranged according to align the print cartridges when they are installed or replaced. 1. During...

Service Manual
Page 46
Remove the ASF guide and spring. 4-4 Service Manual 4479-XXX ASF guide with spring removal 1. Flex the ASF guide and remove tab (A) from the hole. 2.
Remove the ASF guide and spring. 4-4 Service Manual 4479-XXX ASF guide with spring removal 1. Flex the ASF guide and remove tab (A) from the hole. 2.


