Setup Sheet
Page 1
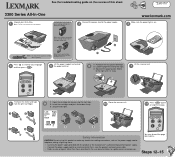
...to scroll to your All-In-One. 1 Note: Contents may include a photo cartridge instead of this product or the manufacturer's authorized replacement power supply. • Connect the power supply cord to an electrical outlet that is snug. 2 3 1 Lift the scanner unit. 7 Remove the sticker and tape 8 from the... page. Left: photo or black Right: color only 1 2 3 Close the scanner unit. 10 2 1 3 11 Press to the right. 3 Squeeze the paper guide. Note: Save the print cartridge storage unit to the power supply. 2 www.lexmark.com Make sure the power light is on. 3 Before you continue,...
...to scroll to your All-In-One. 1 Note: Contents may include a photo cartridge instead of this product or the manufacturer's authorized replacement power supply. • Connect the power supply cord to an electrical outlet that is snug. 2 3 1 Lift the scanner unit. 7 Remove the sticker and tape 8 from the... page. Left: photo or black Right: color only 1 2 3 Close the scanner unit. 10 2 1 3 11 Press to the right. 3 Squeeze the paper guide. Note: Save the print cartridge storage unit to the power supply. 2 www.lexmark.com Make sure the power light is on. 3 Before you continue,...
Service Manual
Page 18
... Byte Character Set End of Form Electrostatic Discharge Flexible Flat Cable Flat Printhead Cable Field Replaceable Unit High Voltage Power Supply Liquid Crystal Display Light-Emitting Diode Low Voltage Power Supply Multipurpose Feeder Nonvolatile Random Access Memory Original Equipment Manufacturer Power-On Self Test Read Only Memory Single Byte Character Set Universal Serial Bus Volts alternating...
... Byte Character Set End of Form Electrostatic Discharge Flexible Flat Cable Flat Printhead Cable Field Replaceable Unit High Voltage Power Supply Liquid Crystal Display Light-Emitting Diode Low Voltage Power Supply Multipurpose Feeder Nonvolatile Random Access Memory Original Equipment Manufacturer Power-On Self Test Read Only Memory Single Byte Character Set Universal Serial Bus Volts alternating...
Service Manual
Page 35
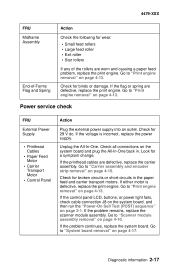
...Feed Motor • Carrier Transport Motor • Control Panel Action Plug the external power supply into an outlet. If the voltage is defective, replace the print engine. If the printhead cables are defective, replace the print engine. Go to "Print engine removal" on page 4-15. Diagnostic information... Check all connections on page 4-17. If either motor is incorrect, replace the power supply. If the control panel LCD, buttons, or power light fails, check cable connection J8 on the system board, and then run the "Power-On Self Test (POST) sequence" on page 4-13. Go to ...
...Feed Motor • Carrier Transport Motor • Control Panel Action Plug the external power supply into an outlet. If the voltage is defective, replace the print engine. If the printhead cables are defective, replace the print engine. Go to "Print engine removal" on page 4-15. Diagnostic information... Check all connections on page 4-17. If either motor is incorrect, replace the power supply. If the control panel LCD, buttons, or power light fails, check cable connection J8 on the system board, and then run the "Power-On Self Test (POST) sequence" on page 4-13. Go to ...


