
User's Guide
Page 10
... application, click Help on a Macintosh operating system. Click to view context-sensitive information. Additional instructions for using the printer. Note: Your printer may not have support for using the printer software on a Windows operating system. Note: If you want to view the main page of the Help. Introduction Finding information about...
... application, click Help on a Macintosh operating system. Click to view context-sensitive information. Additional instructions for using the printer. Note: Your printer may not have support for using the printer software on a Windows operating system. Note: If you want to view the main page of the Help. Introduction Finding information about...
User's Guide
Page 11
... a country or region, and then select the Customer Support link. Mail Support. 6 Complete the form, and then click Submit Request. E-mail support varies by country or region. E-mail support For e-mail support, visit our Web site: www.lexmark.com. 1 Click SUPPORT. 2 Click Technical Support. 3 Select your printer family. 4 Select your printer. - Support in English: Monday-Friday (8:00 AM-11...
... a country or region, and then select the Customer Support link. Mail Support. 6 Complete the form, and then click Submit Request. E-mail support varies by country or region. E-mail support For e-mail support, visit our Web site: www.lexmark.com. 1 Click SUPPORT. 2 Click Technical Support. 3 Select your printer family. 4 Select your printer. - Support in English: Monday-Friday (8:00 AM-11...
User's Guide
Page 12
materials and workmanship for Inkjet & All-In-One Printers. 4 Scroll through the Web page to find (USA) Where to view the warranty. original date of purchase. 2 Click Warranty Information. 3 Click Statement of Limited Warranty for a www.lexmark.com. See the printed furnishes a limited warranty that Limited... and the back of the printer), and have it ready when you contact customer support so that came with this limited warranty, see the Statement of 12 months after the 1 Click SUPPORT. period of country or region. this warranty that they may serve you faster: ...
materials and workmanship for Inkjet & All-In-One Printers. 4 Scroll through the Web page to find (USA) Where to view the warranty. original date of purchase. 2 Click Warranty Information. 3 Click Statement of Limited Warranty for a www.lexmark.com. See the printed furnishes a limited warranty that Limited... and the back of the printer), and have it ready when you contact customer support so that came with this limited warranty, see the Statement of 12 months after the 1 Click SUPPORT. period of country or region. this warranty that they may serve you faster: ...
User's Guide
Page 15
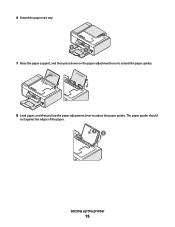
6 Extend the paper exit tray. 2 1 7 Raise the paper support, and then press down on the paper adjustment lever to adjust the paper guides. The paper guides should rest against the edges of the paper. 12 Setting up the paper adjustment lever to extend the paper guides. 8 Load paper, and then pull up the printer 15
6 Extend the paper exit tray. 2 1 7 Raise the paper support, and then press down on the paper adjustment lever to adjust the paper guides. The paper guides should rest against the edges of the paper. 12 Setting up the paper adjustment lever to extend the paper guides. 8 Load paper, and then pull up the printer 15
User's Guide
Page 20
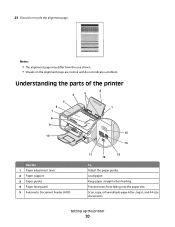
... differ from falling into the paper slot. Understanding the parts of the printer 2 4 3 5 6 1 7 8 9 10 W I F I PRINTING WI F I PRINTING 15 14 Use the 1 Paper adjustment lever 2 Paper support 3 Paper guides 4 Paper feed guard 5 Automatic Document Feeder (ADF) 11 13 12 To Adjust the paper guides. Load paper. Setting up the printer 20 Scan...
... differ from falling into the paper slot. Understanding the parts of the printer 2 4 3 5 6 1 7 8 9 10 W I F I PRINTING WI F I PRINTING 15 14 Use the 1 Paper adjustment lever 2 Paper support 3 Paper guides 4 Paper feed guard 5 Automatic Document Feeder (ADF) 11 13 12 To Adjust the paper guides. Load paper. Setting up the printer 20 Scan...
User's Guide
Page 31
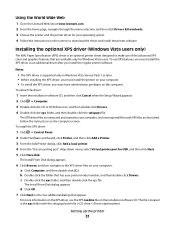
...site at www.lexmark.com. 2 From the home page, navigate through the menu selection, and then click Drivers & Downloads. 3 Choose the printer and the printer driver for Windows Vista users. Installing the optional XPS driver (Windows Vista users only) The XML Paper Specification (XPS) driver is supported only in ... port" drop-down menu, select Virtual printer port for USB, and then click Next. 5 Click Have disk. To use of the advanced XPS color and graphics features that appear. Notes: • The XPS driver is an optional printer driver designed to make use XPS features, you must install...
...site at www.lexmark.com. 2 From the home page, navigate through the menu selection, and then click Drivers & Downloads. 3 Choose the printer and the printer driver for Windows Vista users. Installing the optional XPS driver (Windows Vista users only) The XML Paper Specification (XPS) driver is supported only in ... port" drop-down menu, select Virtual printer port for USB, and then click Next. 5 Click Have disk. To use of the advanced XPS color and graphics features that appear. Notes: • The XPS driver is an optional printer driver designed to make use XPS features, you must install...
User's Guide
Page 33
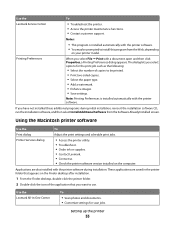
... schedule print jobs. • Access the printer utility. • Troubleshoot. • Order ink or supplies. • Contact Lexmark. • Contact us. • Check the printer software version installed on your printer model. Note: Printing Preferences is installed ...lets you have not installed these additional programs during installation. Use the Lexmark Service Center To • Troubleshoot the printer. • Access the printer maintenance functions. • Contact customer support. Printing Preferences Notes: • This program is installed automatically with the...
... schedule print jobs. • Access the printer utility. • Troubleshoot. • Order ink or supplies. • Contact Lexmark. • Contact us. • Check the printer software version installed on your printer model. Note: Printing Preferences is installed ...lets you have not installed these additional programs during installation. Use the Lexmark Service Center To • Troubleshoot the printer. • Access the printer maintenance functions. • Contact customer support. Printing Preferences Notes: • This program is installed automatically with the...
User's Guide
Page 34
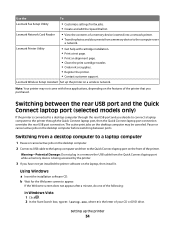
...Order ink or supplies. • Register the printer. • Contact customer support. Pause or cancel active jobs on a wireless network. b Wait for fax jobs. • Create and edit the Speed Dial list. Lexmark Wireless Setup Assistant Set up the printer 34 If the Welcome screen does not ...computer through the Quick Connect laptop port, then the Quick Connect laptop port connection overrides the rear USB port connection. Use the To Lexmark Fax Setup Utility • Customize settings for the Welcome screen to the printer through the rear USB port and you decide to ...
...Order ink or supplies. • Register the printer. • Contact customer support. Pause or cancel active jobs on a wireless network. b Wait for fax jobs. • Create and edit the Speed Dial list. Lexmark Wireless Setup Assistant Set up the printer 34 If the Welcome screen does not ...computer through the Quick Connect laptop port, then the Quick Connect laptop port connection overrides the rear USB port connection. Use the To Lexmark Fax Setup Utility • Customize settings for the Welcome screen to the printer through the rear USB port and you decide to ...
User's Guide
Page 44
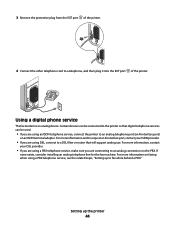
... connected to a telephone, and then plug it into the EXT port of the printer. 4 Connect the other telephone cord to the printer so that will support analog use. If none exists, consider installing an analog telephone line for the fax machine.
... connected to a telephone, and then plug it into the EXT port of the printer. 4 Connect the other telephone cord to the printer so that will support analog use. If none exists, consider installing an analog telephone line for the fax machine.

User's Guide
Page 45
... (either a WEP key or WPA passphrase) that your wireless network is set up the printer on a wireless network (selected models only) 45 If your system support person. Installing the printer on a wireless network Before you are Wi-Fi certified. or • Exactly 5 or 13 ASCII characters. If you want to 63...
... (either a WEP key or WPA passphrase) that your wireless network is set up the printer on a wireless network (selected models only) 45 If your system support person. Installing the printer on a wireless network Before you are Wi-Fi certified. or • Exactly 5 or 13 ASCII characters. If you want to 63...

User's Guide
Page 48
... networks. Assigning a static IP address The printer will prompt you to manually assign an IP address to the printer. For more information, contact your system support person. Changing wireless settings after installation To change wireless settings on the computer screen to reinstall the software, and then make the changes that came...; In Windows XP and earlier, click Start. 2 Click All Programs or Programs, and then select the printer program folder from the list. 3 Click Tools ΠLexmark Wireless Setup Utility.
... networks. Assigning a static IP address The printer will prompt you to manually assign an IP address to the printer. For more information, contact your system support person. Changing wireless settings after installation To change wireless settings on the computer screen to reinstall the software, and then make the changes that came...; In Windows XP and earlier, click Start. 2 Click All Programs or Programs, and then select the printer program folder from the list. 3 Click Tools ΠLexmark Wireless Setup Utility.
User's Guide
Page 54
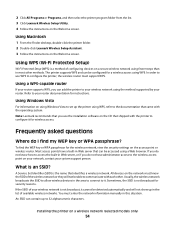
.... In order to 32 alphanumeric characters. The printer supports WPS and can be configured for a wireless access using the method supported by your router documentation for wireless access. Using a WPS-capable router If your router supports WPS, you do I find the WEP key or.... If the SSID of available wireless networks. Using Macintosh 1 From the Finder desktop, double-click the printer folder. 2 Double-click Lexmark Wireless Setup Assistant. 3 Follow the instructions on a secure wireless network using Windows Vista to the wireless access point on using fewer steps...
.... In order to 32 alphanumeric characters. The printer supports WPS and can be configured for a wireless access using the method supported by your router documentation for wireless access. Using a WPS-capable router If your router supports WPS, you do I find the WEP key or.... If the SSID of available wireless networks. Using Macintosh 1 From the Finder desktop, double-click the printer folder. 2 Double-click Lexmark Wireless Setup Assistant. 3 Follow the instructions on a secure wireless network using Windows Vista to the wireless access point on using fewer steps...

User's Guide
Page 55
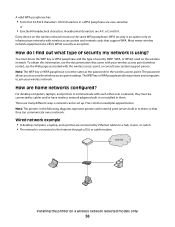
...either of these methods, contact your neighbors' homes. For a device to be able to communicate wirelessly, it receive and transmit radio waves. The wireless printer supports four security options: no security means that lets it must use the same WEP key. WEP security relies on a wireless network (selected models only) 55...hexadecimal characters. Both WPA and WPA2 use a series of characters called the WPA pre-shared key or passphrase, to protect wireless networks from your system support person. Installing the printer on a series of characters, called the WEP key.
...either of these methods, contact your neighbors' homes. For a device to be able to communicate wirelessly, it receive and transmit radio waves. The wireless printer supports four security options: no security means that lets it must use the same WEP key. WEP security relies on a wireless network (selected models only) 55...hexadecimal characters. Both WPA and WPA2 use a series of characters called the WPA pre-shared key or passphrase, to protect wireless networks from your system support person. Installing the printer on a series of characters, called the WEP key.
User's Guide
Page 56
...The printers in to them . How are A-F, a-f, and 0-9. Five common examples appear below. A valid WPA passphrase has: • From 8 to join your system support person. The WEP key or WPA passphrase allows printers and computers to 63 ASCII characters. There are case-sensitive. You must know the WEP key... with wireless access points and network cards that they must use the same WPA passphrase. ASCII characters in them so that support WPA. Every device on infrastructure networks with each other over a network. or • Exactly 64 hexadecimal characters.
...The printers in to them . How are A-F, a-f, and 0-9. Five common examples appear below. A valid WPA passphrase has: • From 8 to join your system support person. The WEP key or WPA passphrase allows printers and computers to 63 ASCII characters. There are case-sensitive. You must know the WEP key... with wireless access points and network cards that they must use the same WPA passphrase. ASCII characters in them so that support WPA. Every device on infrastructure networks with each other over a network. or • Exactly 64 hexadecimal characters.

User's Guide
Page 62
... (MAC) address is not common practice to the hardware of a device instead of network equipment. Routers with the hardware of its software. Yes, the printer supports a simultaneous USB and network connection. While it is possible to change the MAC address of a network device, it is a 48-bit identifier associated with security...
... (MAC) address is not common practice to the hardware of a device instead of network equipment. Routers with the hardware of its software. Yes, the printer supports a simultaneous USB and network connection. While it is possible to change the MAC address of a network device, it is a 48-bit identifier associated with security...
User's Guide
Page 66
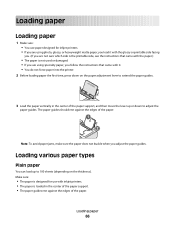
...rest against the edges of the paper support, and then move the lever up to adjust the paper guides. Loading various paper types Plain paper You can load up or down on the thickness). Loading paper Loading paper 1 Make sure: • You use with inkjet printers. • The paper is loaded... in the center of the paper support. • The paper guides rest against the edges of the paper. 1 2 Note: To avoid paper jams, make ...
...rest against the edges of the paper support, and then move the lever up to adjust the paper guides. Loading various paper types Plain paper You can load up or down on the thickness). Loading paper Loading paper 1 Make sure: • You use with inkjet printers. • The paper is loaded... in the center of the paper support. • The paper guides rest against the edges of the paper. 1 2 Note: To avoid paper jams, make ...
User's Guide
Page 67
... sheets. Remove each photo as it exits, and then allow it to dry to peel off during printing, resulting in the center of the paper support. • The paper guides rest against the edges of the envelopes. Note: Photos require more drying time. Notes: • Do not load envelopes ...with inkjet printers. • The envelopes are not sure which side is loaded in the center of the paper support. • The paper guides rest against the edges of the paper. Envelopes You can load up to...
... sheets. Remove each photo as it exits, and then allow it to dry to peel off during printing, resulting in the center of the paper support. • The paper guides rest against the edges of the envelopes. Note: Photos require more drying time. Notes: • Do not load envelopes ...with inkjet printers. • The envelopes are not sure which side is loaded in the center of the paper support. • The paper guides rest against the edges of the paper. Envelopes You can load up to...

User's Guide
Page 68
...transparencies. Remove each strip faces away from you and down toward the printer. • The transparencies are loaded in the center of the paper support. • The paper guides rest against the edges of the transfers. Notes: • Transparencies with the iron-on transfers You can load up... Iron-on transfers. • The print side of the transfers faces you . • The cards are loaded in the center of the paper support. • The paper guides rest against the edges of the label sheets. Make sure: • You follow the loading instructions that came with paper...
...transparencies. Remove each strip faces away from you and down toward the printer. • The transparencies are loaded in the center of the paper support. • The paper guides rest against the edges of the transfers. Notes: • Transparencies with the iron-on transfers You can load up... Iron-on transfers. • The print side of the transfers faces you . • The cards are loaded in the center of the paper support. • The paper guides rest against the edges of the label sheets. Make sure: • You follow the loading instructions that came with paper...
User's Guide
Page 69
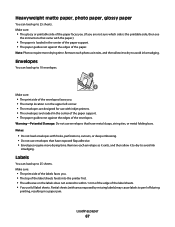
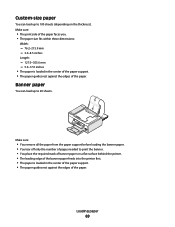
... within these dimensions: Width: - 76.2-215.9 mm - 3.0-8.5 inches Length: - 127.0-355.6 mm - 5.0-17.0 inches • The paper is loaded in the center of the paper support. • The paper guides rest against the edges of the paper. Banner paper You can load up to 20 sheets. Make sure: • You remove... all the paper from the paper support before loading the banner paper. • You tear off only the number of pages needed to print the banner. • You place the required stack...
... within these dimensions: Width: - 76.2-215.9 mm - 3.0-8.5 inches Length: - 127.0-355.6 mm - 5.0-17.0 inches • The paper is loaded in the center of the paper support. • The paper guides rest against the edges of the paper. Banner paper You can load up to 20 sheets. Make sure: • You remove... all the paper from the paper support before loading the banner paper. • You tear off only the number of pages needed to print the banner. • You place the required stack...
User's Guide
Page 72
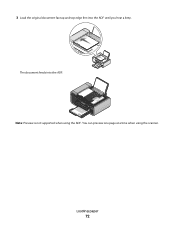
Loading paper 72 The document feeds into the ADF until you hear a beep. You can preview one page at a time when using the ADF. WI F I PRINTING Note: Preview is not supported when using the scanner. 3 Load the original document faceup and top edge first into the ADF.
Loading paper 72 The document feeds into the ADF until you hear a beep. You can preview one page at a time when using the ADF. WI F I PRINTING Note: Preview is not supported when using the scanner. 3 Load the original document faceup and top edge first into the ADF.


