User's Guide for Windows
Page 6
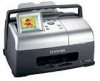
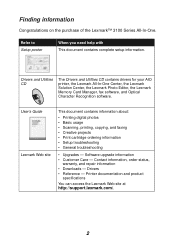
... information • Downloads - Refer to Setup poster When you need help with This document contains complete setup information. Printer documentation and product specifications You can access the Lexmark Web site at http://support.lexmark.com/. 2 User's Guide Lexmark Web site This document contains information about: • Printing digital photos • Basic usage • Scanning, printing...
... information • Downloads - Refer to Setup poster When you need help with This document contains complete setup information. Printer documentation and product specifications You can access the Lexmark Web site at http://support.lexmark.com/. 2 User's Guide Lexmark Web site This document contains information about: • Printing digital photos • Basic usage • Scanning, printing...
User's Guide for Windows
Page 9
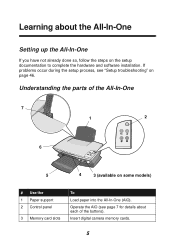
If problems occur during the setup process, see page 7 for details about the All-In-One Setting up the All-In-One If you have not already done so, follow the steps on the setup documentation to complete the hardware and software installation. Insert digital camera memory cards. 5 Operate the AIO (see "Setup troubleshooting" on page 46. Understanding the parts of the buttons). Learning about each of the All-In-One 7 1 2 6 5 4 3 (available on some models) # Use the 1 Paper support 2 Control panel 3 Memory card slots To Load paper into the All-In-One (AIO).
If problems occur during the setup process, see page 7 for details about the All-In-One Setting up the All-In-One If you have not already done so, follow the steps on the setup documentation to complete the hardware and software installation. Insert digital camera memory cards. 5 Operate the AIO (see "Setup troubleshooting" on page 46. Understanding the parts of the buttons). Learning about each of the All-In-One 7 1 2 6 5 4 3 (available on some models) # Use the 1 Paper support 2 Control panel 3 Memory card slots To Load paper into the All-In-One (AIO).
User's Guide for Windows
Page 12
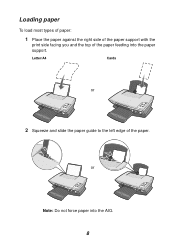
Letter/A4 Cards or 2 Squeeze and slide the paper guide to the left edge of the paper feeding into the AIO. 8 Loading paper To load most types of paper: 1 Place the paper against the right side of the paper support with the print side facing you and the top of the paper. or Note: Do not force paper into the paper support.
Letter/A4 Cards or 2 Squeeze and slide the paper guide to the left edge of the paper feeding into the AIO. 8 Loading paper To load most types of paper: 1 Place the paper against the right side of the paper support with the print side facing you and the top of the paper. or Note: Do not force paper into the paper support.
User's Guide for Windows
Page 13
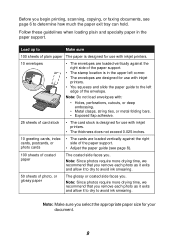
...025 inches. 10 greeting cards, index • The cards are loaded vertically against the right side of the paper support. • The stamp location is designed for use with inkjet printers. 10 envelopes • The envelopes are loaded vertically against the right cards, postcards, or side of coated paper The... exits and allow it to dry to avoid ink smearing. 50 sheets of card stock • The card stock is in the paper support. Follow these guidelines when loading plain and specialty paper in the upper left edge of the envelope. Note: Since photos require more drying ...
...025 inches. 10 greeting cards, index • The cards are loaded vertically against the right side of the paper support. • The stamp location is designed for use with inkjet printers. 10 envelopes • The envelopes are loaded vertically against the right cards, postcards, or side of coated paper The... exits and allow it to dry to avoid ink smearing. 50 sheets of card stock • The card stock is in the paper support. Follow these guidelines when loading plain and specialty paper in the upper left edge of the envelope. Note: Since photos require more drying ...
User's Guide for Windows
Page 15
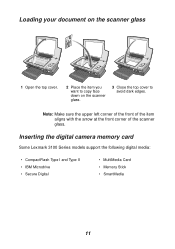
Loading your document on the scanner glass 1 Open the top cover. 2 Place the item you want to copy face down on the scanner glass. 3 Close the top cover to avoid dark edges. Note: Make sure the upper left corner of the front of the item aligns with the arrow at the front corner of the scanner glass. Inserting the digital camera memory card Some Lexmark 3100 Series models support the following digital media: • CompactFlash Type I and Type II • IBM Microdrive • Secure Digital • MultiMedia Card • Memory Stick • SmartMedia 11
Loading your document on the scanner glass 1 Open the top cover. 2 Place the item you want to copy face down on the scanner glass. 3 Close the top cover to avoid dark edges. Note: Make sure the upper left corner of the front of the item aligns with the arrow at the front corner of the scanner glass. Inserting the digital camera memory card Some Lexmark 3100 Series models support the following digital media: • CompactFlash Type I and Type II • IBM Microdrive • Secure Digital • MultiMedia Card • Memory Stick • SmartMedia 11
User's Guide for Windows
Page 16
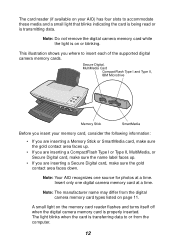
... This illustration shows you are inserting a Secure Digital card, make sure the name label faces up. • If you where to insert each of the supported digital camera memory cards.
... This illustration shows you are inserting a Secure Digital card, make sure the name label faces up. • If you where to insert each of the supported digital camera memory cards.
User's Guide for Windows
Page 31
Printing borderless photos 1 For best results, load photo paper into the paper support (see page 8). 2 Open the All-In-One Center (see page 13). 3 Click the Saved Images tab. 4 From the Creative Tasks section, select Print an album page with various photo sizes. 5 Click Change the category of layouts listed above. 6 Select Only Borderless from the Selected Layouts dialog box. 7 Click OK. 8 Select a paper size for your photos. 9 Select a page layout from the Create a page from saved photos section. 10 Drag your photos onto the page. 11 Click Print Now. 27
Printing borderless photos 1 For best results, load photo paper into the paper support (see page 8). 2 Open the All-In-One Center (see page 13). 3 Click the Saved Images tab. 4 From the Creative Tasks section, select Print an album page with various photo sizes. 5 Click Change the category of layouts listed above. 6 Select Only Borderless from the Selected Layouts dialog box. 7 Click OK. 8 Select a paper size for your photos. 9 Select a page layout from the Create a page from saved photos section. 10 Drag your photos onto the page. 11 Click Print Now. 27
User's Guide for Windows
Page 40
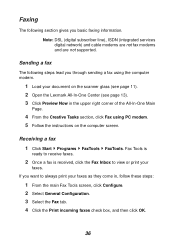
...-One Main Page. 4 From the Creative Tasks section, click Fax using PC modem. 5 Follow the instructions on the scanner glass (see page 11). 2 Open the Lexmark All-In-One Center (see page 13). 3 Click Preview Now in , follow these steps: 1 From the main Fax Tools screen, click Configure. 2 Select General Configuration... document on the computer screen. Note: DSL (digital subscriber line), ISDN (integrated services digital network) and cable modems are not fax modems and are not supported.
...-One Main Page. 4 From the Creative Tasks section, click Fax using PC modem. 5 Follow the instructions on the scanner glass (see page 11). 2 Open the Lexmark All-In-One Center (see page 13). 3 Click Preview Now in , follow these steps: 1 From the main Fax Tools screen, click Configure. 2 Select General Configuration... document on the computer screen. Note: DSL (digital subscriber line), ISDN (integrated services digital network) and cable modems are not fax modems and are not supported.
User's Guide for Windows
Page 42
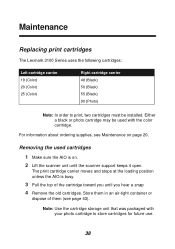
.... Store them (see Maintenance on . 2 Lift the scanner unit until you until the scanner support keeps it open. Maintenance Replacing print cartridges The Lexmark 3100 Series uses the following cartridges: Left cartridge carrier 19 (Color) 20 (Color) 25 (Color) Right cartridge carrier 48 (Black) 50 (Black) 55 (Black) 90 (Photo) Note: In order to store...
.... Store them (see Maintenance on . 2 Lift the scanner unit until you until the scanner support keeps it open. Maintenance Replacing print cartridges The Lexmark 3100 Series uses the following cartridges: Left cartridge carrier 19 (Color) 20 (Color) 25 (Color) Right cartridge carrier 48 (Black) 50 (Black) 55 (Black) 90 (Photo) Note: In order to store...
User's Guide for Windows
Page 48
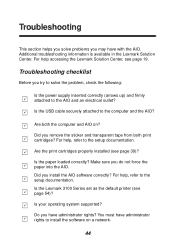
... 39)? Is the USB cable securely attached to the AIO and an electrical outlet? Is your operating system supported? For help , refer to install the software on ? Additional troubleshooting information is available in the Lexmark Solution Center. Troubleshooting checklist Before you have administrator rights to the setup documentation. Do you try to... up) and firmly attached to the computer and the AIO? Are the print cartridges properly installed (see page 19. Are both print cartridges? Is the Lexmark 3100 Series set as the default printer (see page 54)?
... 39)? Is the USB cable securely attached to the AIO and an electrical outlet? Is your operating system supported? For help , refer to install the software on ? Additional troubleshooting information is available in the Lexmark Solution Center. Troubleshooting checklist Before you have administrator rights to the setup documentation. Do you try to... up) and firmly attached to the computer and the AIO? Are the print cartridges properly installed (see page 19. Are both print cartridges? Is the Lexmark 3100 Series set as the default printer (see page 54)?
User's Guide for Windows
Page 56
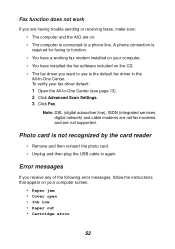
... again. Fax function does not work If you are having trouble sending or receiving faxes, make sure: • The computer and the AIO are not supported.
... again. Fax function does not work If you are having trouble sending or receiving faxes, make sure: • The computer and the AIO are not supported.

User's Guide for Windows
Page 59
Other help sources If the preceding solutions do not solve the problem with your All-In-One: • Refer to the Lexmark Solution Center software for more troubleshooting information: 1 Click Start Programs Lexmark 3100 Series Lexmark 3100 Series Solution Center. 2 Click the Troubleshooting tab on the left side of the screen. • Visit our Web site at http://support.lexmark.com/ for help. 55
Other help sources If the preceding solutions do not solve the problem with your All-In-One: • Refer to the Lexmark Solution Center software for more troubleshooting information: 1 Click Start Programs Lexmark 3100 Series Lexmark 3100 Series Solution Center. 2 Click the Troubleshooting tab on the left side of the screen. • Visit our Web site at http://support.lexmark.com/ for help. 55
User's Guide for Windows
Page 60
... provide reasonable protection against harmful interference in a violation of EN 60950. 56 This equipment generates, uses, and can be directed to: Director of Lexmark Technology & Services Lexmark International, Inc. 740 West New Circle Road Lexington, KY 40550 (859) 232-3000 Industry Canada compliance statement This Class B digital apparatus meets all...exigences du Règlement sur le matériel brouilleur du Canada. However, there is connected. • Consult your point of Manufacturing and Technical Support, Lexmark International, S.A., Boigny, France. If this equipment.
... provide reasonable protection against harmful interference in a violation of EN 60950. 56 This equipment generates, uses, and can be directed to: Director of Lexmark Technology & Services Lexmark International, Inc. 740 West New Circle Road Lexington, KY 40550 (859) 232-3000 Industry Canada compliance statement This Class B digital apparatus meets all...exigences du Règlement sur le matériel brouilleur du Canada. However, there is connected. • Consult your point of Manufacturing and Technical Support, Lexmark International, S.A., Boigny, France. If this equipment.
User's Guide for Windows
Page 63
...-In-One Center opening 13 using 13 Lexmark Photo Editor opening 21 using 21 Lexmark Solution Center 19 Advanced tab 20 Contact Information tab 20 How To tab 19 Maintenance tab 20 opening 19 Printer Status tab 19 Troubleshooting tab 19 loading banner paper 10 card stock 9 coated paper 9 custom ... Feed button 7 Paper Setup tab 18 paper size selecting 18 paper type selecting 18 part numbers black cartridge 38 color cartridge 38 photo cartridge 38 parts control panel 5 memory card slots 5 paper support 5 scanner unit 6 parts of your All-In-One 5 photo cards loading 9 photo cartridge part number 38 ...
...-In-One Center opening 13 using 13 Lexmark Photo Editor opening 21 using 21 Lexmark Solution Center 19 Advanced tab 20 Contact Information tab 20 How To tab 19 Maintenance tab 20 opening 19 Printer Status tab 19 Troubleshooting tab 19 loading banner paper 10 card stock 9 coated paper 9 custom ... Feed button 7 Paper Setup tab 18 paper size selecting 18 paper type selecting 18 part numbers black cartridge 38 color cartridge 38 photo cartridge 38 parts control panel 5 memory card slots 5 paper support 5 scanner unit 6 parts of your All-In-One 5 photo cards loading 9 photo cartridge part number 38 ...
