Maintenance Guide
Page 2
... Adjusting scanner registration...4 Storing supplies...5 Conserving supplies...6 Checking the status of supplies...6 Checking the status of supplies from the printer control panel 6 Checking the status of supplies from a network computer 6 Ordering supplies...7 Ordering print cartridges ...7 Ordering a ... ...9 Ordering pick rollers ...9 Ordering ADF replacement parts...10 Ordering staple cartridges ...10 Recycling Lexmark products...10 Moving the printer...10 Before moving the printer ...10 Moving the printer to another location...11 Setting the printer up in a new location ...11 Shipping the...
... Adjusting scanner registration...4 Storing supplies...5 Conserving supplies...6 Checking the status of supplies...6 Checking the status of supplies from the printer control panel 6 Checking the status of supplies from a network computer 6 Ordering supplies...7 Ordering print cartridges ...7 Ordering a ... ...9 Ordering pick rollers ...9 Ordering ADF replacement parts...10 Ordering staple cartridges ...10 Recycling Lexmark products...10 Moving the printer...10 Before moving the printer ...10 Moving the printer to another location...11 Setting the printer up in a new location ...11 Shipping the...
Maintenance Guide
Page 3
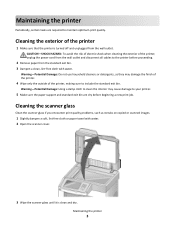
... cloth to clean the interior may damage the finish of the printer. 4 Wipe only the outside of the printer, making sure to your printer. 5 Make sure the paper support and standard exit bin are required to the printer before beginning a new print job. CAUTION-SHOCK HAZARD: To avoid... the risk of electric shock when cleaning the exterior of the printer 1 Make sure that the printer is clean and dry. Maintaining the printer Periodically, certain tasks are dry before proceeding. 2 Remove paper from the standard exit bin. 3 Dampen a ...
... cloth to clean the interior may damage the finish of the printer. 4 Wipe only the outside of the printer, making sure to your printer. 5 Make sure the paper support and standard exit bin are required to the printer before beginning a new print job. CAUTION-SHOCK HAZARD: To avoid... the risk of electric shock when cleaning the exterior of the printer 1 Make sure that the printer is clean and dry. Maintaining the printer Periodically, certain tasks are dry before proceeding. 2 Remove paper from the standard exit bin. 3 Dampen a ...
Maintenance Guide
Page 4
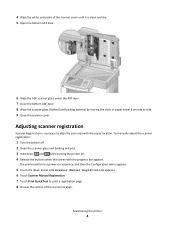
...) and backing material by moving the cloth or paper towel from side to align the scan area with the progress bar appears. The printer performs a power‑on sequence, and then the Configuration menu appears. 5 Touch the down and while turning the... printer on. 4 Release the buttons when the screen with the paper location. Maintaining the printer 4 To manually adjust the scanner registration: 1 Turn the printer off. 2 Clean the scanner glass and backing material. 3 Hold down arrow until Scanner...
...) and backing material by moving the cloth or paper towel from side to align the scan area with the progress bar appears. The printer performs a power‑on sequence, and then the Configuration menu appears. 5 Touch the down and while turning the... printer on. 4 Release the buttons when the screen with the paper location. Maintaining the printer 4 To manually adjust the scanner registration: 1 Turn the printer off. 2 Clean the scanner glass and backing material. 3 Hold down arrow until Scanner...
Maintenance Guide
Page 5
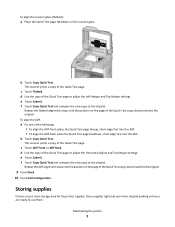
... Touch Submit. c Touch Flatbed. Repeat the flatbed alignment steps until the position on the scanner glass. Storing supplies Choose a cool, clean storage area for the printer supplies. b Touch Copy Quick Test. To align the ADF: a Do one of the Quick Test page. The scanner prints a copy of the following: ...Test and compare the new copy to the original. d Use the copy of the Quick Test page. b Touch Copy Quick Test. Maintaining the printer 5 To align the scanner glass (flatbed): a Place the Quick Test page facedown on the page of the Quick Test copy closely matches the ...
... Touch Submit. c Touch Flatbed. Repeat the flatbed alignment steps until the position on the scanner glass. Storing supplies Choose a cool, clean storage area for the printer supplies. b Touch Copy Quick Test. To align the ADF: a Do one of the Quick Test page. The scanner prints a copy of the following: ...Test and compare the new copy to the original. d Use the copy of the Quick Test page. b Touch Copy Quick Test. Maintaining the printer 5 To align the scanner glass (flatbed): a Place the Quick Test page facedown on the page of the Quick Test copy closely matches the ...
Maintenance Guide
Page 6
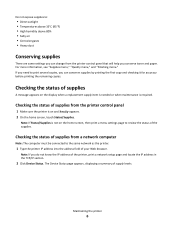
... need to print several copies, you can change from a network computer Note: The computer must be connected to the same network as the printer. 1 Type the printer IP address into the address field of your Web browser. Checking the status of supplies A message appears on and Ready appears. 2 On the... is needed or when maintenance is not on the home screen, then print a menu settings page to review the status of supplies from the printer control panel that will help you conserve toner and paper. Checking the status of the supplies. The Device Status page appears, displaying a summary ...
... need to print several copies, you can change from a network computer Note: The computer must be connected to the same network as the printer. 1 Type the printer IP address into the address field of your Web browser. Checking the status of supplies A message appears on and Ready appears. 2 On the... is needed or when maintenance is not on the home screen, then print a menu settings page to review the status of supplies from the printer control panel that will help you conserve toner and paper. Checking the status of the supplies. The Device Status page appears, displaying a summary ...
Maintenance Guide
Page 7
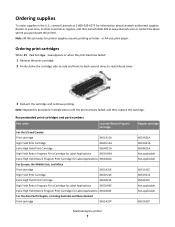
...X651A21P Regular cartridge X651A21A X651H21A X654X21A Not applicable Not applicable X651A11E X651H11E X654X11E Not applicable Not applicable X651A11P Maintaining the printer 7 Note: Repeat this procedure multiple times until the print remains faded, and then replace the cartridge. In other countries ... several times to redistribute toner. 3 Reinsert the cartridge and continue printing. Recommended print cartridges and part numbers Part name Lexmark Return Program Cartridge For the US and Canada Print cartridge X651A11A High Yield Print Cartridge X651H11A Extra High Yield Print Cartridge ...
...X651A21P Regular cartridge X651A21A X651H21A X654X21A Not applicable Not applicable X651A11E X651H11E X654X11E Not applicable Not applicable X651A11P Maintaining the printer 7 Note: Repeat this procedure multiple times until the print remains faded, and then replace the cartridge. In other countries ... several times to redistribute toner. 3 Reinsert the cartridge and continue printing. Recommended print cartridges and part numbers Part name Lexmark Return Program Cartridge For the US and Canada Print cartridge X651A11A High Yield Print Cartridge X651H11A Extra High Yield Print Cartridge ...
Maintenance Guide
Page 8
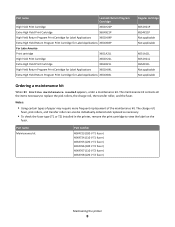
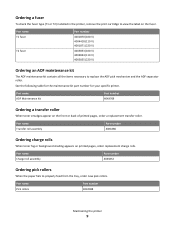
... (110 V T1 fuser) 40X4765 (220 V T1 fuser) 40X4766 (100 V T2 fuser) 40X4767 (110 V T2 fuser) 40X4768 (220 V T2 fuser) Maintaining the printer 8 The maintenance kit contains all the items necessary to view the label on the fuser. The charge roll, fuser, pick rollers, and transfer roller can...8226; To check the fuser type (T1 or T2) installed in the printer, remove the print cartridge to replace the pick rollers, the charge roll, the transfer roller, and the fuser. Part name Lexmark Return Program Cartridge High Yield Print Cartridge X651H21P Extra High Yield Print Cartridge X654X21P...
... (110 V T1 fuser) 40X4765 (220 V T1 fuser) 40X4766 (100 V T2 fuser) 40X4767 (110 V T2 fuser) 40X4768 (220 V T2 fuser) Maintaining the printer 8 The maintenance kit contains all the items necessary to view the label on the fuser. The charge roll, fuser, pick rollers, and transfer roller can...8226; To check the fuser type (T1 or T2) installed in the printer, remove the print cartridge to replace the pick rollers, the charge roll, the transfer roller, and the fuser. Part name Lexmark Return Program Cartridge High Yield Print Cartridge X651H21P Extra High Yield Print Cartridge X654X21P...
Maintenance Guide
Page 9
...the items necessary to view the label on the fuser. Ordering a fuser To check the fuser type (T1 or T2) installed in the printer, remove the print cartridge to replace the ADF pick mechanism and the ADF separator roller. See the following table for the maintenance kit part ...number for your specific printer. Part name Pick rollers Part number 40X4308 Maintaining the printer 9 Part name Charge roll assembly Part number 40X5852 Ordering pick rollers When the paper fails to properly feed from...
...the items necessary to view the label on the fuser. Ordering a fuser To check the fuser type (T1 or T2) installed in the printer, remove the print cartridge to replace the ADF pick mechanism and the ADF separator roller. See the following table for the maintenance kit part ...number for your specific printer. Part name Pick rollers Part number 40X4308 Maintaining the printer 9 Part name Charge roll assembly Part number 40X5852 Ordering pick rollers When the paper fails to properly feed from...
Maintenance Guide
Page 10
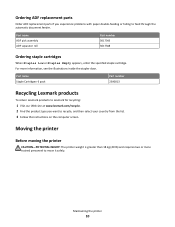
... instructions on the computer screen. Part name Staple Cartridges-3 pack Part number 25A0013 Recycling Lexmark products To return Lexmark products to Lexmark for recycling: 1 Visit our Web site at www.lexmark.com/recycle. 2 Find the product type you experience problems with paper double-feeding... or failing to move it safely. Maintaining the printer 10 Moving the printer Before moving the printer CAUTION-POTENTIAL INJURY: The printer weight is greater than 18 ...
... instructions on the computer screen. Part name Staple Cartridges-3 pack Part number 25A0013 Recycling Lexmark products To return Lexmark products to Lexmark for recycling: 1 Visit our Web site at www.lexmark.com/recycle. 2 Find the product type you experience problems with paper double-feeding... or failing to move it safely. Maintaining the printer 10 Moving the printer Before moving the printer CAUTION-POTENTIAL INJURY: The printer weight is greater than 18 ...
Maintenance Guide
Page 11
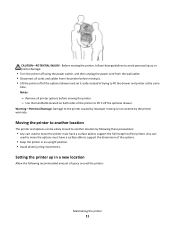
... Any cart used to move the printer must have a surface able to support the full footprint of the printer. Use the handholds located on both sides of space around the printer: Maintaining the printer 11 Moving the printer to another location The printer and options can be safely moved ...power switch, and then unplug the power cord from the printer before moving the printer. - Notes: - Remove all cords and cables from the wall outlet. • Disconnect all printer options before moving is not covered by the printer warranty. Warning-Potential Damage: Damage to lift it aside...
... Any cart used to move the printer must have a surface able to support the full footprint of the printer. Use the handholds located on both sides of space around the printer: Maintaining the printer 11 Moving the printer to another location The printer and options can be safely moved ...power switch, and then unplug the power cord from the printer before moving the printer. - Notes: - Remove all cords and cables from the wall outlet. • Disconnect all printer options before moving is not covered by the printer warranty. Warning-Potential Damage: Damage to lift it aside...
Maintenance Guide
Page 12
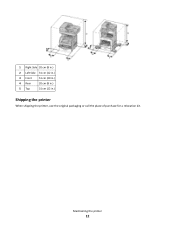
Maintaining the printer 12 1 Right Side 20 cm (8 in.) 2 Left Side 31 cm (12 in.) 3 Front 51 cm (20 in.) 4 Rear 20 cm (8 in.) 5 Top 31 cm (12 in.) Shipping the printer When shipping the printer, use the original packaging or call the place of purchase for a relocation kit.
Maintaining the printer 12 1 Right Side 20 cm (8 in.) 2 Left Side 31 cm (12 in.) 3 Front 51 cm (20 in.) 4 Rear 20 cm (8 in.) 5 Top 31 cm (12 in.) Shipping the printer When shipping the printer, use the original packaging or call the place of purchase for a relocation kit.


