
User's Guide
Page 24
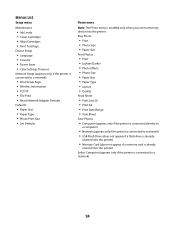
... List Setup menu Maintenance • Ink Levels • Clean Cartridges • Align Cartridges • Print Test Page Device Setup • Language • Country • Power Saver • Clear Settings Timeout Network Setup (appears only if the printer is enabled only when you insert a memory device into the printer. Easy Photo • Print • Photo Size • Paper Size Print Photos • Print • Lighter/Darker • Photo Effects • Photo Size • Paper Size • Paper Type • Layout • Quality Proof Sheet • Print Last 20 • Print...
... List Setup menu Maintenance • Ink Levels • Clean Cartridges • Align Cartridges • Print Test Page Device Setup • Language • Country • Power Saver • Clear Settings Timeout Network Setup (appears only if the printer is enabled only when you insert a memory device into the printer. Easy Photo • Print • Photo Size • Paper Size Print Photos • Print • Lighter/Darker • Photo Effects • Photo Size • Paper Size • Paper Type • Layout • Quality Proof Sheet • Print Last 20 • Print...
User's Guide
Page 27
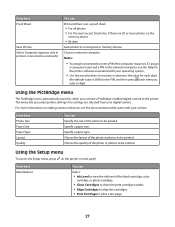
... on the printer control panel. From here Maintenance You can Specify the size of the black cartridge, color cartridge, or photo cartridge. • Clean Cartridges to clean the print cartridge nozzles. • Align Cartridges to align the cartridges. • Print Test Page to print a test page. 27 From here Photo Size Paper Size Paper Type Layout Quality You can Select: • Ink Level to view the ink level of the photo to be prompted to enter a PIN if the computer requires it. From here Proof Sheet Save Photos Select...
... on the printer control panel. From here Maintenance You can Specify the size of the black cartridge, color cartridge, or photo cartridge. • Clean Cartridges to clean the print cartridge nozzles. • Align Cartridges to align the cartridges. • Print Test Page to print a test page. 27 From here Photo Size Paper Size Paper Type Layout Quality You can Select: • Ink Level to view the ink level of the photo to be prompted to enter a PIN if the computer requires it. From here Proof Sheet Save Photos Select...
User's Guide
Page 28
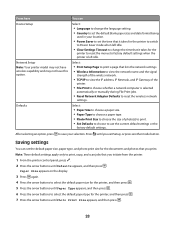
... printer control panel, press . 2 Press the arrow buttons until Defaults appears, and then press . Saving settings You can Select: • Language to change the time that lists the network settings. • Wireless Information to view the network name and the signal strength of the wirelss network. • TCP/IP to view the IP address, IP Netmask, and IP Gateway of photo(s) to print. • Set Defaults to choose to Power Saver mode...
... printer control panel, press . 2 Press the arrow buttons until Defaults appears, and then press . Saving settings You can Select: • Language to change the time that lists the network settings. • Wireless Information to view the network name and the signal strength of the wirelss network. • TCP/IP to view the IP address, IP Netmask, and IP Gateway of photo(s) to print. • Set Defaults to choose to Power Saver mode...
User's Guide
Page 31
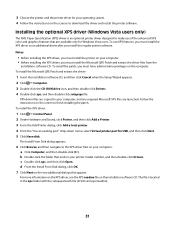
... Add a Printer. 3 From the Add Printer dialog, click Add a local printer. 4 From the "Use an existing port" drop-down menu, select Virtual printer port for Windows Vista users. To install the Microsoft QFE Patch and extract the driver: 1 Insert the installation software CD, and then click Cancel when the Setup Wizard appears. 2 Click ΠComputer. 3 Double-click the CD-ROM drive icon, and then double-click Drivers. 4 Double-click xps, and then double-click setupxps file...
... Add a Printer. 3 From the Add Printer dialog, click Add a local printer. 4 From the "Use an existing port" drop-down menu, select Virtual printer port for Windows Vista users. To install the Microsoft QFE Patch and extract the driver: 1 Insert the installation software CD, and then click Cancel when the Setup Wizard appears. 2 Click ΠComputer. 3 Double-click the CD-ROM drive icon, and then double-click Drivers. 4 Double-click xps, and then double-click setupxps file...
User's Guide
Page 33
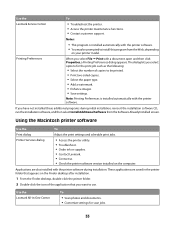
...; Print two-sided copies. • Select the paper type. • Add a watermark. • Enhance images. • Save settings. Use the Lexmark All-In-One Center To • Scan photos and documents. • Customize settings for the print job such as the following: • Select the number of copies to use. If you select File Œ Print with the printer software. The dialog lets you want to be prompted to install this program from the Software Already Installed screen. Applications are saved...
...; Print two-sided copies. • Select the paper type. • Add a watermark. • Enhance images. • Save settings. Use the Lexmark All-In-One Center To • Scan photos and documents. • Customize settings for the print job such as the following: • Select the number of copies to use. If you select File Œ Print with the printer software. The dialog lets you want to be prompted to install this program from the Software Already Installed screen. Applications are saved...
User's Guide
Page 34
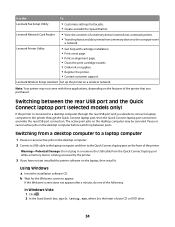
... not yet installed the printer software on the desktop computer may not come with cartridge installation. • Print a test page. • Print an alignment page. • Clean the print cartridge nozzles. • Order ink or supplies. • Register the printer. • Contact customer support. Warning-Potential Damage: Do not plug in or remove the USB cable from the Quick Connect laptop port while a memory device is connected to the computer over a network. If the Welcome screen does not...
... not yet installed the printer software on the desktop computer may not come with cartridge installation. • Print a test page. • Print an alignment page. • Clean the print cartridge nozzles. • Order ink or supplies. • Register the printer. • Contact customer support. Warning-Potential Damage: Do not plug in or remove the USB cable from the Quick Connect laptop port while a memory device is connected to the computer over a network. If the Welcome screen does not...
User's Guide
Page 37
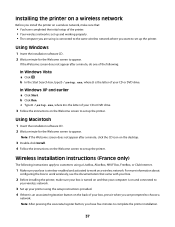
... desktop. 3 Double-click Install. 4 Follow the instructions on a wireless network. In Windows XP and earlier a Click Start. Using Macintosh 1 Insert the installation software CD. 2 Wait a minute for the Welcome screen to work wirelessly, see the documentation that came with your box. 2 Before installing the printer, make sure that your computer is on and connected to your wireless network. 3 Set up your printer using the setup instructions provided. 4 If there is an associate/registration button on the...
... desktop. 3 Double-click Install. 4 Follow the instructions on a wireless network. In Windows XP and earlier a Click Start. Using Macintosh 1 Insert the installation software CD. 2 Wait a minute for the Welcome screen to work wirelessly, see the documentation that came with your box. 2 Before installing the printer, make sure that your computer is on and connected to your wireless network. 3 Set up your printer using the setup instructions provided. 4 If there is an associate/registration button on the...

User's Guide
Page 39
... the arrow buttons until Network Setup appears, and then press . Using Macintosh 1 From the Finder desktop, double-click the printer folder. 2 Double-click Lexmark Wireless Setup Assistant. 3 Follow the instructions on your printer model has an internal wireless print server, and if the printer is not already connected, you want to a network. From here Print Setup Page Wireless Information You can Print a network setup page. Note: If the cable is connected to start using the installation cable as the configured network, the security key, or other settings: Using Windows 1 Do...
... the arrow buttons until Network Setup appears, and then press . Using Macintosh 1 From the Finder desktop, double-click the printer folder. 2 Double-click Lexmark Wireless Setup Assistant. 3 Follow the instructions on your printer model has an internal wireless print server, and if the printer is not already connected, you want to a network. From here Print Setup Page Wireless Information You can Print a network setup page. Note: If the cable is connected to start using the installation cable as the configured network, the security key, or other settings: Using Windows 1 Do...
User's Guide
Page 40
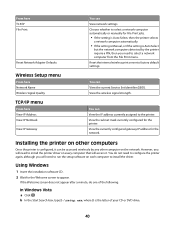
... network settings. View the subnet mask currently configured for the network. Installing the printer on each computer to install the driver. However, you will need to select a network computer from the File Print menu. View the currently configured gateway IP address for the printer. Reset the internal wireless print server to the printer. View the wireless signal strength. Using Windows 1 Insert the installation software CD. 2 Wait for File Print jobs. • If the setting is Auto Select, then the printer selects a network...
... network settings. View the subnet mask currently configured for the network. Installing the printer on each computer to install the driver. However, you will need to select a network computer from the File Print menu. View the currently configured gateway IP address for the printer. Reset the internal wireless print server to the printer. View the wireless signal strength. Using Windows 1 Insert the installation software CD. 2 Wait for File Print jobs. • If the setting is Auto Select, then the printer selects a network...

User's Guide
Page 42
...) Windows Vista will configure the printer for your wireless network connection. 6 Click Enable, if it when running the wireless setup. b Click All Programs. c Select the printer program folder, and then click Tools ΠLexmark Wireless Setup Utility. 9 When the available networks are A-F, a-f, and 0-9. Make sure you can refer to it appears in the space provided so you copy the exact spelling and capitalization. Hexadecimal characters are displayed, provide the network name...
...) Windows Vista will configure the printer for your wireless network connection. 6 Click Enable, if it when running the wireless setup. b Click All Programs. c Select the printer program folder, and then click Tools ΠLexmark Wireless Setup Utility. 9 When the available networks are A-F, a-f, and 0-9. Make sure you can refer to it appears in the space provided so you copy the exact spelling and capitalization. Hexadecimal characters are displayed, provide the network name...

User's Guide
Page 43
... printer program folder from the list. 12 Click Add to create an ad hoc network. 13 In the Network Name (SSID) box, type the name you want to give your knowledge. 17 If necessary, clear the "The key is secure) Note: For more information about passwords (security keys), see "Check your computer to configure my wireless network settings check box. 11 Under Preferred Networks, delete any existing networks. 10 Select the Use Windows...
... printer program folder from the list. 12 Click Add to create an ad hoc network. 13 In the Network Name (SSID) box, type the name you want to give your knowledge. 17 If necessary, clear the "The key is secure) Note: For more information about passwords (security keys), see "Check your computer to configure my wireless network settings check box. 11 Under Preferred Networks, delete any existing networks. 10 Select the Use Windows...
User's Guide
Page 44
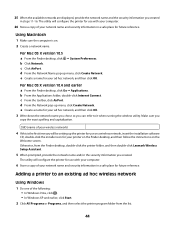
... the computer is the first time you will be setting up the printer for use on a wireless network, insert the installation software CD, double-click the installer icon for your printer on the Finder desktop, and then follow the instructions on . 2 Create a network name. b Click Network. c Click AirPort. SSID (name of your wireless network) 4 If this is on the Welcome screen. Make sure you created. e Create a name for...
... the computer is the first time you will be setting up the printer for use on a wireless network, insert the installation software CD, double-click the installer icon for your printer on the Finder desktop, and then follow the instructions on . 2 Create a network name. b Click Network. c Click AirPort. SSID (name of your wireless network) 4 If this is on the Welcome screen. Make sure you created. e Create a name for...
User's Guide
Page 140
... cartridges, print aligning 98 cleaning 98 installing 95 ordering 102 preserving 101 removing 96 using genuine Lexmark 97 wiping 100 changing default settings 28 Power Saver timeout 28 temporary settings 28 changing wireless settings after installation (Mac) 39 changing wireless settings after installation (Windows) 39 checking ink levels 99 cleaning exterior of the printer 101 cleaning print cartridge nozzles 98 Club Internet 37 collating copies 85 color effects applying 80 Communication not available message 125 configuring IP address 38 connection configurations 51 control panel Photo menu...
... cartridges, print aligning 98 cleaning 98 installing 95 ordering 102 preserving 101 removing 96 using genuine Lexmark 97 wiping 100 changing default settings 28 Power Saver timeout 28 temporary settings 28 changing wireless settings after installation (Mac) 39 changing wireless settings after installation (Windows) 39 checking ink levels 99 cleaning exterior of the printer 101 cleaning print cartridge nozzles 98 Club Internet 37 collating copies 85 color effects applying 80 Communication not available message 125 configuring IP address 38 connection configurations 51 control panel Photo menu...
User's Guide
Page 141
..., 48 installing network printer 54 print cartridges 95 printer software 30, 109 installing printer on wireless network (Mac) 37 on wireless network (Windows) 37 installing wireless printer additional computers 40 interference wireless network 50 internal wireless print server resetting to factory default settings 125 IP address 52, 53 configuring 38 IP address, assigning 54 iron-on transfers, loading 55 K key index 54 L labels, loading 55 labels, printing 66 language changing 104 last page first, printing 63 LiveBox 37 loading banner paper 55 custom-size paper 55, 67 documents on the scanner...
..., 48 installing network printer 54 print cartridges 95 printer software 30, 109 installing printer on wireless network (Mac) 37 on wireless network (Windows) 37 installing wireless printer additional computers 40 interference wireless network 50 internal wireless print server resetting to factory default settings 125 IP address 52, 53 configuring 38 IP address, assigning 54 iron-on transfers, loading 55 K key index 54 L labels, loading 55 labels, printing 66 language changing 104 last page first, printing 63 LiveBox 37 loading banner paper 55 custom-size paper 55, 67 documents on the scanner...
User's Guide
Page 142
... copies 62 multiple pages on one sheet 63 network setup page 112 photos from digital camera using DPOF 83 photos using printer control panel 77 photos using printer software 78, 79 photos using the proof sheet 82 reverse page order 63 Web page 61 proof sheet, using 82 protocol 53 publications, finding 10 Q Quick Connect laptop port 34 R rear USB port 34 receiving a fax 93 recycling WEEE statement 132 reducing an image 84 refilling print cartridges 97 removing print cartridges 96 repeating an image 86 resetting internal wireless print server to factory default settings 125 resuming print jobs...
... copies 62 multiple pages on one sheet 63 network setup page 112 photos from digital camera using DPOF 83 photos using printer control panel 77 photos using printer software 78, 79 photos using the proof sheet 82 reverse page order 63 Web page 61 proof sheet, using 82 protocol 53 publications, finding 10 Q Quick Connect laptop port 34 R rear USB port 34 receiving a fax 93 recycling WEEE statement 132 reducing an image 84 refilling print cartridges 97 removing print cartridges 96 repeating an image 86 resetting internal wireless print server to factory default settings 125 resuming print jobs...
User's Guide
Page 143
using the printer control panel 88 security information 13 wireless network 51 security key 51 Service Center 104 setting up printer on wireless network (Mac) 37 on wireless network (Windows) 37 settings changing Power Saver timeout 28 disabling timeout 28 saving 28 Settings menu Defaults 28 Device Setup 28 Maintenance 27 Paper Setup 27 setup troubleshooting incorrect language appears on display 104 page does not print 106 power button is not lit 105 software did not install 105 setup, printer 13 software removing and reinstalling 109 Service Center 104 XPS driver 31 software did not install ...
using the printer control panel 88 security information 13 wireless network 51 security key 51 Service Center 104 setting up printer on wireless network (Mac) 37 on wireless network (Windows) 37 settings changing Power Saver timeout 28 disabling timeout 28 saving 28 Settings menu Defaults 28 Device Setup 28 Maintenance 27 Paper Setup 27 setup troubleshooting incorrect language appears on display 104 page does not print 106 power button is not lit 105 software did not install 105 setup, printer 13 software removing and reinstalling 109 Service Center 104 XPS driver 31 software did not install ...
Network Guide
Page 3
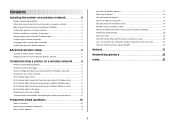
...the printer on a wireless network 4 Wireless installation instructions (France only 5 Interpreting the colors of the Wi-Fi indicator light 5 Configuring an IP address manually...5 Changing wireless settings after installation 5 Installing the printer on other computers 6 Advanced wireless setup 6 Creating an ad hoc wireless network...6 Adding a printer to an existing ad hoc wireless network 8 Troubleshooting a printer on a wireless network............8 Wireless troubleshooting checklist...8 Printing a network setup page...9 Wireless configuration does not continue after the USB cable is...
...the printer on a wireless network 4 Wireless installation instructions (France only 5 Interpreting the colors of the Wi-Fi indicator light 5 Configuring an IP address manually...5 Changing wireless settings after installation 5 Installing the printer on other computers 6 Advanced wireless setup 6 Creating an ad hoc wireless network...6 Adding a printer to an existing ad hoc wireless network 8 Troubleshooting a printer on a wireless network............8 Wireless troubleshooting checklist...8 Printing a network setup page...9 Wireless configuration does not continue after the USB cable is...
Network Guide
Page 6
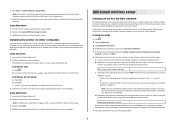
... drive. 3 Follow the on screen instructions for you can refer to install the printer driver on a keyboard. Using Windows 1 Insert the installation software CD. 2 Wait for your wireless network is configured, it can refer to a network" dialog under "Available networks," indicating that network. In Windows Vista 1 Click . 2 Click Control Panel. 3 Click Network and Internet. 4 Under Network and Sharing Center, click Connect to a Network. 5 In the Connect to a Network dialog, click Set up a wireless ad-hoc (computer-to-computer) network...
... drive. 3 Follow the on screen instructions for you can refer to install the printer driver on a keyboard. Using Windows 1 Insert the installation software CD. 2 Wait for your wireless network is configured, it can refer to a network" dialog under "Available networks," indicating that network. In Windows Vista 1 Click . 2 Click Control Panel. 3 Click Network and Internet. 4 Under Network and Sharing Center, click Connect to a Network. 5 In the Connect to a Network dialog, click Set up a wireless ad-hoc (computer-to-computer) network...
Network Guide
Page 7
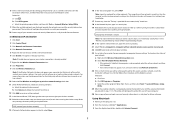
..., clear the "The key is provided for your wireless network connection. 6 Click Enable, if it without your wireless network. 14 Write down the security key you chose so you can refer to configure my wireless network settings check box. 11 Under Preferred Networks, delete any existing networks. Note: If Enable does not appear, your wireless settings. b Click All Programs. c Select the printer program folder, and then click Tools ΠLexmark Wireless Setup Utility. 9 When the available networks are displayed...
..., clear the "The key is provided for your wireless network connection. 6 Click Enable, if it without your wireless network. 14 Write down the security key you chose so you can refer to configure my wireless network settings check box. 11 Under Preferred Networks, delete any existing networks. Note: If Enable does not appear, your wireless settings. b Click All Programs. c Select the printer program folder, and then click Tools ΠLexmark Wireless Setup Utility. 9 When the available networks are displayed...

Network Guide
Page 8
... configure the printer for use on a wireless network, insert the installation software CD, double-click the installer icon for your printer on the Finder desktop, and then follow the instructions on the Welcome screen. If your network has Internet access, try connecting to the same wireless network. 8 Make sure the printer and wireless access point are not sure if your SSID is correct, run the wireless setup again. • The wireless network is working properly. All devices...
... configure the printer for use on a wireless network, insert the installation software CD, double-click the installer icon for your printer on the Finder desktop, and then follow the instructions on the Welcome screen. If your network has Internet access, try connecting to the same wireless network. 8 Make sure the printer and wireless access point are not sure if your SSID is correct, run the wireless setup again. • The wireless network is working properly. All devices...


