

Setup Sheet
Page 1
...-In-One For more help: 1 Refer to a professional service person. Turn your User's Guide. 2 Visit our Web site. http://support.lexmark.com/ 3 Call us at (859) 825-3000. Lift the scanner unit. Make sure the power light is near the product and easily accessible. • Refer service or repairs, other than those...
...-In-One For more help: 1 Refer to a professional service person. Turn your User's Guide. 2 Visit our Web site. http://support.lexmark.com/ 3 Call us at (859) 825-3000. Lift the scanner unit. Make sure the power light is near the product and easily accessible. • Refer service or repairs, other than those...
Setup Sheet
Page 2
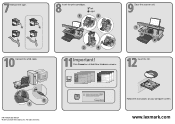
Close the scanner unit. 1 3 2 Insert the CD. 2 1 P/N 17M0270 EC 7M0024 © 2003 Lexmark International, Inc. Connect the USB cable. Click Cancel on your computer screen. All rights reserved. Follow the instructions on all Add New Hardware screens. Insert the print cartridges. 1 2 3 4 Important! www.lexmark.com Remove the tape.
Close the scanner unit. 1 3 2 Insert the CD. 2 1 P/N 17M0270 EC 7M0024 © 2003 Lexmark International, Inc. Connect the USB cable. Click Cancel on your computer screen. All rights reserved. Follow the instructions on all Add New Hardware screens. Insert the print cartridges. 1 2 3 4 Important! www.lexmark.com Remove the tape.

User's Guide
Page 4
This guide tells you for purchasing a Lexmark X1100 Series All-In-One! Also included are sections describing the All-In-One software and troubleshooting information. iv The Lexmark™ X1100 Series All-In-One combines the functionality of an inkjet printer, a scanner, a copier, and a fax machine all into a single, multifunction device, making it one of the most exciting products on your purchase. Congratulations on the market today. Removing and reinstalling the software 26 Other help sources 26 Thank you how to perform printing, copying, scanning, and faxing tasks.
This guide tells you for purchasing a Lexmark X1100 Series All-In-One! Also included are sections describing the All-In-One software and troubleshooting information. iv The Lexmark™ X1100 Series All-In-One combines the functionality of an inkjet printer, a scanner, a copier, and a fax machine all into a single, multifunction device, making it one of the most exciting products on your purchase. Congratulations on the market today. Removing and reinstalling the software 26 Other help sources 26 Thank you how to perform printing, copying, scanning, and faxing tasks.
User's Guide
Page 5
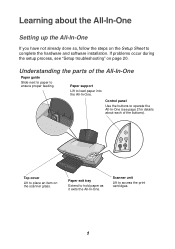
... paper as it exits the All-In-One. Control panel Use the buttons to operate the All-In-One (see "Setup troubleshooting" on the scanner glass. Scanner unit Lift to load paper into the All-In-One. Understanding the parts of the buttons). Paper exit tray Extend to ensure proper feeding. Top...
... paper as it exits the All-In-One. Control panel Use the buttons to operate the All-In-One (see "Setup troubleshooting" on the scanner glass. Scanner unit Lift to load paper into the All-In-One. Understanding the parts of the buttons). Paper exit tray Extend to ensure proper feeding. Top...
User's Guide
Page 18
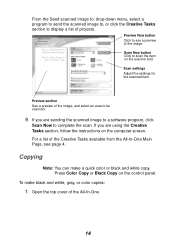
... image, and select an area to be scanned. 9 If you are sending the scanned image to a software program, click Scan Now to see page 4. Press Color Copy or Black Copy on the control panel. From the Send scanned image to: drop-down menu, select a program to send the scanned image to..., or click the Creative Tasks section to scan the item on the scanner bed. Scan Now button Click to display a list of the image. For a list of the Creative Tasks available from the All-In-One Main Page...
... image, and select an area to be scanned. 9 If you are sending the scanned image to a software program, click Scan Now to see page 4. Press Color Copy or Black Copy on the control panel. From the Send scanned image to: drop-down menu, select a program to send the scanned image to..., or click the Creative Tasks section to scan the item on the scanner bed. Scan Now button Click to display a list of the image. For a list of the Creative Tasks available from the All-In-One Main Page...
User's Guide
Page 21
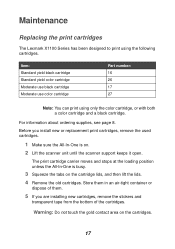
... Replacing the print cartridges The Lexmark X1100 Series has been designed to print using only the color cartridge, or with both a color cartridge and a black cartridge. Warning: Do not touch the gold contact area on . 2 Lift the scanner unit until the scanner support keeps it open. For... information about ordering supplies, see page 8. Item: Standard yield black cartridge Standard yield color cartridge Moderate use black cartridge Moderate use color cartridge Part number: 16 26 17 27 Note...
... Replacing the print cartridges The Lexmark X1100 Series has been designed to print using only the color cartridge, or with both a color cartridge and a black cartridge. Warning: Do not touch the gold contact area on . 2 Lift the scanner unit until the scanner support keeps it open. For... information about ordering supplies, see page 8. Item: Standard yield black cartridge Standard yield color cartridge Moderate use black cartridge Moderate use color cartridge Part number: 16 26 17 27 Note...

User's Guide
Page 22
.... We do not recommend use Lexmark supplies. 18 6 Insert the new cartridge. For best results, use of failures or damage caused by a refilled cartridge. Refilling cartridges can affect print quality and cause damage to the All-In-One. Make sure the color print cartridge is secure in the... right carrier, and then snap the lid closed. 7 Lift the scanner unit and push the scanner support back while lowering the scanner unit until it is completely closed . If you are installing a...
.... We do not recommend use Lexmark supplies. 18 6 Insert the new cartridge. For best results, use of failures or damage caused by a refilled cartridge. Refilling cartridges can affect print quality and cause damage to the All-In-One. Make sure the color print cartridge is secure in the... right carrier, and then snap the lid closed. 7 Lift the scanner unit and push the scanner support back while lowering the scanner unit until it is completely closed . If you are installing a...
User's Guide
Page 34
... changing appearance of 9 Q Quality/Copies tab 7 R reinstalling software 26 removing software 26 S safety information ii Save Settings menu 7 saved images viewing 5 Scan button 2 scan settings 4 scanner unit 1 scanning 13 placing an item on or off 9 30 section 5 Print a Copy...section 5 voice notification turning on the glass 13 settings, saving for future...
... changing appearance of 9 Q Quality/Copies tab 7 R reinstalling software 26 removing software 26 S safety information ii Save Settings menu 7 saved images viewing 5 Scan button 2 scan settings 4 scanner unit 1 scanning 13 placing an item on or off 9 30 section 5 Print a Copy...section 5 voice notification turning on the glass 13 settings, saving for future...


