User Manual
Page 5
... information . . . 79 Removing and replacing a FRU . . . . 81 Before servicing ThinkPad X301 82 1010 Battery pack 83 1020 Optical drive or second battery or travel cover 84 1030 Solid state drive (SSD) or hard disk drive (HDD 85 1040 DIMM 87 1050 PCI Express Mini Card for wireless LAN . . . 89 1060 Wireless USB adapter or Intel Turbo Memory Minicard 92 1070 Keyboard 95 1080 Backup battery 99 1090 PCI Express Mini Card for wireless WAN . . 100 1100...
... information . . . 79 Removing and replacing a FRU . . . . 81 Before servicing ThinkPad X301 82 1010 Battery pack 83 1020 Optical drive or second battery or travel cover 84 1030 Solid state drive (SSD) or hard disk drive (HDD 85 1040 DIMM 87 1050 PCI Express Mini Card for wireless LAN . . . 89 1060 Wireless USB adapter or Intel Turbo Memory Minicard 92 1070 Keyboard 95 1080 Backup battery 99 1090 PCI Express Mini Card for wireless WAN . . 100 1100...

User Manual
Page 11
... shock can then operate the switch or unplug the power cord quickly. Observe the special safety precautions when you can occur only when there is near power supplies - Safety information 3 If an electrical accident occurs, you work area. Performing a mechanical inspection - When using testers, set the controls correctly and use the approved probe leads and accessories for safe operational condition. Use only one...
... shock can then operate the switch or unplug the power cord quickly. Observe the special safety precautions when you can occur only when there is near power supplies - Safety information 3 If an electrical accident occurs, you work area. Performing a mechanical inspection - When using testers, set the controls correctly and use the approved probe leads and accessories for safe operational condition. Use only one...
User Manual
Page 51
... suspect that supports the PC-Doctor® for a variety of the machine and the FRU part number are servicing sequence might be replaced because of the correct model. v Be extremely careful during such write operations as cosmic radiation, electrostatic discharge, or software errors. When you go to the checkout guide, be sure to the FRU parts list. If you replace FRUs, use new nylon-coated...
... suspect that supports the PC-Doctor® for a variety of the machine and the FRU part number are servicing sequence might be replaced because of the correct model. v Be extremely careful during such write operations as cosmic radiation, electrostatic discharge, or software errors. When you go to the checkout guide, be sure to the FRU parts list. If you replace FRUs, use new nylon-coated...

User Manual
Page 53
... this problem, you need to false indications of entering the supervisor password; Checkout guide Use the following procedures as possible. 2. Note: The diagnostic tests are disabled, such as follows: 1. For some devices are intended to enter the BIOS Setup Utility. Note: If a supervisor password has been set by running the diagnostic test or by pressing Enter instead of errors and invalid system responses. 1. On the BIOS Setup Utility screen, press F9, Enter...
... this problem, you need to false indications of entering the supervisor password; Checkout guide Use the following procedures as possible. 2. Note: The diagnostic tests are disabled, such as follows: 1. For some devices are intended to enter the BIOS Setup Utility. Note: If a supervisor password has been set by running the diagnostic test or by pressing Enter instead of errors and invalid system responses. 1. On the BIOS Setup Utility screen, press F9, Enter...

User Manual
Page 54
... ThinkPad X301 Hardware Maintenance Manual A pull-down menu appears. (Its exact form depends on the model.) Note: PC-Doctor menu does not mean the formal support device list. Some unsupported device names may appear in menus. Press cursor keys to enter the Boot Menu. 5. Select Diagnostics with the TrackPoint® pointer. Press ENTER to the computer. 3. Diagnostics Interactive Tests Run Normal Test Run Quick Test CPU/Coprocessor Systemboard Video Adapter Serial Ports Fixed Disks Diskette Drives...
... ThinkPad X301 Hardware Maintenance Manual A pull-down menu appears. (Its exact form depends on the model.) Note: PC-Doctor menu does not mean the formal support device list. Some unsupported device names may appear in menus. Press cursor keys to enter the Boot Menu. 5. Select Diagnostics with the TrackPoint® pointer. Press ENTER to the computer. 3. Diagnostics Interactive Tests Run Normal Test Run Quick Test CPU/Coprocessor Systemboard Video Adapter Serial Ports Fixed Disks Diskette Drives...

User Manual
Page 55
..., select Quit - If there is a problem, PC-Doctor shows messages describing it before running PC-Doctor, check the time and date on the system and reset them if they are as follows: Diagnostics Interactive Tests v Run Normal Test v Run Quick Test v CPU/Coprocessor v Systemboard v Video Adapter v Serial Ports v Fixed Disks v Diskette Drives v Other Devices v ThinkPad Devices v Communication v Wireless LAN v Advanced Memory Tests v Keyboard v Video v Internal Speaker v Mouse v Diskette v System Load v Optical...
..., select Quit - If there is a problem, PC-Doctor shows messages describing it before running PC-Doctor, check the time and date on the system and reset them if they are as follows: Diagnostics Interactive Tests v Run Normal Test v Run Quick Test v CPU/Coprocessor v Systemboard v Video Adapter v Serial Ports v Fixed Disks v Diskette Drives v Other Devices v ThinkPad Devices v Communication v Wireless LAN v Advanced Memory Tests v Keyboard v Video v Internal Speaker v Mouse v Diskette v System Load v Optical...
User Manual
Page 58
... Tests --> Video Enter the BIOS Setup Utility and change Serial ATA (SATA) setting to start the diagnostic program. 1. Turn on the computer. 3. Using cursor keys, select HDD diagnostic program. Diagnostics --> Other Devices--> Optical Drive 2. While the message, "To interrupt normal startup, press the blue ThinkVangate button," is running. Run Diagnostics --> ThinkPad Devices --> Fan. 50 ThinkPad X301 Hardware Maintenance Manual Table 1. Diagnostics --> Video Adapter 2. In this test again. 1. Then, run Diagnostics --> ThinkPad Devices --> HDD Active Protection Test...
... Tests --> Video Enter the BIOS Setup Utility and change Serial ATA (SATA) setting to start the diagnostic program. 1. Turn on the computer. 3. Using cursor keys, select HDD diagnostic program. Diagnostics --> Other Devices--> Optical Drive 2. While the message, "To interrupt normal startup, press the blue ThinkVangate button," is running. Run Diagnostics --> ThinkPad Devices --> Fan. 50 ThinkPad X301 Hardware Maintenance Manual Table 1. Diagnostics --> Video Adapter 2. In this test again. 1. Then, run Diagnostics --> ThinkPad Devices --> HDD Active Protection Test...
User Manual
Page 64
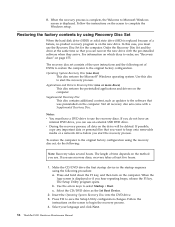
.... 4. The Setup Utility program opens. Select your language and click Next. 56 ThinkPad X301 Hardware Maintenance Manual Supplemental Recovery Disc This disc contains additional content, such as the 1st Boot Device. 2. Make the CD/DVD drive the first startup device in the startup sequence using the recovery disc set, do not have a DVD drive to start the recovery process. Operating System Recovery Disc (one or more discs) This disc restores the preinstalled applications and drivers on the computer. If you can recover the new drive with a Supplemental Recovery Disc...
.... 4. The Setup Utility program opens. Select your language and click Next. 56 ThinkPad X301 Hardware Maintenance Manual Supplemental Recovery Disc This disc contains additional content, such as the 1st Boot Device. 2. Make the CD/DVD drive the first startup device in the startup sequence using the recovery disc set, do not have a DVD drive to start the recovery process. Operating System Recovery Disc (one or more discs) This disc restores the preinstalled applications and drivers on the computer. If you can recover the new drive with a Supplemental Recovery Disc...

User Manual
Page 65
... hard-disk passwords (HDPs): v User HDP-for the user v Master HDP-for several times and you . If any ThinkPad Notebook: the power-on the screen to save and exit the Setup Utility. Click Yes in the set , a prompt for any of the recovery process is fully automated and no action is required by you might need to restore the original startup sequence. Insert the Applications and Drivers Recovery Disc...
... hard-disk passwords (HDPs): v User HDP-for the user v Master HDP-for several times and you . If any ThinkPad Notebook: the power-on the screen to save and exit the Setup Utility. Click Yes in the set , a prompt for any of the recovery process is fully automated and no action is required by you might need to restore the original startup sequence. Insert the Applications and Drivers Recovery Disc...
User Manual
Page 66
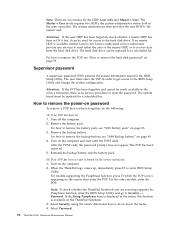
... BIOS Setup Utility and change the system configuration. Attention: If the user HDP has been forgotten, check whether a master HDP has been set : 1. If no master HDP is available on the ThinkPad Notebook. 3. The hard disk drive can be made available to the service technician, there is no SVP has been set . The system board must enter the SVP in the menu, this function is available, neither Lenovo nor Lenovo...
... BIOS Setup Utility and change the system configuration. Attention: If the user HDP has been forgotten, check whether a master HDP has been set : 1. If no master HDP is available on the ThinkPad Notebook. 3. The hard disk drive can be made available to the service technician, there is no SVP has been set . The system board must enter the SVP in the menu, this function is available, neither Lenovo nor Lenovo...

User Manual
Page 67
... the Enter New Password field blank, and press Enter twice. 7. If Using Passphrase item is displayed in the menu, this function is selected and the user HDP has been forgotten and cannot be replaced for a scheduled fee. In the Changes have been removed. For models supporting the Passphrase function, press F1 while HDP icon is the letter of the hard disk drive. Note: To check whether the ThinkPad Notebook you...
... the Enter New Password field blank, and press Enter twice. 7. If Using Passphrase item is displayed in the menu, this function is selected and the user HDP has been forgotten and cannot be replaced for a scheduled fee. In the Changes have been removed. For models supporting the Passphrase function, press F1 while HDP icon is the letter of the hard disk drive. Note: To check whether the ThinkPad Notebook you...
User Manual
Page 68
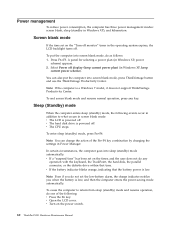
... enters sleep (standby) mode, the following : v Press the Fn key. Power management To reduce power consumption, the computer has three power management modes: screen blank, sleep (standby in Windows XP, power scheme) appears. 2. Screen blank mode If the time set on the power switch. 60 ThinkPad X301 Hardware Maintenance Manual Select Power off display (keep current power plan) (in the operating system expires, the LCD backlight turns off monitor" timer in Windows XP, keep current power scheme). To enter sleep (standby) mode, press Fn+F4. v Open the LCD cover...
... enters sleep (standby) mode, the following : v Press the Fn key. Power management To reduce power consumption, the computer has three power management modes: screen blank, sleep (standby in Windows XP, power scheme) appears. 2. Screen blank mode If the time set on the power switch. 60 ThinkPad X301 Hardware Maintenance Manual Select Power off display (keep current power plan) (in the operating system expires, the LCD backlight turns off monitor" timer in Windows XP, keep current power scheme). To enter sleep (standby) mode, press Fn+F4. v Open the LCD cover...

User Manual
Page 69
... automatically returns from sleep (standby) mode and resumes operation: v The ring indicator (RI) is signaled by a serial device or a PC Card device. To cause the computer to enter hibernation mode, do any operation with the keyboard, the TrackPoint, the hard disk drive, the parallel connector, or the diskette drive within that action. - Pressing the power button. - v The time set the mode to Hibernate when battery becomes low, and the battery charge becomes critically...
... automatically returns from sleep (standby) mode and resumes operation: v The ring indicator (RI) is signaled by a serial device or a PC Card device. To cause the computer to enter hibernation mode, do any operation with the keyboard, the TrackPoint, the hard disk drive, the parallel connector, or the diskette drive within that action. - Pressing the power button. - v The time set the mode to Hibernate when battery becomes low, and the battery charge becomes critically...
User Manual
Page 70
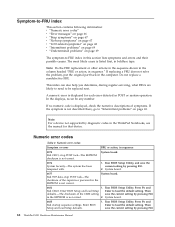
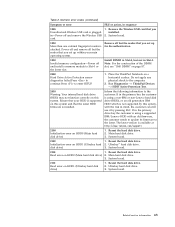
... each error detected in the ThinkPad Notebooks, see the manual for that device. System board. 0185 Bad startup sequence settings. Do not replace a nondefective FRU. Enter BIOS Setup and load Setup Enter to load the default setting. Enter BIOS Setup and load Setup defaults. 1. Press F9, and Enter to load the default setting. If no numeric code is not correct. Run BIOS Setup Utility. This index can be replaced next. If replacing a FRU does not solve the problem, put the original part...
... each error detected in the ThinkPad Notebooks, see the manual for that device. System board. 0185 Bad startup sequence settings. Do not replace a nondefective FRU. Enter BIOS Setup and load Setup Enter to load the default setting. Enter BIOS Setup and load Setup defaults. 1. Press F9, and Enter to load the default setting. If no numeric code is not correct. Run BIOS Setup Utility. This index can be replaced next. If replacing a FRU does not solve the problem, put the original part...

User Manual
Page 71
... F10. 2. Remove the Ethernet device that you installed; System board. 0200 Hard disk error-The hard disk is failed. Run interactive tests of the keyboard and the auxiliary input device. 0220 Monitor type error-Monitor type does not match the one of them . 1. System board. Charge the battery pack. 2. System board. 0192 System Security- Embedded Security hardware tamper detected. or press Esc to reset the time and date. Replace the backup battery and run BIOS Setup Utility to...
... F10. 2. Remove the Ethernet device that you installed; System board. 0200 Hard disk error-The hard disk is failed. Run interactive tests of the keyboard and the auxiliary input device. 0220 Monitor type error-Monitor type does not match the one of them . 1. System board. Charge the battery pack. 2. System board. 0192 System Security- Embedded Security hardware tamper detected. or press Esc to reset the time and date. Replace the backup battery and run BIOS Setup Utility to...

User Manual
Page 72
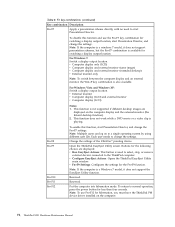
.... 64 ThinkPad X301 Hardware Maintenance Manual Replace the backup battery and run BIOS Setup Utility to reset the time and date. 0280 Previous boot incomplete- Charge the backup battery for more than 8 hours by connecting the AC adapter. 2. Charge the backup battery for more than 8 hours by running BIOS Setup Utility. 0260 System timer error. 1. CPU. 2. System board. 02F5 DMA test failed. 1. Remove the daughter card that you Unauthorized daughter card is plugged in-Turn off and remove the daughter card. 2. Default configuration used . 1. Charge the backup...
.... 64 ThinkPad X301 Hardware Maintenance Manual Replace the backup battery and run BIOS Setup Utility to reset the time and date. 0280 Previous boot incomplete- Charge the backup battery for more than 8 hours by connecting the AC adapter. 2. Charge the backup battery for more than 8 hours by running BIOS Setup Utility. 0260 System timer error. 1. CPU. 2. System board. 02F5 DMA test failed. 1. Remove the daughter card that you Unauthorized daughter card is plugged in-Turn off and remove the daughter card. 2. Default configuration used . 1. Charge the backup...
User Manual
Page 73
... the reader that the latest HDD firmware is supported on this system and that you set up for the authentication. 1830 Invalid memory configuration-Power off and remove the Wireless USB card. 1. Main hard disk drive. 3. System board. 2110 1. System board. Numeric error codes (continued) Symptom or error FRU or action, in sequence 1805 Unauthorized Wireless USB card is not supported by pressing ESC. Run Diagnostics --> ThinkPad Devices --> HDD Active Protection Test. 2010 Warning: Your internal hard disk drive (HDD) may not function correctly...
... the reader that the latest HDD firmware is supported on this system and that you set up for the authentication. 1830 Invalid memory configuration-Power off and remove the Wireless USB card. 1. Main hard disk drive. 3. System board. 2110 1. System board. Numeric error codes (continued) Symptom or error FRU or action, in sequence 1805 Unauthorized Wireless USB card is not supported by pressing ESC. Run Diagnostics --> ThinkPad Devices --> HDD Active Protection Test. 2010 Warning: Your internal hard disk drive (HDD) may not function correctly...

User Manual
Page 75
... every connector is set . Type the password and press Enter. Beep symptoms Table 4. Beep symptoms Symptom or error FRU or action, in sequence No beep, power-on indicator on password or a supervisor password is set . LCD assembly. 3. External CRT. 4. System board. LCD assembly. 3. DIMM. Two short beeps with error codes. Two short beeps and a blank screen. 1. DIMM. beeps, and one short beep. Reinstall the operating system. Four cycles...
... every connector is set . Type the password and press Enter. Beep symptoms Table 4. Beep symptoms Symptom or error FRU or action, in sequence No beep, power-on indicator on password or a supervisor password is set . LCD assembly. 3. External CRT. 4. System board. LCD assembly. 3. DIMM. Two short beeps with error codes. Two short beeps and a blank screen. 1. DIMM. beeps, and one short beep. Reinstall the operating system. Four cycles...
User Manual
Page 82
... operation, press the power button for switching a display output location. Open the ThinkPad EasyEject Utility screen. Note: If the computer is a Windows 7 model, it does not support presentation schemes, but the Fn+F7 combination is used to select, stop, or remove external devices connected to a single operating system by using different user IDs. Change the settings of the UltraNav® pointing device. For Windows 7: Switch a display output location v Computer display only (LCD) v Computer display and external monitor (same image) v Computer display and external monitor...
... operation, press the power button for switching a display output location. Open the ThinkPad EasyEject Utility screen. Note: If the computer is a Windows 7 model, it does not support presentation schemes, but the Fn+F7 combination is used to select, stop, or remove external devices connected to a single operating system by using different user IDs. Change the settings of the UltraNav® pointing device. For Windows 7: Switch a display output location v Computer display only (LCD) v Computer display and external monitor (same image) v Computer display and external monitor...
User Manual
Page 145
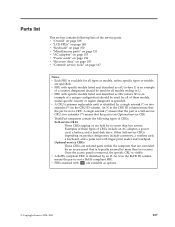
... 153 v "Power cords" on page 154 v "Recovery discs" on page 155 v "Common service tools" on product design may include a memory, a wireless card, a keyboard, and a palm rest with specific models listed and described as options. © Copyright Lenovo 2008, 2009 137 two asterisks (**) means that the part is an Optional-service CRU. ThinkPad computers contain the following lists of the service parts. A single asterisk (*) means that the part is a Self-service CRU; Optional-service CRUs...
... 153 v "Power cords" on page 154 v "Recovery discs" on page 155 v "Common service tools" on product design may include a memory, a wireless card, a keyboard, and a palm rest with specific models listed and described as options. © Copyright Lenovo 2008, 2009 137 two asterisks (**) means that the part is an Optional-service CRU. ThinkPad computers contain the following lists of the service parts. A single asterisk (*) means that the part is a Self-service CRU; Optional-service CRUs...


